Car manufacturers are constantly racking their brains over what to offer car owners to determine their choice when buying a car model. In this respect, Renault is one of those brands that care about consumers even when users have long decided on a brand choice.
We are talking about such a nice little thing as the steering column radio control joystick. In appearance, it resembles a computer mouse, it is installed near the steering column and allows you to switch the radio tape recorder by moving your fingers, without being distracted from driving.
Steering column: pros and cons
The steering wheel control of the radio is a kind of option offered to Renault owners as an option for accessing the functions of the media system. Similar devices like the steering panel are already a familiar device. In this case, it is implemented as a peripheral device. Experienced Renault motorists say that the external buttons for playing music are really very convenient.

In terms of cost and installation time, this is indeed a more acceptable and affordable option compared to the options that are offered for media systems. In fact, we are talking about a separate device with minimal installation requirements. You need to connect the adapter to the corresponding connector and attach in the steering column space.
This option is available for Renault Laguna and Lacetti cars. The device itself is manufactured by Pioneer, which is already a guarantee of quality and well-thought-out ergonomics.
The photo shows the appearance of the installed joystick. As you can see, it is compact, convenient and inexpensive at a price. A similar joystick is also available to Ford Focus owners; the devices are also sold by Sony. This Pioneer gadget has an original stylish appearance and is very convenient to use.

The advantages of the radio steering column switch:
- convenient and inexpensive installation when performing the remote access function;
- low cost of the device;
- simple design and scheme of work;
- after a while, the action becomes reflex, which is very convenient and allows you to refuse remote access.
I must say that joysticks are quite popular with manufacturers. Various tuning devices can be found on sale. For example, a switch for a mirror, navigation, trip computer. These options are often included in expansion packs along with navigators, car TV, music changer and other devices.

The idea is taken from sports cars and concept cars, where the so-called "intuitive" design is realized. These Pioneer accessories are great for extreme driving and long-distance car riders.
Features of use and installation
The practical effect of using this extension is more convincing than the description. Renault engineers very clearly noticed that this functionality is more convenient and completely replaces remote control. The fact is that the driver can use the switch without following the hand, fully automatically.
The device allows you to make the sound more or less, turn it off completely with one click, in Renault there is a button for accepting a call with Hands Free on the device. It also supports track forward / backward, rewind. The adapter for steering wheel control of the radio tape recorder makes it possible to connect all the necessary functions of the radio tape recorder to the remote control. In some cases, such consoles work wirelessly, but, as a rule, such a rise in price is not justified.

A simple and logical solution, as for Renault Lacetti, Laguna, Ford Focus, allows you to avoid using more expensive options without limiting your capabilities. That voice control can also apply to this. The physical switch is used as an addition to the latest features, as it is very convenient and accessible. We recommend installing other variants of similar external functions. It is convenient and inexpensive.
Installation
The package includes a device, installation guide, connection cord, adapter. This peripheral is connected via an adapter to the radio and brings the access button to the external circuit. In fact, during installation, you need to install the mount and connect the connectors. The simplicity of the design implies a low cost. At the same time, the recommended extension allows an order of magnitude to improve the level of access to the media system.

What to choose: modern or time-tested options
When tuning the cabin, drivers often face a rather difficult choice: the latest and already well-proven options. A radio with steering column control has long been offered to consumers and has proven itself well thanks to a simple scheme. In fact, the control buttons are simply displayed on a separate interface located in the steering column space.

In stores, you can find a more modern version of these devices, but the appropriateness of use is questionable, especially for people who do not have a craving for technology. At the same time, all kinds of control systems are used with pleasure by all drivers, regardless of their status and technical expertise. Such devices are the ideal choice for most cases when you need to make a convenient and inexpensive tuning of the technical equipment of the interior of Renault, Ford Focus and others.
Currently, there are quite a few cars, originally equipped with devices that facilitate the control of on-board audio-video equipment. A typical example is the steering column joystick for controlling the car radio. For a number of reasons, car owners eventually replace the standard audio system (usually already morally and physically outdated) with new models. As a result, the control device often remains unclaimed due to the well-known difficulties in pairing it. This leads to a decrease in the ergonomics of control, up to the danger of an emergency situation, since the regulating bodies of the radio can be performed extremely inconveniently and require increased attention.
This article is intended to help solve this problem. Using the example of connecting the steering column joystick of a Reno Scenic car, it will be shown how, using the available element base, to make a joystick controller capable of controlling almost any car radio that has an appropriate interface for external control.
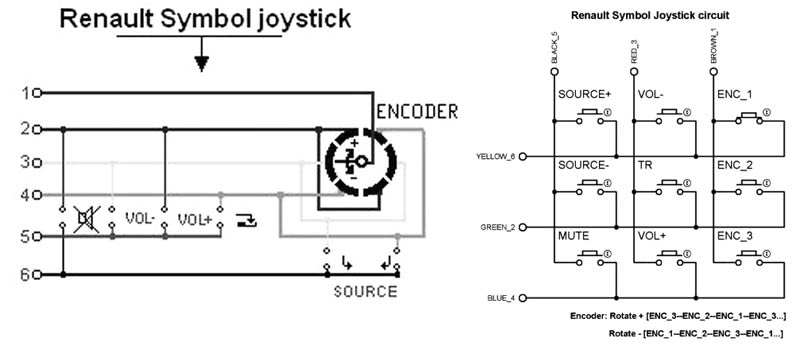
The joystick is no different, in fact, it is a 3x3 matrix of buttons. Moreover, the column is occupied by an encoder, one of the contacts (can be any) of which is permanently closed. When the encoder rotates, another contact closes - in the direction of movement. The direction of rotation can be determined from the switching sequence.
You should be guided by the contact numbers, since the order of colors may differ for this model.
There are many external control interfaces. Let's dwell on the two most common ones.
1. Resistive control panel. It is used in many Sony, Pioneer, etc.

Connects using the usual 3.5 mm audio jack:

It is clear from the diagram that to implement control, it is enough to turn on the resistance of the corresponding rating between the wires AD and GND, depending on the pressed button. It is easy to do this on a microcontroller.
2. Infrared control panel. Almost all modern radio tape recorders have. The difficulty lies in defining the console protocol and address and command codes. To do this, you must have a copy of a suitable remote control. With the help of appropriate programs (for example, CoolEdit, rcexplorer) this information can be obtained. Descriptions of IR protocols are easily found on the network. Further a matter of technology.
For example, for Sony CDX-S22 radio tape recorder

Remote controlled rm-x114:

We find out (CoolEdit + tsop1736 to the sound card) that the Sony Sirc 15 bit IR control protocol:

Detailed information about the protocol is available at http://www.hifi-remote.com/sony/, http://www.sbprojects.com/knowledge/ir/sirc.htm
Carrier frequency 40 kHz, address code 132
Button Code
DSPL 40
MODE 71
MENU 10
DISC_PL 51
LIST 39
SEEK_MN 53
SOURCE 70
SEEK_PL 52
SOUND 16
DISC_MN 50
ENTER 92
OFF 13
ATT 20
VOL_PL 18
VOL_MN 19
You now have all the information you need to start implementing the controller.
Controller circuit providing the ability to control via two interfaces:

Make sure that the voltage on the control wire of the radio with a resistive method is no more than 5V.
The necessary explanations are indicated in the diagram. The matching of the joystick wires can be determined from the joystick wiring diagram (see above).
Printed circuit board, top view (TOP) (reverse side - solid ground plane):

The figure for LUT is given in a separate file (mirrored). It needs to be scaled.
In reality, it turned out something like this (the LEDs then had to be taken out on the wires):

In the photo, only the elements for the IR part are unsoldered.
The board is mounted in the steering column cover (with hot melt glue):

The LEDs themselves are conveniently placed in the holes made at the bottom of the steering column joystick so that the luminous flux, if possible, effectively gets into the receiver of the car radio.
The archive contains source codes () connected to the project (Code :: Block 8.02), a model (Proteus) and a circuit with a printed circuit board (). And also some useful information.
The project has added support for the remote control for the VDM-MB504TV radio (NEC, 38 kHz). In this example, it is easy to see how to add support for new protocols (for each of the IR protocols, a separate firmware is required, the resistive remote control will work in any case).
Some notes:
The controller is clocked from an 8 MHz quartz resonator. Stable operation from the internal 8 MHz RC oscillator is quite possible (in both cases it is necessary to turn off the CKDIV8 fuse). The project contains screenshots of fuses and their numerical code.
It is necessary to provide a fuse with a rating of about 2A in the positive wire supplying the controller.
In conclusion, it should be said that despite the wide variety of control joysticks, types of IR protocols, etc., it is quite easy to upgrade this project to fit your needs.
The project is provided “as is”. All work on the installation of this device in the car is carried out at your own risk, the author is not responsible.
List of radioelements
| Designation | Type of | Denomination | Quantity | Note | Shop | My notebook |
|---|---|---|---|---|---|---|
| U1 | Linear regulator | UA7805 | 1 | Into notepad | ||
| U2 | MK AVR 8-bit | ATtiny2313 | 1 | Into notepad | ||
| Q1 | Bipolar transistor | BC817-16 | 1 | Into notepad | ||
| D1-D3 | Rectifier diode | DL4148 | 3 | Into notepad | ||
| D4, D5 | Light-emitting diode | Infrared | 2 | Into notepad | ||
| DP | Diode | 1 | Reverse protection | Into notepad | ||
| C1, C2 | Capacitor | 22 pF | 2 | Into notepad | ||
| C3 | Electrolytic capacitor | 100 uF | 1 | Into notepad | ||
| C4, C5 | Capacitor | 0.1 uF | 2 | Into notepad | ||
| R1-R4 | Resistor | 10 kΩ | 4 | Into notepad | ||
| R5 | Resistor | 50 ohm | 1 | Into notepad | ||
| R6 | Resistor | 39 k Ohm | 1 | Into notepad | ||
| R7 | Resistor | 2.8 k Ohm | 1 | Into notepad | ||
| R8 | Resistor | 27 kΩ | 1 | Into notepad | ||
| R9 | Resistor | 1.8 k Ohm | 1 | Into notepad | ||
| R10 | Resistor | 12 kΩ | 1 | Into notepad | ||
| R11 | Resistor | 470 Ohm | 1 | Into notepad | ||
| R12, R14, R16 | Resistor | 4.3 k Ohm | 3 | Into notepad | ||
| R13, R15 | Resistor |
The purpose of this project was to "make friends" the steering column joystick for controlling the radio system of a Ford Focus (Mondeo, Fusion) car with Sony and Pioneer radio tape recorders, which have an analog input for connecting a wired remote control. These radios are designed to control Sony RM-X2S and RM-X4S joysticks (Pioneer, as far as I know, did not produce wired joysticks).
Joysticks Ford and Sony are resistive matrices of series-connected resistors and, depending on the pressed button, the number of connected resistors changes and, accordingly, the resistance at the joystick output. Joystick diagrams are shown below.
Fig. 1. Ford joystick circuit

Fig. 2. Sony joystick circuit
The Ford joystick has 5 buttons: volume up / down, switching to the next / previous track / radio station and turning on the radio / selecting a signal source. The table below shows the resistance values of Ford and Sony joysticks when pressing buttons of the same functionality.
| Ford Joystick Button |
Ford Joystick Resistance |
Sony joystick button |
Sony joystick resistance |
|---|---|---|---|
| VOL- |
54 Ohm |
VOL- |
23.6 kΩ |
| VOL + |
147 Ohm |
VOL + |
16.8 kΩ |
| SEEK + |
301 Ohm |
SEEK + |
8.8 kΩ |
| SEEK- |
562 Ohm |
SEEK- |
12.1 kΩ |
| MODE |
1037 Ohm |
SOURCE |
2.2 kΩ |
| None of the buttons pressed |
5057 Ohm |
None of the buttons pressed |
∞ |
It can be seen from the joystick diagrams and the table that they have different resistance values, and the Sony joystick resistances change in the opposite direction (or, conversely, at Ford). This does not allow you to simply rewire the resistors on the Ford joystick to a different nominal value required to control the Sony radio tape recorder. There are 3 options for possible solutions. The first option is to disassemble the Ford joystick, solder the resistors (smd) and solder the 0.125 W output resistors, while changing the circuit so that when the button is pressed, only one resistor is connected, i.e. to form a matrix of resistors connected in parallel. The second option is to disassemble the Ford joystick, unsolder the buttons, and lay out a new PCB. Well, the third option is to make an adapter that will convert the resistance of the Ford joystick into the resistance needed to control the Sony radio tape recorder. The first two options require intervention in the Ford joystick. In addition, when disassembling the Ford joystick, there is a possibility of breaking the plastic clips and antennae of the buttons. Therefore, I stopped at the implementation of an external adapter in order to do without any interference with the joystick and radio tape recorder.
The steering column adapter circuit is very simple. It is based on the Atmel ATtiny13 microcontroller, clocked from an internal generator. The microcontroller is powered from the on-board network through the 78L05 stabilizer. The voltage obtained at the divider formed by the resistance of the Ford joystick and the resistor R1 is fed to the ADC of the microcontroller, where it is converted into code, which in turn controls the resistive chain of resistors R2-R6.

Fig. 4. Adapter circuit for radio control
While none of the buttons on the Ford joystick is pressed, the outputs of the microcontroller PB0, PB1, PB2, PB4 are in a high-impedance state (Z-state, the resistance is of the order of several megohms). Such a high resistance is perceived by the Sony radio tape recorder as none of the buttons are pressed. When you press, for example, the "Seek +" button, pins PB0 and PB1 are switched to a low logic level and provide connection of resistors R2, R3, R4 to ground. High output impedance at pins PB2 and PB4 can be neglected, because with a parallel connection of a multi-ohm resistance with a resistance of several kilo-ohms, the total resistance will differ slightly from the lowest resistance. Thus, when the "Seek +" button is pressed, the resistance at the adapter output is about 8.2 kOhm formed by the series connection of resistor R2 and a parallel chain of resistors R3 and R4. The pin states of the microcontroller for other functions are shown in the table below.
| Ford Joystick Button |
PB0 | PB1 | PB2 | PB4 | Resistance at the adapter output |
|---|---|---|---|---|---|
| VOL- |
Z | Z | Z | 0 | 23.4 kΩ |
| VOL + |
0 | Z | Z | Z | 17.2 kΩ |
| SEEK + |
0 | 0 | Z | Z | 8.2 kΩ |
| SEEK- |
Z | 0 | Z | Z | 12.2 kΩ |
| MODE |
Z | Z | 0 | Z | 2.2 kΩ |
| None of the buttons pressed |
Z | Z | Z | Z | ∞ |
All adapter parts are assembled on a printed circuit board. A photo of the board is presented below.
We put the steering column joystick for the head unit.
A parcel came from the Logan City store with a joystick for the head unit.
Without putting it on the back burner, I decided to install it right away, especially since I had everything for its installation. And so, you need a cutter or a clerical knife to cut a bore hole in the steering column cover, a clip - a nut for a bolt or self-tapping screw. You will also need nails for the mounting holes of the radio tape recorder 2-4 pcs, a pencil or a scribe.
Remove the upper and lower steering column cover by unscrewing two bolts on the lower cover.

Pull the upper one to remove it, and the lower one to the bottom, opening the steering wheel height adjustment lock.
After removing the lower casing, immediately using the steering column wiper switch, we find the joystick seat.


I also post a link to the file containing the pdf document, print it on A4, cut it out, attach it and circle it. File provided by comrade
Cut out a hole with a clerical knife. First, cut out less than the marked


Then we align the hole by applying and trying on the seat.
No matter how hard you try, but all the same, the edges of the hole are not perfect, I found a way out by putting on a rubber edging along the contour of the hole, bought once for framing the mesh in the bumper grille.


We take out first a little on one side, then on the other.


And we take it out in the niche of the radio.

We insert the plug of the cable into the socket of the radio,
The content of the article:
Because the result of the work done is positive and does not cause any complaints, in this post I will describe the step-by-step steps for installing a steering column joystick from Renault Duster in Nissan Terrano, so that any owner of a Nissan Terrano would.
Renault Megane French Turtle ›Logbook› Connecting the steering column joystick for a non-standard radio. Theoretically, you can bind any that has such a connector for control, but you need to select resistances!
About the logo. The Renault logo has an interesting history. During the First World War, the company successfully produced light tanks. Due to the popularity of the company's tanks, the Renault management even changed the logo, placing the image of their tank in it. But the tank on the emblem did not stay long, already in 1923 the well-known form of a diamond appeared.However, this is not quite a diamond - it is a trace from that very tank.
2) Steering wheel joystick with analysis. The joystick, of course, is already installed in place and is connected to the corresponding connector found in the steering column. 29 posts. Gender: Male. Car: Renault Koleos. City: Kadui.

RENAULT DUSTER - GENERAL INFORMATION. Waiting for the Nissan Terrano. And from the standard accessories for the radio did nothing fit? Today I was confused to reconnect the joystick. We protect our rights, consumer rights.


Help With Joystick Joystick Connection - Sandbox (Q&A) - Forum on electronics
Or sign in with one of these services. But the expected miracle did not happen ... The radio tape recorder works, but is not controlled by the joystick. What kind of joystick do you have? The case got off the ground, but somehow it moved incomprehensibly ... Firstly, what I did not expect at all, the display came to life, but came to life so that, regardless of the radio mode, Renault lights up on it and that's all Secondly, the joystick too "came to life", but the patient's pulse is threadlike ..
So what to do with it now? I do not want to create a new topic, so I will unsubscribe here. Who put on the regular "music box"? I have it in the glove compartment, not connected ... You need to be a member in order to leave a comment Sign up for a new account in our community. Community Software by Invision Power Services, Inc. Not recommended on shared computers. Sign in with Facebook. The standard steering column joystick and a non-standard radio tape recorder through the adapter.
Sign in to follow this. Good time to all members of the forum! When replacing the radio, I decided to install a standard joystick and make friends with it through an adapter with a Pioneer radio.
Thanks in advance for your answers! Share on other sites. Those who are versed in electrical engineering, maybe you can help with advice, because of what it can be and how you can try to fix the situation?
Or maybe someone has already encountered similar problems? Since I initially had no experience of using a joystick, tell me how it should work "by default", that is, what functions should the buttons perform?
Is there a difference in how to press buttons, for example, just press, or press and hold? I don't want to create a new topic, so I'll unsubscribe here .. Create an account or sign in to comment. You need to be a member in order to leave a comment. Sign up for a new account in our community. Register a new account. Already have an account? Go To Topic Listing.