Hello to all! I decided on one flash drive to write images of Windows XP, 7, 8.1 and 10 and at the same time write how I did it.
It is actually done very easily. The most difficult thing is when writing Windows XP, but this is not a problem.
How to make a multi-boot flash drive
Creating a multiboot flash drive begins with downloading the program with which we will.
We start. I will show you how to write each operating system. Just don't need it, skip it.
First, before recording:
- select your flash drive;
- check the box Auto format it with FBinst (this is necessary for formatting, all data is deleted from the USB flash drive);
- We put the nfts file system;
- And the default checkmarks are align and copy BPB.
Now the first operating system that I will talk about is Windows XP.

I said before that this system is the most difficult to record, because To write it, you need to unzip the archive or mount a virtual image. I do not use virtual images, so I unpack it with a simple archiver. Right-click on the image of Windows XP and unpack.
I usually do it like this:

After unpacking, installation files will appear.

After the image is unpacked, check the box as shown in the screenshot above and select the folder of the unzipped image. If everything is as in the screenshot, click GO.
A warning may appear that all data will be deleted:

Here again a warning that all data will be deleted and the file system will change to NFTS.

Everywhere we click and wait until the image is recorded. After successful recording, such a window will appear.

Now everything will be easier. If you also started with XP, you don’t need to tick the formatting box anymore. Just in the second window, specify the image.

After each successful recording, a window will appear:
And a window may appear:

This is something like the folders of other systems were found, by default there can only be one boot.win boot file. Do not pay attention, just click OK.
8ka is also recorded:

And the same is Windows 10.

Everything. On the flash drive all 4 operating systems. On a 16GB flash drive, somewhere around 600 mb.
With this program, you can check whether a multiboot flash drive is recorded or not. To do this, check the Test in QEMU checkbox and click GO.
The boot menu appears:

As you can see the first item is Windows XP, and the second contains the operating systems 7, 8.1, 10. By the way, here you can write other images, select them in paragraph 4.
That's all)
In my previous article I talked about how to write various kinds of information to CD / DVD discs, for example: music in MP3 format, any boot program (for example, Windows installation disc or antivirus), a movie in DVD format and, of course, just a set of any files and folders.
Fortunately, CDs and DVDs today are fading into the background. Many laptops no longer have floppy drives, and for stationary home computers it often often makes no sense to buy a floppy drive (if only for reading and writing Blu-ray discs).
And fortunately, because conventional flash drives come to replace disks, i.e. flash drives. Progress does not stand still and now most music players, video players and TVs support the ability to play information directly from a flash drive! Moreover, the USB flash drive can be bootable, and, for example, install Windows from it or run any program to service the computer (antiviruses, partition managers, LiveCD, and much more)!
In this article, I will share with you a simple way to create a bootable and using one simple program.
But how convenient is it now to use flash drives and not to carry these disks in special boxes? :) I sketched a lot of any movies, music onto one flash drive, after which you can listen to music in the car by inserting a flash drive, watching movies simply by connecting it to a TV or DVD Also, at the same time, the flash drive can be bootable and just store numerous of your documents and various kinds of files. In general, all in one bottle :)
In an article about recording discs, I talked separately about recording music, movies, images of boot programs and mixed data. But on a flash drive, such a manual is not required, because to record both movies, music, and just a set of files, you just need to copy it all to a USB flash drive and that's it! For convenience, you can still sort by various folders. That is, it is clear that a separate program for writing data to a USB flash drive is not required :)
For example, copying music:
It's simple!
And now, not only flash drives are very relevant, but USB external hard drives, which can interfere with a huge amount of information, for example 2 TB (2000 GB). And they are used just like flash drives: connected to USB, copied everything you need and you're done! And no CDs needed.
But how can one make it possible to write to a USB drive (whether it is a USB flash drive or an external hard drive), for example, the Windows installer, then to insert the USB flash drive into the desired computer and install Windows directly from the USB flash drive on it? Or we want to write a bootable anti-virus on a USB flash drive to check the computer even before the system starts. And someone may need a boot program to reset Windows passwords. I wrote about this program in an article:
Or maybe someone wants to have several different boot programs on a flash drive with the option of choosing through a special menu? It is very convenient! But, unfortunately, you can’t get by simply copying the images of the necessary programs to the USB flash drive ... You will need a separate program in order to make the USB flash drive bootable and fill it with the necessary boot programs. I met several programs that perform the same function. All of them are free! He personally dwelled on one and so far did not even have to resort to the help of other programs.
The program is called "WinSetupFromUSB". She, like many others, is in English, but do not be afraid, because you have this article on hand :)
Consider how to make a bootable USB flash drive using it.
Download and unpack the program WinSetupFromUSB.
First we need to download the program. As I mentioned in many of my articles, you need to download programs from official sites, and not from anywhere! Otherwise, you can also download viruses in addition to the program :)
winsetupfromusb.com
This is just the official website of the program. At the top of the window you will see links to download the latest Beta versions of the program, but I do not recommend downloading them, since such versions of the programs are at the testing stage and may have various glitches. It is better to always download the latest released stable versions so that there is no “beta” or “b”.
As we see in the example from the image above, the latest stable version to date is 1.5. Here I am downloading it for example as an unpacked.exe archive. There is another option in the 7z archive, but no difference.
In the next window, just click “Download” and the program will immediately start downloading to your computer:
After downloading the program, run the downloaded file for unpacking:
A window will appear in which you need to specify the folder on the computer to unpack the archive:
I unpack directly to my desktop. In this case, the program will still be unpacked into a separate folder “WinSetupFromUSB”, which will be created independently. To start unpacking, click "Extract".
After unpacking, we see a folder with the name of the program:
It is in it that the program itself will be.
Now let's start creating a bootable flash drive ...
Create a flash drive with any boot programs using WinSetupFromUSB!
So, we unpacked the program and now in the folder we see 2 files to run to choose from:
One is designed to run on 32-bit Windows systems, and the other (which is with the word "x64") to run on 64-bit systems. Run the appropriate file depending on the bit depth of your Windows. In this case, there will be no difference in the program itself and the speed of its work! I recommend starting the program on behalf of the Administrator. To do this, right-click on the file and select the option “Run as administrator” (see image above).
The program will start, and we will see this window:
Using the program is very simple!
To begin with, you should know that during the first recording, the program will format the USB flash drive, which means deleting all available data on it. Therefore, either use any empty USB flash drive for these purposes, or copy everything that is stored on the USB flash drive somewhere to the computer so as not to lose data!
After starting the program, we connect the USB flash drive (or USB hard drive) that you want to make bootable to your computer. This can be done before the program starts.
In the very top section “USBdiskselectionandformattools”, the first thing you need to do is select the USB drive you want to record to. I currently have only one flash drive connected to the computer, so the program automatically indicated it:
If you have several devices connected, be sure to select the one you need in the upper selection list (see image above). And, look, make no mistake, because the program, as mentioned above, will destroy all data! It will be best if you have one single USB drive connected to your computer, on which you are going to record programs.
Below we check the box "AutoformatitwithFBinst" in order to format the flash drive and make it bootable. Next, you need to select the file system into which the flash drive is formatted (step 3 in the image above): FAT32 or NTFS. NTFS will be supported today in most cases, so it is better to choose it. However, FAT32 does not support writing files larger than 4GB, which may interfere with you in the future.
Now we pass to the section "AddtoUSBdisk":
In this section, we will just add boot programs that will be written to the USB flash drive. We see the following options:
Windows 2000 / XP / 2003 Setup.
You should choose if you are going to write to the USB drive the installer of one of the listed Windows systems. All of them have long been outdated and, I think, few people need this item today.
Windows Vista / 7/8 / Server 2008/2012 / Based ISO.
This choice will allow you to write to the USB drive the installer of more modern Windows systems, for example 7 or 8. This is already relevant today and I think many will come in handy!
UBCD4Win / WinBuilder / Windows FLPC setup / Bart PE.
This item is needed if you want to write a boot program created on the basis of WinPE to a USB drive. But most of the boot software is based on Linux, so many will never need this feature at all, or very rarely.
Linux ISO / Other Grub4dos compatible ISO.
Actual function! Allows you to write a Linux-based boot program to your USB drive. Now most programs are created that way. For example, boot versions of antivirus products, a boot version of the famous backup and restore program - Acronis, a program for resetting the password of Windows users.
SysLinuxbootsector / Linux Distribution using SysLinux / ISO Linux.
This item is likely to be of little use to anyone. The option allows you to write programs with the Syslinux bootloader to a USB drive. If there is a Syslinux folder in the program image, then most likely you will need to use this option to write it to USB.
So, now that you have at least some knowledge of the purpose of each of the items in the program, you can start adding programs.
Suppose we want to write the Windows 8.1 installer onto a USB flash drive, Acronis, a program for creating backup copies and restoring them, and also a password reset program. Let this be an example.
So, check the item “WindowsVista / 7/8 / Server 2008/2012 / BasedISO” and press the “...” button to the right, which is used to select an image with the desired Windows:
Click “OK” in the following window:
A standard Windows Explorer will open, where you need to select the ISO file (image) of the system you need and click "Open." In my example, I select Windows 8.1:
Now add the Acronis program. I select the item “LinuxISO / OtherGrub4doscompatibleISO” and just click “...” I select the image of the boot version of Acronis as an ISO file:
After selecting the program image, you will be asked to indicate the name of the menu item, clicking on which you will open the added program:
You can mentally ask the question: “how did I find out that the bootable version of Acronis is built on Linux, on the basis of which I chose the option“ LinuxISO / OtherGrub4doscompatibleISO? ”. In fact, in no way, purely intuitively and relying on the fact that now most of the boot programs are built on similar Linux systems. However, you can try to find out on the official sites of the programs themselves. But it’s even easier to take and record the program immediately through the “LinuxISO / OtherGrub4doscompatibleISO” item and if it suddenly does not work, then rewrite the flash drive again, choosing another option :) Fortunately, this is not done for long.
So, I prepared for writing to the USB flash drive 2 programs: the Windows 8.1 installer and Acronis:
And here, since there is only one possibility to choose each type of program to be recorded, another question begs: "How then can I add 2-3 or more boot programs of the same type (for example, based on Linux) or 2-3 installation Windows?"
The question is right! The program allows you to record any number of programs on a USB flash drive. Everything is limited only by its volume :) But this needs to be done in several approaches.
At the moment, I have already indicated 1 Acronis program based on Linux, and I need to write another one - password reset, which is also built on Linux. So the program for resetting the password will have to be added to the USB flash drive on the second call.
But first, write down the 2 programs that I added. To do this, click the “Go” button at the very bottom of the window:
The program will make 2 warnings that the data will be 100% deleted, the disk is redistributed and recovery will probably be impossible. I already warned about data deletion before starting work with the program, so I hope you understand all this and made a copy of the files located on your USB device, if necessary :)
Click "Yes" in each warning window:
The process of writing these programs to a USB flash drive will begin. The duration of the recording depends on the amount of data and the speed of the flash drive. The recording process is shown at the bottom of the window:
For example, for this example, I wrote down Windows 8.1 with a size of 3.85 GB and Acronis with a size of 355 MB on a USB flash drive with a USB 2.0 volume of 8 GB and it took me about 15 minutes. If the flash drive was USB 3.0, the process would most likely be reduced to 5 minutes or even less. Now flash drives and external USB hard drives are mainly in USB 3.0 format, which gives a very high speed of information transfer.
The end of the recording will be indicated by the window labeled “Jobdone”, where you just need to click “OK”:
After the first 2 programs are recorded, we can start WinSetupFromUSB again and add more programs to the USB flash drive, and we won’t have to format it anymore!
When you run WinSetupFromUSB a second time to add new programs, do not check the "AutoformatitwithFBinst" box! All that remains is to select new programs and press the Go button again to record:
As a result, new programs will be added to the USB flash drive. If you need to add more, then do, respectively, the 3rd launch of the program and again add what you need :)
That's the whole recording process. Now our USB drive is ready and it remains to boot from it!
To configure the computer to boot from a USB drive (it does not matter whether it is a USB flash drive or an external USB hard drive), most often you have to go into the BIOS and make some settings there. I’m going to tell you about important BIOS features, including the boot order from various devices, in a separate article:
Now I will briefly show how to do this using the example of one of the BIOS versions - AmiBios:

There are many BIOS versions and each of them has a slightly different interface and capabilities, but still there is one principle and each has a device priority menu similar to that described above.
After saving the settings, the computer will reboot and boot from the USB flash drive will begin, since it was set as the first boot device.
You will need to wait a few seconds and the boot menu will appear, where all the programs recorded by us through the "WinSetupFromUSB" will be indicated:
Selecting the desired program with the arrows on the keyboard (because the mouse will not work in such boot programs) and pressing the Enter key, it will start.
That's all!
I think this article will be useful for those who want to have Windows on the flash drive and various utilities for recovering, partitioning the hard disk, resetting the password, and various other purposes.
As you can see, such multiboot flash drives are recorded very easily!
Have a nice day and good luck! Until;)
Previously, new computer programs or applications were delivered on CD-ROMs. But recently, most computers are not equipped with drives for reading them. More popular is installing software over the Internet. But what to do if the operating system crashed or it was necessary to reinstall its new version on another computer. The flash drive on which the utility of automatic loading of the operating system will be installed will help in this case. There is an opportunity to make a bootable USB flash drive yourself.
Why do I need a bootable flash drive with utilities
For the computer to work properly, it is not enough to install an operating system on it. For the correct operation of all functional units in it, the correct display of information, and playback of audio and video content, drivers or codecs are required. There are universal collections of codecs for each operating system that run on computers of different configurations, power, type of processors, video cards, input / output devices, peripheral equipment. When installing the OS from a bootable USB flash drive, all these utilities must be installed.
Creating a multiboot flash drive
The solution to the problem is possible by using a flash memory device that connects to a USB port. To install Windows and all the necessary utilities for its correct operation, you need a flash drive with a capacity of 16 gigabytes (GB). To create a multiboot flash drive for Windows XP / Windows XPE / Vista / 7 / Windows 7PE / 8/10, a flash memory capacity of up to 32 GB is useful. A Windows 10 multiboot flash drive is created using specialized programs: Acronis Disk Director & True Image, RMPrepUSB, Bootice, WinSetupFromUSB, XBoot, FiraDisk_integrator.
What is needed
To create a resuscitation flash drive, you need a copy (or image) of the OS installation disk. To create it, you will need the UltraISO program, administrator rights and a disk with the original OS. After downloading, installing and running, you must select the location of the image. The UltraISO Wizard will create an ISO image from the OS. Next, select the option “Burn hard disk image”, create a bootable flash. This multiboot flash drive will need to be filled with the necessary service programs, download their standard set - antiviruses, codecs, backup tools.
Program for creating a multi-boot flash drive
Creating MultiBoot USB Flash separately for each operating system is difficult. There is a possibility in Windows 8 to create a multiboot flash drive from the command line, but you can make mistakes. Therefore, several utilities that automate these actions have been created, which have the ability to integrate several operating systems additionally, add the antivirus programs you need to the installer, and batch install this entire set on a multiboot flash drive. Among them, the most interesting are:
- RMPrepUSB is a universal multi-bootloader for flash drives that run on MS-DOS, FreeDOS, WinPE 1, 2 or 3, BartPE, XP, Win 7, Win 8.x, Win 10, Linux. It works with different file systems - FAT16, FAT32, NFTS. It facilitates the verification of flash memory, formatting hard and flash drives, creating backup images of a bootable flash drive, and has many auxiliary functions in the interactive mode of operation.
- Bootice is a useful program when reinstalling the OS on computers without an optical drive, it has the functions of formatting and splitting the amount of flash memory into several sections, changing the way the system boots, you can rename the bootloader.
- WinSetupFromUSB is a free software product for creating bootable Flash USB for Windows and Linux (Linux) systems with a simple graphical interface. It has the functions of formatting and marking flash memory, copying installation files from distributions, final testing of the created bootloader.
- XBoot is a free program for transferring images of operating systems, codecs, and programs to a flash drive. Its advantages are the ability to create a boot disk simultaneously for Windows and Linux, choose the type of bootloader ISO Emulation or Grub4DOS. The disadvantage is the English menu.
- YUMI - Multiboot USB Creator - a small utility for creating bootable USB-flash, has a simple English interface with a description of distributions and recommendations for different computer configurations, offers links for downloading antiviruses, codecs, drivers.
- FiraDisk_integrator is a multifunctional bootloader, it has the ability to integrate all versions of Windows of different assemblies, there is a choice of localization of installed software by interface language, simple image creation from all source distributions downloaded to the SSD folder.
How to make a flash drive multi-boot with MultiBoot USB - step by step instructions
When installing a multiboot program, some antiviruses may block this action. It is worth temporarily disabling them or adding this program to the exceptions. To create an emergency flash drive, you must do the following steps:
- Formatting a USB drive to the bootloader format.
- Bootloader installation.
- Adding images of operating systems (files with the extension .iso).
- Copy files.
- Testing the resulting tool.
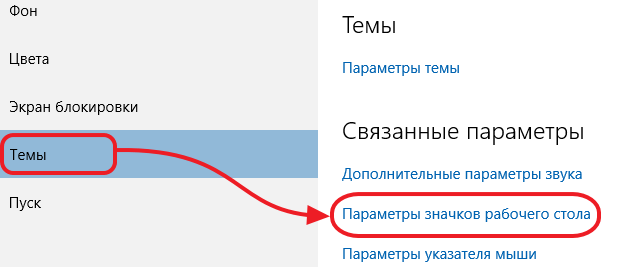
USB drive formatting
Preparing a multiboot flash drive to turn it into a bootable tool starts with formatting it. Transfer from his memory all the information you need to other media - formatting will completely clear it. To format, do the following:
- Launch the HP USB Disk Storage Format Tool.
- Select your drive from the list.
- Specify File system - NTFS if files larger than 4 GB will be installed. FAT32 markup must be left if you intend to work with computers based on the UEFI BIOS.
- In Format Options it should be noted Quick Format - fast formatting.
- Click Start.
Bootloader installation
Above, several options are considered for utilities that will download all OS distributions and service files. To use them you must:
- Copy the installation module of the bootloader of your choice to the formatted USB-drive.
- Then run this installer.
- Choose the name of your flash drive.
- Click Install.
After successful installation of the program, a message appears on the screen confirming the installation of the boot utility on the computer. A message will be displayed asking you to start its work. If up to this point you have created a database with all the necessary distributions and programs on your hard drive, you can check the box next to the Start program and click the Finish button.
Adding operating system images
To add images of different OSs to a multiboot flash drive, you need to prepare them in the root folder on your computer’s hard drive. It will be several files with the extension iso. Using a bootloader such as WinSetupFromUSB, you can make a multi-boot flash drive in Windows XP, 7, 8, 10 and Linux. To do this, you must:
- In the list, select the name of the flash drive.
- Check the box next to the required operating systems, for example, Windows 2000 / Xp / 2003 Setup.
- Indicate the location of the mounted images.
- Click Go.
Copy utilities and files
After transferring the images of operating systems, you should copy the installation files of all necessary utilities and programs from our list to the USB flash drive. To do this, in the WinSetupFromUSB program:
- Uncheck Auto format it with FBinst.
- Select Linux ISO / Other Grub4dos compatible ISO by clicking the button on the right.
- In the explorer we find the folder with the images of the programs, select all the programs in turn, click "Open".
- We follow their correct name in the Boot menu name.
- Click Go and see the process of adding the selected utility to the bootable flash drive.
To create a recovery and resuscitation multiboot flash drive, the following basic utilities can be included in the installation package, which can always be changed, deleted, or replaced with new versions:
- windows distributions version 8.1, 10 and XP;
- Paragon Hard Disk Manager - disk allocation manager ;
- AOMEI Backupper Standard - free backup;
- K-Lite Codec Pack - a universal package of codecs;
- Kaspersky Rescue 10 - Kaspersky Anti-Virus;
- DrWeb LiveCD - Doctor Web antivirus;
- 7-Zip - file and folder archiver;
- Recuva - file recovery utility;
- RegeditPE - registry editing utility;
- Symantec Ghost v11.0 - for archiving and restoring data on personal computers;
- Elcomsoft System Recovery Pro v3.0 Build 466 - utility purpose - restoration of user access to Windows accounts, Microsoft applications;
- Universal boot disk v3.7 - service NTFS disks in MS-DOS;
- NT Password & Registry Editor - change the password and the ability to edit the registry Windows XP;
- [email protected] Boot Disk Professional v2.1 - helps to recover and edit deleted files;
- QuickTech Pro v5.8 - setup, diagnostics of the computer and its components;
- MemTest86 + v4.20 - RAM test;
- MHDD v4.6 - check hard drives;
- Victoria v3.52 - service IDE and Serial HDD;
- HDD Regenerator v2011 - elimination of physical damage to hard drives;
- Reanimator - fast liveCD for data recovery and repair of the working environment;
- Alkid LiveUSB - universal system recovery utility;
- Acronis Disk Director & True Image - scan hard drives;
- Elcomsoft System Recovery - view, change, delete passwords for accounts in Windows OS of all releases;
- Daemon Tools - a popular virtual CD-ROM;
- DOS-Navigator - console file manager for OS / 2 and DOS;
- Alcohol 120% - a program for copying and virtualizing disks.
Testing
After creating a multiboot flash drive, you need to check its performance. To do this, you can use the Test in QEMU utility in WinSetupFromUSB. To do this, follow these steps:
- check the box next to Test in QEMU;
- press GO;
- the program itself will check for the presence of all elements and, at the end, will display on the computer screen a list under the heading “A set of boot images and utilities for working with hard disk partitions”;
- a list of all operating systems, programs and utilities will be presented below;
- if some utilities are not installed, you must repeat the process of installing them.

Writing a bootable USB flash drive via RMPrepUSB
The first step is to start RMPrepUSB. Then you need to go into the dialog box, check in the upper window whether a multiboot flash drive is defined. Then we perform the following steps:
- Size - enter MAX.
- Volume label - The name of the flash drive in the OS.
- On the right we mark "Do not ask questions."
- In the "Boot Sector" section, select WinPEv2 / WinPEv3 / Vista / Win7 bootable (CC4).
- The file system and options are NTFS.
- To the right, select the Boot as HDD (C: 2PTNS) option.
- Check the box "Copy system files from the following folder ...".
- In the "Overview" opens a explorer in which you need to select the Easy2Boot archive and click OK.
- If you click “Prepare Disk”, the formatting of the USB flash drive starts, which you need to prepare for this.
- Click "Install Grub4DOS".
- We answer “No” to the MBR request.
- In the GRLDR ALREADY EXISTS window, press the OK key.
- After that, manually transfer the boot programs to the USB flash drive in the MAIN MENU and UTILITIES Menu folders.
- To complete the creation, open the menu item Drive-\u003e Make All Files on Drive Contiguous.
- By running the RMPrepUSB emulator and pressing the F11 key, you can check the health.
If you copied all your OS distributions to the MAINMENU folder on a USB flash drive, they will be reflected directly in this menu. In the UTILITIES Menu, service utilities and computer maintenance programs will be displayed. This completes the process of creating a multiboot flash drive using this program. To select the installed OS and programs, you need to navigate the menu and select the utilities you need to install.
Flash drive in Bootice - creation order
Bootice is known to be a utility for creating a multi-boot flash memory card. You can download Bootice from the official website of the developer. The utility must be unpacked, and after starting the program:
- In the Destination Disk item, select the flash drive that you must first prepare.
- Click Process MBR (master boot record).
- Select GRUB4DOS 0.4.5c / 0.4.6a (grldr.mbr).
- Click Install / Config.
- Click Save to disk to write all the information to the USB flash drive.
- For Linux systems, SUSLINUX 4.06 / 5.01 (FAT / FAT32 / NTFS) should be installed.
- Click Install / Config.
- Select SYSLINUX 5.01.
- Click confirmation - OK.
- After completing these steps, the multiboot flash drive will be ready.
Creating a bootable flash drive with multiple operating systems in WinSetupFromUsb
After starting the WinSetupFromUSB utility, the SFX archive will be unpacked, the program will start and a menu will open, at the top of which we find our flash drive in the drop-down list. Your steps will be:
- Format media - check Auto format it with FBinst, then NTFS.
- Put a mark on Linux ISO / Other Grub4dos compatible ISO.
- Press the GO button.
- Formatting a flash drive.
- At the next step, select the items from the Add to USB disk list and press the GO button - the OS distributions are transferred to the multiboot flash drive.
For arbitrary selection of downloadable programs, select Linux ISO / Other Grub4dos compatible ISO and click on the button with the image of three dots to the right, the explorer opens, in which we select the utilities and programs we need. Then, in exactly the same way, add all the ISO images. The Test in QEMU item will help you verify recorded images. For control, we boot from this multiboot flash drive and check its boot menu.
Xboot USB Multi-Boot Utility Utility
The Xboot interface is simple - to create a multi-boot device for installing and restoring the OS, you must do the following:
- To add images, drag and drop iso-files into the program window. At the same time, in the green window with the question "How to perceive this image?" When adding Windows images, you must specify Add using Grub4dos ISO image Emulation.
- If you are installing a Unix system, then Utility-Ubuntu.
- In addition to OS images, you can add utility images. There are links in the program, for access to which click File-\u003e Download. Choose utilities and download.
- After clicking Create ISO, the program will ask for the way to save the image file and offer to check it in the virtual machine.
Script FiraDisk_integrator for resuscitation flash drive with multiple OS
To start creating a multiboot flash drive using the FiraDisk_integrator utility:
Video
Multiboot flash driveequipped with a distribution kit for several operating systems, anti-virus Live -drive, the necessary programs that work autonomously from bootable media - this is a universal tool for solving various problems and problems with a computer that ordinary users have to deal with every now and then. What to say about IT-specialists, most of whose professional life is the restoration of computer technology.
Flash drive, which brings together a variety of bootable software solutions, will replace a bunch of different optical boot disks. A single multi-boot flash drive can be used to neutralize viruses blocking the computer’s startup, and to reinstall the operating system, and to restore it from a backup, and to allocate space on your hard drive, and to solve other problems. Ready-made images available for download on the Internet Live -discs with a selection of various software to solve problems with the computer. But, of course, it’s better to prepare a universal rescue tool yourself, picking up the contents of a bootable USB flash drive for your individual needs and preferences.
The program can create flash drives with various bootable software WinSetupFromUSB for windows. It can complete a selection of bootable media based on the bootloader Grub4dos . We will use it to create a multi-boot flash drive. And, accordingly, we will consider this entire process in detail below.
1. The contents of the multiboot flash drive
The first step is to prepare the distribution kit for a multiboot flash drive. In our case, we have a flash drive with a small volume by modern standards - just 8 GB . Therefore, it will be equipped with only the necessary tools. And this is a distribution Windows versions 8.1 , 10 and old XP antivirus Live drive from Avira, disk allocation manager and free backup. For recording on a flash drive, we prepare ISO -images of bootable media of the selected software and installation disks of operating systems.
2. Download WinSetupFromUSB
WinSetupFromUSB - free program. On the official website you need to download its latest version. At the time of this writing, the version is current. 1.6 . WinSetupFromUSB is portable, without installation on the system. All that needs to be done is to unzip the downloaded archive and run the program shortcut in accordance with the bit depth of the current Windows.
Download the WinSetupFromUSB program from the official website:
http://www.winsetupfromusb.com/downloads/
3. Formatting a flash drive
Next stage - formatting a flash drive. This process can be carried out as standard means of Windows (team "Format" in the context menu called on the USB flash drive in Explorer) , and inside WinSetupFromUSB. Let's consider the last option.
In the program window at the top, select the desired flash drive, if there are several of them connected to the computer. Activate option checkmark "Auto format it with FBinst". Then its additional options will be revealed. Of these, you only need to decide on the future file system of the flash drive - NTFS or Fat32. If the distribution prepared for recording on a USB flash drive contains files whose weight exceeds 4 GB , you must select a file system NTFS . If not, leave Fat32 default.
The FAT32 file system must also be left if the multiboot flash drive is intended including for working with computers based on BIOS UEFI. In this case, you will not need to disable the function Secure boot, and the distribution contained on the flash drive 64 bit Windows 8.1 and 10 set to GPT disk partition.
WinSetupFromUSB prepares a universal bootable USB flash drive - and for computers with ordinary BIOS, and for devices based on BIOS UEFI. But the interface UEFI sees only bootable flash drives formatted in FAT32. Some programs can circumvent such restrictions and create bootable ones. UEFIflash drives with file system NTFS, but WinSetupFromUSB, alas, is not one of them.
So, we decide on the file system and press the button below "Go".
In the warning window about erasing data on a USB flash drive, click "Yes".

And click again "Yes" in another warning window.

In a few seconds we will see the inscription "Job done" - The work is done. Click "OK".

Now you can start adding the contents of the multiboot flash drive. The order of adding images of operating system installation disks and bootable media is not important. It is only important to adhere to the corresponding column in the central part of the window WinSetupFromUSB.
4. Adding a Windows distribution
Adding a Windows distribution is possible in two forms of the program window. One of the forms is intended to add images of Windows installation disks, starting with the version Vista , the other is for installation files Windows XP and older versions of the system. In our case, first add the image to the appropriate form Windows 8.1 . Put a tick on this form and using the browse button indicate the path to ISO-image. A set of multiboot flash drives is formed in stages: each distribution kit is added and recorded in a separate order. Press the button "Go".

We are waiting for the completion of the process and click "OK".

Now activate the same form with a tick and use the browse button to add another Windows distribution. In our case, this is the installation disk Windows 10 . For the same version of Windows, you can add its various editions one by one - 32 - and 64 bit. Add, click "Go", wait for the completion of the process.

5. Nuances with Windows XP
The presence on the flash drive installation disk Windows XP It may be necessary in rare cases to reinstall the operating system on very old PC assemblies. But the process of creating a bootable flash drive with this version of the system through WinSetupFromUSB have their own nuances. In the program interface, the upper form is intended to add the distribution of Windows XP and earlier versions of the system.

The browse button of this form does not add the usual ISOdistribution image. First content ISO-image must be opened in a virtual drive. In systems Windows 8.1 and 10 this is done by regular means - on ISO-file the context menu is called and the command is selected.

AT Windows 7 and earlier system mounts ISO-images possible through third-party programs such as Alcohol 120% or Daemon tools . Content Connected ISO-image is transferred to a separately created folder.

And this folder is already in the process of creating a bootable flash drive is added to the program window WinSetupFromUSB.

The next step is to accept the license agreement.

And only then start recording.

Another nuance is the need to integrate drivers for SATAcontroller in distribution Windows XPif such does not initially contain them.
6. Adding bootable program media
ISOimages of the operating system distribution Linux , Live -based drives Linux and Winpe, bootable media of various programs using the browse button are added in active form Linux ISO / Other Grub4dos compatible ISO. After adding ISO- a small window will appear "Boot menu name"where you can specify the name of how bootable media will be displayed in the bootloader menu Grub4dos . In our case, specify the path to the anti-virus image LiveDrive Avira. Press the button "Go" and wait for the recording to complete.


And then the image.

7. Testing a flash drive
One of the benefits of the program WinSetupFromUSB is inline BY to emulate computer hardware - QEMU. Via QEMU You can immediately, without leaving the current operating system, test the USB flash drive - at least the usual boot, at least multiboot. At the bottom of the WinSetupFromUSB window, put a checkmark on the option and click "Go".

The QEMU window opens, in which everything will happen the same as on the monitor screen after booting from a USB flash drive. The first thing to see is the bootloader menu Grub4dos. Using the navigation keys or numbers according to the serial numbers of the software in the list, we can select one or another bootable medium, Live-drive or operating system installation process.

Windows installation disks will be combined into two sections. One will contain distributions Windows XP and older versions of the system, in another - versions of Windows, starting with Vista . Each of the sections leads to the additional menu window for loading the corresponding versions and editions of Windows.

I greet, in fact, everyone and everything. Today we have an extremely interesting topic, a bootable USB flash drive, which many of you have asked for a long time and often, using both, and a special offer of themes.
This article is for those who want to make a multi-boot flash drive with operating system installers. Windows, Linux, and perhaps even with several Livecd and generally with all sorts of utilities, such as disk verification, and all that jazz.
Boot USB flash or HDD the drive is convenient in that you can refuse to use CD / DVD for installing and using diagnostic programs such as , MHDD, TI. A “multiboot” flash drive is also good because you can not format the entire disk for each program, but install everything you need there once and when you boot, select the one you need through the menu you created yourself.
This thing is especially relevant for those who do not CD / DVD Readers, but you need to install the system, then, then something else.
However, let's get started.
Video format
Although no, before we get started, let's show you our interesting series of videos about creating such a thing as a bootable flash drive for the system administrator:
A little about the bootloader
The Forest Raised a Christmas Tree. There are many programs that allow you to create a bootable USB flash drive, each of which has its own advantages and disadvantages. However, the most versatile and flexible tool is such a thing as Grub4dos.
I’ll tell you briefly what kind of animal it is:
GRUB4DOS is a universal bootloader based on GNU GRUB. It can be controlled in command line mode or using a configuration file, its capabilities include:
(Windows 9x / Me) loader (loader) bootloader (kernel boot ( kernel)This bootloader is, in fact, a small console operating system that supports the command line, many management commands, working with files, access control, section modifications, in addition, it supports many file systems, can read data from any of the defined BIOS devices, supports booting over the network, does not depend on the geometry of disks, can work with remote terminals, etc.
And this at a size slightly larger 200 kilobytes! :) Feel it? A bootable flash drive will thank you. In terms of location, at least.
Still Grub has a built-in help system that in response to
Downloading what we need .iso, drop it into the folder boot, we prescribe a new menu bar with a new path and forward .. At least load, at least Linux, at least installers, at least antiviruses.
In a nutshell, something like this.
Afterword
Predicting a possible ton of questions, I traditionally say that you can leave all of them, as well as additions, opinions, reviews, criticism, thanks, etc. in the comments to this article. I will try to answer.
But first of all, of course, try to do at least what is presented in the material, test it, and then read the above documentation.
Thanks for attention. Stay with the project! ;)