Before a person who first gets on the Internet, there is a priority task - to register your email inbox. There are a huge number of services offering such services, but one of the most popular is Gmail from the famous Google company. The mail system has been operating since the spring of 2004, and every year it is growing in millions of satisfied users. Why is this mail better than the rest? Consider the main advantages that have allowed Gmail to take a leading position in the market:
- the mailbox is capable of holding up to 10 GB of information;
- built-in instant messaging and video calling;
- quick search on a specified word among messages;
- powerful anti-spam system;
- high degree of protection;
- availability of mobile applications for all popular operating systems;
- one account for several services (YouTube, GoogleDisk, GoogleMaps, etc.)
- all letters and contacts can be marked and structured;
- built-in spelling errors control;
- every minute backups to prevent data loss in case of loss of the Internet.
check in
Before you take advantage of the benefits described, you will need to go through a small registration process. To do this, go to gmail.com.
Click on the button “Create an account” and get to the page for filling out the profile data.

Enter the necessary information. Carefully consider creating a mail password. Do not use a combination consisting of a birthday date or your mobile number. For better security, the password should contain both alphabetic characters and numbers.
After all the points have been filled, click the "Next" button. An agreement window pops up introducing the user to the Gmail privacy policy. After reading, click "Accept."

If everything is done correctly, then you will be thrown to such a window with congratulations.

Immediately after creation, you will automatically be authorized in the mail. Even if you close the site and return to it in a couple of days or weeks, your inbox will still be open. There is no need to enter a password each time. However, if you are using a public computer or several mailboxes at the same time, then exit from the account is inevitable. For such situations, we’ll review the authorization process and tell you how to log in to Gmail.
Login to Jail Mail
We go to gmail.com and enter the email address. Click "Next."
Important! Do not enter your data on other sites. The only valid email address is https://mail.google.com.

A window appears in which you must enter the password.

If the password is correct, then you will be sent to your inbox.

Output
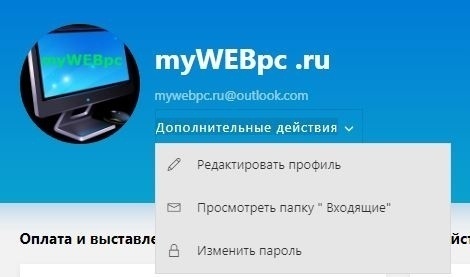
In order to exit the account, click on the icon in the upper right corner of the screen.

In the window that opens, click "Exit."
Work with letters
Thanks to the convenient mailbox interface, working with letters has become a real pleasure. All mail can be structured, marked with various markers, saved in drafts and create bulk mailings.
To start writing a message, click on the red button in the upper left corner of the screen.

One of the main amenities is that the window for a set of messages appears as a tab. Thus, you can simultaneously write a new letter and interact with the mailbox.

The bottom panel allows you to attach various files to the letter from a computer or from a virtual GoogleDisc, insert emoticons, as well as instantly print text.

Various mailbox settings
Gmail is not just considered the best. For comfortable use, Google programmers have provided the email system with a whole list of useful settings. Briefly talk about the most important.
Contacts
The service is equipped with the ability to save the necessary email addresses. You no longer need to remember the mail of a work colleague or old friend. Moreover, you can independently fill out information about a person (name, date of birth, phone).
Adding a contact is incredibly simple. To get started, you need to go to the main mail page and find the Gmail tab in the upper left corner.

Click on it - a small menu opens.

Press the button "Contacts" and get into the list of added addresses. This window displays the people with whom you most often communicate. If the right person is not in the list, then click on the red label in the lower right corner of the screen.
A window opens where you can find the right person. Just enter his name and surname, and then find by photo.

Import from other mailboxes
Another important feature that comes in handy for those who use multiple mailboxes at the same time. To transfer a contact or an important letter from one mail to another there is no need to copy all the information. The whole process is simplified to a couple of mouse clicks.
To do this, in the "Contacts" window, click the "More" button in the left column.

A menu opens. We are looking for the “Import” button.

We select the service from which you want to import contacts.

That's it, now important addresses or messages located in other mailboxes are available on Gmail.
Hello dear readers. In the age of technology, most people, if you do not take grandparents, although they probably have also become more advanced in terms of the Internet, have forgotten what it is to write letters manually and to stand in long lines at post offices. We switched to such a convenient way of communication as email.
Indeed, this method of communication is much more convenient than regular writing. No need to wait for weeks, sent and the recipient immediately received - just an incredible time saver. We’ll talk about this type of quick correspondence with you in this article, and especially about how to create email in Google.
This is a service that allows you to send messages to different parts of the world in seconds. Moreover, you can attach documents, scans, photos or audio and video recordings to them. It should be noted here that this is email. So for its functioning you need to have a computer and the Internet.
Types of Email Services
The most common services in our time are: Yandex, Google and Mail. Each of them has its own advantages and differences. Let's talk a little about each individually.
Mail.ru
This is a portal created for communication, the date of foundation of which is 1998. Initially, mail was created as a messaging service, and later various sections began to appear on the site that allow users to receive weather information and various news.
Now mail takes 5th place in terms of growing number of users. This is not a bad email client that provides great opportunities for its customers.
Yandex Mail
The announcement of the search engine took place in 1997 and was presented as a search engine, but over the years it has also become a multi-portal with its own store, the ability to listen to music, a place to store information on the network, etc. And, of course, another main direction of this company is the mail service.
Google

The Google search engine was founded in 1998, and how mail began to exist only in 2007. However, even at that time, he had a number of significant advantages compared to his competitors. We will talk about this later. This is not only a search engine and e-mail client, but also a huge number of useful services, ranging from gaming to serious business projects.
You can create a mailbox on any of these services for free, it all depends on your preferences. Today we’ll talk about how to create a new Google account. Here is a step-by-step instruction for registration, which will be supported by a photo for a more complete understanding.
Google Registration Instructions
1. The first thing to do is go to the site itself https://www.google.ru/
2. Next, in the upper right corner, click the "Login" button  3. After that, you will be presented with a page with data entry, but since you are initially registered, you do not have them, therefore, on this page you need to mark “Add account”
4. After that, you will see a field with an e-mail input, however, you have nothing to enter so far, so you click on "Create Account"  5. Google offers you to register, let's do it and move on to the data column:
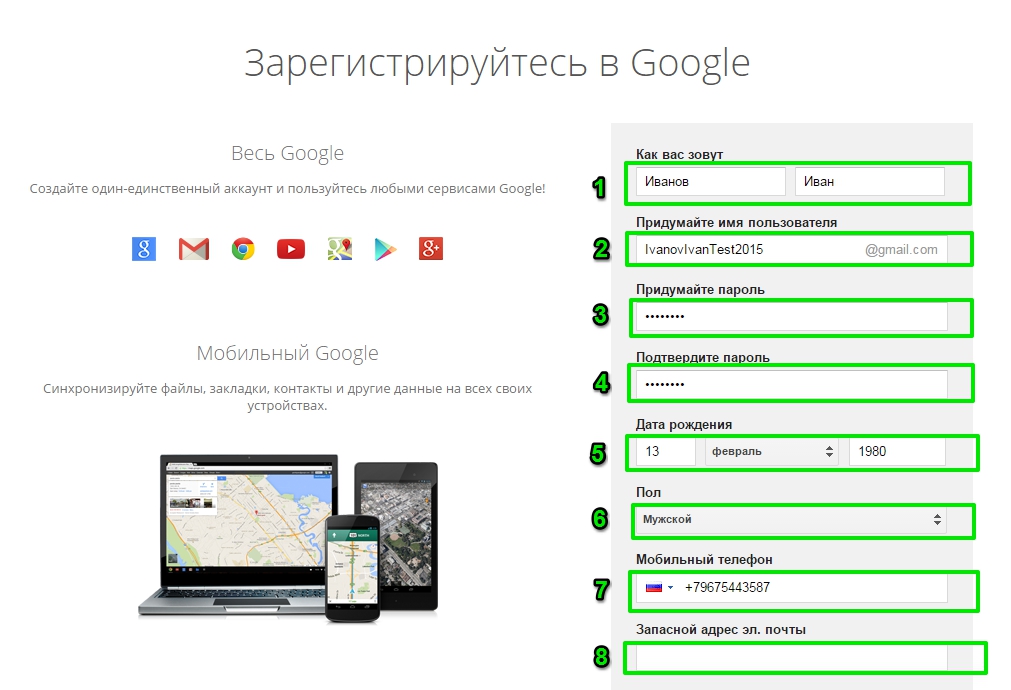
The first thing you need to enter is your first and last name. Next, you come up with a username, that is, a username and enter in the next field.
Note: If you enter a username that already exists in the system, you will be notified of this.
After that you need to think up and enter the password and repeat it.
Note: If the password is entered incorrectly, the system will also notify you of this.
6. After that, you need to prove that you are not a robot and enter the numbers from the picture.

The country is determined automatically, but if you want to change it, you need to select the arrow, after which a window will pop up and you can specify what you need. We settled on Russia.
Now it remains for you to tick off that you agree with everything that is offered to you and mark “Next”.
7. Everything, your account is ready! Click the "Go to Gmail Service" button and you can get to work!

How to use your Google mailbox
Let's see how you will use your account.
You can enter your account absolutely from any Google search page. In the upper right corner your username will be indicated, clicking on which will open a field where it will be written: "My account".
 By clicking on this button you get to the menu where you can configure the account itself, its security and privacy.

Now let's move on to the box itself. In order to enter it, you need to mark either the “Mail” icon or the icon with squares all in the same upper right corner. Then the function menu will open where you need to click on the “Mail” button.
After that, your e-mail box will open.
Let's look at some of the features of the box in Google
This is how the box window looks like, in which there are already 3 incoming letters from Google.

Here you can not only write to someone, but also see how many messages you have in total, how many you sent, received, at what time, etc.
In order for you to write a letter, you need to select the red "Write" button and you will see how the data entry window appeared in the lower right corner.
Here you can enter the recipient address, subject and the text itself, as well as add a document or image, use emoticons.

Everything is quite simple.
In order to send a letter, you just need to click on the "Send" button.
Google Benefits
- The ability to store up to 15 GB of information on a virtual disk, while this is the only company that provides this amount of memory.
- You can also upload your documents to Disk, with which you can quickly and easily send them to your friends and colleagues.
- Photos and videos are uploaded without the help of a variety of programs. You just need to drag the document into the message box.
- You can link the account to any site that supports this system, for example youtube, and receive notifications from there.
- Information about a new message is also available on any search page, and if you use Google chrome, a special application will show you a new message that just arrived.
You can talk a lot about the benefits of working with Google. Most importantly, it is adapted not only to work on a computer, but also on smartphones and tablets. Well, here you have learned about the existence of such a convenient service and you just have to create an account and enjoy its capabilities!
Sincerely, Ekaterina Kalmykova
If you’re having trouble accessing Gmail mail (it doesn’t matter from your computer or mobile device) or you see the message “Add Gmail to your Google Account” and “The name is already taken. Try another one, ”this article should help you solve this problem.
The reasons that you can’t enter Google’s mail may be different, and therefore I will give several possible solutions, and I hope I will help all those who are reading this manual.
Logging in to Gmail.com - First Steps
After that, the very first thing to try is to clear the entire history (cookie) of your browser. From the reviews of several users on the Internet, this is exactly what helped them.
If it worked - great, if not, read on:
- We follow the following link: Sign in to Gmail
- A Gmail login form will appear, where one of your addresses will already be entered. And below will be a link "Sign in to another account" or "Sing in with a different account" (if you have English) - click on it.
- After that, all your addresses will be displayed, including the one you need. Select an address, enter your password and enter your inbox. If an empty login form appears instead of addresses, enter the required address, password and enter.
This option is also possible if, when you try to enter the mail, a window appears Add Gmail to your Google Account and the message “This name is already taken. Try another one. ”
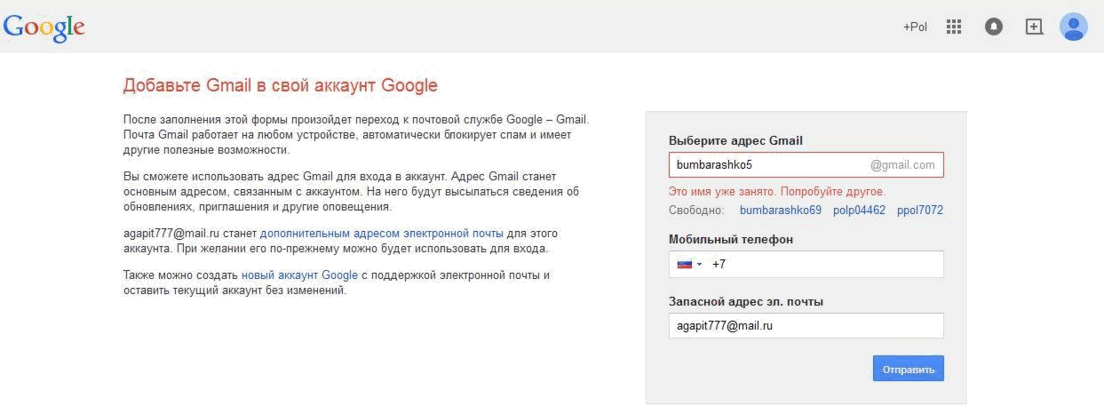
On the same page, where “Name is already taken” answers you, there is a circle with a little man in the upper right corner (or with your avatar). Click on it and select Add account.Next, enter your address, password and click Login.

Account Information
I think it will not be superfluous to make sure once again that you enter all the data necessary to enter the mail correctly. Passwords are very case sensitive, so make sure you don't have the Caps Lock key turned on. Also check for the correct username i.e. email address that is written down to @ gmail.com.
Let me know in the comments how you did it.
Logging in to Gmail.com mail is very easy. But before you log in, you need to have your Google account. In this tutorial, I’ll show you how to correctly and easily enter your mail, and also show how to configure Gmail, how to add and edit contacts, edit mail settings, etc.
If you still do not have a google account, you need to first create one. To do this, we recommend that you go to the lesson. After you create an account, go back and read this lesson to the end to learn how to enter Gmail and configure it.
Update as of February 14, 2016. If you can’t enter your mail, then I wrote about how to solve this problem.
Gmail.com mail - login
Logging in to Gmail is very easy. Immediately after creating an account, you will be automatically logged in, that is, log into it. However, you will always need to enter and exit your account at the end of the work. Signing out is especially important if you are using a public computer (for example, in a library or office). This simple action will protect your letters from prying eyes.
Note: The article was updated on June 13, 2015. There are people who have some difficulty entering the mail. We did not find detailed and accurate information why they did not succeed. We also tried to log in from different computers with different operating systems - there were no problems, everything is standard. Therefore, we came to the conclusion that those who are unable to log in are doing something wrong. Perhaps you confuse the services of Gmail.ru and Gmail.com. The first does not apply to Google, including Gmail.com, these are two different email services, so do not get confused. Also keep in mind that Gmail.com is a Google product, so it’s okay if a Gmail.com page is redirected to a Google page. We also noticed some small changes, so we updated the article with all the images. Follow the steps below to log in to Google mail. It should work without problems. If not, then write in the comments, but in detail.
To enter the mail:

To exit the mail:
- In the upper right corner, click on your photo and select Sign out.

Mail Settings
The time will come when you want to customize the look or “behavior” of your mail. For example, you can create a signature, change shortcuts or a theme. All this can be done in the Gmail Mail Settings.
To go to settings:

- Here you can select the category you want to change.

Adding Contacts
Gmail lets you save contacts in your address book so you don’t have to keep your email addresses in your head. You can also save additional contact information: phone numbers, birthdays and addresses.
To add a contact:
- From the Gmail drop-down menu, select Contacts.

- The contact page will appear. Click New Contact.

- Enter the person’s name and email address. You can also enter additional contact information. All changes will be automatically saved.

To change a contact:
- In the left menu bar, click My Contacts.

- Click on the contact you want to change.
- Now you can make any changes to the contact information.

By default, when you send an email to a new email address, Gmail adds this address to your contacts. By going to Contacts, you can edit this information.
Import mail and contacts
Perhaps you already have a contact list in another mailbox, and manually transferring it to a new mailbox will take a lot of time. Gmail allows you to import contacts from other email accounts, moreover, you can even import all your letters. You can import mail and contacts from many mail services, such as Yandex, Mail.
To import from another mail:
- Click the gear icon in the upper right corner of the page and select Settings.
- Go to the Accounts category and click on the Check mail from other accounts button (using POP3). Following the instructions on the screen, you can import your mail.

Opening Google’s Gmail email was initially perceived as an April Fool’s joke by many Internet citizens. After all, the launch date for the service fell on April 1, 2004. Rumors about the appearance of the second major Google project after the creation of a search engine alarmed the online community the day before. But despite the "mixed" opinions, this event heralded the era of new generation online mail. Today, more than 1 billion people from all over the world, while establishing communications with friends, comrades, business partners, report: “Send a letter to my Gmail, here is the address ...”.
The development of the electronic service has been ongoing for three years. Paul Buckheit, the author of the project, began work in August 2001 as directed by Google. However, according to Buckheit, he made the first developments of online mail without a system application back in 1996.
In the process of creating Google’s email service, they named Cariobu. So it was named after the utility created by Bakhaytom to search for letters in your own mail. Actually, at that time, this function was a proprietary feature of Gmail (now there are already much more of them).
The first two months, Paul pored over the mail code himself. And then with assistants. By 2004, the team of creators of the Google mail service has grown to 10 people.
Throughout its history, Gmail has undergone a variety of metamorphoses - both in code and in external design. Now he bears the honorary title of one of the best email on the network.
From this article, dear reader, you will learn how to log in to Google’s mail on a computer and mobile devices based on the Android and iOS operating systems, and how to use additional applications for monitoring letters.
Gmail on the computer
1. To enter the account, open the browser page - https://mail.google.com/mail/.
Note. If you use Google Chrome, open a new tab and click the “block squares” button. And then in the tiled menu that opens, select Gmail.


3. To enter the account, type in the login (email address) - “name” @ gmail.com. Click "Next."

Enter your password and click "Login."

Inbox Monitoring
If you use e-mail throughout the working day, enable the notification feature on the desktop. As soon as a new message arrives in your account, a Gmail.com pop-up notification will be displayed.
This setting is performed as follows:
Note. First of all, you need to log in to your account (log in).
1. In the upper panel, on the right, click the "Gear" button.

2. Select "Setup."
3. On the “General” tab, in the “Notifications on the desktop” section, with the mouse click turn on the radio button near the “Enable notifications of new messages” setting.


Work offline
(guide for Google Chrome)
This option is indispensable when you need to read received letters in a box on gmail.com in the absence of an Internet connection. It is configured as follows:
1. You need to open in your account: the "Gear" icon ("Menu" button in the upper right corner) → Settings.

2. Click the “Offline” tab and click on the link “Launch Gmail Offline”.

3. On the tab that opens, click the "Install" button to connect the addon for viewing messages offline to the browser.
4. In the modal window, confirm the command: select “Install application”.

5. To view received letters in the absence of an Internet connection:

- in the panel click "Services";
- in the tab that opens, select "Gmail Offline";
- click on the option “Enable offline mail”;
- to enter your profile ( [email protected]) through the addon, click "Continue".


7. To manage correspondence, click the “arrow” icon next to the “gear” on the upper right. And then with the mouse click select the required function (for example, enter "Unread").

Checker Plus for Gmail browser addon
(for Google Chrome)
Allows you to read new emails from gmail.com without opening the profile tabs. Supports management of multiple accounts. Uses only the necessary data. Does not send confidential information to third parties. Provides the user with the ability to enable voice or sound notification of a new message.
Displays photos of contacts (plus to this, you can attach your photo to the selected contact). Perfectly controls messages by tags. Able to work in the background: even when the browser window is closed, the notification system will still work. Has the ability to change the page zoom. Additionally it can be used as a widget for the “Awesome New Tab Page” extension.
To configure the addon checker for your profile on gmail.com, do the following:
1. Press the "Menu" button (three bars) in the browser panel.
2. Go: to the section "Settings" → "Extensions".
3. At the bottom of the list of connected add-ons, click the "More extensions" link.
4. In the online store, in the line "Search ...", type Checker Plus for Gmail.
5. Go to the application page and click “Install”.

6. After connecting, the checker icon will appear in the right corner of the browser. Click her.

9. Click the add-on icon again and start working with email.

Gmail on Android devices
Special applications are used to work in the Google email service account on Android mobile devices. Get to know them better.
Gmail
"Native" messenger service - created by Google Inc. Simple, reliable. Instantly reports emails sent. In it you can not only read messages, but also send them. Supports offline work. Equipped with internal search (by address, word). Automatically sorts mail by recipients (advertising letters, social networks). Reliably protects from spam emails: filtered messages are automatically transferred to the Spam folder. It can work with multiple accounts. Including with profiles of third-party services that support the POP / IMAP protocol - Mail.ru, Outlook.com, etc.
1. From the device’s home screen, go to the Google Play mobile application market.
2. In the search line, enter the query - Gmail.
3. Go to the messenger page. Tap "Install."

4. Allow the application to access the device’s data (identification data, contacts, files and photos): in the window that opens, click “Accept”.

5. At the end of the download and installation, tap "Open."
6. In the messenger window, run the "Go to Gmail" command.

7. Use the vertical menu and the top button bar to manage messages.

Inbox
A decent alternative to Gmail. Also developed by Google. It is designed to eliminate the stress of users from a huge stream of letters. Keeps important messages in sight and eliminates information junk. Analyzes correspondence through smart algorithms. Informs about all important events: without opening a profile, the user can find out about the delivery status of the parcel, transaction confirmation, flight delay.
Automatically groups letters by tags and thereby maintains an ideal order in correspondence. It has a function of reminding and postponing reading letters until a given time. It supports instant search of letters by request: it is very useful when you need to pick up ticket data, find a friend’s email. It is 100% integrated with Gmail: it has the same comfortable interface and a powerful spam filter.
1. In the Google Play store, find the Inbox app from Gmail.

2. Tap "Install", and then "Open."
3. Click “three bars” (button on the left side of the upper panel) to open the application control panel (message categories, Spam folder, options).

4. Tap "Settings" to change the messenger options (alerts, deletions, shortcuts, etc.).

Set up Gmail on iOS (iPad, iPhone)
In the iOS operating system, connection and authorization in the account of the Gmail mail service is carried out by regular means:
1. Click on the “Settings” icon on the gadget’s desktop.

2. In the panel, select the "Mail, Contacts, Calendars" section.

3. With a finger touch, run the Add Account ... command.
4. In the list of services, select Gmail.


7. In the panel that opens, if necessary, you can enable the options "Calendars" (Calendar) and "Notes" (Notepad).

9. Go to the home screen. Click the Mail icon.

10. In the window that opens, tap Gmail to go to the mail service account.

Enjoy using Gmail!