What to do if Windows becomes unstable - i.e. slowly, some glitches are periodically visible, some programs do not open and, perhaps, a lot of other crap is going on? As an option, look for the cause and do full system maintenance, namely, cleaning viruses and any accumulated system garbage, optimizing files on the hard drive, checking for errors, and much more (more details in the article “Review of methods and tools for increasing the performance of Windows OS”). But this will take quite a lot of time and most of the time, while all these maintenance tasks are being performed, you will not be able to really work on the computer. Therefore, you will have to use this option if you simply have a huge number of important files on your computer (documents, videos, photos and everything else), and most importantly, many of the programs you need are installed, and Windows is configured to suit your needs.
And if all the information from the computer can be quickly transferred somewhere, there are few programs installed and they can be quickly reinstalled, then it will be much easier to reinstall the system. In the latest versions of Windows (Windows 8, 8.1 and 10), you can reinstall directly from the already running system, and you can leave all your personal files intact. And now you will learn how to reinstall Windows 8.1 and Windows 10 from the system.
If you need to install a new operating system, for example, install Windows 8.1 instead of Windows 7, or install Windows 8 instead of Windows 10, then this method will no longer work, since a new installation will be required. To do this, you will already need an installation disk or flash drive with the required Windows, from which a new installation of the system will be carried out. This process is described in a separate article:
In any of the above versions of Windows (i.e. Windows 8, 8.1, 10), open the search and enter “Windows Update Settings” there. In the list of results, open the found link:
Further actions depend on the Windows you are using. , if you want to know how to reinstall Windows 8 or 8.1 and if you want to know how to install Windows 10 directly from the system.
How to reinstall Windows 8, 8.1 from the system
If you want to reinstall Windows 8 or 8.1, a window will open as in the image below, where you need to go to the “Recovery” tab:
Recover your computer without deleting files;
Removing all data and reinstalling Windows.
If you choose the first option, all system settings and parameters will be reset, all programs will be deleted (except those that were installed from the Windows store), BUT all your personal files and folders will remain in place! This method can be useful when there are some minor problems with the system, and then, by choosing this option, the system will be like new, and your files will remain in place. However, if you have significant problems with Windows, for example, there may be a severe virus infection, then this option may not help you. After all, after this option of reinstalling Windows 8 / 8.1, all your files will remain in place, which means there is a high probability that some viruses will remain in place and then you will not get rid of all the problems in the system.
If you choose the second option, a full reinstallation of Windows 8 / 8.1 will occur. with deleting everything that is on the computer’s hard drive(i.e. all your files and folders will be deleted!). Then, after reinstalling Windows, the system will be like new, without viruses and other problems. Only, having chosen this reinstallation option, do not forget to save all the files you need from your computer somewhere to another hard drive, for example, a flash drive, in online storage.
If you select both options, a message box may appear stating that some files required for reinstallation were not found:
In this case, you will still have to insert the installation disk or flash drive with the version of Windows that you currently have installed, and then the reinstallation process will continue.
If you choose the option "Remove all data and reinstall Windows", then a window will appear saying that all data will be deleted and the parameters will be reset. Click “Next”:
The next window asks you to choose whether to simply delete all your files or securely clean the disk. The latter is necessary so that the data cannot be recovered later, for example, if you give your computer to someone or dispose of it. If you just need to reinstall Windows 8/8.1, choose the first option.
In the next window we are again warned about exactly what actions will be performed. Click Continue:
Next, the computer will reboot and the reinstallation of Windows 8 / 8.1 will begin, deleting all your data. At first, everything will happen without your participation, and then, when the reinstallation is complete, you will be asked to configure the system:

That's all with the parameter settings. After this, the system itself will install all the necessary components and standard applications, without your participation. This will take a few minutes and the reinstallation of Windows 8 (8.1) will be completed. After this, Windows will start and you will see the desktop.
If you are reinstalling Windows 8/8.1, select the option “Restore your computer to file deletion databases”, a window will appear telling you what will happen to your computer: what data will be deleted and what data will be saved. Click Next in this window:
The next window will list all those programs that you will have to reinstall yourself, because after reinstallation they will not work. Click Next:
In the last window we see a message stating that everything is ready for reinstallation and click the “Update” button:
Next, the computer will reboot and the reinstallation of Windows 8 / 8.1 will begin without deleting your personal data! At first, everything will happen without your participation, and then, when the reinstallation is completed, you will be asked to configure the system: about that.
How to reinstall Windows 10 from the system
If you want to reinstall Windows 10 from the system, then after opening the Update settings, a window will open where you need to open the “Recovery” tab on the left and click the “Start” button:
Here you will have 2 options to choose from:
What each of these options means is described above (click on the appropriate links).
When you have made your choice, click on the desired option in the window:
If you selected the "Delete everything" option, then in the next window you are asked to choose - simply delete all your files or delete files with disk cleanup. The latter is necessary so that the data cannot be recovered later, for example, if you give your computer to someone or dispose of it. If you just need to reinstall Windows 10 from the system, choose the first option.
The next window will once again describe what exactly will happen to the computer, i.e. that all your personal data will be deleted and all settings will be reset. Click Continue:
Next, the computer will reboot and the reinstallation of Windows 10 will begin, deleting all your data. At first, everything will happen without your participation, and then, when the reinstallation is completed, you will be asked to configure the system: this has already been discussed.
By clicking the reset button, the computer will restart and Windows will begin reinstalling, preserving all your personal files. At first, everything will happen without your participation, and then, when the reinstallation is completed, you will be asked to configure the system, as described.
That's the whole reinstallation process. As you can see, reinstalling Windows 8, 8.1 and Windows 10 from the system is very simple and I think any beginner can do it. I hope I explained everything clearly :)
Reinstalling Windows 8 on Windows 7 is quite simple. To do this, you do not need to have any special skills or abilities.
The computer itself, as well as the distribution kit with the operating system, is enough. Installation can be performed from various media: hard drive, CD or USB flash drive. This feature makes the process in question especially simple.
Why is reinstallation necessary?
Sooner or later there comes a time when it becomes necessary to reinstall the operating system. There are many reasons for taking this action.
But most often this needs to be done in the following situations:
- as a result of rash actions, a virus or Trojan was introduced onto the personal computer, killing the OS;
- for some reason a newer version of the OS is needed;
- the disk is heavily fragmented, a large number of fatal errors have accumulated;
- The OS is unofficial.
Most often, a new installation is required if the personal computer begins to work very slowly and it is not possible to cope with this problem by cleaning the OS using specialized utilities. It is also not uncommon for a prerequisite for the normal operation of any application or program to have an updated or new version of the operating system.
BIOS setup
One of the most important steps in installing Windows is setting up the BIOS. It is required when installation is performed from a disk or flash drive. In order to start the installation, you must first go into the BIOS itself. There is no universal way to perform this operation. It all depends on the specific BIOS manufacturer or laptop model.
Most often, modern PCs have BIOS installed from the following manufacturers:
- ALR (Advanced Logic Research) – F2, Ctrl-Alt-Esc;
- AMD (Advanced Micro Devices) – F1;
- AMI (American Megatrends) – DELET, F2;
- Award – DELET;
- Phoenix – Ctrl-Alt-Esc, Ctrl-Alt-S.
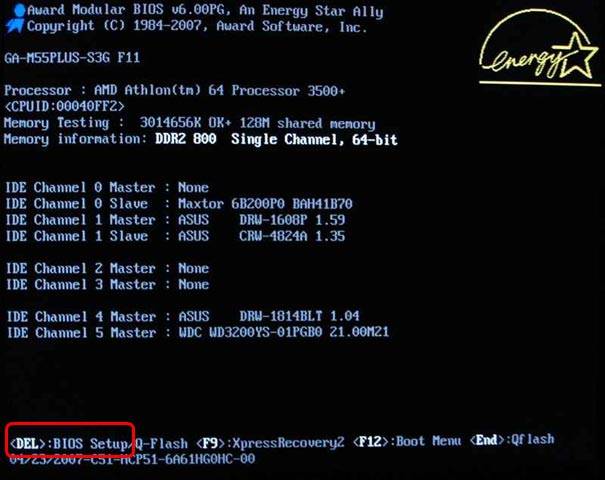
It is quite simple to determine which specific Bios is available under the cover of the system unit: after turning on the power of the PC, a logo and a corresponding inscription are usually displayed on the screen. Each manufacturer has it individually. Having entered the special boot settings menu through BIOS, you need to set the first device to be the one used for booting.
Each Bios menu is individual:

After selecting the required device, you need to restart the PC. The changes are saved immediately, after which you can safely proceed with the installation.
The process of reinstalling Windows 8 to 7
In some cases, a new operating system is not a good thing. Since not all PCs have sufficient performance for comfortable work. It is in such cases that it is necessary to reinstall Windows 8 to a similar OS, but version 7.
A very important feature of OS version 8 is the need to disable a special protection system to perform various manipulations with it.
This can be done through BIOS by going to the corresponding menu item:

- go to Bios;
- find the item called “SecureBoot”;
- set the value to “Disabled”.
You also need to replace the value of the “BootMode:

- go to the “Advanced” -> “System Configuration” section;
- Change the “Boot Mode” parameter from “UEFI Boot” to “CMS Boot”.
Without performing this operation, it will be impossible to launch version 7.
After the protection is disabled, you can proceed directly to the installation. It is done as follows:
- a special, pre-prepared flash drive is inserted into USB2.0;
- the computer restarts and the initial boot window opens, where you can select the language, layout, and time format;
- After clicking the button, you can then proceed directly to the installation process - just click on “Install”;
- in the window that opens, select the installation method - full installation or update;
- When choosing, you need to choose the device that has sufficient unallocated space.
Video: Installing Windows 7
Partitioning the hard drive
After completing all the above steps, Windows7 will automatically convert to standard MBR. You can also perform this conversion manually. To do this, press the key combination Shift+F10. This conversion is performed through a special command line.
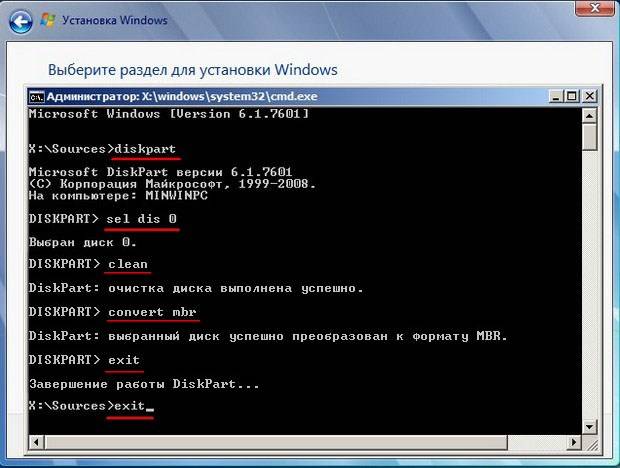
You must enter the following commands:
- diskpart;
- seldis 0;
- clean;
- convert mbr;
- exit;
- exit.
After the above operation is completed, you need to click the “update” button. A new section will appear in the corresponding window.

The second method of creating a partition is the standard one.
To implement it, you must perform the following steps:

The operating system will automatically carry out all necessary operations. This method is the simplest and fastest. It will be useful for less experienced users who do not know how to use a special console. The only drawback is the inability to save a second operating system.
There are some features associated with MBR - they impose some restrictions on the use of equipment and the ability to implement certain actions.
The most important features include:
- the boot record is located in the first sector - 512 bytes;
- After the boot sector there is information about the main partitions (placed according to the LBA scheme).
It is in LBA that the most important problem lies - this scheme does not allow the use of hard drives larger than 2 TB. Which is a big problem today, since many PCs (even portable ones) are equipped with similar hard drives. Please keep this limitation in mind.

Another limitation associated with MBR is the inability to use more than 4 partitions at the same time. But such a nuisance can be dealt with quite simply; it is enough to make the “extra” “placeholders” - extended sections. But this method of solving the problem can lead to some inconveniences precisely in the case of installing several operating systems.
Very often, when using MBR, data integrity problems arise. Since the information is placed in a single array. And the presence of bad sectors makes it impossible to access all other information.
Continue with installation
When all the above operations are completed, the standard Windows installation begins.
It includes the following steps:
- copying files;
- unpacking;
- installation of components;
- installing updates;
- installation complete.

The completion of each stage is displayed on the computer screen as a percentage. This allows you to estimate the total amount of time that will be spent on completing the operation. Once the installation is complete, you will need to restart your personal computer for the changes to take effect.
After the reboot, you will need to enter in the newly appeared window:
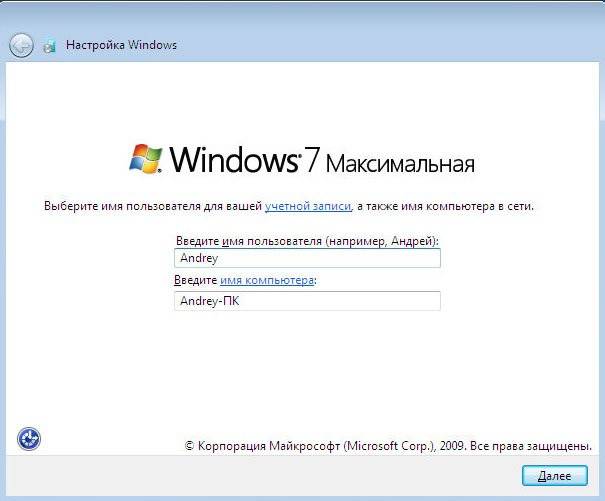
- Username;
- computer name.
When all the required fields are filled in, click the “next” button. A window will open in which you can set a password for the administrator account, as well as a hint for this password. It is recommended that you set a password, which will make it possible to protect your PC as much as possible from use by unauthorized persons.
The next step is to enter the registration key. It is usually found on the bottom of the disc box containing the operating system. If you don’t have a key, you can simply not enter it, and Windows will start in test mode. It has no restrictions on functionality, but its validity period is only 30 days, after which it will be necessary to activate it.

By clicking on “Next”, the user will see a window for setting up the protection of their personal computer. The system recommends choosing the first item, but if you have some experience, it is still recommended to postpone the decision. Since some default settings are not entirely convenient. They somewhat limit the capabilities of the computer.
The penultimate step is setting the date and time. Using special tools you can choose:

All operating systems, regardless of version, have both their advantages and disadvantages. That is why it is often necessary to reinstall a later version to an earlier one. This process has a very large number of different nuances. For the most part, they are all related to dividing disks into separate partitions, as well as other features of various kinds.
Installation of Windows of any version is as automated as possible. This allows you to perform it even if you have no experience in performing such operations. All you need to do is get a working distribution and all the necessary drivers.
>Any operating system can be subject to virus attacks, or various problems caused by inept user actions: when installing drivers and utilities, when removing some Windows components, intentionally or accidentally. In some cases, it is not possible to correct the situation using conventional methods, such as treating the computer for viruses or using system recovery functions. And you have to resort to methods such as reinstalling Windows 8 on your computer or laptop.
There are several options for reinstalling Windows 8 on a laptop. The first and probably more correct is a clean installation of the system with full formatting, from bootable media. Or, as it is also called, installing Windows via BIOS, although this is not a very correct name.
And the second option is to reinstall Windows 8 using the built-in “Recovery” function. Where is it possible to Restore Windows to its original state, deleting all files and applications. And also save all user files, but reinstall Windows to the state at the time of the first launch. This option will work if Windows boots, but for some reason you need to reinstall it.
Reinstalling Windows 8 without a boot disk
So let's get started.
- We go to the system parameters menu; to do this, you need to move the mouse cursor to the lower right corner of the monitor so that the toolbar appears. Click on the settings icon. Here we are interested in the point “ Change computer settings».

- Next, switch to the tab “ Update and recovery».
- And the next point is “ Recovery».
- Here we can see several categories - “Recovering a computer while saving all personal files” - (all programs, utilities and applications installed by the user for the entire period of using the computer will be deleted). And the option is to delete all information and return the computer to its original state at the time of installation.
- Select the second item and click the button “ Begin" Why the second one? Because in this way we will perform a full reset and restore the system to its original state.

- Next, a warning will appear that all files and applications will be deleted - confirm.

- Next you need to select the option, completely clean the disk or reinstall Windows, select the first option.

- Click " Continue", then the computer will restart and the process of returning Windows 8 to its original state will begin. This may take about half an hour or a little more.

- At the final stages, as in a regular Windows 8 installation, you need to make settings, language and regional settings, security settings, and others.

- Further, the final stages of installation will be accompanied by messages about the installation progress on a background that changes brightness. (The pleasure, let’s say, is not quick, even though the messages say that everything is about to happen soon). Until the desktop loads.

Clean reinstallation of Windows
The more preferable method, of course, is to reinstall Windows 8 on a laptop or computer using installation media. In this case, you can format the system disk and install a completely clean OS. But for this method, you need to burn the Windows 8 image onto bootable media. For owners of the licensed Windows 8 operating system, you can use the MediaCreationTool utility, which can be downloaded from the official Microsoft website
You can find out more about how to create it here. And also, here you can read how to do it on a computer or laptop. Try it, experiment, in fact, everything is much simpler than it seems.
@
How to reinstall Windows 8 on a laptop. Hello admin, my problem is the following. I bought a laptop with Windows 8 installed for one language (Windows 8 Single Language), which I successfully demolished and installed Windows 7. I used your article for instructions. Now I’ve changed my mind and want to install Windows 8 again, but I don’t want to install the exact version that was preinstalled on the Windows 8 Single Language laptop. I have a licensed disc in a box of Windows 8 Professional 64-bit Rus (OEM) with a key, I bought it in a store, that is, everything is as it should be. But, when I try to install this version of Windows 8 Professional 64-bit Rus (OEM), the message “The entered product key does not match any of the Windows images” appears on the laptop.
The second option for reinstalling Windows 8 on a laptop
We will install a different edition of Windows 8 on our laptop, namely, we will use the existing Windows 8 Professional 64-bit Rus (OEM) disk.
Why, when installing a different edition of Windows 8 on a laptop, does the error “The entered product key does not match any of the Windows images” appear? ? Because information about the Windows 8 Single Language installed by the laptop manufacturer and its key is stored in the UEFI BIOS.
But all professionals know that there is such a file (EI.cfg) and a product identifier file (PID.txt) - these are additional configuration files that can be used during the Windows installation process to specify the product key and edition of Windows!
Attention friends! In simple words, when installing, the Windows 8 installer program first accesses the EI.cfg configuration file (it specifies the edition of Windows 8 being installed) and the PID.txt file (it specifies the key of Windows 8 being installed). If these files are not present, Windows 8 reads information about the system version and its key in the UEFI BIOS of your laptop, and this key is from the Windows 8 Single Language installed by the manufacturer (for one language), and this is where the error comes out. So, friends, we will independently create these two files (EI.cfg) and product identifier (PID.txt) and indicate in them information about the Windows 8 Professional 64-bit Rus (OEM) we are installing, then we will place them in the sources folder Windows 8 distribution, that's all.
How to do it?
1) For example, I have a licensed disk with Windows 8 Professional 64-bit Rus (OEM) or its image in ISO format. So the easiest way for me is to create a bootable USB flash drive for Windows 8.
- Attention! If you reinstall Windows 8 with the UEFI BIOS enabled, then the Windows 8 bootable USB flash drive must be UEFI, how to create it and how to configure the UEFI BIOS itself to reinstall Windows 8, read in our article, this method involves creating a bootable USB flash drive using command line. Know that using such a flash drive you can reinstall Windows 8 on a laptop with a simple BIOS. So, we have created a flash drive, now we create two system installation configuration files (EI.cfg) and (PID.txt) and add them to the “sources” folder of the Windows 8 distribution.
- Note: Windows 8, 8.1 can be installed using a simple ISO image, but then you need to add the above-mentioned files (EI.cfg) and (PID.txt) to it, sometimes it will even be enough to add just one pid.txt file to the sources folder with Windows key. You can find out exactly how you can add files to the installation disk or image of Windows 8, 8.1 from our article
Despite all the advantages of Windows 8, it, like all other operating systems, is not immune to system failures. Computer glitches, errors and viruses lead to the fact that many users begin to think about getting rid of it as soon as possible. However, before you completely demolish Windows, you should consider reinstalling the Windows 8 OS that came pre-installed on your laptop. Even a first-grader can cope with this, and all because such a process is easy to perform using the software built into Windows.
General method to reinstall Windows 8 OS
The tools built into Windows 8 today allow you to revive the operating system in 2 ways:
- by restoring the original Windows settings (while preserving user media files (photos, audio and video) and programs installed from the Windows Store);
- through a complete reinstallation of the operating system (deleting all data from the laptop).
In both the first and second cases, we need to go to the “PC Settings” menu. To do this, press +C on the keyboard, thereby giving the opportunity to appear on the Charms bar screen. In it we find and click the “Parameters” tab, and then select the “Change parameters...” item in the new menu:

As a result, the “PC Settings” window we need should appear. Now all that remains is to find the “General” section in it, open it and select the required Windows 8 recovery option:

As a result, by clicking the “Start” button, the reinstallation of Windows 8 on the laptop will start:

All that remains is to follow the system prompts until the recovery process is completed.
Options for different laptop models
It is easy to notice that if Windows 8 does not start at the time of reinstallation, it will not be possible to reinstall it using the general method. What to do in this case? Use the standard recovery utility installed on the laptop. It will delete all user data from the hard drive, format the system partition and reinstall Windows 8. What is required for this? A working hard drive, not formatted since the laptop was purchased, well, a little time to run the recovery utility.
Instructions for Toshiba
To launch the recovery utility simultaneously with the system boot, press the F8 button on the keyboard and click “Troubleshoot computer problems” in the additional boot options window that appears. Next we proceed like this:

Instructions for ASUS
To reinstall Windows 8 on an ASUS laptop, reboot the system and press the F9 button on the keyboard when starting again. As a result, the Backtracker utility should launch. Then in the first window that appears, select System Recovery and click the Start button to start the data recovery process.
The next step is to select the Restore the system option (completely removing all data from the hard drive):

Instructions for Samsung
The recovery utility on a Samsung laptop is called Recovery Solution and is launched by pressing the F4 button when the operating system starts. Working with it is almost as easy as with analogue programs installed on computers from other manufacturers. So, after the utility loads, click the “Restore” button, and then select a restore point in a new window:


After its completion, all that remains is to restart the laptop and wait until the utility installs the necessary components for Windows 8.
Instructions for HP and Acer
How to reinstall Windows 8 on a Hewlett Packard laptop using the recovery utility? Almost the same as on PCs from other manufacturers. First, restart the HP laptop and press the F11 key on the keyboard when starting again. Next, select the option to restore the system to its original state in the HP Recovery Manager window that opens and create (if necessary) a backup copy of the hard drive data:

By clicking “Next”, at the request of the utility, we disconnect all external devices connected to the laptop, including a flash drive and an optical mouse. After clicking the “Next” button again, Recovery Manager will begin a step-by-step reconstruction of the preinstalled Windows 8 image, namely:
- re-formats the hard drive;
- copy installation system files to the laptop;
- will reinstall the software components included with the system.
What are we doing? We wait for the recovery to complete, click “Finish” and reboot the laptop:

As a result, Windows 8 will restart, returning the laptop to factory settings. Note that the procedure is almost the same when setting up the system on an Acer laptop. If you wish, you can read the separate instructions for it.
In general, the process of reinstalling (restoring) Windows 8 on different laptop models is almost identical. The only thing that is required from users is to carefully follow the prompts of the Recovery utility.