Here are 5 frequently asked questions about photography by aspiring photographers.
How to avoid blurry images?
Here are a few tricks to help you avoid blurry photos.
Use the right shutter speed. There is one simple rule for calculating shutter speed, knowledge of which will help you take clear pictures when photographing without a tripod. If you are using a 50mm lens, then the maximum shutter speed is approximately 1/50s, if you are using a 100mm lens, then you are talking about a speed of 1/100s, and so on (This rule also works for focal lengths that have been converted from film to 35 mm).
Bring a tripod. Everything seems logical, but many people simply leave it at home. Tripods can be bulky and heavy, or they can be completely light and mobile. Dimensions do not affect its effectiveness in any way, so everyone can choose something for themselves.
Use a remote shutter release, or the timer function in combination with a tripod. This will definitely guarantee that your camera will not shake while shooting.
Understanding Image Size and Resolution
The size of the image and its extensions are often presented in difficult-to-perceive units. Below is a brief overview of the most commonly used units
- File size, depends on the compression format used to save the image. The file size is indicated in KB, or MB. The image in the picture above is a TIFF compression of about 41.4 MB. The same image compressed in JPEG format will require 15 MB. File size can vary greatly.
- Image Size In pixels, we are talking about the height and width of the image captured by the camera. The Nikon D70 produces images of 3008 x 2000 pixels (that is, 6.1 million pixels, or 6 megapixels). Here, the basic rule is the more, the better.
- Permissions, counted in points per inch (PPI). The resolution of photographs taken on Nikon D70 is 300 pixels (dots) per inch, that is, when printing the image we get:
- 3008/300 × 2000/300 = 10.02" x 6.66" (24.46 cm x 16.93 cm)
- When printing a single image on an inkjet printer, at 180 pixels per inch, the image size will be: 3008/240 × 2000/240 = 12.53" x 8.33" (31.83 cm x 21.17 cm).
- Printers (and other output devices) have a resolution, which is specified in DPI (dots per linear inch). Typically, an inkjet printer has a resolution between 1400 and 5760 pixels per inch. However, the result is only 180 to 360 dpi, due to halftone dithering. Inkjet printers are the most optimal printing devices for digital photographs.
- Prepress still uses LPI (lines per inch) resolution devices.
- Monitors have a resolution of 72 to 100 pixels per inch (72–100 ppi).
- Constrain Proportions: Always use this option, it will help avoid distortion of your photo.
- Resample Image: This option is used to obtain a larger or smaller version of the image, but when enlarged it leads to a noticeable loss of quality. If you disable this option, the image data remains unchanged and only the physical output size (when printed) changes.
What does the Rule of Three say?

The Rule of Three, a compositional rule in the visual arts, is used in painting, photography and design. The rule states that any image can be divided into nine equal parts, can be divided along a horizontal or vertical line, and most importantly, that the main compositional elements must be located along these lines, or at their intersection. Proponents of this rule argue that such alignment of objects gives the photograph more tension and attracts the viewer's attention, much more than the usual centering of the object.
Understanding Lab Color

Lab Color is an independent program for performing color transformations. It does not depend on how peripheral devices such as a monitor, scanner, or camera recognize colors. It is directly related to the most advanced optical instrument - the human eye. Lab Color is used to describe the entire spectrum of colors that people distinguish.
Lab Color uses three color channels, the L channel - which contains all the brightness information, and two color channels - A and B.
The L channel has 100 possible values, from zero, which is black, to 100, which is white.
Channel A consists of magenta and green. A negative value, which ranges from -128 to -1, represents the color green, and a positive value, from 0 to 127, represents the color magenta.
Channel B is responsible for yellow and blue. A negative value, from -128 to -1 indicates blue, a positive value, from 0 to 127, indicates yellow. You can control these channels independently of each other and use them creatively to make your photos even more attractive.
What is a Histogram?

Histograms are useful in determining the exposure of a photo. A histogram is a graphical representation that shows the number of pixels in an image between absolute white and absolute black.
When shooting, it is very important to be able to read the histogram correctly because it gives you a true idea of what your camera captured. Each camera displays a histogram differently, but the basic information is the same. Some cameras show a separate histogram for each color channel - green, red and blue, as well as for the entire image. The histogram shows which color range your image falls into.
- Image size. Physical, logical size and resolution
- Resize the image. Image Size command. The concept of resampling.
Image size. Physical, logical size and resolution.
Image File Size is the physical size of the file in which the image is stored. It is measured in kilobytes (KB), megabytes (MB), or gigabytes (GB). The file size is proportional to the pixel dimensions of the image. The higher the number of pixels, the more detailed the image obtained when printed. However, storing them requires more disk space and slows down editing and printing. Thus, when choosing a resolution, a compromise must be made between image quality (which must contain all the necessary data) and file size.
Another factor that affects file size is its format. Due to differences in compression methods used in the GIF, JPEG, and PNG file formats, file sizes with the same pixel dimensions can vary greatly. The bit depth of the color and the number of layers and channels also affect the file size.
Photoshop supports maximum image pixel dimensions of 300,000 horizontal and vertical. This limitation determines the maximum permissible size and resolution of the image on the screen and when printing.
About pixel sizes and resolution
The pixel dimensions (image size or height and width) of a bitmap image are a measure of the number of pixels across the image's width and height. Resolution is a measure of the clarity of detail in a raster image and is measured in pixels per inch (ppi). The more pixels per inch, the higher the resolution. In general, a higher resolution image results in a higher quality print.
The same image at 72-ppi and 300-ppi; increased to 200%
The combination of pixel size and resolution determines the amount of image data. If the image has not been resampled, the amount of image data remains the same when the image or resolution is changed individually. When you change a file's resolution, its height and width are changed so that the amount of image data remains the same. The same thing happens when you change the height and width of the file.
Photoshop allows you to define the relationship between image size and resolution in the Image Size dialog box (Image > Image Size). Clear the Interpolation option as there is no need to change the amount of image data. Then change the height, width or resolution of the image. When one of the values changes, the others will be brought into line with the first.
A. Dimensions in pixels are equal to the product of the dimensions of the output document and the resolution.
B. Original dimensions and resolution. Reducing the resolution without changing the pixel dimensions (without resampling).
B. Reducing the resolution while maintaining the same document dimensions leads to an increase in pixel dimensions (resampling)
Resize the image. Resampling.
Changing the pixel dimensions of an image affects not only its size on the screen, but also the quality of the image on screen and when printed, that is, the print size or image resolution.
- Select Image > Image size.
- To save the current ratio between height and width in pixels, select Maintain Aspect Ratio. This function automatically changes the width when the height changes and vice versa.
- In the Dimension fields, enter values for width and height. To enter values as a percentage of the current dimensions, select percentage as the unit of measure. The new image file size appears at the top of the Image Size dialog box (the old size is in parentheses).
- Make sure Interpolation is selected and select an interpolation method.
- If your image has layers with styles applied to it, choose Scale Styles to scale the effect of the styles on the resized image. This feature is only available if Maintain Proportions is selected.
- When you have finished changing the settings, click OK.
For best results when creating a smaller image, downsample and then apply the Unsharp Mask filter. To create a larger image, rescan the image at a higher resolution.
Resampling changes the amount of image data when changing its pixel dimensions or resolution. When downsampling (reducing the number of pixels), the image loses some information. When resampling (increasing the number of pixels or increasing the resolution), new pixels are added. The interpolation method determines how pixels are removed or added.
Pixel resampling
A. Downsampling
B. No change
B. Resampling (selected pixels are displayed for each set of images)
Keep in mind that resampling may result in reduced image quality. For example, resampling an image to a larger pixel size reduces its detail and sharpness. Applying the Unsharp Mask filter to a resampled image can sharpen details in the image.
You can avoid resampling by scanning or creating images with a sufficiently high resolution. To view the results of resizing in pixels or printing proofs at different resolutions, resample a duplicate of the original file.
Photoshop resamples an image using interpolation techniques, assigning color values to new pixels based on the color values of existing pixels. You can select the method to use in the Image Size dialog box.
In neighboring A fast but less accurate method that follows the pixels of an image. This technique is used in illustrations that contain unsmoothed edges to maintain crisp edges and create a smaller file size. However, this method can create jagged edges that become noticeable when you distort or scale the image, or perform many selection operations. Bilinear This method adds new pixels by calculating the average color value of surrounding pixels. It produces results of average quality. Bicubic A slower but more accurate method based on analyzing the color values of surrounding pixels. By using more complex calculations, bicubic interpolation produces smoother color transitions than neighbor interpolation or bilinear interpolation. Bicubic, smoother A good method for image enlargement based on bicubic interpolation, designed specifically to produce smoother results. Bicubic, clearer A good method for reducing image size based on bicubic interpolation with increased sharpness. This method allows you to preserve the details of the resampled image. If Bicubic Sharper interpolation makes some areas of the image too sharp, try using Bicubic Interpolation.You can specify the default interpolation method to use when resampling image data in Photoshop. Choose Edit > Preferences > General (Windows) or Photoshop > Preferences > General (Mac OS), and then choose a method from the Image Interpolation menu.
In preparation images for printing It is useful to set the image size by specifying the print dimensions and image resolution. These two parameters, called document size, determine the total number of pixels and therefore the file size of the image. The document size also determines the base size of the image when placed in another application. You can control the print size using the Print command, but changes made by the Print command will only affect the printed image—the image file size will not change.
If resampling is used for a given image, you can change the print dimensions and resolution independently of each other (thereby changing the total number of pixels in the image). If resampling is turned off, you can change either the image dimensions or resolution - Photoshop will automatically change the remaining value, maintaining the total number of pixels. In general, to obtain the highest quality print, you should first change the dimensions and resolution without resampling. Only then, if necessary, can resampling be performed.
- Choose Image > Image Size.
- Change the pixel dimensions, image resolution, or both.
- To change just the print dimensions, or just the dimension and proportionally change the total number of pixels in the image, choose Interpolation, and then choose an interpolation method.
- To change the print size and resolution without changing the total number of pixels in the image, do not select Interpolation.
- To save the current ratio between the height and width of the image, select "Save Aspect Ratios". This function automatically changes the width when the height changes and vice versa.
- In the Print Size field, enter the new height and width values. If necessary, select a new unit of measurement. Note that the Width field in the Columns feature uses the width and spacing between columns specified in the Units and Rulers settings.
- Enter a new value in the Resolution field. If necessary, select a new unit of measurement.
To restore the values in the Image Size dialog box to their original values, Alt-click (Windows) or Option-click (Mac OS) the Restore button.
Resizing and rotating the canvas. Canvas Size command.
Rotate or flip the entire image
You can use the Rotate Image commands to rotate or flip the entire image. These commands cannot be applied to individual layers, slices of layers, outlines, or the borders of selections. You can rotate a selection or layer using the Transform or Free Transform commands.
Rotate images
A. Flip the canvas horizontally
B. Original image
B. Rotate the canvas vertically
D. Rotate 90° counterclockwise
D. 180°
E. Rotate 90° clockwise
From the Image menu, choose Image Rotation, then from the submenu, choose one of the following commands.
- 180° — Rotate the image by 180°.
- 90° clockwise — Rotates the image 90° clockwise.
- 90° counterclockwise — Rotates the image 90° counterclockwise.
- Freely—Rotate the image by a specified angle. When you select this option, you must enter an angle between 359.99 and 359.99 degrees in the text box. (In Photoshop, you can set the rotation to clockwise or counterclockwise using the CW or CW options.) Click OK.
Note. Rotating an image is a permanent edit that changes the actual information of the image file. If you want to rotate an image for viewing without making permanent changes, use the Rotate tool.
Changing the Canvas Size
The canvas size is the full editable area of the image. You can use the Canvas Size command to increase or decrease the size of the image canvas. Increasing the canvas size adds space around the existing image. When you reduce the canvas size, the image is cropped. When you increase the canvas size of an image with a transparent background, the added area will be transparent. If the image does not have a transparent background, the color of the added canvas will be determined in various ways.
- From the Image menu, select Canvas Size.
- Perform one of the following actions.
- Enter the canvas dimensions in the Width and Height fields. From the pop-up menus next to the width and height fields, select the units of measurement you want.
- Select the Relative option and enter an amount to add to or subtract from the current canvas size. Enter a positive number to increase and a negative number to decrease the canvas size by the specified amount.
- To get an anchor point, click the square that shows the desired location of the existing image on the new canvas.
- Select an option from the Canvas Extension Color menu.
- “Basic color” - fills a new canvas with the current primary color
- “Background” - fills a new canvas with the current background color
- “White”, “Black” or “Grey” - fills the new canvas with the corresponding color
- “Others” - select a color for the new canvas from the color palette
Note. You can also open the color picker by clicking the square to the right of the Canvas Extension Color menu.
The Canvas Extension Color menu is not available if the image does not have a background.
- Click OK.
Original canvas and base color canvas added to the right side of the image
Crop the image. Crop tool.
Cropping is cutting off parts of an image for the purpose of focusing or improving composition. You can crop an image using the Frame tool and the Crop command. In addition, you can trim pixels using the “Straighten and Crop” and “Trim” commands.
Using the Frame Tool
Crop an image using the Crop tool
Crop an image using the Crop command
- The part of the image that you want to save is selected using the selection tool.
- From the Image menu, select Crop.
Crop an image using the Trim command
Crop using the Trim command removes unwanted elements differently than using the Crop command. You can crop an image by clipping out surrounding transparent pixels or background pixels of a specific color.
- From the Image menu, select Trimming.
- In the Trim dialog box, select an option.
- Selecting the Transparent Pixels-based option removes transparency from the edges of the image and leaves the smallest image made up of opaque pixels.
- Selecting Top Left Pixel Color removes the area that matches the color of the top left pixel in the image.
- Selecting the Bottom Right Pixel Color option removes the area whose color matches the color of the bottom right pixel in the image.
- Select image areas to remove: top, bottom, left or right
Transforming Perspective When Framing
One of the parameters of the Frame tool allows you to transform the perspective of the image. This feature is useful when working with images that contain keystone distortion. Keystone distortion occurs when photographing an object from an angular angle. For example, if a tall building is photographed from ground level, the top of the building will appear narrower than its base.
Perspective Transformation Steps
A. Mark the original crop area B. Align the crop area with the edges of the object C. Extend the crop boundaries D.
The resulting image
The calculators in this article are devoted to the topic of printing digital photographs.
The first calculator helps you select a photo format for printing an image of known dimensions. Let's formulate the problem.
Given: We have a digital image of sizes known to us, for example, 3264 by 2448 pixels, and a set of standard formats offered by photo printing services. The format determines the linear dimensions of the photograph, for example, a 10x15 photograph has dimensions of 102 by 152 millimeters.
Required: Select from a set of formats the largest possible on which you can still print the image without losing quality.
To set photo formats, I created a separate reference book Photo formats, which can be expanded if necessary.
The only special knowledge that you need to have to find the answer is the knowledge that high-quality printing of a digital image requires a resolution of at least 300 dots (pixels) per inch (300 dpi), and more or less acceptable printing is possible with a resolution of at least 150 dots per inch. inch (150 dpi). Everything else is simple mathematical operations.
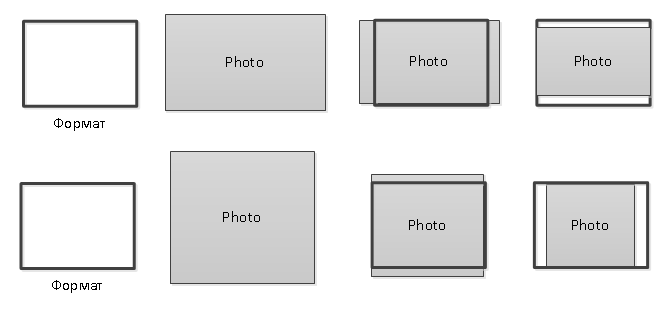
Graphically, the task is shown in the figure below.
The logic of finding the answer is simple - the linear dimensions of each format are converted into inches and then into pixels, based on the fact that there are 300 (150) pixels in one inch. Next, the resulting number is compared with the size of the image (there are certain nuances related to the ratio of height and width, but more on that in the second part). If the format size in pixels is larger than the size of our image (in the picture - the format to the right of the photo), then it will no longer work, because the photo will have to be stretched, and we will get a resolution worse than 300 (150) dpi. If the format size is smaller than the size of our image (in the picture - the format to the right of the photo), then it will fit - the photo will have to be compressed, and we will get a resolution better than 300 (150) dpi.
Of all the suitable formats, the calculator selects the maximum size format (there are no problems with printing smaller images - as far as I understand, you can print with a resolution of 1200 dpi).
Format size in pixels for 300 dpi resolution
Format size in pixels for 150 dpi resolution
The second calculator uses the dimensions of the already printed photograph and the dimensions of the original image to help determine the resulting resolution of the photograph and the part cropped out when scaling. Let's formulate the problem.
Given: An image of known dimensions is printed on a photograph of known dimensions. Since the value of the ratio of the height and width of the image and the value of the ratio of the height and width of the digital image, as a rule, do not coincide, when printing the image is scaled, obviously while maintaining the proportions. This is shown graphically in the figure below.
When scaling, as you can see, two options are possible:
the first is scaling with loss of part of the image,
the second is scaling, preserving the entire image, but leaving empty space in the image.
As an esthete, I chose the first option for calculations.
Thus, the first thing is required: to find the resulting resolution of the image and the part of the image that was not included in the image. Second, accordingly, this will be the difference between the used width (height) and the original width (height) of the image.
Width of the printed image, cm
Height of the printed image, cm
Sometimes it happens that you need to resize an image. The reason for this could be many factors. Firstly, the higher the resolution of a photo, the larger its size, and such files can be problematic to store on your device. Secondly, if you need to upload a photo via the Internet, problems may arise, because some file hosting services have a maximum permissible photo size limit.
That’s why in this article we’ll talk about how to change the resolution of a photo. This may come in handy when working on a computer, so let's get started.
What is permission
First of all, let's understand what permission is. And the term is basically simple: resolution is the number of pixels vertically and horizontally in an image.
As you know, the more pixels a photo has, the larger its size. However, nowadays there are an innumerable number of programs that can reduce the size of an image, thereby reducing its size without losing quality. Well, now let’s talk in more detail about how to change the resolution of a photo.
I would also like to say that if the number of pixels is reduced relative to the original value, the photo will not lose quality, but if the same value is increased, the difference will become noticeable.
Method number 1. Paint
Everyone is probably familiar with the Paint program. But despite its small number of functions, it can help in changing the resolution of a photo.
So, let's say you have a photo with a resolution of 3,000 by 4,000, and you want to reduce that number by half. To do this, open Paint. You can use the search by calling it using the Win + Q keys. There, immediately click on “File” and select “Open”. In the explorer that appears, indicate the path to the required photo and click “Open”.
You now have your photo in front of you. To change its resolution, click “Resize”. This button is located on the top panel next to “Select”.
Now a small window has opened, in which you first need to select in what quantities the size will be changed. There are two options to choose from: pixels and percentages. Let's choose the first one. Now you need to check the “Maintain proportions” checkbox, this will prevent the photo from becoming narrowed or flattened.
Now you can start resizing. Since we initially wanted to reduce the photo by half, we entered the value 2,000 in the “Horizontal” field. You probably noticed that the “Vertical” field filled in by itself, this is due to the fact that the “Keep proportions” checkbox is checked "

Now click OK and we can safely save the photo in a new size: “File - Save”.
This was the first way to change the resolution of a photo - in Paint, now let's move on to the second.
Method number 2. Adobe PhotoShop
Now we move from small to large, more precisely from Paint to PhotoShop. Of course, these are two but they are nothing alike, however, this approach will not be radically different from the previous one.
So, let's start figuring out how to change the resolution of a photo in PhotoShop. First you need to open it. Immediately after that, click "File" and then "Open" and navigate to your photo.
Now click on the “Image” item on the same toolbar. In the list, select the line “Image size...”. Or you can simply press the key combination Alt + Ctrl + I.
In the window that appears, immediately check the box next to “Keep proportions.” And in the “Dimension” column, select “Pix.” from the drop-down list. Now feel free to resize the photo.

Now you know how to change the resolution of a photo without losing quality using PhotoShop.
Conclusion
As you may have noticed, you don't need to know much to change a photo. Anyone can perform the above manipulations, and in the end you will get what you want: the photo will change, but the quality will remain the same, and the file size will be noticeably reduced. We hope the article gave you the answer to the question of how to change the resolution of a photo.
Resolution (computer graphics)
Permission- a value that determines the number of points (raster image elements) per unit area (or unit length). The term is usually applied to images in digital form, although it can be applied, for example, to describe the grain level of photographic film, photographic paper, or other physical media. Higher resolution (more elements) typically provides more accurate representations of the original. Another important characteristic of an image is the depth of the color palette.
Typically, the resolution is the same in different directions, resulting in a square-shaped pixel. But this is not necessary - for example, the horizontal resolution may differ from the vertical one, and the image element (pixel) will not be square, but rectangular.
Image Resolution
Raster graphics
Resolution is mistakenly understood as the size of a photograph, monitor screen or image in pixels. The dimensions of raster images are expressed as the number of horizontal and vertical pixels, for example: 1600×1200. In this case, this means that the width of the image is 1600 and the height is 1200 pixels (such an image consists of 1,920,000 pixels, that is, approximately 2 megapixels). The number of horizontal and vertical dots may vary for different images. Images, as a rule, are stored in a form that is most suitable for display on monitor screens - they store the color of the pixels in the form of the required brightness of the screen's radiating elements (RGB), and are designed so that the image pixels will be displayed one to one by the screen pixels. This makes it easy to display images on the screen.
When an image is displayed on the surface of a screen or paper, it occupies a rectangle of a certain size. For optimal placement of an image on the screen, it is necessary to coordinate the number of pixels in the image, the proportions of the image sides with the corresponding parameters of the display device. If the image pixels are output one to one by the output device pixels, the size will be determined only by the resolution of the output device. Accordingly, the higher the screen resolution, the more dots are displayed in the same area and the less grainy and better quality your picture will be. With a large number of dots placed in a small area, the eye does not notice the mosaic pattern. The opposite is also true: low resolution will allow the eye to notice the raster of the image (“steps”). A high image resolution with a small plane size of the display device will not allow the entire image to be displayed on it, or during output the image will be “adjusted”, for example, for each displayed pixel the colors of the part of the original image falling within it will be averaged. When you need to display a small image large on a high-resolution device, you have to calculate the colors of the intermediate pixels. Changing the actual number of pixels in an image is called resampling, and there are a number of algorithms for this that vary in complexity.
When printed on paper, such images are converted to the physical capabilities of the printer: color separation, scaling and rasterization are carried out to output the image with inks of a fixed color and brightness available to the printer. To display colors of different brightness and shade, the printer has to group slightly smaller dots of the color available to it, for example, one gray pixel of such an original image, as a rule, appears on print as several small black dots on a white paper background. In cases not related to professional prepress, this process is carried out with minimal user intervention, in accordance with the printer settings and the desired print size. Images in formats obtained during pre-press preparation and designed for direct output by a printing device require inverse conversion to be fully displayed on the screen.
Most graphic file formats allow you to store data about the desired scale when printing, that is, the desired resolution in dpi. dots per inch- this value indicates a certain number of dots per unit of length, for example 300 dpi means 300 dots per inch). This is a reference value only. As a rule, to obtain a printout of a photograph, which is intended to be viewed from a distance of about 20-30 centimeters, a resolution of 300 dpi is sufficient. Based on this, you can estimate what size print can be obtained from an existing image or what size image needs to be obtained in order to then make a print of the required size.
For example, you need to print an image with a resolution of 300 dpi on paper measuring 10x10 cm. Converting the size into inches, we get 3.9x3.9 inches. Now, multiplying 3.9 by 300, we get the photo size in pixels: 1170x1170. Thus, to print an image of acceptable quality measuring 10x10 cm, the size of the original image must be at least 1170x1170 pixels.
To denote the resolution of various image conversion processes (scanning, printing, rasterization, etc.), the following terms are used:
- dpi (English) dots per inch) - number of dots per inch.
- ppi (English) pixels per inch) - number of pixels per inch.
- lpi (English) lines per inch) - the number of lines per inch, the resolution of graphics tablets (digitizers).
- spi (English) samples per inch) - number of samples per inch; sampling density ( sampling density), including the resolution of image scanners (en:Samples per inch English)
For historical reasons, they try to reduce values to dpi, although from a practical point of view, ppi more clearly characterizes the printing or scanning processes for the consumer. The lpi measurement is widely used in the printing industry. A measurement in spi is used to describe the internal processes of devices or algorithms.
Color depth value
To create a realistic image using computer graphics, color is sometimes more important than (high) resolution, since the human eye perceives an image with more color shades as more believable. The appearance of the image on the screen directly depends on the selected video mode, which is based on three characteristics: in addition to the actual permissions(number of dots horizontally and vertically), the image refresh rate (Hz) and the number of displayed colors (color mode or color depth) differ. The last parameter (characteristic) is often also called color resolution, or resolution frequency (frequency or gamma depth) colors.
There is no visible difference between 24- and 32-bit color, because in the 32-bit representation 8 bits are simply not used, making it easier to address pixels, but increasing the memory occupied by the image, and the 16-bit color is noticeably “rougher”. For professional digital cameras and scanners (for example, 48 or 51 bits per pixel), a higher bit depth is useful for subsequent photo processing: color correction, retouching, etc.
Vector graphics
For vector images, due to the principle of image construction, the concept of resolution is not applicable.
Device resolution
Device resolution ( inherent resolution) describes the maximum image resolution produced by an input or output device.
- Printer resolution is usually indicated in dpi.
- Image scanner resolution is specified in ppi (pixels per inch), not dpi.
- Monitor screen resolution usually refers to the size of the image received on the screen in pixels: 800x600, 1024x768, 1280x1024, meaning the resolution is relative to the physical dimensions of the screen, and not to a reference unit of length such as 1 inch. To obtain resolution in ppi units, this number of pixels must be divided by the physical dimensions of the screen, expressed in inches. Two other important geometric characteristics of a screen are its diagonal size and aspect ratio.
- The resolution of a digital camera matrix, as well as a monitor screen, is characterized by the size (in pixels) of the resulting images, but unlike screens, it has become popular to use not two numbers, but a rounded total number of pixels, expressed in megapixels. We can talk about the actual resolution of the matrix only taking into account its dimensions. We can talk about the actual resolution of the resulting images either in relation to the output device - screens and printers, or in relation to the photographed objects, taking into account their perspective distortions during shooting and the characteristics of the lens.
Monitor screen resolution
For typical monitor, dashboard and device screen resolutions ( inherent resolution) there are established letter designations:
| Computer standard/device name | Permission | Screen aspect ratio | Pixels, total |
|---|---|---|---|
| VIC-II multicolor, IBM PCjr 16-color | 160×200 | 0,80 (4:5) | 32 000 |
| TMS9918, ZX Spectrum | 256×192 | 1,33 (4:3) | 49 152 |
| CGA 4-color (1981), Atari ST 16 color, VIC-II HiRes, Amiga OCS NTSC LowRes | 320×200 | 1,60 (8:5) | 64 000 |
| QVGA | 320×240 | 1,33 (4:3) | 76 800 |
| Acorn BBC in 40-line mode, Amiga OCS PAL LowRes | 320×256 | 1,25 (5:4) | 81 920 |
| WQVGA | 400×240 | 1.67 (15:9) | 96 000 |
| KGD (graphical display controller) DVK | 400×288 | 1.39 (25:18) | 115 200 |
| Atari ST 4 color, CGA mono, Amiga OCS NTSC HiRes | 640×200 | 3,20 (16:5) | 128 000 |
| WQVGA Sony PSP Go | 480×270 | 1,78 (16:9) | 129 600 |
| Vector-06Ts, Electronics BK | 512×256 | 2,00 (2:1) | 131 072 |
| 466×288 | 1,62 (≈ 8:5) | 134 208 | |
| HVGA | 480×320 | 1,50 (15:10) | 153 600 |
| Acorn BBC in 80-line mode | 640×256 | 2,50 (5:2) | 163 840 |
| Amiga OCS PAL HiRes | 640×256 | 2,50 (5:2) | 163 840 |
| AVI container (MPEG-4/MP3), Advanced Simple Profile Level 5 | 640×272 | 2,35 (127:54) (≈ 2,35:1) | 174 080 |
| Black & white Macintosh (9") | 512×342 | 1,50 (≈ 8:5) | 175 104 |
| Electronics MS 0511 | 640×288 | 2,22 (20:9) | 184 320 |
| Macintosh LC (12")/Color Classic | 512×384 | 1,33 (4:3) | 196 608 |
| EGA (in 1984) | 640×350 | 1,83 (64:35) | 224 000 |
| H.G.C. | 720×348 | 2,07 (60:29) | 250 560 |
| MDA (in 1981) | 720×350 | 2,06 (72:35) | 252 000 |
| Atari ST mono, Toshiba T3100/T3200, Amiga OCS, NTSC interlaced | 640×400 | 1,60 (8:5) | 256 000 |
| Apple Lisa | 720×360 | 2,00 (2:1) | 259 200 |
| VGA (in 1987) and MCGA | 640×480 | 1,33 (4:3) | 307 200 |
| Amiga OCS, PAL interlaced | 640×512 | 1,25 (5:4) | 327 680 |
| WGA, WVGA | 800×480 | 1,67 (5:3) | 384 000 |
| TouchScreen in Sharp Mebius netbooks | 854×466 | 1,83 (11:6) | 397 964 |
| FWVGA | 854×480 | 1,78 (≈ 16:9) | 409 920 |
| SVGA | 800×600 | 1,33 (4:3) | 480 000 |
| Apple Lisa + | 784×640 | 1,23 (49:40) | 501 760 |
| 800×640 | 1,25 (5:4) | 512 000 | |
| SONY XEL-1 | 960×540 | 1,78 (16:9) | 518 400 |
| Dell Latitude 2100 | 1024×576 | 1,78 (16:9) | 589 824 |
| Apple iPhone 4 | 960×640 | 1,50 (3:2) | 614 400 |
| WSVGA | 1024×600 | 1,71 (128:75) | 614 400 |
| 1152×648 | 1,78 (16:9) | 746 496 | |
| XGA (in 1990) | 1024×768 | 1,33 (4:3) | 786 432 |
| 1152×720 | 1,60 (8:5) | 829 440 | |
| 1200×720 | 1,67 (5:3) | 864 000 | |
| 1152×768 | 1,50 (3:2) | 884 736 | |
| WXGA (HD Ready) | 1280×720 | 1,78 (16:9) | 921 600 |
| NeXTcube | 1120×832 | 1,35 (35:26) | 931 840 |
| wXGA+ | 1280×768 | 1,67 (5:3) | 983 040 |
| XGA+ | 1152×864 | 1,33 (4:3) | 995 328 |
| WXGA | 1280×800 | 1,60 (8:5) | 1 024 000 |
| Sun | 1152×900 | 1,28 (32:25) | 1 036 800 |
| WXGA (HD Ready) | 1366×768 | 1,78 (≈ 16:9) | 1 048 576 |
| wXGA++ | 1280×854 | 1,50 (≈ 3:2) | 1 093 120 |
| SXGA | 1280×960 | 1,33 (4:3) | 1 228 800 |
| UWXGA | 1600×768 (750) | 2,08 (25:12) | 1 228 800 |
| WSXGA, WXGA+ | 1440×900 | 1,60 (8:5) | 1 296 000 |
| SXGA | 1280×1024 | 1,25 (5:4) | 1 310 720 |
| 1536×864 | 1,78 (16:9) | 1 327 104 | |
| 1440×960 | 1,50 (3:2) | 1 382 400 | |
| wXGA++ | 1600×900 | 1,78 (16:9) | 1 440 000 |
| SXGA+ | 1400×1050 | 1,33 (4:3) | 1 470 000 |
| AVCHD/"HDV 1080i" (anamorphic widescreen HD) | 1440×1080 | 1,33 (4:3) | 1 555 200 |
| WSXGA | 1600×1024 | 1,56 (25:16) | 1 638 400 |
| WSXGA+ | 1680×1050 | 1,60 (8:5) | 1 764 000 |
| UXGA | 1600×1200 | 1,33 (4:3) | 1 920 000 |
| Full HD (1080p) | 1920×1080 | 1,77 (16:9) | 2 073 600 |
| 2048x1080 | 1,90 (256:135) | 2 211 840 | |
| WUXGA | 1920×1200 | 1,60 (8:5) | 2 304 000 |
| QWXGA | 2048×1152 | 1,78 (16:9) | 2 359 296 |
| 1920×1280 | 1,50 (3:2) | 2 457 600 | |
| 1920×1440 | 1,33 (4:3) | 2 764 800 | |
| QXGA | 2048×1536 | 1,33 (4:3) | 3 145 728 |
| WQXGA | 2560×1440 | 1,78 (16:9) | 3 686 400 |
| WQXGA | 2560×1600 | 1,60 (8:5) | 4 096 000 |
| Apple MacBook Pro with Retina | 2880×1800 | 1,60 (8:5) | 5 148 000 |
| QSXGA | 2560×2048 | 1,25 (5:4) | 5 242 880 |
| WQSXGA | 3200×2048 | 1,56 (25:16) | 6 553 600 |
| WQSXGA | 3280×2048 | 1,60 (205:128) ≈ 8:5 | 6 717 440 |
| QUXGA | 3200×2400 | 1,33 (4:3) | 7 680 000 |
| QuadHD/UHD | 3840×2160 | 1,78 (16:9) | 8 294 400 |
| WQUXGA (QSXGA-W) | 3840×2400 | 1,60 (8:5) | 9 216 000 |
| HSXGA | 5120×4096 | 1,25 (5:4) | 20 971 520 |
| WHSXGA | 6400×4096 | 1,56 (25:16) | 26 214 400 |
| HUXGA | 6400×4800 | 1,33 (4:3) | 30 720 000 |
| Super Hi-Vision (UHDTV) | 7680×4320 | 1,78 (16:9) | 33 177 600 |
| WHUXGA | 7680×4800 | 1,60 (8:5) | 36 864 000 |
see also
Notes
| Video adapter and monitor standards | ||
|---|---|---|