In Windows 10, the default image display app has changed. The design has become more modern, dark and simplified. But there are ways to get your old photo viewer back from Windows 7.
Returning standard photo viewing
The old program, which works with images and photographs of different formats, has been replaced, but not removed from the system. Therefore, by changing Windows settings using one of the methods described below, you will get a familiar window. At the same time, you can return to the modern Photos program used by default in Windows 10 at any time.
In Windows 10, you can return “Photo Viewer” from Windows 7
Making changes to the registry
First of all, you need to change the registry settings so that the familiar application from Windows 7 becomes available. To do this, you need to download the Registry_commands file with a set of commands that automatically change certain registry settings:

Now the Photo Viewer application is unlocked, all that remains is to set it as the default program using one of the methods described below.
If for some reason this method did not bring results, that is, the old application did not become available, use the analogue methods “Configuration via PowerShell” and “Configuration via Winaero Tweaker”. Applications from third-party developers will also be described below. You may like them better than the old or modern program from Microsoft.
Using the context menu
The easiest way is to use File Explorer's quick access options:

Done, thanks to the tick, all images will open in the old application. Please note that if you opened a file in the .jpeg format, then the default application will only be used for other files of this format, and for images in the .png extension you will have to repeat the above steps again.
Change settings
If the previous method did not work for some reason, follow these steps:
- Expand PC settings.
 Open the Settings application
 - Expand the "Applications" block.
 Open the “Applications” section
 - Go to the default application settings and find the “Photo Viewer” item in the list. The “Photos” program is selected in it, click on its icon and select the “Photo Viewer” application from the list that appears.
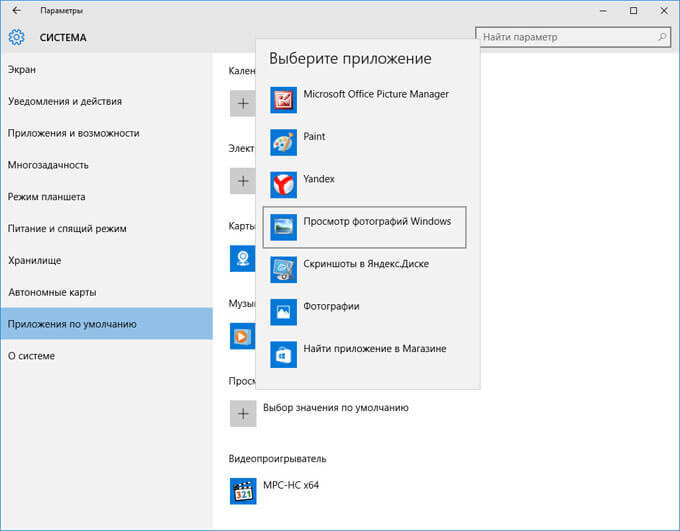 Set the Photo Viewer app as default
Done, now all images will open using Photo View until you install the Photos app again in your computer settings.
Video: How to get Photo View back in Windows 10
Setup via PowerShell

If you want to allow the use of the old display program only for certain formats, then select the appropriate commands from the list yourself. Once the commands complete, return to the Use the context menu and Change settings instructions to set Photo Viewer as your default program.
Configuration via Winaero Tweaker
Winaero Tweaker is a Windows 10 tuning application that can be downloaded for free from the developer’s official website. With it you can change a huge number of system parameters by pressing a couple of buttons. The program can also return the usual photo display window:

Third-party photo viewing apps
By installing an application from this list, you will get a new program for viewing photos. Almost all third-party utilities differ from standard ones in a wider range of settings offered. But their main difference lies in the design, since it is the fundamental factor in the convenience of viewing something.
IRfanView
The program allows you to perform all standard actions with a photograph: enlarge and reduce it, rotate and crop. In addition, you can draw, write, and use the Eraser and Fill tools on the open picture. It is possible to select a specific area of the image and copy it.
 You can edit photos in IRfanView
 You can download the program from the official website. There is a version for both 32-bit and 64-bit systems.
Picasa
Picasa is an application from Google, the support of which is currently discontinued (instead, the Google Photos service is being developed). But you can still download it from unofficial sites and use it, although without support for synchronizing photos on different devices. The convenience of the application lies in the fact that the program window has a built-in explorer, thanks to which you can find another snapshot without returning to the standard Windows Explorer.
 Picasa app is developed by Google
 FastStone Image Viewer
The application is similar to the previous one in that it also has a built-in explorer. An open photograph can be edited at a primitive level, since there are no professional editing tools. You can download the installation file for free from the official website.
 FastStone Image Viewer has a built-in explorer
 Video: how to use FastStone Image Viewer
Carambis PhotoTrip
The special feature of the application is that it allows you to create folders for photos, dividing them into groups. You don't have to move pictures in Explorer, because you can collect all the necessary pictures directly in Carambis PhotoTrip. The application also has a built-in editor that allows you to change the color, brightness and other parameters of the photo. You can also download the program from the official website.
 The application has a built-in editor and folder breakdown
 XnView
The XnView application can not only display images, but also change their format. It has a built-in explorer, thanks to which you can easily find the files you need. In the program settings you can specify methods for sorting and displaying images. You can download the program from the official website.
 XnView has many settings and the ability to convert formats
 Video: How to use XnView
ACDSee
Professional photo viewer. It contains a huge number of settings with which you can change the appearance, properties of the application and pictures to suit you. There are two versions on the official website: paid ($89.95) and free (trial).
 ACDSee offers many settings for professional work
 You can replace the new application for viewing pictures from Microsoft with the familiar old one by editing the registry, running commands in PowerShell, or the third-party application Winaero Tweaker. You can also download a third-party utility and use it instead of the standard options.
Have you switched to the new Windows 10 OS, but didn’t like viewing photos through the new program? Then let's bring back the good old standard “viewer” like in Windows 7 or 8.1.
You won’t be able to download the standard photo viewer in Windows 10 from previous versions, and why should it, because it’s already in the system. You just need to activate it.
The standard photo viewer on Windows 10 is already installed on the system, you just need to use it!
Where is it located - the Windows 10 photo viewer? And how can I set it as the main one for viewing photos? Go!
How to open pictures in Windows 10 through browsing
We make changes to the registry.
1) Start - Windows System Tools - Run (or by holding down the Win + R keys). We write regedit - we call the Windows registry.
Attention! The registry is an important element of Windows. Don't change anything unnecessary here. Just to be on the safe side, we recommend making a Windows restore point (backup).
2) Once in the registry window, go to the folder:
HKEY_LOCAL_MACHINE/SOFTWARE/Microsoft/Windows Photo Viewer/Capabilities/FileAssociations

Only 2 image formats have been added for the photo viewer: tiff and tif.
3) Right-click on an empty space and select New - String Parameter. Sign the name.jpeg

4) Left-click twice on the created name and enter in the Value field: PhotoViewer.FileAssoc.Tiff
Next OK.

5) Create names as in point 3 for other types of files, namely for: .jpg, .png, .gif and any others, for example, .ico and .bmp. The value is the same for everyone: PhotoViewer.FileAssoc.Tiff
As a result, you will get this picture:

Setting up Photo Viewer in Windows 10
6) Start - Settings (or Win+i) - System - Default Applications - Set default values for the application (link below).
If there is no Default Applications item in the list, then write Applications in the search box at the top left (Find parameter) and the desired item will appear in the drop-down list.

7) On the left in the list of programs, select Windows Photo Viewer and click Select default values for this program.
If you have a slightly different window (the usual list of programs), then find Photo Viewer in it, click once and select Manage. Then select the desired program for all file formats.


9) Now right-click on any image in .jpg, .png, .gif or .jpeg format - Open with - Select another application (or select an application).
Select Windows Photo Viewer from the list and check the box Always use this application.

Bottom line. In this simple way, in 5-10 minutes you can permanently install the standard Photo Viewer for Windows 10, which was in Windows 7 and 8.1.
Many users, when familiarizing themselves with the new OS from Microsoft, discovered that viewing Windows 10 photos is done through the Photos program. But in Windows 8, Microsoft offered a choice between a photo viewer and a Photos tool.
Why did the developers save users the ability to view common graphic formats through a more convenient and functional program?
Many Windows 10 users are starting to look for third-party products that are more suitable for them, knowing that Photo Viewer only works with TIFF and TIF formats. Therefore, today we will look at how to add this tool to the “Default Applications” section and the “Open With” dialog, where the program is initially missing.
Let's use the registry editor
More advanced users try to specify "Photo Viewer" as the application to open pixel images via the Program Mapping tool, but again, the application is only available for the above TIFF/TIF. Is it possible to make it so that the photo viewer can be specified as an opener for other image formats? Naturally, and this is easy to do.
1. Call the registry editor by running the “regedit” command in the search line or text line of the “Win + R” command interpreter.

2. Go to HKLM/SOFTWARE/Microsoft/Windows Photo Viewer/Capabilities/FileAssociations.

Here you will see a couple of parameters with the name of image formats that can be opened using the photo viewer.
3. Using the right button, call up the context menu of the free part of the space in the right frame of the window and select creating a string parameter (REG_SZ).

4. Enter its name as “.jpeg”, and set the value to “PhotoViewer.FileAssoc.Tiff”.

We perform all the same operations for other formats (.jpg, .gif, .png) that you want to open through a more convenient image visualization tool.

5. Call “Settings” using Win+i.
6. Go to “System” → “Default Applications”.

8. In the left frame with the list of programs, click on “Photo Viewer”, then on the icon with the inscription: “Select default values for the program.”

9. Check the boxes next to the required formats.

11. Call the context menu item “Open with” on one of the selected image formats.
The Windows Photo Viewer option will appear.
12. Specify the tool as the default image opener.

Alternative method
For beginners who do not want to delve into the wilds of the Windows 10 settings storage, it is recommended to use the WinAero Tweaker utility.
- After launching the application, move to the last item of available tweaks “Windows Accessories”.
- Click on the “Activate Windows Photo Viewer” button.

The result will be the same in both cases.
The developers of Windows 10, for some reason known to them, decided to abandon the image viewer that has been familiar since the days of Windows 7 - Windows Photo Viewer, in favor of the Modern application Photos. The old photo viewing application is associated only with *.tif and *.tiff file extensions and there is no way to assign it to open other types of image files.
Despite the fact that the modern Photos application has much more functionality (filters, image processing, visual effects are available), the old Windows Photo Viewer works much faster and is simply more convenient. In this article we will figure out How to restore the old photo viewer app in Windows 10.
So, as we have already said, in Windows 10 you cannot assign Windows Photo Viewer as a program for opening graphic files, in particular:
Windows 10 developers have cleared out as much as possible all registry keys associated with the functionality of Windows Photo Viewer, although the utility itself remains in place in the system and is located in the directory C:\Program Files (x86)\Windows Photo Viewer\.
Note. If you upgraded to Windows 10 from Windows 7 or Windows 8.1, Windows Photo Viewer will be available for selection in the Open With context menu and file associations in Control Panel because the necessary registry keys will not be deleted during the upgrade. Thus, everything discussed below applies to systems on which Windows 10 was installed “from scratch”
You can force the Photo Viewer in Windows 10 to launch in a specific folder using the command:
rundll32 "%ProgramFiles%\Windows Photo Viewer\PhotoViewer.dll", ImageView_Fullscreen C:\FOTO
 To restore the ability to set Windows Photo Viewer as the default application in Control Panel for the current user, import the following registry file:
Windows Registry Editor Version 5.00
@="PhotoViewer.FileAssoc.Tiff"
@="PhotoViewer.FileAssoc.Tiff"
@="PhotoViewer.FileAssoc.Tiff"
@="PhotoViewer.FileAssoc.Tiff"
@="PhotoViewer.FileAssoc.Tiff"
@="PhotoViewer.FileAssoc.Tiff"

The following reg file with registry data is more universal and applies to all users of the system by creating file associations at the application level. File associations with Windows Photo Viewer are created in the registry key HKEY_LOCAL_MACHINE\SOFTWARE\Microsoft\Windows Photo Viewer\Capabilities\FileAssociations  Additionally, this registry tweak returns the ability to select Windows Photo Viewer to the Open With image context menu.
 Ready reg file for making the necessary changes:
Thus, Windows Photo Viewer can again be used to open most types of images.
Note. If you are using Windows 10 inside a virtual machine (VirtualBox, VMWare) without hardware acceleration, then Windows Photo Viewer, which depends on Direct3D acceleration, will not work.