Reinstall Windows XP. Suppose you have a question how to reinstall your Windows XP, you installed it for a long time, performance has fallen, some programs do not start, many errors occur, and so on. Where to start, and we will start by copying important settings, folders and documents, from that section of the hard drive where we will reinstall the operating system. After reinstalling Windows XP, all of them will be lost.
Friends if you want , then our other article will help you.
Reinstall Windows XP
First, copy everything you don’t want to lose from the desktop and from the My Documents folders to a safe place: photos, music files, any documents. A safe place, such as a drive(drive D :). If you have only one logical drive (C :), then copy these folders to a USB flash drive or burn to a DVD drive, after reinstalling the system, you will need to return everything to their places.Next, the Application Data folder - here are stored the settings from the programs installed on your computer.
You can also copy the folders of your browsers Opera and Mozilla Firefox, with all your bookmarks, contacts, classmates. Torrents with your distributions, ratings and more.Of course, you have accumulated a lot of links in the Favorites folder, you shouldcopy it too.
I recall in Windows XP all these folders are located in the folderC: \\ Documents and Settings ( your_user_name).For example, if you have Windows XP installedon (drive C :), and your username (by which you log in) isAlex, then our folder will be called C: \\ Documents andSettings \\ Alex.
If you use Outlook Express as your email program, then all letters and addresses you receive are stored in a specific folder -C: \\ Documents and Settings \\ Petya \\ Local Settings \\ Application Data \\ Identities \\ (set of letters and numbers) \\Microsoft \\ Outlook Express \\.
Next, we save your accounts and mailbox settings. In the Outlook Express menu, select Tools\u003e Accounts. In the window that appears, clickcall the file as we want on the Export button, save it further away to a USB flash drive or other section of the hard drive, after reinstalling we need it.We will start Outlook Express again and in the menu we will choose not import but importand indicate the file in which your accounts were exported. Outlook Express will work as before reinstalling Windows XP.
Driver Magician will copy from the system the driver to all your devices: printers, scanners, video card and so on in a special folder. After reinstallation Windows XP, you don’t have to look for drivers on all your devices, you run the device installation wizard and specify the folder created by Driver Magician and the drivers will be installed automatically.
After starting the utility, you will be taken to its main window. Mark all your devices and click (Start),

Driver Magician will ask you where to save the driver folder, save it only to the wrong section where you will reinstall the system. Of course, the ideal option after reinstalling Windows XP is to download drivers for all the devices of your computer on the Internet on the official websites of their manufacturers. Well, we finally got to the reinstallation, it is no different from the installation, here is the article on our site
To reinstall Windows XP, you need a USB flash drive or CD-Rom with Windows XP installation files and about half an hour.
The process of reinstalling Windows XP is as follows:
1. Copy all important files and documents from the system drive to NOT the system drive. During the installation of Windows, the entire system disk will be formatted and your data will be lost.
2. Restart your computer. During the reboot, click the "Delete" button. The BIOS will open.
3. In the BIOS, find the Boot tab and select "1st boot device" the device on which you have the installer for Windows XP.
4. Press F10 - Enter. The computer will restart and the Windows installation process will begin.
5. When the window for selecting the disk on which Windows will be installed appears - select the "C" drive and press "Enter".
6. Format the selected location for installing the system in NTFS format. It is better to do this in full format (not fast) mode.
Wait for the formatting process to complete. This may take several minutes.
7. After formatting, the program will begin to copy new files and install the OS.
8. After copying all the files, the computer will restart. Make sure that it does NOT boot from the installation CD or flash drive, but from the hard drive (hard drive).
9. If you boot the PC correctly, the process of further installation of Windows XP will begin.
Be patient. This process can take quite a while. It almost does not require your attention - you can go about your business, periodically returning to the installation.
Some versions of Windows require entering a license key, as well as choosing the primary and secondary language of the system, setting up a user profile, etc.All these settings, except the key, can be changed after the installation of the system.
10. After a long installation, your computer will reboot - again, you need to make sure that it boots from the hard drive, not a CD-rom or flash drive. And you will see a picture like this:
Everything is ready! Now it remains only to install various office programs, some drivers, but Windows XP itself is installed.
Greetings. I decided today to write about how to install windows xp. They just brought me a computer, such an old one. 256 MB RAM, Celeron processor, 40 GB hard drive. Well then? That where there, XP is the most for him.
It’s just that everyone is already writing about installing Windows 8, but something went wrong to me in the old days. Well, okay, I think that XP will still live, because whatever you say, this is a good OS and many still work with it. Immediately I want to apologize for the pictures, photographed on a 15-inch monitor, also on the phone. Ideally, of course, you could install Windows XP on a virtual machine and make beautiful screenshots, but I have a live example :).
Preparing to install Windows XP
Important! Make sure that there is no information important to you on drive C (the drive on which you installed or the operating system was installed). Desktop and folder "My documents" stored on drive C. If there is information, then it can be copied to drive D using a boot disk.
If everything is fine, then move on. Place the Windows XP installation disc in the computer drive and restart the computer. Ate after starting the download at the bottom of the screen you will see the download (the points will move), then everything is fine. Quickly press any key (do not have time :), restart the computer again) and you can proceed to the beginning of the installation.
Well, if you didn’t start booting from the CD, and the computer started to boot as usual from the hard disk, or an error appeared through which you started reinstalling the operating system, it means that you did not set the boot from the drive in the BIOS first. I already wrote an article about that, but in this computer the BIOS was different from what is described in the article.

Go to the “Boot” tab.

Click “Boot Device Priority”.

Using the “Enter” and “Up” “Down” keys, first set the CD / DVD, then the hard drive, etc. Now press F10 and save the changes. The computer will restart and boot the CD. Press any button and go to the beginning of the installation.
Windows XP installation process
As soon as you press any key, we see this:

Here you have to wait, well, nothing can be done, we are waiting :).

In this window, press “Enter”.

We accept the license agreement by pressing the F8 key.

As you can see, I already found an old version of Windows XP and you can try to restore it, but I think you also need a clean installation, so press “Esc”.

We select the partition on the hard drive in which we want to install the operating system. Typically, this is C:, select it and press “Enter”.

Confirm the installation with the “C” key.

Here you need to choose how the section will be formatted. I advise you to choose in FAT and not fast. Click “Enter.” Confirm the format by pressing the “F” key.

We are waiting for the partition on the hard disk to be formatted.

Copying files from a disk will immediately begin, again we wait :(.

You can immediately configure the language and keyboard. Click “Next.”

Enter your name and the name of the organization. Move on.

Set the time and date. Click “Next.”

We are waiting again, but do not go far :).

I left “Common Settings” and clicked “Next”.

We write the name of the computer on the network. And we continue the installation.

We read the greeting and as usual click “Next”.

Configure automatic update settings.

We skip these settings, or you can configure the Internet.

You can register with Microsoft. But I refused. We continue.

Specify computer users.

Congratulations! Windows XP installation is complete.
All friends, the installation is complete and you can start using the computer. I also want to note that I installed the simplest assembly of Windows XP. You may also have an assembly for example from ZWER, there the installation process may be slightly different. For example, in this version I also entered the key, I forgot to take a picture. And in the assembly from ZWER, there seems to be no such item. Well, if you ask for the key, then look for it in the text file that you most likely downloaded from the disk image.
Well, everything seems to be. Good luck friends!
More on the site:
How to install Windows XP? Picture Guide updated: December 20, 2012 Posted by: admin
Reinstall Windows XP. Suppose you have a question how to reinstall your Windows XP, you installed it for a long time, performance has fallen, some programs do not start, many errors occur, and so on. Where to start, and we will start by copying important settings, folders and documents, from that section of the hard drive where we will reinstall the operating system. After reinstalling Windows XP, all of them will be lost.
Friends if you want , then our other article will help you.
Reinstall Windows XP
First, copy everything you don’t want to lose from the desktop and from the My Documents folders to a safe place: photos, music files, any documents. A safe place, such as a drive(drive D :). If you have only one logical drive (C :), then copy these folders to a USB flash drive or burn to a DVD drive, after reinstalling the system, you will need to return everything to their places.Next, the Application Data folder - here are stored the settings from the programs installed on your computer.
You can also copy the folders of your browsers Opera and Mozilla Firefox, with all your bookmarks, contacts, classmates. Torrents with your distributions, ratings and more.Of course, you have accumulated a lot of links in the Favorites folder, you shouldcopy it too.
I recall in Windows XP all these folders are located in the folderC: \\ Documents and Settings ( your_user_name).For example, if you have Windows XP installedon (drive C :), and your username (by which you log in) isAlex, then our folder will be called C: \\ Documents andSettings \\ Alex.
If you use Outlook Express as your email program, then all letters and addresses you receive are stored in a specific folder -C: \\ Documents and Settings \\ Petya \\ Local Settings \\ Application Data \\ Identities \\ (set of letters and numbers) \\Microsoft \\ Outlook Express \\.
Next, we save your accounts and mailbox settings. In the Outlook Express menu, select Tools\u003e Accounts. In the window that appears, clickcall the file as we want on the Export button, save it further away to a USB flash drive or other section of the hard drive, after reinstalling we need it.We will start Outlook Express again and in the menu we will choose not import but importand indicate the file in which your accounts were exported. Outlook Express will work as before reinstalling Windows XP.
Driver Magician will copy from the system the driver to all your devices: printers, scanners, video card and so on in a special folder. After reinstallation Windows XP, you don’t have to look for drivers on all your devices, you run the device installation wizard and specify the folder created by Driver Magician and the drivers will be installed automatically.
After starting the utility, you will be taken to its main window. Mark all your devices and click (Start),
Driver Magician will ask you where to save the driver folder, save it only to the wrong section where you will reinstall the system. Of course, the ideal option after reinstalling Windows XP is to download drivers for all the devices of your computer on the Internet on the official websites of their manufacturers. Well, we finally got to the reinstallation, it is no different from the installation, here is the article on our site
Everyone once has to Install or reinstall Windows XP for the first time. Many are afraid to do this on their own and entrust the installation to specialists, although even a novice user can easily handle this procedure.
Actually, the installation process for any version of Windows is initially developed by Microsoft specialists in such a way that even a novice can handle it. After reading this article, you will learn how to do this and understand that installing Windows is nothing complicated.
* Preparing to install Windows XP
If you want to to install or reinstall Windows XP on a new computer - transfer all the files you want to save from the system partition (Usually C) to other sections of the hard drive. This does not apply to programs; they still have to be reinstalled.
It is advisable to have driver disks from:
- motherboard
- video cards
- other devices
 In principle, Windows has its own driver library, which it uses during installation, but there is no guarantee that there is everything you need. Although you can always find the missing driver on the Internet. If you are reinstalling a working system, make a backup of the installed drivers and save it on any partition except the system one.
Programs such as Double Driver and the like will help you with this. Finding a description of the process and downloading the program is very easy via Google.
Of course, you should have a disk with the operating system itself. If you downloaded the image of the installation disk on the Internet - write it to disk.
* Install Windows XP
Windows XP Drive load into the drive (drive). Now we need to set the BIOS to boot from this disk.
To do this, we reboot the computer and at the very beginning of the boot we start repeatedly pressing the DEL key (F2 key for laptops) until we get into the BIOS. Then we will need to find the tab responsible for setting the priority of the download.
In different BIOS versions this tab can be called differently. One of the most common options is this: Find the “Boot” tab on top (move using the arrows on the keyboard), go to it (press Enter) and set the arrows or the +/- keys to the top position - “CD / DVD Drivers” (now it stands for “Hard Disk Drivers "). For more details, see the video at the end of the article.

Another BIOS option: find the “Adwanced Bios Features” tab and go into it (Enter)

Next, we are interested in a parameter that tells the system why it should be loaded in the first place. By default, this line contains “Hard Disk” (or HDD - hard disk). Again, select it with the arrows, press Enter, select “CDROM” from the list that appears (instruct the system to use the CD drive to boot), press “Enter”, press F10 (save changes) and again “Enter”.
In different BIOS versions, the names of the tabs and parameters may differ slightly (for example, instead of CDROM there may be a DVD, etc.), but now you understand the meaning of the actions and you can always figure it out. You can go into the BIOS beforehand for review before reinstalling the system and find all the necessary parameters, so that later you do not have to look for anything.

After pressing the last “Enter”, the system goes to reboot and starts to load from the Windows XP disk that we previously inserted into the drive. This screen will testify to this:

Press any key, even a space, and the installation begins.

The Windows XP setup program starts. We are offered the choice of one of three actions and the keys that correspond to them are indicated. Since we want to install Windows XP, we press, respectively, “Enter” (Enter).
A license agreement appears that, usually, no one reads. Press “F8” to continue (by the way, all the keys that you can use for actions are displayed in the prompts that you see in front of you and at the very bottom).
At the next step, we are invited to select the partition of the hard disk in which the operating system will be installed. Usually this is section C. Select it with the arrows on the keyboard and press “Enter”.
If you install Windows XP to a new computer, then your hard drive is not yet partitioned and it's time to create them. As written in the tips, to create a partition, you need to press "C" on the keyboard and select the size of the future partition in megabytes.
Suppose, if you want to allocate 50 GB for the system partition, this is 51200 megabytes. Section created. Press "C" again and create the next section. At a minimum, it is enough to divide the hard drive into two partitions: partition C for the operating system and programs with a capacity of 50 GB, and another partition for everything else (for all the remaining free space).
However, we cut as many sections as you need. After creating the partitions, select the one in which we will install Windows XP, and press "Enter".
In the next window, we are asked to format this section. We choose exactly the option that is shown in the picture below and no other. Click "Enter."

Most likely, no drivers will be needed, since in assemblies from the Network, often everything is already included. After that, when you reboot, do not forget to enter the BIOS again and change the first boot device from the CDROM back to HARD DISK (HDD).
Those who install the licensed version, or build without automatic installation and activation, will have to go a few more steps. The first of these is regional settings. Here you can customize the language and regional standards for your country. The default is "Russian". Click "Next."

Then there will be a window for entering the name and organization, you can enter any, it does not matter. In the next window, you will need to enter the activation key for Windows XP. If the license - look at the box from the OS. Either buy on the Internet, or search elsewhere. Enter the key - "Next".

Then enter the computer name (any) and password (remember). Next, we configure the time and date for ourselves. If a window appears with network settings - just click "Next." That's all. Windows is installed. Do not forget to reboot and change the first boot device in the BIOS to the HDD.
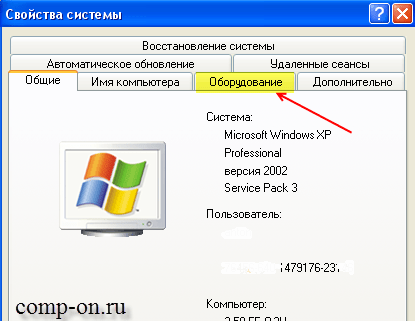
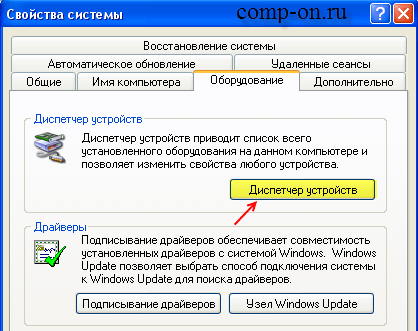
After starting a freshly installed operating system, go to the device manager: "My computer" - "View system information" - "Equipment" - "Device Manager".

We look at devices marked with yellow question marks as having no drivers. We install drivers on them. If it does not work out automatically, we search for drivers on the Internet by the name or code of the device and update manually.

By double-clicking on any device, we get a window with all the information about it. On the “Driver” tab, information on the installed driver, on the “Information” tab, you can find the device code.

On this topic, the installation of Windows XP is completed. If, after installing the operating system and all the necessary software, you make a copy of the system partition with Acronis, you will always have at hand the image of a fresh working OS without bugs and everything else that you can deploy at any time.
Video about installing Windows XP