That is what we are going to tell you in this article!
Tickrate
One of the important factors that affects the game is Tickrate. What is it? Tickrate is a unit of sending / receiving data from the server per second. The higher the Tickrate value, the better the synchronization with the server, which means that the game is displayed more accurately. That is why it is better to play on servers with maximum tickrate values. In CS:GO they are capped at level 128.
When you shoot, your client sends data to the server, the server compares the received data, and makes the final decision. Remember, this often happens - you shoot at the enemy, you see blood, but then you find out that you did not cause damage. This is because the blood display is on the client side. Your client thinks you hit the target, draws blood, and sends packets to the server for verification. If the server thinks you missed, the player takes 0 damage. Therefore, our task is to get a picture in the game that is closest to the server's perception. And in this case, it is more profitable to have deformed player models than smooth interpolated ones.
Teams
It is very important in the game to get as little server interpolation as possible. Therefore, we prescribe cl_interp 0, as the minimum possible value of the variable. You also need to get the maximum number of updates from the server per second. To do this, set the values cl_updaterate "128" And cl_cmdrate "128". You can try to use higher values, but they will still not be supported by the server and the server will default to the maximum allowed values for you.
config
The next important thing in the game is your config. What is it? Game config - these are personal settings and game launch options. The config is represented by files with the extension .cfg that are in the folder As a rule, the main settings are stored in a file config.cfg. With notepad or any other text editor, you can edit your settings. For the convenience of editing commands, you can create an additional configuration file with any name.
To install someone's config, or the config of any PRO player, you just need to download it, just go to STEAM\SteamApps\common\Counter-Strike Global Offensive\csgo\cfg. Put the config in this folder, go into the game, and write the command " exec [config name].cfg". Everything is ready, you can play.
Launch parameters
Now let's talk about launch options. Launch parameters registered in the properties of the game. Go to steam library, press the right button on the game CS:GO, select the tab properties. Go to bookmark " are common", and select " set launch options” and enter the desired commands there.
Command List
Novid - to remove the Valve intro video
-w 640 -h 480 - to run the game with a screen resolution of 640x480 pixels
-full - to run the game in full screen mode
-window - to run the game in windowed mode
-noborder - to run the game in borderless windowed mode
-low - to run the game with low priority
-high - to run the game with high priority
-dxlevel 81 - to use DirectX 8.1
-dxlevel 90 - to use DirectX 9
-heapsize 262144 - allocates 512MB of RAM for the game
-heapsize 524288 - allocates 1GB of RAM for the game
-heapsize 1048576 - allocates 2GB of RAM for the game
-noaafonts - to disable screen font smoothing
-freq 100 - to change Hertz for HL1 Engine monitors. CRT 60-100 85=Common LCD 60-75 72=Common
-refresh 100 - to change Hertz for HL2 Engine monitors. CRT 60-100 85=Common LCD 60-75 72=Common
-soft - to run the game in graphics mode Software
-d3d - to run the game in Direct3D graphics mode
-gl - to run the game in Open GL graphics mode
-nojoy - to disable joystick support
-noipx - to disable the LAN protocol
-noip - to remove the IP address without the ability to connect to servers
-nosound - forcibly turns off the sound in the game
-nosync - forcibly disables vertical sync
-console - to access the developer console
-dev - to enable mods for developers
-zone # - to allocate more memory to files like autoexec.cfg etc
-safe - to start the game in safe mode and disable audio
-autoconfig - to restore default video settings
-condebug - to save all console logs in a text file console.log
-nocrashdialog - to cancel the display of some errors (memory could not be read)
-toconsole - to start the game engine in the console if the map is not defined with +map
+a +r_mmx 1 - to start the game with a console command or cvar command on the command line (instead of cfg)
+exec name.cfg - to connect the config with the name "name"
Mouse:
-noforcemparms - uses mouse button settings from Windows
-noforcemaccel - uses the mouse acceleration settings from Windows
-noforcemspd - uses mouse speed settings from Windows
If all three commands are registered, there will be no acceleration
Graphics settings
GRAPHIC ARTS
Well, it almost all depends on your hardware, but it's worth saying that a lot of professional players use the minimum graphics settings, while having top-end computers. Personally, I'm used to the minimum settings, and I think that extra details in CS only interfere with a normal game, and in principle, most players think the same way. There are several console commands that will help you get rid of unnecessary reflections, namely:
r_dynamic 0 - removes dynamic lighting;
r_cheapwaterend 0 - removes the drawing of the bottom and water;
muzzleflash_light 0 - removes dynamic light from flashes; To adjust the graphics, you can also go to GeForce Experience, then select CS: GO in the list of games, click more, see the wrench icon on the side, click on it and set the slider to the position at which the FPS does not lie down, and the picture does not get worse , but if FPS is important to you, however, like me, then drag the slider to the left to the end.
PERMISSION
And here someone is already used to it, but there is one BUT. This is something with a resolution at which your screen becomes flat in cs - it's easier to hit the enemy. This gives you an advantage in shooting, but reduces your visual perception of opponents (that is, you do not see the entire territory where your enemy may be). I would like to say that if you are with CS 1.6 and you like BLACK STRIPS, then play with them, if you like a FLAT PICTURE, then play with it, and if you like a full-fledged, high-quality picture, play FULLSCREEN. That is not worth me the permission with which you used to play.
LIGHTING
In the game, you can adjust the lighting as you like with the GAMMA parameter, but I still strongly recommend setting the minimum gamma value, i.e. 1.6, or this can be done using the console command - mat_monitorgamma "2.2"(1.6 - BRIGHT, 2.2 - DARK).
In addition, you can set the display mode - TV (the screen will become brighter) or standard - MONITOR. You can also enter this command - mat_autoexposure_min "0.5"- screen brightness (0.5 - minimum, 3 - maximum).
Sound settings
In principle, you can adjust the volume in cs go, but this will not be a very effective solution, unless you turn off the music, make the voice chat quieter and set the device that will perceive this sound, namely speakers or headphones. Not so long ago, an interesting thing was added to the cs - HRTF (surround sound). Here, for an amateur, I personally have a headache from this, so I set it as standard (on headphones). But this will not be enough for normal sound settings. Here are some console commands to help you customize the sound:
snd_front_headphone_position 45
- frontal sounds are heard better and more "voluminous";
snd_headphone_pan_exponent 1.5
- sounds are heard better with increasing distance;
snd_rear_headphone_position 135
- sounds that are heard from behind - are heard better and more accurately;
You can also go to the PLAYBACK DEVICES section, then SPEAKERS and set the LOUD COMPENSATION.
I also advise you to reduce the volume of shots with this console command - suitvolume 0
You can also adjust the audio buffer size - snd_mixahead 0.1
Launch parameters
The launch options are some commands that are entered in the field in the properties of the game, these commands will give you some options and increase the FPS in the game:
-novid- disables the initial splash screen;
-console- turns on the game console at the beginning of the game;
-freq "value"- screen refresh rate (usually 60 or 70 or 100);
-high- start the game with high priority;
-low- start the game with low priority;
-fullscreen- full screen mode;
+cl_updaterate 128- the maximum number of requested package updates from the server (per second);
+cl_cmdrate 128- the maximum number of packets sent to the server (per second);
-tickrate 128- update frequency;
-w "value"- screen width;
-h "value"- screen height;
-threads "value"- the number of cores used by the game;
-noforcemspd- mouse speed is the same as in Windows;
-noforcemaccel- disable mouse acceleration;
-noforcemparms- mouse buttons work like in Windows;
The sight from itself, in principle, is nothing important, it serves as a kind of guideline in CS. We focus on where and how we will shoot. Sights are different, and they can be made in different ways, both on the site and on a special user map. And if you like the console, then here:
KINDS
cl_crosshairstyle 0 - dynamic by default;
cl_crosshairstyle 1 - static by default;
cl_crosshairstyle 2 - classic;
cl_crosshairstyle 3 - classic dynamic;
cl_crosshairstyle 4 - classic static;
COLOR
cl_crosshaircolor 0- red;
cl_crosshaircolor 1- green;
cl_crosshaircolor 2- yellow;
cl_crosshaircolor 3- blue;
cl_crosshaircolor 4- blue;
cl_crosshaircolor 5, 6, 7, 8- other colors;
DOT
cl_crosshairdot 0- without a dot in the middle;
cl_crosshairdot 1- with a dot in the middle;
STROKING
cl_crosshair_drawoutline 0- sight without stroke;
cl_crosshair_drawoutline 1- sight with a stroke;
cl_crosshair_outlinethickness 0- thickness 0;
cl_crosshair_outlinethickness 1- thickness 1;
cl_crosshair_outlinethickness 2- thickness 2;
cl_crosshair_outlinethickness 3- thickness 3;
(the larger the value, the thicker, from 0 to 3)
TRANSPARENCY
cl_crosshairalpha 0- you can see her sight;
cl_crosshairalpha 127- the sight is half transparent;
cl_crosshairalpha 255- the sight is completely opaque;
cl_crosshairusealpha 0- transparency disabled;
cl_crosshairusealpha 1- transparency is enabled;
SIZE
cl_crosshairsize 0- size 0;
cl_crosshairsize 5- size 5;
cl_crosshairsize 10- size 10;
SIGHT LINE THICKNESS
cl_crosshairthickness 0, 1, 2, 3(the more - the thicker);
DISTANCE BETWEEN LINES
cl_crosshairgap -5- there is no distance;
cl_crosshairgap 0- the distance between the lines is small;
cl_crosshairgap 5- long distance;
(you can put any numbers up to 5 and minus 5);
MAP FROM THE WORKSHOP
This map is from famous CS:GO map developer - crashz. The map is easy to master and it seems to me that everyone will understand here:
There you just need to shoot at the settings you need, for example, shoot at the SIZE section, a sign appears where you can adjust the size of the sight, shoot at +1, +0.5, +2 and it will increase respectively by 1, 0.5, 2 times. With -1, -0.5, -2 everything is the same, only in reverse.
WEBSITE
This site is also very simple, like the above map, it is quite easy to make a scope on it, the instructions for installing the scope will be indicated a little below:
After creating the crosshair, go to the folder where CS:GO is installed, find the folder there csgo, open the folder in it cfg, create a text document there, then paste the commands of your sight that were shown to you on the site below the sliders, click File --> Save As --> Name your file whatever you like --> Attribute to the name .cfg--> Go to CS:GO --> Open the console --> Enter this exec "config name" (not in quotes). That's all.
Radar and Simple radar
RADAR
Radar is a must have for any CS player. Therefore, I will try to explain how to set it up and improve it.
The first is that you need to try to reduce the radar to such an extent until you say: "There is nowhere less!". This can be easily done in the CS:GO settings, but I still recommend going to the custom map - Hud generator by Distroir. This is more convenient, since you can immediately see the result of the settings on the map itself, and not switch to the menu, then back. Also, this map will help you in setting up the HUD, but more on that later. Link to it:
So, on this map, you can easily adjust the size of the radar, its scrolling, the size of the map on the radar. Personally, my advice is to take away the scrolling, make the size of the radar a little larger than its standard size, but reduce the map on it until you can see it all.
SIMPLE RADAR
But after all, the usual radar is a bit bad for a normal game and it has several disadvantages:
1. It does not show small details (most barrels, boxes, cars, etc.);
2. You cannot learn the names of positions and different places on it;
3. Due to the nondescript gray-pale color, you can not understand in some situations where the enemy is (you see on the radar that he is on short, go there, and he goes from the city to the plant and kills you);
Therefore, there is one handy thing, such as Simple Radar. This radar is the absolute opposite of the standard one, namely:
1. It shows small details;
2. You can learn the names of positions and places on it (when loading the map, all positions are indicated on it);
3. The colors are blue, gray and blue, with this you can easily understand where your opponent is - above or below;
DOWNLOAD AND INSTALLATION:
Don't worry, a lot of esportsmen and streamers use it because it's more convenient and you won't get banned (ESL commentators also stream matches with it, and as you can see, NOTHING). You can download it on this site (official):
Scroll down, you see a large inscription DOWNLOAD, then put on the bottom of the FULL PACK and the button with the same inscription DOWNLOAD, only a little smaller. After downloading, extract the archive to any empty folder --> Go to the folder where our CS:GO is installed --> Look for the folder csgo--> Go to the folder resource--> Folder overviews--> Throw files there with a replacement. That's all, your new, unique radar is installed. Here is an example of the difference (on the left is standard, on the right is Simple radar)
HUD/ Interface
The interface is a thing that won't matter too much, either for you or for the game process. To set up the interface, we just need to go to this map (I mentioned it when talking about the radar). Link for those who are lazy:
Here you can set any color from the list for your interface. I do not advise you to choose bright colors - they distract from the game, but maybe someone is used to it. And the color is selected in the middle plate:
You can also make the font color of the weapon change depending on the quality of the skin (I don’t know why, but I set this function myself). She is placed there. Also on this map you can change the position net_graph, and resize it. In addition, you can change the style of armor and cartridges, you can make it so that instead of the avatars of the players it shows only the number of players in the teams, and move this plate either up or down (as you like). All this can be found in the first table on the map:
Hand position
The position of the hands will not affect the shooting, but it will affect how we perceive the game and the actions in it. Not everyone will be able to normally play a game where a character holds a gun in front of his nose, and even to the side, and not directly. To change the position of the hands in CS:GO there is a cool custom map from our famous crashz - crashz "Viewmodel Generator. Link to it:
In fact, the position of the hands is a very simple concept. that is, all you need to do is set values for each variable (x, y, and z). I don't think you need to explain what these variables mean. Here are the console commands to help you adjust the position of the hands:
viewmodel_presetpos 0 - prescribe before you write the following commands;
viewmodel_offset_x [-2 to 2.5];
viewmodel_offset_y [-2 to 2];
viewmodel_offset_z [-2 to 2];
viewmodel_fov [54 to 68]- "arm length";
HAND CHANGE
cl_righthand 0 - left hand
cl_righthand 1 - right hand
For convenience, you can put a bind to change hands in CS:GO (I advise you to set it so that the keys for the bind are nearby)
Bind "key" "cl_righthand 1" - right
Bind "key" "cl_righthand 0" - left
Basically, what are binds? Bind, bind from English bind - binding abilities to pressing mouse / keyboard / joystick keys. For example, "bind the purchase of a smoke grenade by 1" - make it so that when you press the "1" key, the character uses the ability "buy a smoke grenade".
Right side of the keyboard:
1. kp_slash("/" button)
2. kp_multiply (button "*")
3. kp_minus (button "-")
4. kp_home (button "7")
5. kp_uparrow(button "8")
6. kp_pgup(button "9")
7. kp_leftarrow(button "4")
8. kp_5 (button "5")
9. kp_rightarrow (button "6")
10. kp_end(button "1")
11. kp_downarrow(button "2")
12. kp_pgdn (button "3")
13. kp_ins(button "0")
14. kp_del (button ".")
15. kp_plus ("+" button)
16. kp_enter ("Enter" button)
WEAPON
RIFLES
:
Scout (ssg08)
Galil (galilar)
Famas (famas)
SG550 (sg550)
AUG (aug)
M4 (m4a1)
M4A1 with silencer (m4a1_silencer)
ak47 (ak47)
G3SG1 (g3sg1)
SCAR-20 (scar20)
AWP (awp)
PISTOLS - MACHINE GUN
:
Mac 10 (mac10)
UMP (ump45)
P90 (p90)
bison (bizon)
MP7 (mp7)
MP9 (mp9)
SHOTGUN
:
Auto Shotgun (xm1014)
Mag7 (mag7)
Sawed Off Shotgun (sawedoff)
Nova Shotgun (nova)
M249 (m249)
Negev (negev)
PISTOLS
:
228 Compact (p228)
Glock (glock)
Dual Elites (elite)
Five Seven (tec9) - and yes, to buy Five Seven, you need to enter "buy tec9";
Desert Eagle (deagle)
Tec9 (tec9)
HKP2000 (hkp2000)
USP (usp_silencer)
P250 (p250)
GRENADE AND EQUIPMENT :
Incendiary Grenade (incgrenade) - incendiary grenade
Flashbang (flashbang) - light
Smoke (smokegrenade) - smoke
HE Grenade (hegrenade) - explosive
Molotov (molotov) - molotov
Decoy (decoy) - false
Kevlar (vest) - body armor
Kevlar + Helmet (vesthelm) - body armor + helmet
Zeus x27 (taser) - shocker
Defuse Kit (defuser) - sapper kit
PRO BANDS
In general, the bind looks like this:
bind "button" "action" OR bind "button" "action; action" (there can be several actions) FOR EXAMPLE:
bind f2 "buy awp; buy vesthelm; buy deagle; buy flashbang"
SCRIPTS
A script is a program or script file that automates some task that a user would do manually using the program's interface. In this case, this is a text document in which certain commands are entered that will be executed when a key is pressed. Here is an example of one of the most famous scripts:
JUMP GRENADE SCRIPT
alias "+MD" "+jump:-attack"
alias "-MD" "-jump"
bind "key" "+MD"
They are based on such an example, that is, a certain "scheme" of binds. To be honest, there are plenty of them on the Internet, but personally I use only this one.
The font does not play any role in the game, you can simply install it if you are infuriated by the standard one. You won't catch a ban, because a lot of streamers use such a thing and as you can see, nothing! So how to install it?
1. Go to the site:
2. Download any font;
3. After that, you will have an archive (where you indicated the download);
4. Extracts archive files to an empty folder;
5. Go to the "end" of the folders, where you will see 2 files (format cfg And Shockwave Flash);
6. Copy them;
7. Go to the folder where your CS:GO is installed and follow this path:
Counter-Strike Global Offensive --> csgo --> resource --> flash ;
8. Transfer those 2 files that you copied with a replacement to the flash folder;
9. Go to CS:GO and admire the new font;
Thank you!
Thank you for your attention, friend, I hope you can set up CS:GO without any problems, and if they arise, write in the comments what went wrong, and maybe you will get an answer from me, and if I don’t answer, then you will be happy help other CS:GO players who asked for my guide.
Immediately after installing the CS:GO client, you will be able to start the game process, however, in order to achieve maximum comfort, we would strongly recommend First, preconfigure the client.
This is done quite quickly and without any hassle, so we see no reason to refuse such events. After all, 15 minutes of tuning can save you millions of nerve cells. So, let's look at the main points that you need to touch before connecting to the server.
Mouse sensitivity
First of all, you need to set mouse sensitivity, since this is perhaps the most important parameter of the game. Choose the sharpness value that suits you. We cannot name specific values, since in each individual case they may vary. It all depends on the model of the mouse, on the style of the game, on the quality of the rug and other factors.
In addition, if you are the proud owner of an expensive, one might even say, professional mouse, then you will need to additionally adjust the DPI parameter, that is, the number of dots per inch. To do this, go to the proprietary settings of the mouse, and set the DPI value at 400-1000. This value is considered the most optimal for a comfortable game at low and medium mouse sensitivity. In the game itself, the sensitivity is set within 1,7-2,5. Acceleration is disabled, and direct connection, on the contrary, is activated.
Launch Options and Graphics
Now the important point. In order not to enter various commands into the console a million times, many of them can be registered in the game launch options. To do this, go to the games library in Steam, right-click on CS:GO, go to properties, and from there to launch settings. Next, paste this set of commands there:
- +cl_cmdrate 128 -novid - freq 60 -high -full -console -m_rawinput -noforcemaccel -threads 4
Rest assured, it simply does not make any sense for you to understand what each individual command means, since such a parameter value is optimal for 99.9% of cases. Take our word for it, and just copy all the above commands into the launch options line.
As for the graphics, then the opinion of the majority does not exist. Someone plays with a screen aspect ratio of 4:3, someone - at 16:9. So try both of these options at different levels of graphics and anti-aliasing, and find the best option for you.
The only thing you really need to do is set the maximum brightness, enable multi-core processing, expand the window to full screen and disable synchronization. Maximum brightness will allow you to see enemies in dark rooms, multi-core processing will connect all available processor cores, an open window will simply provide convenience, and disabled synchronization will not allow system mouse settings to affect the settings made in the game itself.
Game Options and Console Commands
The last thing left to do is set up some points in the game, as well as register a couple of important console commands. So, first of all, go to the game options and enable the developer console there. Next, be sure to uncheck the "Switch to raised weapon" checkbox.
Otherwise, for example, when shooting from a pistol, if you accidentally step on a machine gun, the game will automatically switch to it, and this is very disturbing. So we turn this off without question. You should also work a little on the radar settings so that the minimap gives as much information as possible.
Finally, you will need to write a few useful commands to the console:
- cl_interp 0
- cl_interp_ratio 1
- Rate 128000
On our CS:GO settings page you will find the best settings for DPI and mouse sensitivity, as well as screen resolutions, aspect ratios and optimal graphics settings to get the best performance.
Many CS:GO newbies feel that personalizing the game to their liking is bound by the boundaries of the game's settings menu. If you have come to this page, then you will understand the wonders that can be achieved, as well as the benefits of adjusting your mouse sensitivity to be faster than your enemies.
If you are serious about CS:GO, then you have time to sort out all your settings. The level of customization possible with console commands is pretty staggering, and you can change anything from simple mouse sensitivity to changing the screen resolution in your game.
Below we've compiled everything you need to know about changing your CS:GO settings to help you achieve optimal FPS. All of this is laid out in a walkthrough style with no assumed knowledge involved.
Disabling Windows Mouse Acceleration
Never changed computer settings?
Not surprising if you didn't, as we certainly didn't touch anything until we started getting serious about CS:GO in our attempts to climb the ranks.
For starters, you probably still have mouse acceleration enabled, and that's the first priority.
To simply explain what enabling mouse acceleration means, Windows subtly changes the way the cursor moves in an attempt to increase precision. It turns out that this feature is not ideal if you want to have full control of your scope.
Disabling mouse acceleration will mean that Windows will stop adjusting the pointer, and this will ensure that every mouse movement is yours. You may not even notice it at first, but you will begin to develop muscle memory as you move your mouse, developing inconsistencies in your target that are the result of the computer awkwardly trying its best to help.
Here's how to disable mouse acceleration:
- Type "mouse options" in the Windows search bar (start menu).
- Select Change Mouse Settings.
- Click Advanced Mouse Options.
- Select the Pointer Options tab.
- Uncheck "Improve pointer precision".
- Click "Apply" in the lower right corner.
- Click OK.
Mouse DPI settings
First, you need to have a mouse that can switch DPI. If you are using a regular mouse with your PC, then it is unlikely that it supports DPI switching.
It won't cost much, but rest assured that the right gaming mouse is worth the investment, as you'll reap the benefits for both video gaming and productivity.
DPI stands for "Dots Per Inch" and the setting for this setting determines how many pixels you will use when you move your mouse. Playing at 400 DPI will be extremely difficult and your hand will fly all over the mat to shoot at the enemy, while at 1200 DPI you will only need to move a little to achieve the same result. This does not mean that one is better than the other - it all depends on personal preference.
Low DPI (400-800)
When you set your mouse to a low DPI level, you will have to put more effort into moving the cursor. Often you will need to move your mouse strongly to turn around in games or even close browser tabs.
We found Low DPI settings around 400-800 ideal for precise aiming as you start to build muscle memory. Just be careful and know that it takes some time.
One of the main downsides is the time it takes to reach your chosen destination if you don't practice on such a low setting.
High DPI (1000-3000+)
Few gamers use 1000 DPI+ as this is more of a preference if you like to use your wrist instead of your hand when moving your mouse.
Having such a high DPI means you will be able to click with the flick of your wrist, however your accuracy will most likely suffer as there is little room to aim.
 What to choose?
We would suggest choosing both low and high DPI settings and trying them out. Focus on moving, turning and shooting. Practice a little with the bots and choose the right DPI.
Force yourself to focus on your target before headshotting, or turn around and aim at enemies before taking a kill to see how you deal with the recoil.
Finally, get to the DPI that feels most comfortable and start honing it in game.
Some mice come with software that allows you to fine-tune your mouse's DPI per pixel instead of being locked to moving up in increments. If there's a DPI setting that isn't quite right, try tweaking it until you find your ideal sensitivity.
Thank you friends for visiting our resource. If the information turned out to be useful, share it on social networks using the buttons at the end of the article.
Best resolution and aspect ratio
If you've ever watched the best CS:GO players in the world via streaming services like Twitch, then you'll probably notice that their screen isn't crisp 1080p HD.
Instead, it probably looks a bit low quality and scales up a lot. It all depends on the screen resolution and the aspect ratio they play in, with many older CS players using older monitors. They feel more comfortable playing the game with the screen settings they've always known.
Of course, there are advantages and disadvantages to playing at lower resolutions and aspect ratios. Before we cover that, we'll take a look at what's available to you in the game:
Aspect Ratio
- 16:9 - Most often.
- 16:10 - Mainly used on new monitors.
- 4:3 - Old school. This will cause a "stretched" screen.
Some gamers and many pros play in 4:3 aspect ratio, which means the image you see on the screen is stretched and enlarged. One of the main advantages of this aspect is that you can see enemies more clearly, and potentially even shoot them easier.
One of the main downsides of stretched 4:3 resolution is that you won't be able to see the full width of the screen, which means you'll need to work more on your positioning and movement.
 We don't have much to say about 16:9 as it's fine for your screen, allowing you to see absolutely everything without stretch marks. Nothing will be enlarged, everything will look farther compared to 4:3. We personally prefer this over anything else.
Like sensitivity, this comes down to personal preference. Try them all and see which one suits your playstyle.
To change the resolution and aspect ratio at any time, go to the video settings menu and you can find them right at the top.
 Better graphics settings
Below is an overview of the best graphics settings and for maximum FPS. It won't make the game beautiful, but it will save you every last frame per second!
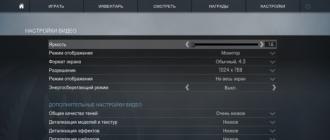
- Brightness - choose the percentage of brightness that suits you.
- Color mode - computer monitor.
- Aspect ratio. We personally prefer 16:9, but choose what works for you.
- Permission. Again choose what works for you.
- Display Mode - Go full screen.
- Notebook Power Saving - Disabled
- Global shadows - minimum value
- Textures - minimum
- Effects are minimal.
- Layered Rendering - Enabled
- Smoothing - disabled
- Texture Filtering - Bilinear
- Anti-Aliasing FXAA - disabled
- Set shaders and other settings to a minimum, or disable them altogether.
- Blur - disabled
Full game settings Counter-Strike: Global Offensive
Part 1. Teams for training.(sv_cheats 1)
Issue weapons:
give weapon_deagle - Drop Desert Eagle
give weapon_usp_silencer - drop USP-S
give weapon_glock18 - drop Glock-18
give weapon_knife - a knife falls to the ground
give weapon_knifegg - a golden knife falls to the ground
give weapon_m249 - drop M249
give weapon_tec9 - Drop Tec-9
give weapon_negev - drop Negev
give weapon_scar20 - Drop SCAR-20
give weapon_sawedoff - Drop Sawed-Off
give weapon_nova - drop Nova
give weapon_ssg08 - Drop SSG 08
give weapon_sg553 - Drop SG 553
give weapon_cz75a - drop CZ75-Auto
give weapon_hkp2000 - P2000 drop
give weapon_awp - AWP drop
give weapon_aug - drop AUG
give weapon_ak47 - drop AK-47
give weapon_m4a1_silencer - drop M4A1-S
give weapon_m4a1 - drop M4A4
give weapon_galilar - drop Galil AR
give weapon_famas - drop FAMAS
give weapon_p90 - Drop P90
give weapon_ump45 - drop UMP-45
give weapon_mac10 - Drop MAC-10
give weapon_xm1014 - drop XM1014
give eapon_elite - Drop of Dual Berettas
give weapon_fiveseven - Drop Five-SeveN
give weapon_taser - Zeus drop
give weapon_hegrenade - grenade drop
give weapon_flashbang - Drop a blinding grenade
give weapon_smokegrenade - Drops a smoke grenade
give weapon_molotov - Molotov cocktail drops
give weapon_decoy - Drop a decoy grenade
give weapon_healthshot - drops of honey. injection
give weapon_tagrenade - drop tactical grenade
give weapon_c4 - drop c4
give item_cutters - drops a demining tool
give item_assaultsuit - armor drop
give item_heavyassaultsuit - drop of heavy armor
Mat_wireframe 1 - the ability to see the entire frame of the walls, to see through the walls, in addition, the places that are shot through are marked separately.
mat_wireframe 0 - disables the ability to see through walls.
r_drawothermodels 2 - Allows you to see other players through walls, but doesn't show the general wall frame.
r_drawothermodels 1 - disables this feature.
noclip - flight through walls. Entering the noclip command again disables this feature.
thirdperson - third person view.
firstperson - returns to normal first person view.
god - immortality
mp_maxmoney 16000 - money limit.
mp_startmoney 16000 - issue initial money.
mp_respawn_on_death_ct 1 - Instantly respawn CT after death.
mp_respawn_on_death_t 1 - instantly respawn T after death.
mp_limitteams 32 - limit of players in a team.
mp_autoteambalance 0 - balance of players in the team.
sv_infinite_ammo 1 - enable infinite ammo.
sv_showimpacts 1 - show impact.
sv_showimpacts_time 5 - impact time in seconds.
sv_grenade_trajectory 1 - enable the grant trajectory.
sv_grenade_trajectory_time 20 - grenade trajectory time in seconds.
bot_kick - kick bots from the server.
mp_free_armor 1 - give everyone armor.
mp_teammates_are_enemies 0 - Make allies enemies.
bot_stop 1 - bots stop.
bot_knives_only - Bots only use knives.
bot_pistols_only - Bots only use pistols.
bot_all_weapons - Bots use all weapons.
cl_righthand 0 - changes the hand to the left when the value is "0" and vice versa when the value is "1".
mp_buy_anywhere 1 - enable the buy zone throughout the map.
sv_gravity 500 - enable reduced gravity.
bot_add_t - Add bot to T
bot_add_ct - Add bot to CT
mp_restartgame 1 - restart the match.
mp_freezetime 0 - movement freeze at the beginning of the round (in seconds).
mp_warmup_start - start warmup.
mp_warmuptime 350 - warm up time (in seconds).
mp_warmup_end - end warmup
mp_maxrounds 30 - number of rounds in the match (0 disables the limit).
mp_roundtime_defuse - maximum round time for de maps (in minutes).
mp_roundtime_hostage - maximum round time for cs maps (in minutes).
mp_roundtime - maximum round time for other maps (in minutes).
mp_timelimit - maximum match time (in minutes, 0 disables the limit).
ammo_grenade_limit_total 150 - (more possible) - the maximum number of grenades that a player can carry.
sv_showbullethits 1 - shows where you hit the enemy by drawing his silhouette.
cl_disable_ragdolls 1 - cs go console command that will help with fps during training. Often, when 3-4 smoke lies, it becomes noticeable that the FPS sags. This command will remove physics from the Ragdoll game.
Below is what is useful, but not always:
r_drawparticles 0 - another fps command. Removes almost all animation - shots, water splashes, etc.
sv_ignoregrenaderradio 1 - Disables the radio.
Part 2. "Cl" commands (General client settings)
//cl General client settings
cl_allowdownload "1" // Download maps, models and decals from the server when connected
cl_allowupload "0" // Disable uploading maps, models and decals to the server when connected
cl_autohelp "0" // Turn off hints (!D."1")
cl_autowepswitch "0" // Disable automatic change of picked up weapons (!D."1")
cl_bob_lower_amt "21"
cl_bobamt_lat "0.33"
cl_bobamt_vert "0.14"
cl_buy_favorite_nowarn "0"
cl_buy_favorite_quiet "0"
cl_chatfilter_version "1"
cl_chatfilters "63" // Chat filter
cl_class "default" // Player skin selection ("default")
cl_clearhinthistory "1" // Clears client-side hint memory.
cl_cmdrate "128" // The number of packets the client can send to the server.
cl_crosshairalpha "255.000000" // Crosshair transparency. (!D."200")
cl_crosshaircolor "5" // 0 - Green; 1-Red; 2-Dark blue; 3-Yellow; 4-Light blue; 5-The color of the crosshair is assigned by RGB commands.
cl_crosshaircolor_b "80" // Crosshair color (B)
cl_crosshaircolor_g "240" // Crosshair color (G)
cl_crosshaircolor_r "60" // Crosshair color ®
cl_crosshairdot "1" // Crosshair dot (!D."0")
cl_crosshairscale "0" // Crosshair size. (!D"0")
cl_crosshairsize "0.0" // crosshair size. (!D."6")
cl_crosshairstyle "1" // Change crosshair style (!.D"0")
cl_crosshairthickness "1" // Crosshair thickness. (!D"0.5")
cl_crosshairusealpha "1" // Enable/disable the transparent crosshair option.
cl_crosshair_drawoutline 1 - turns on the black outline
cl_crosshair_outlinethickness 0-3 - outline size
cl_debugrumble "0" // Disable \ Enable "Rumble" debugging.
cl_detail_avoid_force "0.0"
cl_detail_avoid_radius "0" // The radius at which any trash will be visible.
cl_detail_avoid_recover_speed "0"
cl_detail_max_sway "0" // Distance at which debris will be visible.
cl_disablefreezecam "1" // Disable the death screen (!D. "0")
cl_disablehtmlmotd "1"
cl_downloadfilter "nosounds" // Determines which files can be downloaded from the server (all:Download all files, none:Don't download files, nosounds:Don't download sounds).
cl_dynamiccrosshair "0" // Enable dynamic crosshair - expands on the move and while jumping (D."0").
cl_fixedcrosshairgap "3" // Size of the new crosshairgap
cl_forcepreload "1" // Load information about textures and models at the beginning of the map. (!D"0")
cl_freezecampanel_position_dynamic "1"
cl_idealpitchscale "0.1"
cl_inv_showdividerline "0"
cl_interp "0.0299" // The time interval through which the interpolation occurs. (!D."1")
cl_interp_ratio "1" // The number of gaps between "interpolating" the world. (! D. "2")
cl_lagcompensation "1" // Performs lag compensation on the server side.
cl_language "russian" // Game language (!D. "english")
cl_logofile "materials/vgui/logos/t1.vtf" // Path to your spray
cl_minimal_rtt_shadows "1"
cl_mouselook "1" // Set to 1 to look around with the mouse, 0 for looking around with the keyboard.
cl_observercrosshair "1" // Display crosshair in observer mode (!D. "1").
cl_playerspraydisable "0" // Enable display of player sprays
cl_predictweapons "1" // Performs client side prediction of weapon effects. (! D. "1")
cl_resend "6" // Time after which the packet will be sent if the previous one did not reach
cl_righthand "1" // Weapon in right hand
cl_rumblescale "0" // Rumble effect sensitivity scale. (!D"1.0")
cl_scalecrosshair "1" // Enables resizing
cl_show_scaleform_achievement_popups "1"
cl_showerror "0" // Close the prediction error window
cl_showfps "0" // Don't show the FPS indicator at the top of the screen
cl_showhelp "0"
cl_showloadout "0"
cl_showpluginmessages "1" // Allows plugins installed on the server to show you messages (ads, etc.).
cl_soundfile "sound/player/jingle.wav" // Jingle sound file.
cl_spec_mode "6" // Spectator mode. (!D."1") 4 - On behalf of the player. 5 - Binding the flying camera to the player. 6 - Flying mode.
cl_team "default" // Team selection when connected to the game
cl_teamid_overhead_name_alpha "240"
cl_teamid_overhead_name_fadetime "0.5"
Cl_timeout "25" // If the server does not respond within the specified time, an automatic shutdown occurs.
cl_updaterate "128" // The number of packets the client can receive from the server.
cl_viewmodel_shift_left_amt "1.5"
cl_viewmodel_shift_right_amt "0.75"
Closecaption "0" // Subtitles
closeonbuy "0" // closes the store after buying
commentary_firstrun "0" //
con_enable "1" // Activate the console
Crosshair "1" // Enable Crosshair
cursortimeout "60.0"
Clientport "27005" // Client Port (Default: "27005")
Part 3. Sound settings.
dsp_enhance_stereo "1" - Stereo enhancement effect. (By default."0")
dsp_mix_max "0.9" -
dsp_slow_cpu "0" - High sound quality
dsp_volume "1.0" - Enable sound
force_audio_english "0"
fps_max "401" - FPS limit (Default. "300") (!0 - No limit).
func_break_max_pieces "0" - Number of fragments from any junk such as boxes, bottles, barrels. (By default."15")
g15_update_msec "250"
gameinstructor_enable "0"
host_flush_threshold "20" (Default."20")
Snd_mixahead "0.1" - Sound buffer size. ("0.1")
snd_ducking_off "1"
snd_duckerattacktime "0.5"
snd_duckerreleasetime "2.5"
snd_duckerthreshold "0.15"
snd_ducktovolume "0.55"
snd_legacy_surround "0"
snd_musicvolume "0.000000" - Music volume
snd_mute_losefocus "1"
snd_pitchquality "1"
snd_rear_speaker_scale "1.0"
ss_splitmode "0"
snd_rebuildaudiocache - Rebuild all audio caches from resource list
soundscape_flush
suitvolume "0" - Decrease the volume of shots. (Default. "0.25")
Part 4. Mouse settings. ("m" commands)
m_customaccel "0" - Custom mouse acceleration
m_customaccel_exponent "0" - Disable acceleration proportionality factor measurement.
m_customaccel_max "0" - Maximum acceleration proportionality factor.
m_customaccel_scale "0.04" - Custom mouse acceleration value.
m_forward "1" - Sets the mouse forward speed sensitivity multiplier.
m_mouseaccel1 "0" - Windows mouse acceleration, initial threshold (2x movement).
m_mouseaccel2 "0" - Windows mouse acceleration, medium threshold (4x movement).
m_mousespeed "1" - Windows mouse acceleration factor
m_pitch "0.022" - Mouse inverted(Disabled) (By default. "0.022")
m_rawinput "1" - Direct mouse connection ignoring OS control panel settings (Default."0")
m_side "0.8" - Sets the mouse speed sensitivity multiplier.
m_yaw "0.022" - Sets the left-right turn speed sensitivity multiplier.
Mouse sensitivity is configured with the commands:
Sensitivity "1.200000" - Sight movement speed
sf_ui_tint "1"
Now a little about the mouse itself.
Better wired, laser or optical - it doesn't matter, but everyone is used to laser ones.
You need to get used to the mouse, you need to select according to your ergonomics.
You can glue the "legs" to the mouse, I saw it with different gamers and met in the recommendations.
How to set up a mouse.
Go to "Control Panel" -> "Mouse" -> "Pointer Options".
Usually there is a speed on the 6th division.
We need to disable mouse acceleration. This is done like this:
In the "Enable enhanced pointer precision" checkbox, uncheck it.
In the launchpad or configuration, you need to write:
-noforcemaccel -noforcemspd -noforcemparms
And disable acceleration in the game itself in the settings:
Keyboard/Mouse - Mouse acceleration - select "OFF"
In the configuration file, you can fix the following:
m_rawinput "0" // Direct connection enabled
m_customaccel "0" // Mouse acceleration disabled
m_customaccel_exponent "0" // Acceleration value 0
m_mousespeed "0" // mouse acceleration "0"
m_mouseaccel1 "0" // mouse acceleration (at 2x mouse speed)
m_mouseaccel2 "0" // mouse acceleration (at 4x mouse speed)
In general, something like this.
A couple of examples of mouse settings:
Mouse speed: 400dpi;
Direct mouse connection: Disabled (m_rawinput 0);
Mouse sensitivity in game: 1.3;
Mouse sensitivity in zoom: 1.2 (zoom_sensitivity_ratio 1.2);
Mouse sensitivity in windows: 6/11;
Mouse speed: 500dpi;
Mouse Hertz: 500 Hz;
Mouse Acceleration(Acceleration): Off;
Direct mouse connection: On (m_rawinput 1);
Mouse sensitivity in game: 2.5;
Mouse sensitivity in windows: 5/11;
Part 5. Graphic settings. ("mat" commands)
mat_accelerate_adjust_exposure_down "0" (Default.?")
mat_autoexposure_max "3" - Maximum screen brightness.
mat_autoexposure_min "0.5" - Minimum screen brightness.
mat_bloomamount_rate "0"
mat_colcorrection_forceentitiesclientside "0"
mat_debug_postprocessing_effects "0" - Do not show postprocessing algorithms in screen quadrants (By default."0")
mat_dynamic_tonemapping "0"
mat_disable_bloom "1" - Disable the bloom effect (Default."0")
mat_monitorgamma "2.2" - Gamma.(D "2.2") 1.6(Light) - 2.6(Dark)
mat_monitorgamma_tv_enabled "0"
mat_powersavingsmode "0"
mat_spewalloc "0"
mat_queue_mode "2" - Enable multi-core rendering (-1=default, 0=synchronous single thread, 1=queued single threaded mode, 2=uses multi-threaded mode)
mat_savechanges - Save video settings in the windows registry
mat_setvideomode "1680 1050 1" - Screen resolution 1680 by 1050
mat_texture_list_content_path ""
mc_accel_band_size "0.5"
mc_dead_zone_radius "0.06"
mc_max_pitchrate "100.0"
mc_max_yawrate "230.0"
mm_server_search_lan_ports "27015,27016,27017,27018,27019,27020"
muzzleflash_light "0" - Disable dynamic (reflected) light from flashes.
Part 6. Setting up graphics textures. ("r" commands)
r_cheapwaterend "0" - Drawing the bottom and water
r_cheapwaterstart "0" (Default. "0")
r_drawmodelstatsoverlaymax "1.5"
r_drawmodelstatsoverlaymin "0.1"
r_drawtracers_firstperson "1"
r_drawparticles "1"
r_dynamic "0" - Dynamic highlights from objects. (By default."1")
r_eyegloss "1"
r_eyemove "1"
r_eyeshift_x "0"
r_eyeshift_y "0"
r_eyeshift_z "0"
r_eyesize "0"
safezonex "1.0"
safezoney "1.0"
r_farz "0"
r_radiosity "4" (Default."4")
Part 7. Internet settings. ("net" commands)
net_allow_multicast "1"
net_channels "0" - Display channel information in the console (same information as net_graph command).
net_graph "1" - Enable the connection information bar
net_graphheight "40" - The height of the net_graph panel
net_graphmsecs "400" - Block update rate changes
net_graphpos "1" - Location of the net_graph.
net_graphproportionalfont "0.5" - Net_graph size
net_graphshowinterp "1" - Shows the interpolation line
net_graphshowlatency "1" - Draws a graph of Ping and "packets"
net_graphsolid "1" - Turn off the transparency of the "lagomer"
net_graphtext "1" - Include text in the block
net_maxroutable "1260" - Maximum fragmentation in bytes per packet
net_scale "5" - Chart size
net_steamcnx_allowrelay "1"
net_splitpacket_maxrate "15000" (Default. "15000")
npc_height_adjust "1" (Default. "1")
option_duck_method "0" - Hold/single press the duck key. (Default. "0")
option_speed_method "0" - Hold/single press the run key. (Default. "0")
password "" - Current server access password (Default. "")
play_distance "1"
player_botdifflast_s "2"
player_gamemodelast_m "0"
player_gamemodelast_s "0"
player_gametypelast_m "0"
player_gametypelast_s "0"
player_last_leaderboards_filter "0"
player_last_leaderboards_mode "0"
player_last_leaderboards_panel "0"
player_last_medalstats_category "0"
player_last_medalstats_panel "0"
player_maplast_m "0"
player_maplast_s "0"
player_medalstats_most_recent_time "0"
player_teamplayedlast "3"
rate "30000" - The number of bytes the client can receive from the server per second.
Part 8. FPS.
fps_max 401 - FPS limit (Default 300) (!0 - No limit).
func_break_max_pieces 0 - The number of fragments from various utensils (vases, radios, furniture, etc.). (By default15)
Part 9. Texture settings. ("texture" commands)
texture_budget_background_alpha "9999999" (Default "128").
texture_budget_panel_bottom_of_history_fraction ".25"
texture_budget_panel_height "284"
texture_budget_panel_width "512"
texture_budget_panel_x "0"
texture_budget_panel_y "450"
tr_best_course_time "0"
tr_completed_training "0"
Part 10. Hand position settings. ("viewmodel" commands)
viewmodel_fov "65" - For zooming in / out of the weapon model on the screen (By default. "60") min 54 max 65
viewmodel_offset_x - 0 x position of weapon and arm
viewmodel_offset_y - 0 the position of the weapon and arm in the y-axis
viewmodel_offset_z - 0 weapon and arm z position
viewmodel_presetpos 0
A few examples:
First:
viewmodel_fov "65";
viewmodel_offset_x "2";
viewmodel_offset_y "2";
viewmodel_offset_z "-2";
Second:
cl_hud_background_alpha "1";
viewmodel_fov "68";
viewmodel_offset_x "2.5";
viewmodel_offset_y "0";
viewmodel_offset_z "-1.5";
viewmodel_presetpos "3";
Part 11. Voice settings. ("voice" commands)
voice_enable "1" - Enable Voice Chat.
voice_forcemicrecord "1" - Enable microphone recording.
voice_mixer_boost "0"
voice_mixer_mute "0"
voice_mixer_volume "1.0"
voice_loopback "0" - Turn off voice playback along with other players.
voice_modenable "1" - Voice chat is in fashion.
voice_recordtofile "0" - Disable microphone recording to file.
voice_scale "1" - Voice level for everyone.
voice_threshold "2000"
volume "1.0" - The volume of the overall sound.
Part 12. "vprof" commands.
vprof_graphheight "256"
vprof_graphwidth "512"
vprof_unaccounted_limit "0.3"
vprof_verbose "1"
vprof_warningmsec "10"
weapon_accuracy_logging "0"
weapon_debug_spread_gap "0.67"
weapon_debug_spread_show "0"
windows_speaker_config "1" - Speaker type Headphones.
Part 13. Game launch options.
-noforcemaccel - windows acceleration settings;
-noforcemspd - mouse speed settings;
-noforcemparms - parameters of windows mouse buttons;
-noaafonts - disable font smoothing;
-heapsize 262144 - allocation of RAM 512MB;
-heapsize 524288 - allocation of RAM 1GB;
-heapsize 1048576 - allocation of RAM 2GB;
-w 640 -h 480 - launch the game with a screen resolution of 640x480 pixels;
-w 800 -h 600 - launch the game with a screen resolution of 800x600 pixels;
-w 1024 -h 768 - launch the game with a screen resolution of 1024x768 pixels;
-full - launch the game in full screen mode;
-window - launch the game in windowed mode;
-noborder - launch the game in windowed mode without a border;
-low - start the game with low priority;
-high - start the game with high priority;
-freq 100 - Hertz change for HL1 Engine monitors;
-refresh 100 - change Hertz for HL2 Engine monitors;
-nojoy - disable joystick support;
-noipx - disable LAN protocol;
-noip - remove IP address without the ability to connect to servers;
-nosound - forcibly turns off the sound in the game;
-nosync - forcibly disables vertical sync;
-dxlevel 90 - use DirectX 9;
-dxlevel 81 - use DirectX 8.1;
-console - getting access to the developer's console;
-dev - enable mod for developers;
-zone # - allocate more memory to files like autoexec.cfg;
-safe - start the game in safe mode and disable audio;
-autoconfig - restore default video settings;
-condebug - saving all console logs in a text file console.log;
-nocrashdialog - cancel display of some errors (memory could not be read);
-novid - delete Valve intro video;
-toconsole - start the game engine in the console if the map is not defined;
+a +r_mmx 1 - start the game with a console command or cvar command on the command line (instead of cfg);
+exec name.cfg - connect the config with the name "config.cfg";
A few examples:
Open the STEAM library, then select "Properties" - "Launch Options"
and paste the command data into the line:
-novid -high +rate 128000 +cl_updaterate 128 +cl_cmdrate 128 -threads 4 -tickrate 128 +fps_max 300 -console
Fps_max 300 - Max FPS
+cl_showfps 1 - Shows FPS in the game
-novid - Removes the man at the start of the game
-threads 4 - number of cores of your processor
-high - Sets CS high priority
-freq 60(your monitor frequency) - Monitor refresh rate
-tickrate 128 - Tickrate
-cmd,upd,rate - Rates
-noaafonts - Remove anti-aliasing from fonts
-novid -console -freq 60 -threads 2 -high +rate 128000 +cl_cmdrate 128 +cl_updaterate 128 +cl_interp 1 +cl_interp_ratio 1+fps_max 300 -noforcemaccel -noforcemspd -noforcemparms
novid +rate 128000 +cl_cmdrate 128 +cl_updaterate 128 -noforcemaccel -noforcemspd -noforcemparms
novid -console -freq 60 -threads 2 -high +rate 128000 +cl_cmdrate 128 +cl_updaterate 128 +cl_interp 0 +cl_interp_ratio 1 -noforcemaccel -noforcemspd -noforcemparms
novid -console -freq 60 -threads 2 -high +rate 128000 +cl_cmdrate 128 +cl_updaterate 128 +cl_interp 0 +cl_interp_ratio 1+fps_max 0
Novid - Disable video on startup
freq 60 - monitor frequency
threads 2 - two cores
freq 60 - monitor frequency
high - run the game with high priority
rate 128000 - right
cl_updaterate 128 - rate
cl_interp 0 - Interpolation interval (Default 1)
cl_interp_ratio 1 - Number of gaps between "interpolating" the world (Default 1)
fps_max 0 - limit, default 300, no limit - 0.
If you have a regular computer / laptop, then you can not pervert, but enter:
-novid -console -freq 60 -threads 2 -high +rate 128000 +cl_cmdrate 128 +cl_updaterate 128 +cl_interp 0 +cl_interp_ratio 1 -noforcemaccel -noforcemspd -noforcemparms
And you will be happy.
Part 13. About the sight.
Everyone suffers as best and which is better. Everyone has their own color tolerance. Here everyone can pervert as he wants. Let me remind you the main commands:
cl_crosshairsize - crosshair size, the higher the value, the larger the crosshair.
cl_crosshairdot - dot in the center of the crosshair, there are two indicators: - 0 - no dot, and 1 - there is a dot.
cl_crosshairusealpha - sight transparency, 1 - on, 0 - off.
cl_crosshairalpha - crosshair transparency, from 0 to 255, the higher the value, the less transparent the crosshair.
cl_crosshair_drawoutline - crosshair outline, 0 - on, 1 - off.
cl_crosshair_outlinethickness - the thickness of the crosshair line of the crosshair, the higher the value, the thicker.
cl_crosshairthickness - thickness of crosshair lines, the higher the value, the thicker again))).
cl_crosshairgap - distance between crosshairgap, decrease minus sign, increase without minus. (for example: -5, -3, 0, 2, 4, 5, etc.)
crosshair - show/hide crosshair, 1/0 respectively.
Scope style:
cl_crosshairstyle 0 - default (dynamic)
cl_crosshairstyle 1 - default (static)
cl_crosshairstyle 2 - classic
cl_crosshairstyle 3 - classic (dynamic)
cl_crosshairstyle 4 - classic (static)
This can be done in the menu settings of the game itself: Settings > Game Options > Interface Settings in the Crosshair style field.
cl_crosshaircolor - crosshair color:
cl_crosshaircolor 0 - red;
cl_crosshaircolor 1 - green;
cl_crosshaircolor 2 - yellow;
cl_crosshaircolor 3 - blue;
cl_crosshaircolor 4 - blue;
cl_crosshaircolor 5 - custom crosshair.
Cl_crosshaircolor 5 includes the ability to use other three console commands that are responsible for color shades:
cl_crosshaircolor_r - proportion of red;
cl_crosshaircolor_g - proportion of green;
cl_crosshaircolor_b - proportion of blue;
You can set these parameters from 0 to 255.
Target example:
Cl_crosshairalpha "200";
cl_crosshaircolor "1";
cl_crosshaircolor_b "50";
cl_crosshaircolor_r "50";
cl_crosshaircolor_g "250";
cl_crosshairdot "0";
cl_crosshairgap "0";
cl_crosshairsize "5";
cl_crosshairstyle "4";
cl_crosshairusealpha "1";
cl_crosshairthickness "0.5";
cl_fixedcrosshairgap "0";
cl_crosshair_outlinethickness "0";
cl_crosshair_drawoutline "0";
Part 14. Purchasing setup.
Bind - binding to certain buttons of the keyboard or mouse of a special command or commands.
Bind uparrow "toggle net_graph 0 1" - enable/disable display of net_graph.
bind downarrow "toggle voice_scale 1 .5 .25 0" - adjust the voice volume level.
bind toggle leftarrow "cl_showfps 0 1" - enable/disable showing your FPS.
cl_autowepswitch "0" - disable automatic selection of more powerful weapons when picking up.
cl_autohelp "0" - disable automatic hints.
cl_showhelp "0" - disable showing any hints.
cl_forcepreload "1" - load all necessary files for the game before the game starts.
For extended ("full") keyboard:
Button: Button code:
/kp_slash
*kp_multiply
- kp_minus
home kp_home
8 kp_uparrow
pgup kp_pgup
4 kp_leftarrow
5 kp_5
6 kp_rightarrow
+ kp_plus
end kp_end
2 kp_downarrow
pgdn kp_pgdn
insert kp_ins
delete kp_del
enter kp_enter
Codes for weapons, grenades and equipment for binds:
Rifles
Galil galilar
Scout ssg08
famas famas
SG550 SG550
AUG aug
M4A1 m4a1
M4 (silencer) m4a1_silencer
K-47 ak47
G3SG1 g3sg1
Scar scar20
AWP awp
Submachine guns
UMP ump45
P90p90
bison bison
mp7 mp7
mp9 mp9
mac10 mac10
Pistols
P 228 p228
glock glock
dual elite
five seven five seven
Desert Eagle deagle
Tec9 tec9
hkp2000 hkp2000
USP usp_sil
P 250 p250
heavy weapons
mag7 mag7
Nova nova
xm1014xm1014
M 249 m249
negev negev
grenades
incendiary incgrenade
Molotov cocktail molotov
smoke grenade
flashbang flash drive
false decor
Equipment
Full armor vest
defuser sapper kit
taser shocker
kevlar kevlar
Part 15. About rates.
The rate parameter is not entirely independent. It works in conjunction with ping. High ping, levels all rate settings. In one sentence, he characterizes the pairing of a game on a computer with a server.
What rates are usually set. This is done in the console:
64 - for playing on official servers:
rate 80000; cl_updaterate 64; cl_cmdrate 64; cl_interp 0; cl_interp_ratio 1; cl_lag compensation 1
The rest is less common:
102:
rate 104000; cl_updaterate 102; cl_cmdrate 102; cl_interp 0; cl_interp_ratio 1; cl_lag compensation 1
128:
rate 128000; cl_updaterate 128; cl_cmdrate 128; cl_interp 0; cl_interp_ratio 1; cl_lag compensation 1
But all the configurations that I have seen have a value of 120, so you can see not to bother.
Tracking your rates is carried out by the command:
net graph 1
Which will display the following indicators on the screen:
FPS is the FPS of the player.
VAR - within 1-2 is considered acceptable, if higher - you need to look for the causes of the problem.
PING - ping.
LOSS & CHOKE - packet loss.
TICK - tick rate.
SV - server FPS.
Server VAR (Bottom net_graph) - Shows the standard deviation of server frametime (where server FPS = 1.0 / frametime) during the last 50 frames recorded on the server. If the server's frame rate is below 20 fps, then this line will draw in yellow. If the server's frame rate is below 10 fps, then this line will draw in red. The display is enabled by the net_graphshowsvframerate 1 command. the lower the VAR of the server, the worse.
Return to original values:
rate 80000; cl_updaterate 64; cl_cmdrate 64; cl_interp 0.03125; cl_interp_ratio 2; cl_lag compensation 1
Part 16. Configuration files.
The configuration files are located in this path (with a standard Steam installation):
C:\Program Files\Steam\steamapps\common\Counter-Strike Global Offensive\csgo\cfg
I didn’t understand what exactly to edit there, the experiments led to the demolition of the entire steam, cleaning and a new installation. In theory, you need to fix the autoexec file, but I didn’t find it in the folder, which of the existing files with the .cfg extension, I didn’t understand the same.
Therefore, it is best to create your own configuration file and run it with a separate command specified in the autorun settings of the game.
For example like this: -console -exec horseradish.cfg
where horseradish is the name of the configuration file, the name must be in Latin.
In order to save the desired configuration option when starting the game, then in the console, after starting, we write: host_writeconfig horseradish.cfg. The host_writeconfig command saves the current configuration.
At the same time, in order not to "spoil" in the sense of rewriting the "native" configuration file, you must enter the command exec horseradish.cfg
And what is important, when the configuration file is born, you need to write host_writeconfig horseradish.cfg in the console
An example of a configuration file will be in the next part, if it fits of course.
Part 17. "Budget" team.
//budget
budget_averages_window "0" // Number of frames to count when displaying the panel's average frame rate (!D. "30")
budget_background_alpha "0" // Panel transparency (!D. "128")
budget_bargraph_background_alpha "128" // Bar transparency (!D. "128")
budget_bargraph_range_ms "16.6666666667" // Bargraph border in seconds (!D. "16")
budget_history_numsamplesvisible "0" // Number of segments to draw the chart (!D. "100")
budget_history_range_ms "5" // Chart border in seconds (!D. "5")
budget_panel_bottom_of_history_fraction ".25"
budget_panel_height "384" // Height of the panel in pixels
budget_panel_width "512" // Width of the panel in pixels
budget_panel_x "0" // The x position of the window from the left edge of the screen
budget_panel_y "50" // Window's y position from the left edge of the screen
budget_peaks_window "0" // Number of frames to count the statistics window display (!D "30")
budget_show_averages "0" // Turn off average in statistics
budget_show_history "0" // Turns off graphics history (!D. "1")
budget_show_peaks "0" // Disables displaying peaks in statistics
Part 18. "Bugreporter" team. (Bugreport).
// bugreporter
bugreporter_uploadasync "0" // Upload apps asynchronously (!D. "0")
bugreporter_username
Part 19. "C" team.
//c
c_maxdistance "200" (205)
c_maxpitch "90" (95)
c_maxyaw "135" (125)
c_mindistance "30"
c_minpitch "0"
c_minyaw "-135"
c_orthoheight "100"
c_orthwidth "100"
c_thirdpersonshoulder "false"
c_thirdpersonshoulderaimdist "120.0"
c_thirdpersonshoulderdist "40.0"
c_thirdpersonshoulderheight "5.0" (5.1)
c_thirdpersonshoulderoffset "20.0" (21.0)
Part 20. "SS" team.
//cc
cc_lang "" // Subtitle language (default is user interface language)
cc_linger_time "1.0" // Subtitle delay time.
cc_predisplay_time "0.25" // Delay before displaying subtitles.
cc_subtitles "0" // If enabled, then sound effects will not be displayed in subtitles, only speech (for example, sounds of the player being injured will not be displayed).
End.
Thanks for using my guide! Rate, comment, add to favorites!