Apple ID or Apple accountis an authentication system for users of Apple products. It was created so that the owner of a tablet or phone with an apple on the back of the device can access company resources. For example, use the free iWork suite of apps, or go to the iTunes Store to purchase audio, video, games, or a paid app from the App Store.
In addition, all information about the user and his personal settings are stored in the Apple id account. That is, if an account is used to log into an Apple device, then the settings saved in the account will be automatically installed on this device. Apple ID also speeds up the boot process for OS X and iOS, again due to the fact that all personal data, including contacts and Apple Mail settings, will be entered automatically.
Basically, the registration process with Apple's authentication system is simple. The problem arises when it comes to entering a bank card number. Some users do not want to trust such confidential information, while others (usually teenagers) simply do not have this card.
There are two ways how to create an Apple id account without a card. Both the first and the second are described on the technical support website (http://support.apple.com/kb/ht2534) though in the original language. Let's take the liberty to translate them with some important notes.
Create an Apple ID account without a card using a desktop computer
1. Open iTunes (Apple's media player). If it is not there, then download it here http://www.apple.com/ru/itunes/download/, install and run.
2. Click on the iTunes Store button located in the upper left corner of the player and select the country by clicking on the tricolor (in the lower right corner of the main page of the iTunes Store).

3. VERY IMPORTANT: go to the Top Charts column and scroll down until you see a list of FREE (required, otherwise you will have to enter the map number) applications. Click on any you like. Under the main image of the application, we see the button "free" and click on it.

4. We see a pop-up dialog asking you to either sign in to the Apple ID, or create one. Choose "Create Apple ID".
5. You were redirected to the iTunes Store Welcome screen. In the lower right corner, click "Continue".
6. We read the terms of the store and indicate our agreement with them by checking the box next to the corresponding inscription. The "Continue" button becomes active. Click on it.
7. Enter information in the proposed fields: email, password, year and month of birth, etc. Once again we check the entered data and - "Continue".

9. Hour X has come - a window with a choice of payment type has appeared. If the third step was taken according to the instructions, then among the payment options there will be a button with the inscription "No". Click on it and move on with a calm heart.
Creating an Apple ID account without a credit card on a mobile iPhone, iPad, and iPod Touch
1. Open the App Store on your device.
2. Find, download and install a free (mandatory, otherwise you will have to enter the card number) application.
3. In the dialog box that appears, select "Create Apple ID".
4. Choose a country, click "Finish".
5. We read and agree to the terms of the store by clicking on the "Agree" button at the bottom of the screen.
6. Enter information in the proposed fields: email, password, year and month of birth, etc. Check the entered data one more time. If everything is ok, click "Next".
An Apple ID is required for all Apple device owners. Without it, you cannot download an application or music, purchase a movie or book, or use the iCloud network service. In addition, users can use their Apple ID to place orders for products in Apple retail stores.
In this article, we will look at 2 ways to create an Apple ID without a credit card, and also describe possible errors during registration.
It should be noted that the process of creating a new identifier itself is quite simple. Users need to fill in a number of fields and come up with a password. Many are puzzled by the need to enter payment card details during registration. This step is required to make purchases from the iTunes Store. But if desired, users can leave this item blank. To do this, you need to go for a little trick.
You can create an Apple ID in 2 ways - from a mobile device or using iTunes. However, we want to immediately highlight several key features:
- When registering, be sure to indicate an existing E-mail. In the future, a link will be sent to it to complete registration.
- Apple does not allow Apple ID registrations until age 13. In addition, there are some restrictions for users under the age of 18.
By the way, registering in the App Store requires the same steps, and many people confuse these concepts. It's just that in this case, the ID is generated automatically. But you can register in the App Store with a ready-made Apple ID.
How to create Apple ID from iPhone
Here's how to create an Apple ID without a credit card. If you want to shop later, you can always link the card.
The only thing that is needed is an internet connection.
1. Open the App Store application on your mobile device.
2. Go to the "Top Charts" section and select any free application to download.


3. The "Enter" window will appear where you need to select "Create Apple ID".


5. Here you need to understand and forgive Apple's privacy policy.
6. Fill in the information about yourself (E-mail, password, answers to security questions, etc.) and press the Next button.
Nuances during registration:
- The Apple ID password must be at least 8 characters long.
- The password must contain numbers (1,2,3,4,5,6,7,8,9).
- The password must contain small letters (lowercase).
- Password must contain capital letters (CAPITAL).

7. If you did everything correctly, then you will have item no in your payment data. Choose it.

If “no” is not available, check your regional settings. If you specify a Russian address, then make sure that in "Settings - General - Language and region" in "Region" you have set "Russia". Change the region if necessary.

8. Click the Create Apple ID button.
How to create an Apple ID from a computer using iTunes
Here's how to create an Apple ID without a credit card using iTunes.
1. Download and install iTunes. You can download the Apple Media Combine on the official Apple website.
2. Run the application and go to the top menu in "Account" -\u003e "Login".
3. In the window that appears, select "Create New Apple ID".

4. On the next page, enter your account details: Email, password; select your country and check the box to accept the Apple Media Services Terms and Conditions.
Click the "Continue" button.

5. In the new window, enter your personal data and ask security questions / answers.
6. In the payment methods, check the box "no", and enter the data: zip code, city, street, telephone.

7. All of you have successfully registered your Apple ID.
If “no” is not available, check your regional settings. If you enter a Russian address, make sure that the Russian flag is in the lower right corner of the program. By clicking on the flag icon, you can change the region to the desired one.
Each user of an iOS device simply needs to have a personal Apple ID (Apple ID), because without it it is impossible to get access to the mass of Apple giant's branded services and, accordingly, the device's functionality is seriously limited.
Unfortunately, for many, the requirement to provide credit card information when registering a personal account becomes a serious obstacle to creating an Apple ID. Someone is psychologically not ready to share this kind of information, fearing that it will leak into the wrong hands, and someone simply does not have a bank card - in Russia, at least, there are still quite a few such people.
Well, we have great news - registering an Apple ID is possible without a credit card, and in this article we will introduce you to how to complete this procedure.
How to create an Apple ID without a credit card on an iPhone and other mobile iOS device?
First of all, it is worth noting that you can create an Apple ID with and without a card in two ways - directly from the device itself or through a PC with the iTunes utility installed on it.
Both methods are very similar, you will have to perform almost the same steps, so the choice in this case is determined only by which gadget is closer to you at the moment - as a rule, of course, it is easier to register an Apple ID directly from Apple, without using any, let's say , intermediate links, so we'll start with this method of creating an identifier.
So, you've just purchased, say, an iPhone (or other Apple mobile gadget) and turned it on. What's in store for you? Not an instant loading of the interface, but an initial setup, during which the SIM will be activated, and a number of important parameters for the system will be set. Also, at the initial setup stage, you will be asked to provide an Apple ID, but you can skip this step, so we will do so by tapping on "Skip this step".

After completing the initial setup, we get an activated clean device, which is just waiting for it to have its own ID. So let's start creating it:
- Open the App Store, tap Top Charts, switch to the Free selection. We choose any program that you want to install - and you will definitely want some - Instagram and VKontakte at least - click “Free” in front of it, then “Download”.
Important!!! The system allows you to start registering a personal account in other ways, but it is essential for you to start with this step, otherwise you will not be able to create an Apple ID without a card.

- In the pop-up window, click "Create Apple ID", then indicate the region - Russia and accept the privacy policy.

- Now a "registration form" will appear - "New account", in it you will need to enter first of all your e-mail - an Apple ID will be linked to it, and it will serve as the account login.
An important point! Take as seriously as possible the indication of the e-mail - it must be your mailbox! You also need to make sure that you have not forgotten the password for the specified mailbox and can enter it, because it is through the mailbox that your personal Apple account will be managed.

- Next, you will need to specify the password twice. The "secret key" of the identifier must contain 8 or more characters, one of which must be a capital letter, one is an uppercase letter and one is a digit.
- You also need to answer special verification questions, indicate your birthday (if you are under 18, then keep in mind that age restrictions will apply in the App Store and some other services, and if less than 13 years old - Apple ID will refuse to be "created" at all) and a backup e-mail. The last step is optional, but it is the backup email inbox that can become your lifeline to recover Apple ID, if, say, the first email is hacked, and answers to special questions fly out of my head.
An important point! Practice shows that 99% of users do not remember the answers to questions specified during registration, and therefore, when asking them, adhere to the rule - the simpler, the better.

- Well, now we come to the most interesting part - the section "Payment details". And then everything will be very easy - you just need to select the item "No".
There is no such? This situation is possible only in one case - if you started registering an identifier from a step other than step 1 of this manual. Click Back on the Create ID page and start over, this time without departing a step from this tutorial.

- Now, despite the fact that you did not indicate the card, you need to provide some of your data - name, surname, address, etc. However, it is not necessary to indicate real information at all, if you want, you can play 007. The only important thing here is that all fields are written in Latin.
- Everything! Click further on the "New Account" menu and wait for the system to check the entered parameters - if all fields are filled in without errors, you will only have to go to your e-mail, to which you assigned an Apple ID and click the "Confirm Now" link (located in the body of the email).

Well, congratulations! You have got a personal Apple ID and you can start enjoying all its "benefits". By the way, if you suddenly decide that you are ripe for shopping, for example, in the App Store, then you can always easily enter your payment information. To do this, you need to tap "Download" on the paid application that you want to have, and the system will automatically transfer you to the page for specifying billing information.
How to create an Apple ID without a credit card on a computer?
Well, now let's look at a way to register an identifier using a PC. Here, too, everything will be quite simple, the only condition is the presence of iTunes. If you do not have it, we highly recommend downloading the utility from the official Apple website, because it is the main link between the iOS device and the PC, in particular, it allows you to drop music and other content, set ringtones, etc. In short, it will certainly come in handy.
So, if you have iTunes, let's start creating an account:

Done! See, as we promised, the registration methods are identical.
How to untie your Apple ID card?
You need to understand that there is absolutely nothing wrong with tying a card to an Apple ID, with only one condition - if a conscious person uses an iOS device. For example, the following situations are very common. A parent buys a device for his child and does not know that an Apple ID can be created without a card, but he knows that it is possible to create an electronic card with a balance of 0 rubles. So the parent makes such a map and specifies it when registering the ID.
Unfortunately, there is one very subtle point here - the system, when accepting card data, does not take into account its balance, and payments may be debited with a delay. That is, your little daughter can freely download paid programs or content, and after a couple of days you will find that your account is blocked, because there is no funds on the specified card, and until you put money on the card and the payment fails, use Apple ID will be impossible.
You probably have a question - what can be done in such a situation, how can I unlink a card from Apple ID? Is this even possible? Sure! And it's very simple:

That's all! The child will still be able to download free applications and content without problems, but he will not be able to get paid ones, and you will not receive any unexpected invoices.
Let's summarize
Well, now you know how to create an Apple ID without entering billing information using the device itself and the PC, as well as how to untie the card if it is already linked to your ID. We hope our article helped you!
Creating an account on the iPhone is one of the most important manipulations for every Apple smartphone owner. Only with your own ID will you be able to enjoy the full range of functions of this device. In addition, important operations such as setting up security or syncing with iCloud will need confirmation with your Apple ID. With your Apple ID, you can shop, download content, and use the Find iPhone feature.
Typically, the Apple ID on the phone is created when you first use the gadget. If you change your model to a newer one, you can link the new iPhone to your existing account. But if you are using gadgets from an American company for the first time, you will need to go through full registration. Before you can change your Apple ID to a new one, you need to create a mailbox. Best of all, if you need to create an Apple ID account, you'll use a separate email address you just created.
The data, during the initial authorization on the official website, must be entered real, so that, if necessary, you have the opportunity to restore access. In addition, truthful information about you will be required when setting up your account. Therefore, be extremely careful and try not to make mistakes when entering accounting information.
Create account using iPhone
Apple company accounts can be created directly from your iPhone. To do this, there are two options for doing this - go through the standard registration, in which you need to specify information from your bank cards to make payments, or create an Apple ID without a credit card. Up-to-date payment information will be required if you purchase any software from the AppStore. If you do not plan to shop and do not want to do it by accident, for example, by mistake. We recommend using the second, more sophisticated, method.

The standard procedure is as follows: you need to open the iTunes Store, App Store tab and find the "Create a new Apple ID" item there.
If you want to register an Apple ID without payment cards and for free, proceed as follows:
- Go to the App Store.
- Choose a game or application that is offered for free.
- Download and wait for it to be installed on your iPhone.
- The next step is to enter an existing record or create a completely new one. When prompted, select "create a new ID".
After that, the steps are the same in both options:
- If you do not want to link a card, for one reason or another, it is better to set Russia as a country, even if you live in another state - this will give a wider selection of applications, programs and other things.
- After that, you need to carefully read and accept the standard user agreement.
- Then personal data is entered. When specifying an existing email address and password, be careful - for security reasons, the password must be at least eight characters long and have letters in both cases.
- When specifying age, please note that you cannot specify less than 13 years old, and if you specify less than 18, access to the content will be limited.
- The answers you will enter to security questions are best saved in a text file or written down on paper and hidden. This is done in order to quickly and safely restore access to your account if necessary.
- If you register in the first way, then you will need to enter your payment information.
- The procedure is complete.

After that, you need to go to the mailbox that was used to create your account. It should receive a letter from technical support, confirming the creation of an Apple ID. To make the first registration of apple id go quickly and correctly, just click on the highlighted link with the text of the letter.
iTunes to help
Alternatively, an account for an iPhone or iPad can be issued using the official iTunes program. In this situation, you will be able to choose whether to indicate information about your cards or not. Before changing the ID, you need to go to the menu and find the iTunes Store item there. If you want to learn how to create an Apple ID without payment information, as in the first case, you need to download any free application and go to this menu using it.

After this, the actions are standard in both cases:
- The system will offer to log into a newly created, already existing account or register a new one.
- After choosing the option to create a new one, enter your details. As stated earlier, they must be true in order for you to confirm their accuracy.
- After that, you will have to answer security questions (it is better to write down the answers) and enter the card details or refuse it if you want to create an Apple ID without a credit card.
- After completing the registration, be sure to go to the mailbox and immediately confirm the creation in the mail, using the highlighted link in the body of the letter.
If the letter from those. support does not come for a long time, check your spam folders and filtered emails by other categories - often emails arrive there by mistake.
What mistakes can you make?
To learn how to register an ID on an iPhone correctly, how to change an ID on a device, you need to know what mistakes should be avoided. Most often, the following difficulties arise in the process:
- You don't want to make App Store purchases. In order not to accidentally buy any paid content without specifying bank card details.
- It is best to indicate the real age, but only if it is more than 13, and better - more than 18 years. If you set the age to 12 years or less, the system simply won't let you create your Apple ID. And if you specify age less than 18, you will not get access to all content.
- If you managed to get mail with the address at @ iCloud.com or @ me.com, you will have to create a new mailbox to register an account for the iPhone. These addresses are not suitable for creating accounts.
- If the name you entered contains invalid characters, please note that the mail address does not contain Russian letters, but that the name and surname contain extra characters, periods, numbers, etc.
- The password must be complex. If the password is too simple, the system will not allow the process to complete. Numbers, letters large and small, symbols - the more of them in the password, the better.
- An obstacle to creating an ID on an iPhone can be a server crash. In this case, it is best to wait and continue after half an hour - an hour, when the servers will be operational.
In general, it doesn't take long to register a new Apple ID. Even an inexperienced user will be able to carry out this operation if he follows the instructions.
We will tell you how to set up and manage Apple ID in the next article, stay tuned.

Conclusion
You have already understood that creating an account for iphone is no more difficult than creating an e-mail. It is necessary to grasp the essence of the process and further, mechanically fill in the necessary fields. Registration does not take a lot of time, so in 20 minutes you will be able to use smartphones as the rightful owner of a smart device capable of many amazing things.
Video instruction
Every device running iOS or macOS must be associated with an ID. you need not only for authorization, it also allows you to synchronize data on all devices via iCloud.
Today we'll show you how to create a new Apple ID directly on your iOS device. There are two versions of instructions - for iOS 10.3 and firmware 10.2.1 and later. The algorithm of actions in the case of the iPhone is the same.
How to create a new Apple ID on iOS 10.3 and later
If you have upgraded to iOS 10.3, follow the instructions below to create a new Apple ID on your device. The procedure has changed from earlier versions of the operating system.
Step 1

Step 2
In the settings menu, select "Login to iPhone / iPad".

Step 3
The operating system will prompt you for your Apple ID and password for authorization. To create a new Apple ID, click "Don't have an Apple ID or have you forgotten it?"

Step 4
In the new window select "Create Apple ID".

Step 5

Step 6

Step 7
Important! If you want to use an iCloud email address as your Apple ID, select "Create an iCloud Email" and then follow the on-screen instructions.

Step 8

Step 9

Step 10
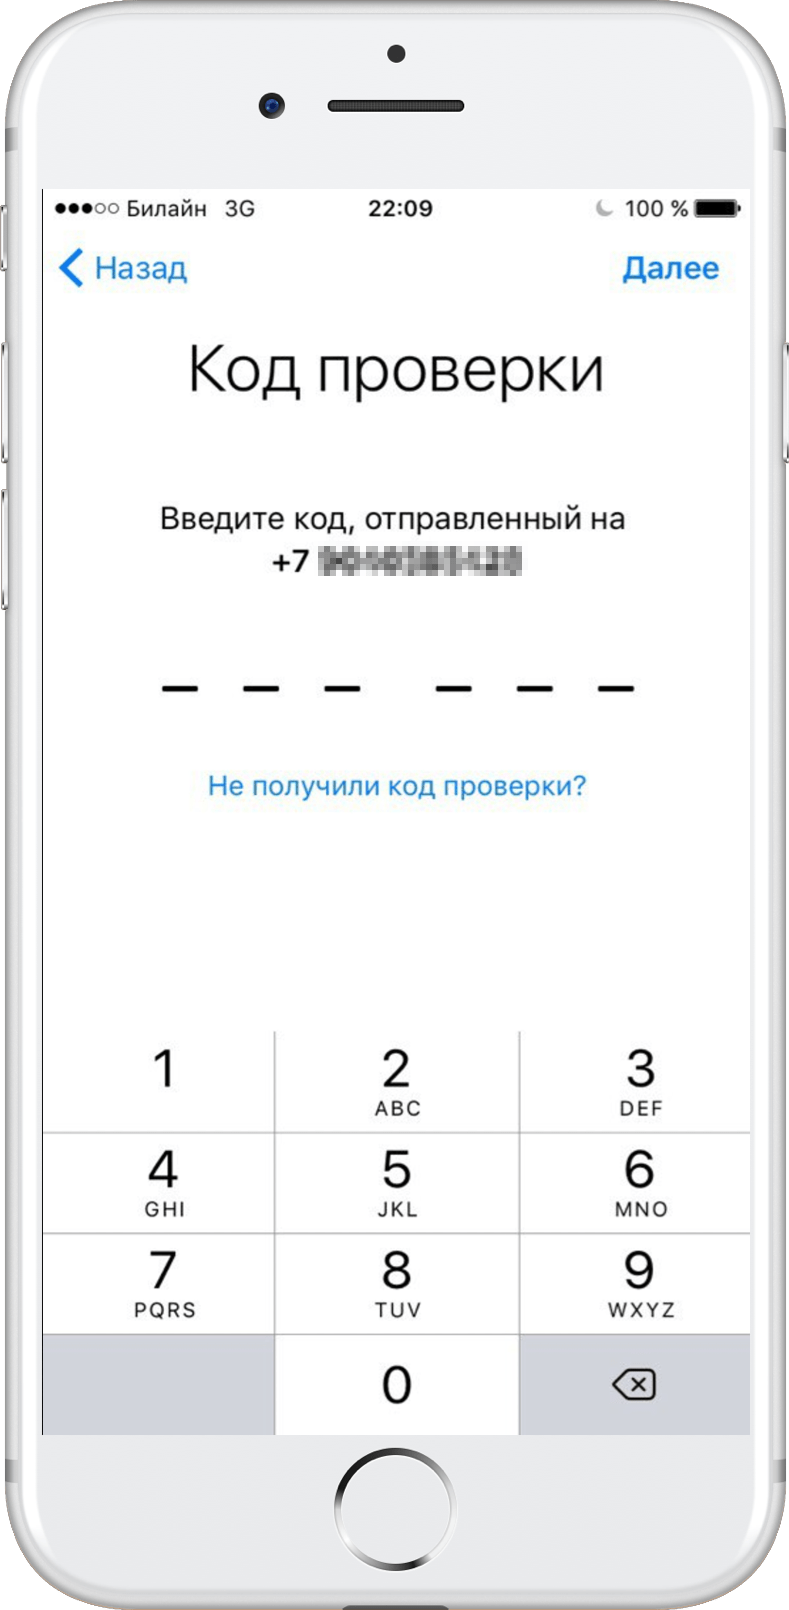
To verify your identity when authorizing with your Apple ID on a new device or browser, or if you need to reset your password, you will need to enter your mobile phone number. Select your country and enter your real phone number. Proceed further.

Step 11
A message with a verification code will be sent to the mobile phone number you entered. Enter it in the appropriate field when prompted.
Step 12
You must agree to the Terms and Conditions to proceed. Select "Accept".

Step 13

Step 14
Enter the password you use to unlock your iOS device.

Step 15

Step 16

Step 17

How to create a new Apple ID on iOS 10.2.1 and earlier
If you are using iOS 10.2.1 or earlier, you will need to do the following to create a new Apple ID.
Step 1
Go to "Settings" from the home screen.

Step 2
From the settings menu, select iCloud and then Create Apple ID.
Step 3
Scroll to set your date of birth, then tap Next.

Step 4
Enter your first and last name in the appropriate box. Click Next.

Step 5
In the email field you can use your email or create a free iCloud mail. In this guide, we suggest creating an Apple ID using your existing email, so click "Use current email".
Important! If you want to use an iCloud email address as your Apple ID, select "Create an Email on iCloud" and then follow the on-screen instructions.

Step 6
In the input field, enter the email address you want to use as your Apple ID. Click Next.

Step 7
Set and confirm a password for your new Apple ID. Click Next again.

Step 8
A security page will appear asking you to select three security questions. Click on the first question to open the selection menu.

Step 9
In the dialog box that appears, select the question you like.

Step 10
You will be automatically redirected to the security page. Click on the empty answer field for the selected question to start typing the answer.
Repeat steps 8-10 for the remaining two questions.

Step 11
After selecting three security questions, you will need to agree to the Terms and Conditions by clicking Accept.

Step 12
Click Accept again when another agreement appears on the screen.

Step 13
A verification message will appear on the device screen.

Step 14
Now you will need to confirm the entered e-mail. Check your email and follow the link to verify your address.
Step 15
After confirming your e-mail, you will be automatically authorized on the device using your new Apple ID.

Step 16
Find iPhone / iPad will automatically become active. Click OK.

You can also create a new ID in your browser by clicking Create Apple ID on the Apple ID website. However, in this case, Apple will ask for a custom email to create an iCloud address. If you create a new ID using the Apple ID website, the original address will remain associated with your Apple ID.
Therefore, if you want to use only an iCloud email address as an Apple ID without binding other email addresses, then at the stage of entering an e-mail, select "Create an e-mail on iCloud". Then the only email associated with your Apple ID will be your iCloud email address.


