Every year new elements are added to the interior design of residential and special premises. LED strip for ceiling lighting has become one of them.
This functional decorative piece can transform even the most boring interior. Often, she is able to shine in various colors, from which you can choose the one corresponding to the current mood or evolving situation.
LED strip is a flexible strip that can have a width of 5 to 50 mm. On one side of the tape, there are LEDs and resistors connected by electrical conductors into a single circuit. On the other hand, double-sided tape is usually glued to it, on which the strip is fixed in the place chosen for it.

The LED strips of different models also have a different number of LEDs, and they may also differ in size. If it is necessary to achieve greater lighting brightness, sometimes additional LEDs are soldered in the second or even third row.
Benefits of LED strip for ceiling lighting

The advantages of this decorative lighting device are many, and these include the following indicators:
- Affordable price of the kit and significant energy savings with a sufficiently high lighting brightness.
- Ease of installation of such lighting equipment, which is quite possible to make yourself, following the attached instructions.
- Wide range of colors. LED strips can be composed of LEDs of the same color, for example, white to enhance lighting or accent lines, or elements of different glow to create special moods in the room.

- Long service life, since high-quality LEDs can last 10 or more years.
Selection criteria for LED strip for ceilings
LEDs used in tapes
When purchasing an LED strip for lighting ceilings, you need to know which types of LEDs are used for this purpose.
The main types that are currently used for the production of lighting strips for ceilings are SMD 5050 and SMD 3028 LEDs.

SMD - these letters in the marking are an abbreviation, an abbreviation of the name "Surface Mounted Device", in translation it means, as "surface-mounted device", since the LED is securely soldered into the surface of the tape.
The numbers following the letters in the marking indicate the size of the LED in millimeters. For example, SMD 3028 is an element with dimensions of 3 × 2.8 mm, and, accordingly, SMD 5050 is 5 × 5 mm.

The LED with this marking has six "legs" coming out of the body, with which it is soldered into the tape. The element itself is equipped with three light-emitting crystals. Such an LED will emit light about three times more intense than a single-chip SMD 3028, connected to the tape with only one pair of contacts.
A term such as luminous flux, which is measured in lumens, is used to characterize the light intensity of an LED. So, the officially determined values \u200b\u200bof this parameter for SMD 5050 LEDs are 12 lumens, and for SMD 3028 - only 4 lumens. One LED from the SMD 5050 brand shines as intensely as three SMD 3028 placed side by side.
The glow color of the LED strip will depend on the LEDs that are installed in it. In the case when the strip contains SMD 5050 LEDs, then in each of their cases three crystals of different colors can be installed - red (Red), green (Green), and blue (Blue). It is these English color names that give rise to the so often used abbreviation RGB.
By means of the electronic control circuit, any of the colors can be switched on at will. Moreover, it is possible to obtain an endless variety of beautiful shades by changing the brightness of the glow of red, green and blue crystals. By mixing in this way, a new rich light background is obtained - it's hard to believe, but the "play" of just three colors when mixed can ultimately give up to sixteen million different shades.
The intensity and brightness of LEDs is usually controlled through the remote control using a special device - a controller.

Very interesting shades can be obtained by adding white light to the existing background. It dilutes the brilliance of reds, blues and greens, resulting in delicate, eye-pleasing shades such as pale blue or pale pink.
These shades can be obtained by turning on white at full brightness with the addition of other colors turned on with a lower intensity. It is also necessary to take into account the fact that with different lighting, the view on interior design almost completely changes, since it can appear in different colors every time.
Experts recommend using LED strips with white light or a combined version consisting of white and tricolor elements to illuminate the ceiling. These ribbons will make it possible to change the color scheme in the room according to your mood. And the intensity of the white color can be so high that it can be compared to daylight natural light on a fine day.
Getting white
Since there are no pure white LEDs, there are two ways to get it.
- One of them is that they use crystals with a blue glow, which are covered with a phosphor on top.
A phosphor is a seemingly light yellow substance applied to the surface of an LED crystal. This composition is capable of converting the absorbed energy into white light radiation. By the presence of a light yellow substance on the LEDs, you can clearly determine that these are elements that will emit white light.

It should be noted that the phosphor gradually loses its quality as a converter over time, and the blue color begins to break through the white, and the radiation acquires a bluish tint.
If the LED strip is used continuously throughout the year, then its brightness may decrease by 25-30%. Therefore, when purchasing this "lighting device", you must familiarize yourself with its technical characteristics and instructions for use, where the manufacturer must indicate the warranty period.
When the intensity of white light decreases or a blue tint appears in it, you can use the second method of obtaining it.
- The second method is based on the laws of optics, from which it is known that white can be obtained by mixing all the available colors (in this case, green, red and blue) by turning them on at full power at the same time. Thus, it is possible to "create" white light, and the problem with the influence of the "hooked" phosphor will not matter.

The best choice for installing the backlight on the ceiling can be an RGB LED strip, since three-color LEDs are installed on it, which will help to get white light, as well as other shades, if necessary.

This type of LED strip will last long enough. They are quite convenient to use - they have the ability to turn on white light if you need only intense lighting, or a color scheme that matches your mood. The color adjustment process is done from the remote control and does not take much time.
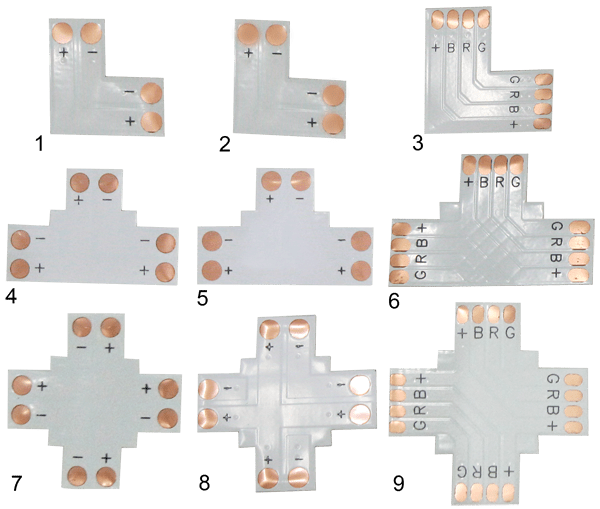
Varieties of LED strips

1 - tape with SMD 3028 LEDs with a density of 60 pcs / running meter.
2 - the same, but with a packing density of 120 pcs / running meter.
3 - double-row tape with SMD 3028 LEDs, with an installation density of 240 pcs / running meter.
4 - a tape with a rare arrangement of LEDs of the SMD 5050 type - the density is only 30 pcs / m.
5 - the same, but with a density of 60 pcs / running meter.
6 - double-row LED strip with SMD 5050 elements and a density of 120 pcs / running meter.
If you plan to install decorative lighting for niches of ceilings, furniture or a desktop in the kitchen, then it is better to use the SMD 3028 tape, which has 60 LEDs per meter. It will be enough for it to cope with its task. An LED strip with a light intensity that is too high will be unnecessary, since it can blind the eyes, especially since for greater brightness you will need a power supply of increased power and larger in size, so it is more difficult to find a secluded place for it.
The importance of quality LED strip
Having decided to make additional lighting in the apartment or decorate the interior with LED strip, it is not recommended to buy its cheapest options. Such products will not last a long time in their original state - as a rule, their color balance is quickly disturbed, or even diodes can completely burn out. In cheap lighting strips, elements of not too high quality are usually installed, which predetermines the low price.
Design and self-assembly of LED strip
An LED strip lighting system is often sold as a kit. You can, of course, purchase all of its elements separately, but it will be more difficult to choose them correctly in terms of parameters.

The LED backlight kit includes several electronic devices:
- a power supply unit, which is necessary to convert the mains alternating current into the constant voltage required for the diodes;
- controller with a sensor that allows you to change the color of the lighting using the remote control;
- remote control panel, which regulates changes in intensity and shades of light flux;

- lED strip of the desired length.
The system installation diagram looks like the following.

This diagram shows a system with RGB - an amplifier, which is necessary to maintain a stable control signal in cases where it is necessary to lengthen the tape or it initially has a long length. In this drawing, the connection points are clearly visible, therefore, relying on it, it will be easy to understand the sequence of work.
- The first step is to connect a network cable with a plug to the power supply to connect it to the network, that is, connect the N and L pins.
- Next, there is a connection of two contacts of the controller to the same power supply, provided that RGB LED strip is used for backlighting.
- After that, contact cables are connected to the controller, connecting the tape to it.

In quality kits, the color coding of the wires corresponds to "reality". Yellow wire - plus power.
- If the controller is designed for a certain length of the tape, and it is necessary to use a larger number of LEDs, then an amplifier must be used to lengthen or wire the elements, which is connected to the power supply and the other end of the tape. Then another piece of LED strip is fixed to the amplifier on its other side.
The fact is that it is dangerous to connect more than 1500 mm of tape to one power line in succession, since the conductive tracks may not withstand the load. But the control signals go exactly sequentially, from segment to segment, gradually fading out. It is in these cases, for parallel connection to the power supply of several sections, and an amplifier of control signals is used.
- After everything is assembled, you can check by plugging the plug into the outlet.
- When making connections, be sure to observe the polarity and voltage compliance of the controller, power supply and tape.
- If it is necessary to build up the tape, if other devices allow it in terms of their capacity, this process is carried out using specially designed connectors.
- If the tape needs to be shortened, then the cut is made exclusively in the manufacturer's designated place at -0, usually it is indicated on it with a dashed line. The incision is made using conventional scissors.

A few words must be said about the correct installation of the tape in the place intended for it.
- The tape is fixed on double-sided tape, which is freed from the protective film before gluing.
- If the ceiling is illuminated, then usually the tape is fixed under its surface in a small niche made of drywall. This installation method is effective in that the light is directed to the light plane of the ceiling, which, illuminated by LEDs, contributes to a more even illumination of the room.

Is it difficult to independently assemble a suspended ceiling?
Installation of such a structure solves at once a lot of problems of repair and improvement of the premises. There are no problems with materials and components in our time, and making it with your own hands is quite a feasible task. Detailed instructions can be found in a special publication of our portal.
- Another option for increasing the efficiency of the lighting is to fix the tape on the cornice (for curtains or specially installed around the perimeter of the entire room for lighting purposes).
In this case, the tape is fixed in such a way that it directs the luminous flux to the wall and to a certain section of the ceiling, on which the light will scatter, increasing the illuminated area. A well-lit ceiling will not only make the room brighter, but also help save on electricity.

- In order for the tape to adhere to the surface without problems, the place of its gluing should be cleaned of dust and preferably degreased, and then dried well.
Financial question
A few words can also be said about the financial side of the issue. It should be remembered that when inviting a master to install LED lighting, he will have to pay an amount that will range from 50 to 150% of the cost of the devices themselves. Therefore, it is recommended to purchase ready-made sets of the system, to which the installation diagram of all components is always attached. Each of the assembled sets is designed for a certain number of LEDs and the length of the tape, so there will be no fear that an extra number of them will be connected. Having assembled a self-illuminating system, you can save quite a decent amount on this process.
Some systems are sold pre-assembled and wired so that you can test them immediately upon purchase. All that remains is to bring the kit home and install it in a specific place for the backlight, and then plug the plug into the outlet.
Those who purchase such a backlight option will not need special skills as an electrician. The most difficult moment in installation will be choosing a place for the power supply and controller, and then reliably their correct and reliable fastening.
If funds are limited, and the lighting is already planned for installation, then you can choose a set with a strip of the same color - SMD 3528 LEDs, the density of the installation of elements on which is 60 pieces per linear meter. However, such an option cannot be placed in the bathroom, since such tapes are not equipped with moisture protection.
When installing the backlight in damp rooms or in other places where there is a possibility that neighbors from above can flood, it is worth choosing a tape equipped with silicone external insulation.
At the end of the publication - a video that shows the process of correct installation of LED strip lighting.
Video: installing and connecting LED strip
The design of a modern kitchen involves the installation of high-quality lighting. It favorably emphasizes the interior of the room and makes it possible to do homework without impairing eyesight. Conventional incandescent lamps do not always fit into the concept of a comfortable and beautiful kitchen, so alternative sources are being considered. - a vivid example of organizing the main lighting or lighting in the kitchen. Let's figure out what it is, how the tapes are installed and whether it is possible to connect the LED strip with our own hands. For convenience, we will assign the abbreviation SDL to the LED strip.
LED lighting is a new trend in indoor style
What is LED strip and how does it work
The main element of the SDL is the LED. An electric current passes through it and the semiconductor begins to glow. SDL is supplied in coils of 5 meters and vary in a number of parameters. Lighting with the help of SDL creates a cozy and extraordinary atmosphere, saves energy consumption.
Attention!!! LED is connected using additional equipment - 220V voltage is not suitable for it

Additional equipment includes:
- Dimmer
- Amplifier
- Mounting profile if required
Each of the devices and devices has special requirements.
How to choose a LED strip
To make the right choice of LED strip, pay attention to the following parameters and features of semiconductors:
- Density of elements - the further the LEDs are apart from each other, the more dark spots will be on the illuminated surface. The table shows the dependence of brightness on the number of LEDs
 LED strip is sold in any specialty store
- LED type - three-crystal is suitable for main lighting, single-chip is an LED strip for kitchen lighting.
- Color rendering is indicated in Kelvin. A lower reading corresponds to a warmer glow. For example, 2000 K is comparable to a candle flame, 2600 K is an incandescent lamp, 5000 K is the light of a fluorescent lamp.
- Power - indicated per linear meter in watts. To illuminate one square meter of kitchen, 2 W is required, which corresponds to about 20 W of a conventional incandescent lamp. The LED strip in the kitchen should produce an illumination rate of 150 lux.
- Moisture resistance - optimal for the kitchen is SDL with IP65 marking.
- The base is usually adhesive, if not, double-sided tape is used for installation.

Knowing the device of the LED strip, the parameters of the glow of the elements, the marking features, the dimensions of the room, the backlight for the kitchen is selected.
Optional equipment for LED lamp
Let's take a closer look at what you need to have if you plan to install an LED strip in the kitchen with your own hands.
 Light can be conducted in any corner of the kitchen
Typically, one power supply unit is designed to run 5 meters of tape. Depending on the SDL, the voltage is chosen - 12V or 24V. Power is taken 20% more than is required for the connected backlight. Attention is drawn to the type of cooling of the power supply:
- Active - the fan constantly draws air into the power supply, the equipment works without interruption. The noise and dimensions of the power supply are among the disadvantages of this cooling method.
- Passive - heat is released into the environment, rapid overheating occurs, but attracted by the small size of the power supply
Dimmer and amplifier
A device that regulates the lighting of the kitchen with LED strip. It has a built-in potentiometer that stores the last brightness values \u200b\u200bin memory. The dimmer is operated mechanically or works with a remote control.
It is installed in the event that the dimmer cannot cope with the load or several power supplies are used.
 The mounting profile for the LED strip is perfect to keep the overall look of the kitchen beautiful
Fastened slightly below the ceiling when organizing the main lighting or at the required level when lighting. Preference is given to the aluminum profile, which is completed with a diffuser. You can use a plastic profile for the LED strip, but then a high-quality material is chosen that will not melt from the glowing diodes. The dimensions of the profiles are selected in such a way that it is possible to stick a strip with LEDs inside.
Self-installation of LED lighting in the kitchen: in the work area, ceiling and other locations
In addition to the SDL and additional equipment, you will need a drill, a screwdriver, self-tapping screws for fastening a profile, a miter box for forming the corner joints of a profile, a degreaser. If the base of the strip is not self-adhesive, then double-sided tape is required.
DIY installation of the LED strip in the kitchen takes place in the following order:
- Installation of the shield is the organization of a sealed structure in which additional equipment is located. If the dimmer works from the remote control, then it is taken out. If necessary, several power supplies are used and an amplifier is installed for every additional 5 meters of strip. All connections are made in parallel;
- Marking - the LED ceiling is the reference point, not the floor level;
- Preparing the profile - if there are no mounting holes in it, then they must be drilled before fixing the profile to the wall;
- Profile installation;
- Connecting the tape to the dimmer and the power supply, checking the operation of the equipment before mounting the LEDs in the profile;
- Bonding the SDL to the profile.
To prevent the tape from coming off, degrease the surface of the profile before fixing the LEDs on it.
 Installation of tape in 6 steps
What else can you do with your own hands
When you plan to install LED lighting with your own hands, it is not always possible to find the necessary materials or equipment. In this case, you have to do something yourself.
Profile for SDL
You can make a profile for an LED strip with your own hands from any aluminum profile that has a pleasant appearance, or a plastic cable channel. It is important that the SDL fits in width, and the plastic withstands heating. A cover is used from the cable channel.
You can make a power supply for an LED strip with your own hands from a 19 V power supply for a laptop or monitor. The voltage should be lowered to 12 V. For this, an impulse stabilizer is bought, while even the Chinese versions, which differ in a democratic price, work without problems.
 The power supply is required, do not let water get on it
Lamp for cabinets in the apron area
For its manufacture, the same components are used - LED strip, power supply, dimmer. Only the aesthetic issue with the body should be solved. You can use blanks cut from plastic, on which tape is glued, or an aluminum corner. And you can attach the SDL to the crossbar on which the hangers are hung in the cabinets. The flat chrome profile fits perfectly. As an option - make a double lamp from an LED strip with your own hands. To do this, you need to connect two pieces of the crossbar to each other and stick two sections of the SDL in parallel.
Dining table and illuminated table top
The decorative qualities of the SDL will be involved here. The table is assembled on the basis of the old table so as not to attach legs and use the existing tabletop. You will need 8 mm glass to fit the old table, wooden planks for the frame of the new countertop, a metal strip under the SDL, a low-power LED strip - the table should have a pleasant backlight, but not be a source of kitchen lighting. To make a backlit table with your own hands, you will need to follow these steps:

- Use sandpaper to make one side of the glass matte
- Assemble the frame from the planks
- Glue metal strips to the old countertop to install SDL on them - the location depends on your imagination, but you can just do it around the perimeter
- The wires from the SDL are led out under the tabletop, the power supply and the dimmer are also attached there
- The frame is installed on an old tabletop, covered with glass
It is important to process the glass sections well so as not to get hurt.
WATCH THE VIDEO
Summing up
Backlighting in the kitchen with LED strip is used to create main, additional or decorative lighting. It is mounted in a special profile and installed under the ceiling or glued over the work surface. Lighting parameters are selected individually, but remember that the kitchen should not be in the shade. Saving on electricity is inappropriate here, because LEDs consume 7-10 times less electricity than incandescent lamps.
The invention of LED light sources in the form of flexible strips has contributed to a variety of lighting solutions. Today, using LED strips, they organize complex geometric shapes for the advertising industry, decorate signs and facades of buildings, create lighting effects in fountains and pools, and add coziness to quiet cafes and restaurants. With the help of LED strip in the house, you can create a beautiful stretch ceiling illumination or make excellent lighting of the kitchen working area.
The large assortment of products poses the question for the average consumer: "How to choose an LED strip to get the most out of its use?" Any consumer can answer this question, but for this you need to get acquainted with this type of LED products.
Decoding of LED strip marking
LED strips are made of a dielectric with a thickness of about 0.2 mm, on which conductive tracks are applied with contact pads for chips, on which SMD components (LEDs and resistors) are mounted. The standard tape consists of individual modules from 2.5 to 10 cm long, connected in parallel. Each module contains from 3 to 22 LEDs and several resistors that limit the current consumption. Thus, an LED strip is a set of modules with a nominal supply voltage of 12 or 24 volts. The finished product is usually supplied in reels 5 meters long and 8 to 40 mm wide.
The labeling is applied to the packaging or reel of the product adhering to international standards. Decoding of tape marking using the example of LED 12V RGBW SMD 5050 120 IP65 is presented in the table below.
| Position in title | Designation | Decoding |
|---|---|---|
| 1 | LED | lED |
| 2 | 12V | supply voltage |
| 3 | RGBW | glow colors |
| 4 | SMD | assembly of elements in the product |
| 5 | 5050 | size of led chips |
| 6 | 120 | number of LED chips per meter |
| 7 | IP65 | protection class |
Points to look out for
Color tone and number of colors
The choice of an LED strip begins with determining the color of its glow. Modern single-color LEDs are available with one of four crystal glow: white (W), blue (B), red (R) or green (G). Other colors are obtained by applying a special phosphor to the crystal or by installing several LEDs of different colors in the crystal at once, which work simultaneously. Thus, a single color LED strip can be produced with any luminous flux color. In specialized stores, you can even choose copies of orange, raspberry, purple or turquoise glow. But LED strips of white light are in great demand, which are divided into three groups: warm, neutral and cold glow. It is possible to select exactly the desired option only visually by comparing several samples.  In addition to single-color LED strips, there are multicolor analogs on sale, marked with RGB symbols. They have LEDs consisting of three crystals: red (red), green (green), blue (blue). As a result of the simultaneous glow of several crystals with different intensities, you can get any light shade. Usually, such flax is chosen for decorative lighting. It is worth noting that pure white light is not possible with the R, G and B LEDs. If you need a multi-color LED strip with the ability to glow with white light, then you should choose a product with the WRGB marking. Additional crystals of white glow are built into the LED chips of WRGB tape.
Light flow
Today in retail stores you can buy a piece of any length. In this case, one should take into account the density of SMD elements in one running meter of tape. In a single-row strip, the density of LEDs is a multiple of 30, and in a double-density strip - 60. The maximum number of LED chips installed in 1 meter of the product is 120. When switched on, such a segment resembles a continuous luminous strip. Also on sale you can find a tape of double, triple and even quadruple width with LED-elements placed in several rows.  Special attention should be paid to the size of the LED chip. Initially, the most widespread were two chips: 3528 with one die and a standard size of 3.5x2.8 mm and 5050 with three crystals and a total chip surface area of \u200b\u200b5.0x5.0 mm. Later, the LED industry presented new types, among which there are standard sizes 5060, 5630 and 5730 on the Russian market. The size of the element directly depends on the size of the luminous flux - the amount of light energy emitted per unit time. In theory, the luminous flux for LED SMD 3528 is 5 lm, for LED SMD 5050 - 15 lm. Multiplying these values \u200b\u200bby the corresponding number of elements in the segment, we get the total brightness. For example, the luminous flux of a five-meter tape 3528-60 will be about 1500 lm.
Supply voltage and power
In order for the LED strip to start glowing, it must be supplied with a suitable power supply (usually 12 V). For these purposes, converters of a 220 volt power network are used, called drivers, adapters or power supplies. An important parameter of any power supply unit is the power that it can provide to the load. The power of the inverter is selected based on what is indicated on the package. In the absence of documentation, it can be calculated independently. For example, every three 3528 LEDs connected in series consumes 20 mA and 0.24 W. Multiplying these values \u200b\u200bby the number of triads, we get the total value. For frame size 5050, set the current to 60 mA and power - 0.72 W. Thus, a meter segment of SMD 3528-60 tape consumes 4.8 W, and SMD 5050-60 - 14.4 W. Below is a table of the wattage of the most common LED strips.
| SMD LED type | Number of LED chips per meter, pieces | Power consumption 1 meter, W |
|---|---|---|
| 3528 | 60 | 4,8 |
| 3528 | 120 | 9,6 |
| 3528 | 240 (double row) | 19,2 |
| 5050 | 30 | 7,2 |
| 5050 | 60 | 14,4 |
In order for the power supply to work stably and without overheating, it needs to provide a margin of safety. For this, the calculated power is multiplied by a factor of 1.2. The RGB tape is connected to the driver through a special controller with outputs for each color. The organization of backlighting from tapes more than 10 meters long requires additional recharge and matching blocks. Otherwise, the edge distant from the power source will not provide the nominal luminous flux. This negative phenomenon occurs due to the voltage drop on the current-carrying paths, which reaches 0.4 V / m.
Degree of protection
The correct choice of LED strip is impossible without taking into account the degree of protection (IP - Ingress Protection). The designation consists of two numbers, the first of which indicates protection against the ingress of solids, and the second - protection against the ingress of liquid into the product. Some manufacturers, instead of the generally accepted designation, indicate their own abbreviation, the decoding of which is located on the manufacturer's website. 
IP65 - IP68 LED strips have better protection against moisture, but worse heat dissipation due to the silicone shell. They should be chosen only when clearly necessary, since they have a significantly higher price due to the additional silicone coating.
Build quality
The quality of LED strips is determined exclusively by the manufacturer. It is worth noting two points here: the build quality of the final product and the quality of the components of the tape itself. The second is impossible for an ordinary buyer to determine, since SMD components are very small. The problem is that the robotic system cuts and installs a smaller crystal in the LED, which leads to its gradual overheating and loss of brightness. As for the assembly of the final product, it is easier here. Low-quality LED strips have unevenly soldered SMD elements and, as a rule, there are no special cut marks on them.  When making a choice in favor of low-quality Chinese products, you need to consider three nuances:
- the real value of the luminous flux will be less than the theoretical;
- the service life of such a product may differ downward;
- the adhesive base will lose its properties over time.
In order for the LED strip to please the owners of the house with a long and stable operation without losing brightness, you need to choose a branded product. On the territory of the Russian Federation, LED products of dozens of companies are sold, most of which are stamped in China without appropriate quality control. You can avoid troubles by adhering to the following principles:
- do not choose too cheap goods;
- pay attention only to well-known brands;
- inquire about the guarantee of the LED strip.
The leading manufacturers of LED products in Russia and the CIS countries have official representations. On their websites you can get acquainted with the assortment, find detailed information about each product. These leaders are: Feron, Camelion, Dreamled, Navigator, Arlight, Era. In the catalog of these companies you can find related products, for example, mounting profiles and ready-made lamps. Which LED strip is better - everyone decides for himself. Indeed, in addition to the brand, the buyer's choice is often influenced by the seller's opinion, price range, and visual effect during testing.
What kind of LED strip to choose for lighting the ceiling, kitchen working area and other purposes? First, you need to answer the question: "What functional load will be assigned to it?" Maybe an eye-pleasing shade should highlight the beauty of the pattern on the wardrobe mirrors or create an intimate setting in the bedroom. Or vice versa - become a source of diffused white light.
In any case, every person, after thinking a little, can find an application for it in his home. In the organization of LED strip lighting, an important role is played by an aluminum profile luminaire. There are many photos on the Internet with various variations on the design of the ceilings of kitchens and various other rooms. From lamps, you can create creative geometric shapes that blend harmoniously into the overall design. Cool white light stream will accentuate the shine of kitchen appliances and complement the main lighting.  To illuminate the stretch ceiling, it is recommended to install the tape with an indent of about 5 mm from it. The light emitted from the LED strip, in the absence of embedded white crystals, distorts the colors of objects in the room. A particularly strong effect is observed with blue light. This fact must be taken into account in order not to be disappointed after the first start.
The color of LEDs for decorative lighting is selected according to individual taste. Often RGB strips are included in complex lighting design. They look original on plasterboard ceiling ledges. The liquid wallpaper applied around it disguises it for the general style.
The implementation of LED strip lighting should have an integrated approach, starting with a competent technical calculation and ending with installation work. Each stage is an important link in the chain, the strength of which will be the key to the trouble-free operation of the entire system.
Read the same
LED strip is one of the most popular solutions today for the manufacture of decorative lighting or economical main lighting systems. It can be a light in an apartment or a lighting in a car, a luminous strip under the ceiling or near a bookshelf, finally, a festive decoration of the facade of a house or a New Year's lighting of a composition on the street - anything, you can simply decorate it with LED strips, you just need to choose the right ribbons for a particular application.
In this article, we will talk about the choice of light-emitting diode (LED) strips for various purposes, note the important aspects of the choice, and warn the consumer against possible mistakes.
Single color or RGB tape
First, you need to decide if you need a single color or multi color LED strip. Single-color ribbons shine in a specific color: red, orange, yellow, green, cyan, blue, purple or white. One ribbon - one color. Or another option -.
No, this does not mean that several LEDs of different colors are installed on the tape, this means that special three-color LEDs are installed on the tape, each of which is capable, in principle, of giving any shade, depending on the mode of supplying power to it from the RGB controller.
Such multi-colored ribbons are well suited for the manufacture of iridescent decorative lighting for shelves, architectural compositions, ceilings in the bedroom or living room, in a car, etc. If you need to establish a general lighting system, then it is better to choose a single-color white tape (warm yellowish light for a bedroom or a cold bluish tint for a garage).
Choice of brightness and power
When the issue with the choice of color is resolved, the next step will be to determine the expected brightness, and accordingly - with the power of the tape. Here, the determining factors are: the size of the LEDs installed on the tape, as well as the density of their installation along the length of the tape.

The following standard sizes of LEDs are most popular: SMD5630 - for a luminous flux of 18 lm, SMD5050 - for 15 lm, SMD3528 - for 5 lm. The numbers after the letters "SMD" are, as you might have guessed, the size of each LED on the strip in tenths of a mm: for example, 5630 is 5.6 mm by 3.0 mm, etc. The larger the LED, the higher it is power.

And the denser the LEDs are installed on the tape, the higher the brightness of the tape, the higher the power of the light source obtained in this way will be. Typical mounting densities are 30, 60, 72, 120 or 240 LEDs per meter of tape.
As for power, 15 watts per meter is usually enough to form a general lighting system, and here the smaller the LEDs, the denser they must be installed on the tape.
For example: SMD3528 with a density of 60 pieces per meter will give approximately 300 Lm of luminous flux per meter of tape length, and from SMD5050 with a density of 30 pieces per meter of tape, we will get 450 Lm. The order of the numbers is now clear.
Power Supply
Without a power supply, the LED strip will not work, so next you need to select a power supply. When choosing, they proceed from the supply voltage and from the total power of the connected tapes. The rated power of the power supply should be taken with a margin of 10-20% compared to the total power of the tapes being connected.

As for the tapes themselves, depending on the type of LEDs on the tape, and on their density on it, the power of a meter of tape will turn out to be strictly defined.
Let's say you need 4 pieces of 2 meters of tape with SMD5050 solid white LEDs, and with a density of 120 LEDs per meter of tape. The supply voltage for the tape is most commonly 12 VDC.
A tape with LEDs of this standard size and with the named density consumes 25 W per meter. Therefore, 4 pieces of 2 meters each - this is 8 meters - 8 times 25 watts, that is, 200 watts.
So, with a margin of 20% in terms of power, we will choose a network stabilized AC-DC power supply unit for a constant voltage of 12 V, with a power of 240 W. And what if it was a colored ribbon? In this case, one would also have to choose an RGB controller for the corresponding power and for the same supply voltage as the unit.
Ribbon quality
When the calculations regarding the power and standard size of the tape are made, it is up to the purchase of the tape. And here the main thing is not to miscalculate with the quality of the product. You should not chase the cheapness and immediately go to the Chinese Internet trading platform.
In cheap tapes, wishing to get the maximum brightness and, manufacturers put resistors that are undervalued, for example, instead of the prescribed 150 or 300 Ohms - only 100 Ohms. It is better if the resistors are larger.

In addition, the base of the tape should not be very soft - the conductive tracks will have to withstand the operating current and not overheat.
Finally, installation: LEDs should be installed on the tape evenly, not crooked. It is better to pay a little more, and then you can be sure of the quality for many years. And it happens, you save money - and you get a curve soldering and overheating. Miser pays twice.

Where do you need to install this LED strip? Will it stand in a bathroom, where there is regular high humidity, or is it intended for a dry living room, or maybe even for an open-air street? This is where you need to think about the degree of tape security.
Silicone or epoxy coating with a degree of protection of the shell IP65, IP67, IP68 - will protect the tape from precipitation, moisture and dust - this is almost an analogue of duralight. If the tape is placed on a shelf or in a cabinet, where it will definitely always be dry and clean, then you can do with the most ordinary IP20 tape without a protective coating.
The same goes for the power supply. The power supply unit to provide light for the bathroom is installed either in a separate room, or its body must be protected from moisture.
Andrey Povny
During the renovation, special attention is paid to lighting, which is known to set the basic atmosphere for each room. Along with the rapid development of energy-saving technologies, the use of diode lamps is increasing, which can significantly reduce energy consumption. LED strips are distinguished by a combination of practicality and attractive design. They attach directly to the ceiling and create even, soft lighting.
What is the device
LED strips are flexible boards made in the form of strips and equipped with LEDs. The latter are located at an equal distance from each other.


In addition to the luminous elements, there are resistors on the tape that protect the entire system from high voltage and limit the current flow.

Table. Varieties of LED strips.
| Characteristic | Varieties |
|---|---|
| Diode type | 1.SMD 3028. 2. SMD 5050. Diameter affects the coverage area. |
| Fixation method | 1. Self-adhesive with reliable adhesive layer. 2. Mounted with plastic brackets. |
| Tightness | 1. Without sealant, used in ordinary rooms. 2. Medium water resistance, can be used next to a sink or in a bathroom. 3. Sealed, able to function under water. |
| LED color | 1. White tape. 2. RGB. |


Product advantages
The main advantages of LED strips include:
- saving electricity;
- uniform and directional lighting;
- duration of operation, reaching 10 years;
- a choice of different colors;
- in multi-color ribbons - stable color throughout the entire service life;
- flexibility to give the tape any shape;
- environmental friendliness and fire safety due to the absence of mercury and low heating;
- the possibility of adjusting the length of the tape;
- no influence on TV signals due to the absence of interference.

Due to these qualities, the diode strip is often used not only for additional illumination, but also as the main light source. At the same time, the energy consumption of 10 meters of such a tape will be even less than that of an incandescent lamp familiar to many.

Selection of tape by type of diodes
The most common diodes for such tapes are SMD 3028 and SMD 5050. They are attached directly to the surface of the tape and vary in size, which is displayed as numbers in the name. In terms of brightness, small SMD 3028 diodes are not inferior to large ones, but due to their small size they can illuminate a smaller ceiling area. Therefore, to create a brighter backlight, it is worth stopping at SMD 5050.
As for the color parameter, it is worth paying attention to the crystals used in LEDs.

At the moment there are 4 options available:
- yellow;
- red;
- blue;
- green.
White crystals are not currently produced. Instead, the design uses a blue element that emits ultraviolet light. Since the diode is coated with a phosphor that shines under the influence of such rays, the output is white light.

But such a solution to the issue negatively affects the quality of the tape. It is the most short-lived due to the rapid burnout of the phosphor. The result is not only a decrease in the brightness of the tape, but also the manifestation of a blue glow.
The classic RGB combination, in turn, allows you to get not only one of the offered three colors. As is known from optics, white is obtained by mixing all three colors. In combination with the stable operation of crystals that do not require additional coatings, this significantly increases the service life of the product. Usually, such tapes come complete with a remote control with which the lighting is set up. This provides additional room for experimentation.
Tips for choosing an LED strip for different rooms
Depending on where the ceiling lighting is planned to be installed, the type of product and its placement are selected. The change in brightness occurs due to variations in the number of diodes within one meter of tape. The more backlighting elements, the brighter and more expensive it is.


In the corridor
Since this area does not require stable bright lighting, the purchase of a tape with SDM 5050 and higher diodes will be impractical. Mostly corridors and walkways need additional light at night. Using incandescent bulbs will lead to high energy costs and darkness is not the best solution. The best option would be to install low power LED strips. Their light will not irritate the eyes at night, and using a dimmer, you can change the brightness, which will also have a positive impact on the family budget.


In the bathroom
Since this is a damp room, it is necessary to use a sealed structure. This will prevent electrical problems in the event of water ingress. The brightness of the lighting is selected at the request of the owners of the house, because for a small space, the tape is suitable both as additional lighting and as the main source of light.

In the bedroom
Most of those wishing to purchase LED strips install them in the bedroom to give a cozy and more relaxed atmosphere. In this case, options with RGB crystals are suitable, giving more room for imagination, working in certain parts of the spectrum and providing more fine tuning when using a dimmer.

In the nursery
It will be a great joy for the child to select interesting color combinations with their parents and customize the lighting according to their mood. For this reason, it is worth paying attention to diode strips with advanced capabilities. These are the models with RGB + W diodes.
Advanced mode allows you to adjust both pure white light during regular time and various shades of the spectrum for gaming. In this option, the use of dimmers will also be appropriate. Then a low voltage will allow you to maximally weaken the glow of the diodes and use the backlight as a night light.

In the living room
This place fulfills key functions in almost any home. All relatives gather here, holidays are held and guests are received. Therefore, it is important to choose not only the optimal interior design, but also to take a responsible attitude to the lighting installation. Massive chandeliers with incandescent lamps have long given way to diode systems. The latter allow you to embody a larger number of design ideas. For example, creating a multi-level ceiling with interior lighting.

This idea will appeal not only to guests, but also to households. For supporters of natural white light, monochrome ribbons are suitable, and for a festive atmosphere, RGB ribbons are the best solution, the variety of colors and customization options of which will be an excellent addition to the fun.
In the kitchen
Here, in most cases, ribbons are used not only for decorative, but also for practical purposes. In addition to the ceiling, they can be glued to the top edges of wall cabinets, which will add a special touch to the kitchen interior. You can increase functionality with the help of sensors - they are convenient to use when you need to turn on the light, but your hands are busy. When using the tape over the work surface, this solution is especially convenient if your hands get dirty during cooking.

Video - RGB LED Strip
DIY installation
Since adhesive tapes are in greatest demand, consider this method of creating LED lighting.
For work you will need:
- lED strip, purchased with a small margin for safety net;
- scissors for cutting the required length of the product;
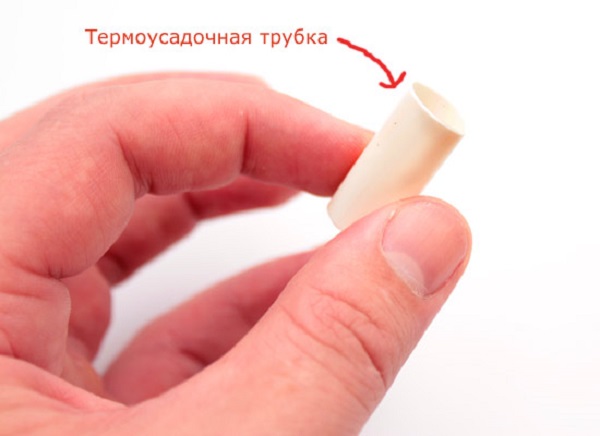
- shrink tubing or electrical tape;
- soldering iron with solder and rosin or LED connectors;
- wires for connecting tapes.

Additionally, you may need ceiling plinths and a level for marking the ceiling. The best option is a ceiling plinth glued to the wall. Using the level, you will need to mark the walls to obtain horizontal lines along which the part will be glued.
Installation of a tape completely ready for installation
Step 1... Measure the heights in different corners of the room and find the lower value from which the marking will go.
Step 2... Using a level, mark the horizontal lines for installing the skirting board. At its lowest point, it should be 5 cm from the ceiling. So the light will freely penetrate the upper area of \u200b\u200bthe room.

Step 3... If the necessary wiring is available, install the skirting board with glue known as liquid nails.

Step 4... Degrease the surface on which the LED strip will be installed. It is also necessary to get rid of crumbling coatings. To increase the reliability of the fastening, glue the installation site with strong double-sided tape.
Step 5... Peel off the sticky layer from the diode tape and glue it parallel or at an angle to the ceiling to create the desired lighting.

Connecting to the power supply with wires
The easiest way is to use an LED connector. In this case, the contact end of the tape is applied to the contacts of the connector, after which the cover is closed. But this option is more expensive and less reliable, like soldering.


Stages of power connection using soldering.
Step 1... Tin contact pads on the tape, cover them with solder.

Step 2... Remove about 8 mm of insulation from the wires, tin them, provide solder and cut to a length of 3 mm.
Step 3... Place the wires on the pads and use a soldering iron tip and solder to solder.

Solder on different sites should not be connected to avoid short circuits on the wires.

Step 4... Despite the low voltage, it is better to insulate the soldering point with heat shrink tubing or ordinary electrical tape.


Cutting and bonding tape
To cut the tape, use the special markings on the surface of the product. The standard step through which the pads are repeated is 3 diodes. Usually, the cutting site is indicated by a line or scissor icon.

The tape is connected in one of three ways:
- LED connector;
- soldering with wires;
- soldering without wires.
Regardless of the method chosen, you must follow the rule - do not connect the tape in length exceeding 5 meters. This value allows all diodes to burn evenly without losing brightness, which will suffer when it goes beyond 5 m.


The first method, as mentioned, is simple but expensive, so let's pay attention to soldering.
Soldering with wires.
Step 1... Tin the stripped wire ends. Cover with solder.
Step 2... Solder the contact pads at the end of the tape.

Step 3... Solder the ends of the wire and the end of the tape so that the solder from different sites does not connect.

Step 4... Repeat with the end of the other tape.
This method is convenient when you need to mount the tape at an angle. It is forbidden to bend the tape itself at a right angle for fastening. Soldering the ends with a copper wire of a suitable diameter solves this problem.

Another option is to use the angled connector
Backlight power supply
After installing the tape in place, a pulsed power supply is connected to it, reducing the voltage from 220 volts to the optimal value for the functioning of the structure. The operation of the tape itself is maintained using a voltage of 12 or 24 volts. When installing the product, keep in mind that the power consumption of LEDs should not exceed the power of the power supply. Otherwise, an automatic shutdown will occur in accordance with the protection system. This characteristic is selected based on the length of the tape to be installed. Also, the size of the power supply plays an important role. The smaller it is, the easier it will be to hide it. Therefore, it is better to think over the connection diagram in advance.
A special controller is used to operate the multicolor tape. Upon completion of installation, it is advisable to hide it together with the power supply. The result of the work will be functional lighting and aesthetic appearance of the equipped room.

As practice shows, the popularity of LED strips only increases over time. This is due to the convenience of using structures in everyday life and when working with the design of the room. Well-chosen lighting will not only provide visibility in the home. Using a custom setting, you can achieve the desired emotional effect when changing several backlighting parameters, which cannot be noted in classic incandescent chandeliers. The economic benefit is also a plus. The purchase of a diode strip will save you from high energy bills and the need to replace lighting for the next 10-20 years (depending on the type of product).
Video - DIY LED lighting


