Physical / capacitive or on-screen buttons - which is better? There are different opinions on this issue, but it is from different angles. And there is still a demand for phones with both physical and touch buttons. Even since Google made it clear that Android is only for on-screen buttons, manufacturers like Samsung and even HTC continue to equip their devices with physical buttons.

However, other manufacturers, including LG, Sony and Motorola, almost completely follow Google's approach, limiting themselves to soft buttons in their devices. The advantages and disadvantages of physical and soft buttons were discussed by Edgar Cervantes in his article Physical vs. on-screen buttons - what’s your pick? ”.
Moreover, even the Priv, a phone with a full-fledged keyboard, has on-screen navigation buttons. However, the question of which buttons are better and, most importantly, why, remains relevant. Alas, this question is one of those for which there is no definite answer.
A bit of history
In 2011, Google released the Galaxy Nexus and the then-new Android 4.0 Ice Cream Sandwich operating system. Subsequently, the new Nexus began to be accompanied by the next version of Android. Android 4.0 Ice Cream Sandwich was targeted at both tablets and smartphones, which was a big step forward for the operating system.
Other changes to the operating system include the appearance of soft buttons. It was the device of the future, and it changed the way a modern smartphone should look. Users are aware of this, but many of them still love physical buttons.
Physical / capacitive buttons
Let's start by talking about the disadvantages of physical buttons. First of all, novice users will have to work harder to learn how to use them, especially when it comes to mechanical buttons that require pressing, not touching. This, of course, is not difficult, but many users are accustomed to the fact that the effort can be made even less.
The second point concerns reliability. Physical buttons are optional items that can break. And don't forget that these buttons are permanent design elements of the device. They will forever remain where the device manufacturer placed them. They will not move anywhere and will not update.
But physical buttons have certain advantages. Many novice users would prefer to feel real buttons under their fingers and feel a tactile response, which is not to be expected from touch buttons. Some things - for example, gaining access to the camera - can be done without even unlocking the phone, especially if the device has a dedicated camera button.
And crucially, the physical buttons allow for more screen real estate. Phones are getting bigger, their screens continue to improve, but many users still choose to keep some of the display space away from on-screen buttons.
In addition, it should be noted that some of the physical buttons on modern phones also have fingerprint scanners, which is another reason to keep them in modern devices. The well-known HTC 10 phones can be cited as examples of such a design decision - a new flagship phone in a familiar look, for which the Samsung Galaxy S7 is also.
On-screen buttons
Some users like the soft buttons and others don't. In this respect, everything is exactly the same as with the physical buttons. And there are a number of reasons not to like them that every user who switches from a phone with physical / capacitive buttons will remember.
As noted above, these on-screen buttons reduce precious screen real estate. Since they are hidden in the process of playing games, viewing photos and videos, the user experience with the phone as "less natural".
But there are also reasons why onscreen buttons are popular with users. They open up ample opportunities for customization and adaptation of the user interface, since a soft button can be added to or removed from the phone screen. Didn't the developer add a menu button? No problem. Does the user prefer left or right button to go back? And it is possible. A lot is possible with softkeys, if the software allows it, of course.
In addition to a more varied software experience, eliminating physical buttons also improves the hardware performance of the phone. The free space can be used, for example, for a larger battery. Alternatively, the manufacturer can narrow the bezel around the screen.
On-screen buttons give manufacturers the ability to customize a smaller phone with a larger screen.
Undoubtedly, each of the users has their own reasons for preferring physical or on-screen buttons. What, in your opinion, should be the navigation buttons of a modern smartphone?
Everything and always breaks down unexpectedly. Dropping your phone on a tiled floor is an annoying accident, drowning it in a bathtub is a commonplace that is more common than it seems at first. The statistics of calls to service centers contain many complaints about accidents from the series “it fell and crashed” even more often than drowning. At the same time, one should not expect that the very first fall will take away the sensor substrate or even the screen itself - in most cases the consequences of annoying accidents do not look so destructive. Among other things, this is the sudden inoperability of the physical buttons "back, home and menu". If this trouble happened to your phone, and there is still no money for repairs, do not worry. There is a relatively simple solution to this common problem. Now we will teach you how to turn on the onscreen buttons on your smartphone if the physical ones no longer work.
For everything to work out, you need to get Root rights. Administrator access to the depths of system files is sometimes difficult to get. But with the advent of apps that get the access they need for you, you no longer need to read the multi-page instructions. Just install Kingo Root software on your computer and connect your phone. The only thing that needs to be done while the program is being installed is in the phone settings, in the "security" section, to enable "USB debugging". That's all. By clicking the big Root button in the interface Kingo root, activate administrator rights.

Step two looks a little more complicated. You will need to download the Root Explorer program from Google Play (or a little ... alternative sources). Install it on your smartphone. Run this application, find the System directory, and in it - build.prop. If such a file is not visible in the system directory, it does not matter. There is an ellipsis in the upper corner of the program - tap on it to open a submenu. In the program settings, check the "Show hidden files" item. The loss will immediately be revealed.

In the left corner Root Explorer there is one more item we need - r / w. Tap it once and confirm your choice. This action activates the ability to edit system files. Now tap and hold build.prop on it. The top menu will change and from the drop-down list (in the same ellipsis) you will find the "open in a text editor" sub-item.
Scroll to the bottom of the open file - all those long lists of settings are unnecessary for now. At the very bottom add the line qemu.hw.mainkeys = 0. Save the file and restart your phone.
Done, at the very bottom of the screen there are three on-screen buttons - similar to what you can see on the screen of any tablet. And after repairing the physical buttons, the virtual ones can be completely hidden back by replacing the line qemu.hw.mainkeys = 0 with qemu.hw.mainkeys = 1 and restarting the device again.
10.12.2017
- Android App Key Remap, Version: 1.12.0, Price: Free
It so happened historically that on smartphones it is more convenient for me to have the navigation button "Back" on the right. And on my BQ Aquaris U Plus it is just on the left and it is "oh, how uncomfortable" to reach for it. It's not a problem to get used to it, but it's too late for my fingers to grow in length, and the inconvenience of getting used to it has not gone anywhere. Unfortunately, the smartphone manufacturer BQ Aquaris did not provide a tool to change the functionality of the navigation buttons, even on-screen ones, so they had to turn to third-party applications.
The most preferred application - GravityBox - did not cope with the task assigned to it. On pressing the "Back" and "Home" buttons, it allowed to hang any action, but somehow it could not influence the "Recent" button. It was a wild idea to block both the "Back" and "Recents" buttons altogether, leaving all responsibilities to the remaining "Home" button, but GravityBox could not simply disable the "Recents" button. The Spaniards in general somehow protected their smartphones "from the fool", and, as far as I know, so far no one has been able to get system root rights on the stock firmware of these smartphones.
Leaving GravityBox alone, I turned to other softinks, whose specialization was precisely the reassignment of the functionality of the navigation buttons. In the battle with the software of the Spanish-Chinese gadget, only one softphone with the original name "Key remapping" was able to win. I use it.
It has become popular among mobile software developers to divide their functionality into two unequal parts. The first part - free - allows you to use the softphone for its intended purpose quite normally. The second - paid - brings some additional features and convenience. And this, in my opinion, is correct. Likewise, the "Reassign Keys" application has both basic functions (reassignment of single short and long presses on the navigation buttons in the amount of no more than two pieces) and premium features (assigning actions to button combinations, removing the restriction on the number of reassignments). By the way, the latest version of the app got rid of ads even in the free version.
What should be mentioned without fail is that root-rights are not needed for the functioning of the softinka. Recently, I began to notice that proprietary firmware has become more functional and customizable (we are not talking about AOSP), so root rights have become less and less required ... And various payment services do not really like ROOT, although it can be hide. But that is another story...
The application interface is minimalistic.
There are only four controls in the free version. These are the three points under which settings are usually hidden. This is a switch for activating and deactivating the service. This is the "Quick Disconnect" checkbox for displaying the application status on the notification panel (with the ability to pause / resume the service by tapping). And it's a round button with a plus sign for adding a new remapping. There are actually no settings in this application, and when you click on the button with three dots, only one item appears - "About the program".
To activate the service, you need to enable these very special features for the application in the gadget settings in the "Accessibility" section.
To disable the service, you need to do exactly the same steps, only the special features for the "Key remapping" application should be disabled. It makes sense, isn't it? It is very good that you do not have to manually search for the aforementioned "special" features in the jungle of system settings: the software itself will guide you to the necessary points.
The ability to quickly deactivate the application action (without going to system settings) appeared only in the latest version. Do you really need it? I don't, but maybe it will be useful to someone (needed). When the "Quick Disable" checkbox is activated, a tile (strip?) Appears in the notification panel, dedicated to the "Key remapping" softphone. By tapping on it, you can quickly turn off and turn back on the active reassignment of the softphone.
The informational part of the main and only application window is represented by two sections: "Premium Features" and "Active Reassignments". For now, let's leave the first one and pay attention to the second. Active reassignments is a list of reassignments made from our filing. In the free version, as already mentioned, there may be only two reassignments, but that was enough for me. The button "Recent applications" (in the application it is called "Recent applications", but the meaning is the same) was assigned the action "Back", that is, the functionality of the "Back" button. And for the "Back" button I assigned the action "Recent_Apps" ("Recent applications", I suppose). Thus, the Back and Recent Apps buttons on my smartphone are swapped. Hooray!
By the way, I learned about the softphone almost a year ago, but I started using it only two months ago. Why is that? Because on the sixth Android, not all the functionality of the buttons was transferred. That is, all, but only stock. Let me explain. Such a function, as the transition to the previous application by double tap on the button "Recent applications", was implemented by the Google team only in Android Nougat. And the Spanish developers from the BQ team have implemented this in their smartphones and in Android Marshmallow. But when transferring the functionality of the "Recent Applications" button on the sixth Android using the described softinka, the doubletap processing was lost (it was not transferred to the new button, but disappeared on the old one), since it was, as it were, brought in from the outside. I did not want to lose such a convenient "feature", so the "Reassignment of keys" software did not take root for me then. But I never got used to the "Back" button on the left, so after switching to Nugu I tried to use the softphone again. And I tried it for a reason. Now the transition to the previous application by doubletap is also transferred to the new button along with the main action ("Recent applications").
The procedure for adding a new reassignment is simple and straightforward; I think a couple of screenshots will be enough. I delete one of my overrides (for the Recent Apps button) and add it again. After clicking on the add reassignment button, you need to choose a free or premium action. In the second case, you will be asked to pay the money, if it has not already been done.
I choose "Short and long press". In the form that appears, select the "Recent_Apps" button from the drop-down list, and the action for it is "Back". I put the checkbox "Replaces the standard action", and the checkbox "Long press", on the contrary, I do not (after all, I need a reaction to the usual quick tap on the button). Everything, you can press "Ok".
When you tap on the active reassignment, a completely similar form for changing the action (reassignment) opens, supplemented with only one button - "Delete" - to delete the selected reassignment. With a long tap on the active reassignment, the context menu "Edit" and "Delete" is called.
The lists of buttons and actions are truly overwhelming. First, when you select, for example, a button, you see a list of seven buttons and the "Other" item. So, under this item there is a huge additional list, in which the buttons are represented by both the official names (used in the code by the developers) and numerical and alphabetic representations.
You can connect an adult external keyboard (if your gadget is able to do this) and reassign all its keys to your taste. The same applies to possible actions, although here everything is a little different: the initial list consists of a little more than 20 actions, and the additional one (hidden under the "Other ..." item) consists of only two lines ("Open application" and "Shortcut" ). As they say, the spool is small, but expensive: in these two points you can cram almost all the functionality of your gadget.
There is also a limitation: when the screen is locked, button presses by the softphone are not tracked. There are pros and cons here. The disadvantages include the impossibility of unlocking the screen with the selected button while simultaneously launching an application (Phone, for example). And the plus is that the softphone will not constantly consume battery power while monitoring the state of the buttons.
The cost of the software (the cost of unlocking premium features) is $ 0.99, that is, a little less than sixty rubles of ours.
After purchase, the "Show application icon" checkbox becomes available, which allows you to hide the application icon from the list of all applications installed in the system (and even from the list of recent applications). To return the icon, you must press the "Back" button ten times in a row (the system button, not the one assigned by the application).
And the most important thing, but not everyone needs, is the ability to use button combinations. This term hides three concepts: "Double click", "Triple click" and "Two buttons".
We are not interested in double and triple clicks, because they differ from fast and long clicks insignificantly. But the use of two buttons increases the number of all kinds of reassignments. I think this is already pampering, but the idea of swapping "Back" and "Recent" may also seem wild to someone.
In addition, premium reassignments have one significant drawback - they do not replace system actions. That is, if I assign any action I need to a double tap on the volume up button, then the sound volume will first increase, and only then the action I have set will be performed. No, it is clear that double tap should not completely cancel the system action (otherwise how can the volume be adjusted?), But the developer needs to do something in this direction.
And one more thing: the action assigned to the simultaneous pressing of any two of the three touch buttons ("Home", "Back", "Recent applications") has never worked for me. Mechanical - no problem, sensory - no problem. Either there is something in the application, or in my phone.
As a result, I can and recommend using the softphone on your smartphones, especially if you need to change the functionality of short clicks to the buttons available on the gadget. The software works great here. If you, like me, wanted to swap "Back" and "Recents", then you don't even have to buy the softphone: the free option is enough for your eyes. If you wanted to make more than two reassignments, then you can already sponsor the developer. But the rest of the premium functionality is not even worth the money that is asked for it, IMHO.
That's all, good luck and health to you. Read Helpix.
When I once again got a smartphone with hardkey navigation keys, without any possibility of customizing them or activating on-screen keys in the style of Nexus, I decided that something had to be done about it. After digging for a couple of hours in the guts of Android, I turned off the annoying backlight, swapped the Back and Browse keys, and then turned on the on-screen buttons and found peace.
Intro
I'll make a reservation right away: I'm a big fan of the idea of on-screen navigation keys. All these houses, arrows and squares drawn right at the bottom of the screen. Yes, they take up some space there (which, however, in most cases is not really needed), yes, they may spoil the appearance of applications, but, damn it, they are dynamic.
On-screen navigation buttons rotate with the screen, disappear when not needed, change color and integrate seamlessly into the home screen interface. If we discard the very idea of the uselessness of the existence of three buttons at once (in the end, Yabloko people get by with one and do not feel disadvantaged) and rather convenient navigation systems like PIE or the MIUI navigation bubble, then on-screen buttons are the best that was invented before so far.
So that's it. For some reason, my wonderful, wonderful idea that there is nothing better than on-screen buttons is not shared by many smartphone manufacturers. And they do not even just do not share, but do not share in a completely monstrous way, forcing to use a smartphone with touch buttons (AAA!), Equipped with dynamic backlight (AAA-2!) And a "Back" button on the right side of the screen (AAA-3: decisive blow ).
The situation is extremely unacceptable, and given that the kind firmware developer did not provide any settings for activating the on-screen keys and settings for controlling the touch buttons, I had to do it myself. There were two options for further action:
- bring the touch buttons to the desired state, namely, turn off the backlight and move the "Back" key to the left side (even if it looks like a "square", it is even more interesting);
- disable the touch buttons completely and activate the on-screen buttons.
I don't like third-party tools, so the decision to do everything with my own hands came by itself.
Method number one. Configuring touch buttons
First, let's try to turn off the button illumination. For this we need root, a terminal emulator and a directory / sys at the root of the filesystem. This is exactly the combination. We are dealing with the Linux kernel, and in systems based on it, all important information about the hardware, as well as the "toggle switches" that control it, are usually located in the sysfs file system, connected to the directory / sys.
Actually, sysfs is not even a file system, more precisely, it is a file system, but operates on so-called synthetic files. And they are not stored on the disk, this is a kind of interface for communicating with the drivers: I read the file - I received data about the piece of hardware, wrote it down - changed some setting. And for recording, you just need root rights.
So, we get root, start the terminal emulator (or better). And we write the following:
# su # cd / sys
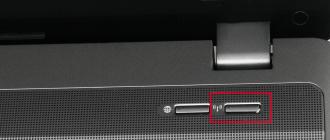
# find -name \ * button \ * ./leds/button-backlight
Bingo! This is a directory / sys / class / leds / button-backlight... We go into it and see what's inside:
# cd / sys / class / leds / button-backlight # ls brightness device max_brightness power subsystem trigger uevent
I bet my Nokia 3310 that the file is brightness is the current brightness of the buttons, and max_brightness- maximum. Let's check the guess by writing the value 100 to the first file (well, like 100%, although what scale is there is unknown):
# echo 100> brightness
Great, the buttons are on and are not even going to go out.
The moment of truth - write the value 0 to the max_brightness file:
# echo 0> max_brightness
The buttons went out, forever, like the light in my stairwell last night.
But just like a light bulb, they can turn on again if you reboot. That is, the command is valid only in the current session. Fortunately, this does not matter, we will put our command in a script on the memory card:
# mkdir / sdcard / boot # echo "echo 0> / sys / class / leds / button-backlight / max_brightness"> / sdcard / boot
And, in turn, we will put it into startup using. We launch the application, select the first three checkboxes, use the Select folder option to select the boot directory on the memory card.


Half of the task is completed, it remains to swap the "Back" and "Browse" buttons. To do this, you need to change the layout of the buttons. In Android, it lies in several directory files / system / usr / keylayout /... There are quite a few of them, but if you discard files like Vendor_2378_Product_100a.kl and qwerty.kl(they store the layouts of full-fledged Qwerty keyboards that Android supports out of the box), then there will be only five pieces left.
We just need one of them. Often smartphones use the file ft5x06_ts.kl, specific to the FT5x06 touchscreen controller (the buttons are touch-sensitive, right?), but in my case it turned out to be a file Vendor_2378_Product_100a.kl.
If you open this file, you can see the three lines you are looking for:
Key 158 BACK VIRTUAL key 139 MENU VIRTUAL key 102 HOME VIRTUAL
It remains only to swap the numbers 158 and 139 in places (any file manager with root rights support is suitable for this). After a reboot, the new layout will take effect.
Method number two. Screen keys
It's even easier here. Android has a special debug variable qemu.hw.mainkeys which allows you to control the visibility of the onscreen navigation keys. If it has a value of 0, the keys will be shown on the screen, 1 - the opposite effect.
We write the variable with the desired value to the file /system/build.prop, and that is all:
# su # mount -o remount, rw / system # cp /system/build.prop /system/build.prop.bak # echo qemu.hw.mainkeys = 0> /system/build.prop
conclusions
Sometimes you have to take such criminal steps to make your smartphone a little more convenient. As for me, I settled on the third option: "turned off" the buttons plus installed LMT Launcher. It seems to me that this is the most convenient way to control.
If we talk about possible reasons why the touch buttons on the android phone stopped working, the failure is more often from the physical than the software side. If there are reasons from the first list, most likely you will have to carry the device to a service center.
Physical reasons:
- Strong blow to a tablet or smartphone, falling from a height.
- Prolonged exposure to moisture. Especially serious damage occurs when water gets into the area between the screen and the film or under the case. Contacts are oxidized. After exposure to moisture, action must be taken immediately.
- Sudden temperature changes. Return the device to room temperature. Sensor performance may improve.
- Screen punching. No scratches or cracks. The breakage is noticeable when pressed - then you can see glare in the damaged parts of the sensor.
- Replacing the screen with an unsuitable model.
- Serious pollution. Wipe off dirt, dust, moisture, and fingerprints with special wet wipes from an electronics store or a microfiber cloth.
- Poorly glued film. In places where air accumulates under the film, parts of the screen will stop working. Remove the film, replace it with a new one if possible.
Software reasons:
- The OS is overloaded with applications or some of them are not working properly.
- Changes to device settings.
- Touchscreen malfunctions are possible if the screen does not correctly or poorly recognize touches. Calibration of the screen will help here (really do it at home).
- Inappropriate or unstable firmware version.
Why is part of the sensor not working on android? Most likely, the contact has moved away or oxidized.
In a phone with a removable battery, remove the cover and remove the battery. Reinsert and turn on the device using the mechanical button.
If the sensor does not work partially, but not completely, and you can download the application, install Rebooter from the Play Market. On Xiaomi, Meizu or Digma, after long pressing the on / off button (20 seconds or longer), the phone will restart or turn off. For Samsung and Sony, press the Power / Lock, Volume Up and Volume Down buttons at the same time. Hold for 7-10 seconds. If that doesn't work, try again, but keep these three keys pressed for longer. If your smartphone is from other manufacturers and has a built-in battery, perhaps the above methods will help. Otherwise, you will have to wait until the battery is completely discharged or carry the device to the service center, where at the same time they will deal with the screen malfunctions. It also happens that a reboot is only needed for the display to react again. What to do if the sensor on Android does not work after locking the screen?

Most often the problem is in the firmware version. To solve it, update the Android version and, if it does not help, reset the settings. How to do this is in paragraphs 2 and 4 of the instructions of the next paragraph of the article. Why don't touch buttons work on android phone? Sometimes the film is the problem. If everything was good before it, try to remove it. Sometimes it's even a new protective glass, which you can also detach yourself. Users say that the bottom touch buttons, which stopped working after screen calibration (3rd step of the next instruction), have become touch sensitive again.
Common repair options
These actions will help in many cases of malfunctioning of a phone or tablet running Android OS due to software, so you can apply these tips when you doubt the system is working properly.
- Reboot your device. Perhaps it was under heavy software load, or a minor error occurred. Maybe the application just hung, but the sensor is working?
- Update your firmware. To do this, go to the following items: "Settings" - "About device" - "System updates" - "Check now". More often than not, the problem is solved.
- Reset the settings to factory defaults. Save all important data to a memory card, computer, or similar media. Tap Settings - Memory - Factory Reset - Reset Settings - Erase All. Confirm your choice if necessary. Wait a few minutes and the reboot will be done automatically
- What to do if the screen is buggy? If it works but slowly, just clean your phone altogether. Delete unnecessary files and applications and cache ("Settings" - "Applications" - any application from the list - "Clear cache"). Use CCleaner, Cleaner Master, or another application to remove other junk and clear RAM.
How to fix a device
You can hardly fix your phone yourself. You will succeed when the cause of the malfunction is in the software. In this case, read the methods below.

- Calibrate the screen. Depending on the manufacturer, there may be a built-in utility for this, or you will have to download the application yourself. There are several ways. For HTC models: Settings - Language & Keyboard - HTC Sense Input. On other smartphones: "Settings" - "Display" - "Screen" - "Calibrate the screen". Optionally, you can calibrate the screen through the engineering menu. It is used by developers to test and modify system components. We do not recommend this method as it can cause problems and take longer than other methods. A third-party screen calibration app from the Play Market can improve display response. For example, Touchscreen Calibration or SGS Touchscreen Booster (you can set parameters manually in it).
- The bottom touch buttons on an android phone do not work, what to do? You can install an application to create soft buttons with the same functions, but in a different place. We recommend Back Button - it does not require root rights.
Contact the service center. They will more accurately determine the cause and fix the device.