In most cases, when buying a printer, drivers are provided for it. If you have lost them or scratched the disc, and you need to use the device urgently, then you need to look for a way out of the situation. Many users are starting to wonder how to install a printer without a disc. This is more than real, and there is nothing difficult here. The key is to be patient and have a USB cable at your disposal.
Some general information
The fact is that most users, even if they are not beginners, naively believe that installation without a special disk is impossible, but this is a fundamentally wrong point of view. Moreover, there are several ways that you can use. The easiest is to use the internet, if available. You need to go to the official website of the developer of your printer and find the latest drivers for it. Then download them to your computer. And since the printer is not difficult in the future, then you yourself will figure it out. You just need to follow the instructions and restart your computer at the end. For now, let's talk about how to install the printer in one of the ways discussed below. Everything about everything will take no more than 10 minutes.
no disk for Windows XP

Go to the Start menu. If you are using the Windows XP operating system, then you need to go to the "Control Panel" and select "Printers and Other Hardware". A new window will appear in front of you, here we need the "Printers and Faxes" tab. The next step is to go to the section "Printing Tasks", "Add Printer Wizard". In the window that appears, you need to start the installation, for this, just click on the item "Printer Installation". After that, the process will start, maybe you will still need to click on "Install a local printer", if the system suggests it. Since installing a Canon or HP printer is quite simple, and the process is completely similar, you should not have any problems with this. For now, let's see how these steps are performed for other operating systems.
How to install a printer: Windows 8, Vista and 7

Go to "Start", here on the right side of the window that opens, you will see a tab called "Devices and Printers", which we need. We go along it and see the button "Add printer". After that, the process is similar to that described above, with the only difference being that there is a wireless installation option. To do this, you must have either Wi-Fi or Bluetooth. Since it is much easier to install the printer on a laptop in this way, it is recommended to use it. First you need to select the printer connection port, and then its model and go further. You need to come up with a name for the device, after which the installation will start automatically. To check if everything worked out, print a test page. If all is well, congratulations - you know how to install a Canon, HP or any other printer without the necessary software.
Another good method

As already noted, if for some reason the method that we described above does not suit you, then use the alternative option. To do this, go to the developer's site. This could be Canon, HP, Epson, and so on. You need to find a page with the latest drivers for your device. As a rule, they are located on the support tab, where it is recommended that you follow. Now all that remains is to find the required driver and install it. There is one small nuance here: it is necessary to take into account the capacity (bitness) of the system. So, there are drivers for x32 (x86) and x64 systems. To find out what you need, right-click on "My Computer", then "Properties" and there you will see the necessary information. Since it is not difficult to install drivers on the printer further, just follow the instructions of the installer. Restart your computer and you're done.
A little about how to install the driver from disk
Some users, especially beginners, cannot understand the disc. In principle, this is quite normal, since there is a bunch of additional software that you are unlikely to use, you do not have to install it. After you insert the disc into the drive, it will start and you will be prompted to select a package that will be automatically installed. You have the choice of partial or complete installation. It is recommended to give preference to the first option, and now we will tell you why. The fact is that by installing the entire package, you will have a lot of unnecessary programs that you will hardly ever use. These are both instructions for use, and a utility that allows you to view photos, by the way, is not the most convenient, etc. Do not forget to connect the printer and then start it, only after that the installation will be completed. Reboot the system and you can use it.
About installing HP printers

It is worth considering the process of installing a device from this manufacturer. This is due to the fact that there are several important points that can drive you into a dead end. In principle, how to install a printer without a disk is clear, but sometimes, even having a driver for HP, it is very difficult to do it. In the first stages, everything is done by simply pressing the "Next" button. When you are prompted to select the type of connection, check the box next to "Via network, network, wireless network". This is only needed when the installer himself did not find the parameters he needed. Please note that the name may differ depending on the driver. It so happens that you need the printer to be available on several computers in the office. To implement this, you must turn on the device, then the software will detect it, and everything will be configured automatically. If the web search was successful, then everything was done correctly. In the event that the printer cannot be found, it is recommended to perform an advanced search by the IP address assigned to the device. This is where we end. It remains only to reboot the system, and you can work. If something went wrong, it is best to contact the support service on the developer's official website. Since the installation of the HP printer may not work for other reasons, you need to print a log file or send a bug report to the developers.
Some more alternative methods

We have already covered several good ways above, which are effective anyway. However, if for some reason they do not suit you, then there are several more options for solving the problem. Proceed as follows. Connect the USB cable to the printer and plug it into the port. The search for the printer starts. Then click "The printer that I want is not in the list of found". A new dialog box will open in front of you, in which there will be several illustrative examples of how to register the device address. When you do this, then click "Next". It so happens that the program displays the following: "There is no driver" or "The driver could not be found." Do not panic. In this case, it is recommended to first click "OK", and then specify the correct file search path. Of course, you must first download it from the Internet. The required package extension must be .inf. Now print a test page and check that the device works.
What else do you need to know?
Do not forget that some printer drivers are installed along with the operating system, but this is only if they are included in this assembly of Windows. In addition, it is recommended that you remember to update them, as this will greatly simplify your life. Since you can install a printer without a disk, it is better to do this using Windows Update, again, this is only for the software that was installed along with the OS. In other cases, you need to download a special utility that will display the status of your software on your computer. In simple terms, outdated drivers will be automatically updated, but you can do it manually. It so happens that everything seems to work, but the printer does not find it. You think that this is due to another "broken" driver, and start reinstalling it, but the reason is often far from this. If the USB port has been in use for a long time, then it is quite possible that it has failed. It is for this simple reason that it is recommended to first try changing the socket, and only then reinstall something.

Conclusion
A lot of information has been written in this article that will be useful to you in the event that you do not have an installation disc. Even if there is one, then read this material, because sooner or later it may come in handy. I would like to note that you should disable the antivirus while installing the drivers, but this can not always be done, but only when it blocks the content. Well, that's all on this topic. You now know how to properly install the printer and make it work even in the absence of software. As you can see, there is absolutely nothing difficult here. Take a few minutes of your time and everything will definitely work at its best.
Some drivers are only supplied in the ".zip" format, which does not include an ".exe" installation file. They are as easy to install as regular drivers. Now we will tell you how to install a printer driver for their archive
Notes:
- you do not need to connect the printer until it is specified in this manual;
- these instructions are applicable to all Windows operating systems, from XP to 10.
First of all, the downloaded driver must be unpacked. This can be done with the free program 7-Zip (you can download it on the official website http://7-zip.org.ua/ru/), or the paid program WinRar. Also, archives can be unpacked using basic Windows tools (if the archive is in zip format) or if the archive is self-extracting (usually it is, exe format).
Example 1. If you take the Xerox Phaser 3010 as an example, then you will download the driver archive (in exe format), which are simply packed into one file. You need to run the downloaded archive (by clicking 2 times with the left mouse button) and you will see a window where you need to specify where to unpack the drivers.
Example 2. If we download the driver in zip format, then we need to use archivers to extract the drivers. To do this, you can install one of the above archivers and then right-click on the archive. In the context menu, select: "Extract all" or "Extract to current folder" or "Extract to (the name of the folder will be written here)".
So, the unpacked file, if you haven't changed anything, will be in the same folder as the downloaded archive. If you are offered a path where to unpack the drivers, then be sure to pay attention to this path, so that you do not later look for drivers throughout the computer.
After unpacking, make sure that there are no files in the ".exe" format (for example, "Install.exe" or "Setup.exe"). If such a file was found, it means that the installation must be carried out in standard mode (run the file and use the prompts of the installer), if not, we move on to this guide.
Go to "Control Panel" - "Hardware and Sound" - "Devices and Printers". In the top menu, click "Add Printer".

After that, a window with an indicator of device search will appear. Without waiting for the results, click "The required printer is not in the list."

After that, select the lowest item - "Add a local or network printer ..." and click "Next".

In the port selection menu, just click "Next" - in this window, the settings are not important.

In the next window, click the Have Disk button.

In the window that appears, click "Browse". 
Now we indicate the path to the folder that you unpacked. Next, click on the ".inf" file with the left mouse button, then click "Open".

Click "OK".

In the next window, select a printer (by clicking the left mouse button) and then click "Next".

You don't need to change anything in this window, just click "Next".

When we do these manipulations, the driver installation will begin. Now we are waiting for this process to complete on your computer. A window will appear asking you to share this printer with network users. We do not need this, so we leave the selected top parameter by default and click "Next". It is possible that this window will not be displayed for you. Then there will be a window like this:  Here you need to click "Finish". Now go to the folder where the devices and printers are located (it was described above how to enter here) and right-click on the printer that was just installed. Click "Remove device" (the drivers will remain in the system).

After that, we connect the printer to the computer, turn on the printer and Windows will automatically install the necessary driver for your device.
Driver installation via device manager
If the above method did not help you, then in this case we want to suggest another. Traditionally, the downloaded driver must be unpacked. Most often, the built-in Windows archiver is enough for this purpose. We have already discussed this archiver above.
Now you need to do the following: connect the printer to a PC or laptop. Open Start, write to the search bar "Device Manager" and press "Enter";
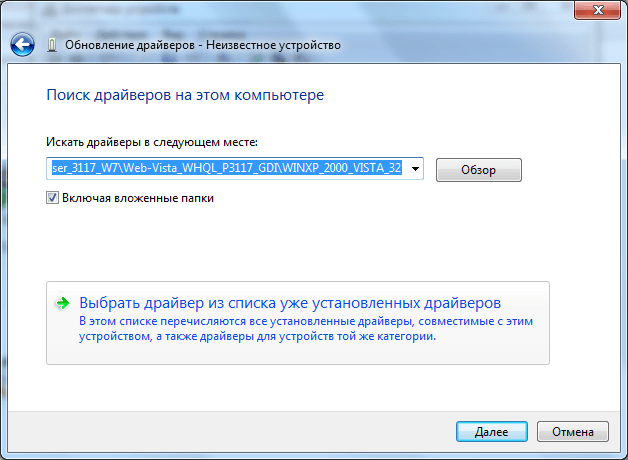
You will see a summary of all devices connected to your computer. Your printer will be located in the Other Devices section titled Unknown Device. Right-click on this device and select the "Update drivers ..." item.

In the "Driver Update" window, select the manual driver search item (item 2).

We select the item for choosing a driver from the already installed drivers.
In the menu for selecting the type of device, select "Printers" and click "Next".

And the final stage: in the Add Printer Wizard window, select the "Install from disk" item, then "Browse" and specify the path to the .inf file from the unpacked folder with the driver.

After that, your printer will be installed on your computer or laptop.
Buying a brand new printer is still half the battle - achieving the goal is full functioning. To do this, the printer still needs to be connected to a personal computer and the necessary software installed. But here, as in any other business, there are nuances and working moments. Below is a step-by-step guide to the driver installation process.
Installing from external media
After directly connecting the printer to your computer and loading a disc or other external drive with drivers, you are ready to install. In most cases, autorun will turn on, following the advice of which all actions will be intuitive. In this case, the process will be divided into several stages:
- Choice of the region of residence.
- Installation options. There are two options here - simple and selective. The first is suitable for beginners and involves moving data to the default folder. The second point is more relevant for experienced personal computer users.
- Confirmation of agreement with all the details of the license agreement.
- Waiting for the setup program to connect the printer to the hardware. You will need to connect the printing device to the computer using a specialized cable (usually it is completed by the companies that produce the printer). After that, it remains to wait for the direct data movement.
It should be noted that sometimes the driver disc may not work correctly or the operating system will be incompatible with the data on the external media. In this case, downloading the necessary files from the Internet will help.
Choosing the Right Driver
To do this, you need to know the model and name of the printer, as well as the operating system of the personal computer that will be integrated with the printing device. There are a few simple steps to find efficiently:
- Go to the address: Start - Control Panel - System and Security - System and look at the type of operating system.
- Download the required driver from the manufacturer's website.
- We save it to the hard drive and proceed with the installation.
- The process itself is almost identical with transferring data from a disk or other storage device.
Where to find and download the driver you need
First of all, the search must be done on the websites of printer manufacturers. Firstly, official sources are the most effective in this case, and secondly, it is such a distribution kit that contains the latest driver versions, where errors of previous developments have been corrected. Do not forget about third-party resources where the same official driver versions are found.
What to do if installation fails
The best advice in this case would be:
- Disconnecting the printer from the personal computer.
- Removing all installed software components.
- Repeated, more attentive, study of the instructions and other attached information materials.
- Find the missing part and try to install the driver again.
Drivers and printers
Summing up, it should be said that the process of installing a driver on a personal computer will not cause difficulty for any person, even superficially versed in this aspect of the issue. Any official website or third-party resource will offer the user detailed step-by-step instructions for installing all the necessary components. In addition, it will provide an opportunity to download the required driver within a short period of time.
In conclusion, let's recall the main steps:
- Connecting the printer to the computer.
- Loading external media or access to the Internet.
- Search and download the driver if necessary (no disc with software).
- Selection of the required component and its compatibility check.
- Installing all required drivers.
- Checking the equipment for full functioning.
We hope that our article helped to quickly and efficiently understand all the nuances of the question - how to install the driver yourself on your personal computer.
Drivers are vital for the operation of the printer and the OS; they are the connecting link between devices. Without their presence, nothing will work, the same will happen if the drivers are broken or outdated - full work will not be possible. The question is how to install a printer on a computer without a disk that is not at your fingertips. There is a way out of this situation, and today we will tell you about it.
The absence of an installation disk is confusing for many users, because they have no idea what can be done here. In fact, the situation is not hopeless, there are other sources of obtaining irreplaceable drivers.

In general, there are two main sources where you can get drivers, but you need the Internet to download them:
- Use the built-in Windows function;
- Manually find and download files designed and posted by the manufacturer.
How to install the printer driver automatically
We will postpone solving the problem manually until the next sections. First you need to use the automatic update process - this integrated function searches, installs and configures drivers.
- Go to "Control Panel" from Start;
- Select the "Devices and Printers" tile;

- Now on the icon showing the computer, right click and see Windows Update;

- Next, in a new window, start the update and wait for it to finish.
The convenience of using the method lies in the automation of the process of searching and installing devices. No manual manipulation is required, so try this option first.
In theory, immediately after connecting the printer, the computer tries to find the necessary drivers, but since you are still reading the article, apparently Windows was unable to detect the device. We will help you in solving this issue.
How to install a printer on a computer using standard tools Windows
This option uses special system tools to load the driver we need from the resources embedded in the system. First of all, disconnect your printer from your computer.
1. Follow the same path Start - Control Panel - Devices and Printers;
2.Click the button in the "Add Printer" menu;

3.Then add "Local Printer";


5. You need to select the manufacturer of your printer in the left column, and its model in the right column and click on;
6.Then come up with a new name or leave the old one and wait until the necessary files are loaded;
7.Now, by checking the box next to "No shared access to this printer", click next;

8.Simply remove the device you installed;

9.Connect the printer to your computer.
Windows OS will automatically analyze the storages for the presence of drivers, then apply them to a new device - a printer.
Downloading drivers from the manufacturer's official website
How do I install a printer without an installation disc? - the question is rather loud, but we do not need a disk, but only drivers. You can simply get this software from the website of your printer manufacturer. You can usually find them there without any problems.
- Follow the developer's site, it is easy to find it through a search engine;
- As a rule, the sites have a corresponding section called "Drivers";

- Going into it, you will see a search where you should enter your device model;

- From the list of found materials, select the appropriate result and indicate the version of Windows on which you plan to use the device;
- Download the file. It usually comes with either a zip or exe extension. In the latter case, just run the file. If the file is zip, you should unzip it and run an item called install or setup with an exe extension.
On this, the problem should be eliminated, only there is a situation when you cannot find the exact model of your device. Then try to find the printer as close as possible in structure, usually with a difference in the model by 1-2 numerical units and try to install a Windows printer.
Additional printer setup methods
There are situations when it is not clear how to install the printer due to the fact that the presented methods do not work. It often helps to simply change the connection connector. This is due to some glitches in the system. Just plug into a different connector, if possible, change the cable with which you connect the devices.
Initially, Windows is designed in such a way that it will try to look for drivers for a connected and undefined device, but this may not work for a simple reason, the printer is not connected to the network, therefore its model is not determined and the software download is interrupted. Just plug the printer cable into a wall outlet before connecting.
In a situation where the driver simply stopped working after a time after the Windows update or the connection port changed, you should manipulate it yourself from the system partition:
- Click "Start";
- Right mouse on "My Computer";
- Find "Device Manager";
- Expand the section containing your device with a non-working or buggy driver;
- Right-click on the device and select the "Properties" option;
- The "Driver" tab, then you will see an active item "Update" or "Roll back" if the problem occurred after updating the driver.
Perhaps your device will be displayed as an unidentified device, then you will have to resort to the methods described above.
By using one of the solutions provided, you can correct the problem and return the printer to proper operation.
If you still have questions on the topic "How to install a driver for a printer without an installation disk?", You can ask them in the comments
if (function_exists ("the_ratings")) (the_ratings ();)?\u003e
Into your computer, read the instructions that came with it. Before connecting some printers, you need to install special software, while other printers can be connected immediately.
Turn on your computer and follow the instructions for your printer.
- If your printer is a Plug-and-Play (plug and play) device, plug it in and turn on the power. Windows will take all the necessary steps automatically.
- Insert the disc (or discs) that came with your printer into the drive and follow the instructions on the screen.
- Run the command Start\u003e Devices and Printers.
- If a wireless printer is connected, run the command Start\u003e Devices and Printers and in the window that appears, click on the link Setting up the printer... Select an option Add network, wireless or Bluetooth printer and follow the instructions.
If the third option is selected, in the window that appears Devices and Printers click on the link Setting up the printerdisplayed at the top of the window.
In the Add Printer Wizard (Add Printer dialog box), click Add a local printer and on the button Further.

In the dialog box Select Printer Port, click the down arrow displayed to the right of the box Use an existing port, and select a port. You can also leave the port recommended by Windows. Click on the button Further.

In the next window of the installation wizard - Installing the Printer Driver - select the manufacturer and printer. The following options are available:

- If you have a disc from the printer manufacturer, insert it into the appropriate optical disc drive and click the Install from disk... Then click on the button Further.
- If there is no such disk, click on the button Windows Updateto view a list of drivers that you can download from the Microsoft website. Then click on the button Further.
- In the dialog box Enter printer name, enter a name for the printer. Click on the button Further.
- In the next dialog box, click on the button Doneto exit the Add Printer Wizard.
If the computer is connected to a network, the installer displays an additional dialog box that allows you to share the printer over the network. Set the switch No printer sharingto prevent other users from accessing this printer. If you want to allow access to this printer, select the switch Allow Printer Sharingso that others can use it in the field Resource name enter the shared name of the printer on the network. In this case, all network users can use the printer.
Defining the Default Printer
If you have two or more printers installed on your system, you can define a default printer to use whenever you want to print a document. Run the command Start\u003e Devices and Printers.
In the Devices and Printers window, the current default printer is marked with a check mark. Right-click any non-default printer and select the option from the context menu Use as default... Click on the button Close in the window Devices and Printersafter saving the new settings.

To change properties for your printer model, such as the print mode (draft or high quality, color or black and white), right-click the printer in the window Devices and Printers and in the context menu select the option Printer properties... The Printer Properties dialog box appears.
Removing a Printer
Over time, if you buy a new printer, then the old one can be disconnected from the system. However, you may need to uninstall the old printer driver to clear the window. Devices and Printers from the icon of an old printer that you will most likely never use again. To remove the printer, run the command Start\u003e Devices and Printers.
In the window Devices and Printers right click on the printer and select the option from the context menu Delete device... (Note that you can also highlight the printer and click the button Delete devicelocated at the top of the window Devices and Printers.)

In the dialog box Delete device click the Yes button. Window Devices and Printers will close and your printer will be removed from the list of printers.
If you delete a printer, it will disappear from the list of installed printers, and if it was the default printer, Windows will choose another printer as that. You will no longer be able to print to the removed printer unless you reinstall it.
Share.


