Instructions
In order to be able to open access to the local disk, you need to manage an account that has volume owner rights. Turn on your Windows computer.
Go to the "Security" menu by clicking on the tab of the same name. Click the "Advanced" button and go to the "Owner" item. Select the required account by clicking the "Change" button. Save your local drive settings.
Now open the properties of the local drive through the explorer menu. Navigate to Access and click the Advanced Setup button. Check the box next to Share this folder. Enter the name of the network share in the corresponding field.
Open the "Permissions" menu by clicking the button of the same name. Select a user group for which access to disk... If you plan to allow any account to use the network resource, select the "All" item.
Check the boxes next to Modify and Read. Click the Apply buttons several times. Restart your computer and check if the local disk is available.
If you are working with Windows XP, then after starting the Explorer menu, right-click on the disk icon and select "Sharing and Security". Open the "Access" tab after starting a new window.
Activate the items "Allow editing files over the network" and "Share this folder" by checking the boxes next to them. Click the Apply button and close the settings menu. Restart your computer after completing the above steps.
Computer networks are created for communication and collaboration, and the security system of the operating system is designed to protect against unauthorized access to the computer resources under its jurisdiction. How to instruct a security system to allow access to a specific folder externally described in this article.
Instructions
Windows security is organized at the level of individual files and is based on the use of the NTFS (New Technology File System) file system. All folders each have special controls access - ACL (Access Control List). They contain a list of specific users and user groups who are allowed access to a specific file or the entire folder generally. It also lists the actions that these users (or groups) can perform with folders and files. The operating system provides both detailed and simplified control over ACLs. So how exactly do you share any folder depends on whether the "Use simple sharing to" option is enabled in your operating system settings. You can find this out in the "Folder Options" Control Panel. To make it, on the "Start" button in the "Settings" section, click "Control Panel", and then select the "Folder Options" item. In the window that opens, the option we are interested in is on the "View" tab.

To open (or vice versa - close) access to any folder in yours, right-click on it and select "Sharing and Security" in the menu that appears. If the “simple sharing” option is enabled (we found it out in the previous step), then in the opened folder properties window the “Access” tab will look like this:

To allow access over the network, you should check the box "Share this folder". Here you can specify the name under which the folder will be seen by other users of the folder, as well as put a checkbox that allows network users to change folder... Click "OK" for the changes to take effect.
Here, too, you can specify the folder name for network users, as well as the limit is not the number of simultaneous connections. To allow network users to modify files in folder here it is necessary to press the "OK" button and put a mark opposite the "Change" item.

Related Videos
rules access to the resources of your computer in the NTFS file system are regulated by special control lists access (ACL - Access Control List). By changing these rules for a specific user or entire groups, you can regulate the options available to them to use files located on the computer media.

Instructions
To allow network access to any disk your change that is captured in the ACL of that. The sequence of actions in this case depends on the type of management of such lists that is currently enabled on your system. To type, open the main OS menu on the "Start" button and select "Control Panel". If your OS is Windows XP, then look for it in the "Settings" section.
With the panel open, click the Appearance and Themes link and then Folder Options. Going to the "View" tab, look for the line "Use basic sharing to" in the list of "Advanced options". If you want to have the most control over user rights, then uncheck this line, and if you trust the operating system more, then check.

When you're done with that, go to diskto be opened for general access... Clicking on the disk icon with the right mouse button brings up a menu in which you need to click the "Sharing and Security" line, and then go to the "Access" tab. If you enabled Easy Access Control in the previous step, it will look like this screenshot.

You need to check the box next to "Share this folder", and in the "Share name" field type its alias for network users. If you need full access, then check the box next to "Allow changing files over the network." To make changes to the security policy click the "OK" button.
The field for the disk alias is also present in this variant. It is also possible to limit the number of simultaneous to it. And to issue permissions for changing the contents of the disk by network users, click the "Permissions" button and make a mark in the "Change" checkbox.

Related Videos
It makes sense to open access to hard drives on a computer network of some company to speed up the production process. In order to grant any user the right to dispose of the data of any computer on the network, it is necessary to set the address of his computer in the access protocol. How do I make my local drive open to users on my local network?

Instructions
Enter the Start button menu. Select "My Computer". Basically, you can do this by double-clicking on the "My Computer" icon located in the upper left corner of your desktop. A window will open in front of you. Select the local drive in it, access to which you want to open. Click on it with the right mouse button, select "Properties" in the menu that appears. A window will appear in front of you.
Select the "Access" tab. Find and select the item "If you want to open access to the root folder of the disk, click here". Check the box next to Share this folder. You will find it under the "Network Sharing and Security" section. Then specify the network name of the local drive, which will be displayed on the local network as a share.
Check the box next to "Allow changing the file network" to open access to the local drive. After that, other network users will be able to freely dispose of the information that is stored on it.
To prevent various kinds of unpleasant moments associated with erroneous information correction, uncheck the box next to the "Allow changing files over the network" item so that the information of the selected local disk is available to other users only in read mode.
Apply changes. To do this, click OK. If you did everything correctly, the drive selected for sharing will be displayed in the "My Computer" window as an icon with an open palm.
To open access to a particular folder, and not the disk as a whole, do everything in accordance with the instructions described above. If you want to allow access only to some users, then specify their addresses on the network so that only they have the right to view documents on an open local disk.
General activation access allows you to share various data stored on hard drives and external drives. This method is widely used in enterprises, because allows you to quickly access the information you need.

You will need
- - administrator account;
- - guest account.
Instructions
There are two main types of public resources. In the first case, users can only read files, and in the second, they can change their content and add new documents. Turn on your computer. Wait for the operating system to load.
If you've set up workgroups within your local network, select the Homegroup (Read / Write) field. In the event that you want to open access to certain clients, select "Specific users".
Now leave the menu that appears for a while. Open Control Panel and select "User Accounts". Go to the "Create Account" menu.
Enter a name for the new account. Check the box next to "General access". Click the "Create Account" button. Be sure to set a password to access this account.
Now go back to the sharing settings menu. Enter the name of the account you just created in the field that appears. Click the Add button. Highlight this account in the bottom menu and click the "Share" button.
When connecting from another device to your computer, an authorization form will appear. Enter the name of the account that is shared. Please enter the correct password. Check the Save Login Options checkboxes.
Be sure to check your firewall settings. During the first attempt to connect to a public folder, a system warning may appear. Allow this connection by highlighting the "Remember action" item.
Related Videos
Setting up general access to certain computer resources allows you to provide quick access to the information you need. In addition, this method is ideal when using a PC as a network storage device.

You will need
- administrator account.
Instructions
Turn on your computer and wait for Windows to boot up. Use an account with administrator rights to log in to the system. This will allow you to perform all the necessary directory operations.
In a situation where the owners of network computers are verified users, use simple sharing options. Open the My Computer menu. Select the desired local drive and right-click on the icon of the folder you want to access.
Select Properties from the expanded menu. Open the Access tab and click the Advanced Setup button. Activate the "Open to this folder" option by checking the box next to the item of the same name.
In order not to create a heavy load on the hard disk, set the maximum number of simultaneous sessions to 5-10. Click the Permissions button. In the User Groups submenu, highlight the All item.
Check the Allow box next to Full Control. If you want users to be able to only view and copy files, activate the "Read" option. Click the "Apply" and Ok buttons in sequence.
Sometimes computers are part of a relatively large local area network. Do not share with all users if you are not sure about their reliability. Create a Guest account on your computer.
Do not forget to protect this account with a password. Otherwise, you will not be able to correctly open access to directories. Open the properties of the desired folder, click the "Share" button in the corresponding menu.
Enter the name of the account you recently activated in the available fields. Set the required permissions for this account, such as Read and Write.
Click the Apply and Ok buttons. It should be noted that this method has a significant drawback: network users will not be able to simultaneously access directories. If this is critical for you, use the Windows HomeGroup capabilities.
Quite often there is a need to transfer information to local network users. And so that they do not run to each other with flash drives or disks, but calmly exchange information while sitting at their workplace, you can simply create a folder with the necessary information (shared resource) and open a shared access.

Instructions
In the window that appears, select the "Access" tab and put a checkmark in front of the "Open general access to this one. " Also in the "Name" field of the folder opened for the general accessa, you can assign any name. It will be seen by everyone who came to you (the real name of the folder will be hidden). If you want all network users to be able to change the contents of the folder, that is, copy, move, delete, then you should check the box opposite the item "Allow changes over the network".
If you need to expand access to the computer, then you create several accounts, being an administrator, and set to some files limited access... But if you want your files had access someone else, then you are wondering how to do it. It is quite simple to perform such an operation, it is enough to follow the step-by-step instructions.

You will need
- Personal Computer
Instructions
Boot your computer and click the "Start" button. Now select the item "My Computer" and find the folder or drive to which you want to share
Make sure you have file and printer sharing turned on. It should be enabled to share the desired folders. The method to enable it is slightly different, depending on which version of Windows you are using. We strongly recommend that you do not enable sharing on a public network such as a school or coffee shop.
Select the folder you want to share. Once File and Printer Sharing is enabled, you can share any folder on your hard drive to other network users. Find the required folder in File Explorer. Right click on it.
Select "Share Access." This will open the access menu. You can share it for everyone in your Group or select specific users.
- When configuring access to a Group, you can allow users of the other Group to read and overwrite the folder, or restrict it to read only.
Click on "Users" to select who to give access to the folder. A new window will open listing all users currently having access to the selected folder. You can add users to this list and give them special permissions on the folder.
- To share the folder with everyone, select the drop-down menu at the top and select “Everyone”. Click Add.
- To be able to access specific users, click the drop-down menu and select them, or enter a name and click Add.
Set permissions for list users. Find the user in the list for whom you want to change access rights. Look in the Access Levels column and click on the arrow next to the existing rights. Select a new rule from the list.
- Read - The user will be able to view, copy and open files from the folder, but will not be able to modify them or add new ones.
- Read and Write - In addition to the Read capabilities, users will be able to make changes to files and add new ones to the shared folder. With these rights, users can delete files.
- Remove - The permissions for this user are removed and the user is removed from the list.
Click on the Share button. The selected permissions are saved and the folder is available on the network to the selected users.
Using Shared Folders
-
Enabling Shared Folders. Shared folders are folders that are always available to anyone on the network. Anyone can view and overwrite files in such a folder and does not require special permissions. Shared folders are disabled by default if you are not in your Group.
- Windows 8 - Right-click on the Network icon in the System Tray and select "Network and Sharing Management". Click Change Advanced Access Settings. Click the All Network tab. Find the item "Shared Folder Access" and enable it. Click "Save Changes".
- Windows 7 - Click Start, write "control panel" and press Enter. Double click on the "Network and Sharing Center" icon. Click on Change Advanced Access Settings. Open the profile you want to open Shared Folders (Home / Work or Public). Find the item "Shared Folder Access" and enable it. Click "Save Changes" and enter the administrator password if needed.
- Windows Vista - Click Start and select Control Panel. Click Network and Internet and select Network and Sharing Center. Open Shared Folders under the Access & Discovery tab. Turn it on and click Save.
In the Windows operating system, you can connect to a shared access to a folder on your local home network to exchange data between computers using shared folders. This is a very convenient and fast way to transfer files according to the computer-to-computer scheme, without using external media (flash drives, external hard drives, memory cards, etc.).
In this article I will talk about creating a local network using the example of the Windows 10 operating system. Creating and configuring a local network in Windows 8 and Windows 7 is similar, this instruction is universal.
The article discusses the following option for using shared folders on a local network: several computers are connected to the router, connected via cable and a Wi-Fi wireless network, united into a home network. A shared folder is created on each computer, and all computers on the local network have access to shared folders.
Computers connected to a home local network can have Windows 10, Windows 8, Windows 7 operating systems (different OS, or the same operating system) connected to the router via Wi-Fi or cable.
Creation and configuration of a local network takes place in four stages:
- the first stage - checking the name of the workgroup and the settings of the network card
- second stage - creation and configuration of local network parameters
- the third stage - connecting the shared access to the folder on the local network
- the fourth stage - data exchange over the local network
First, you need to check the parameters of the workgroup and the settings of the network card, and then create a local Windows network.
Checking network card and workgroup settings
On the Desktop, right-click on the "This Computer" icon ("My Computer", "Computer"), in the context menu select "Properties". In the "System" window, click on "Advanced system settings".
In the "System Properties" window that opens, open the "Computer Name" tab. Here you will see the name of the workgroup. By default, Windows 10 gives a workgroup the name "WORKGROUP".

On all computers connected to this local network, the workgroup name must be the same. If the workgroup names are different on the computers you connect to the network, change the names to the same workgroup name.
To do this, click on the "Change ..." button, in the "Change computer name or domain" window, give a different name for the workgroup (write the new name in capital letters, preferably in English).
Now check your network card settings. To do this, in the notification area, right-click on the network icon (Internet access). Click on the "Network and Sharing Center". In the "Network and Sharing Center" window, click on the link "Change adapter settings".
In the "Network Connections" window, select a network card, Ethernet or Wi-Fi, depending on how your computer is connected to the Internet. Next, right-click on the network card, in the context menu, click on "Properties".
In the properties window of the network card, in the "Network" tab, select the component "IP version 4 (TCP / IPv4)", and then click on the "Properties" button.

In the opened Internet Protocol properties window, in the "General" tab, check the parameters of the IP address and DNS service. In most cases, these parameters are assigned automatically. If these parameters are inserted manually, check the corresponding addresses with your Internet provider (the IP address on the computers connected to the network must be different).

After completing the verification of the parameters, you can go directly to creating a local network in Windows.
Creating a local network
First, configure your local network settings in Windows. Enter the "Network and Sharing Center", click on "Change advanced sharing settings."
The Advanced Sharing Settings window configures how to change the sharing settings for different network profiles. The Windows operating system creates a separate network profile for each network used with its own specific parameters.
There are three network profiles available:
- Private
- Guest or public
- All networks
In the private network profile, under Network Discovery, select Enable Network Discovery.
In the "File and Printer Sharing" option, activate the "Enable File and Printer Sharing" option.
For Homegroup Connection, select Let Windows manage homegroup connections (Recommended).

Then open the network profile "All networks". For Sharing Public Folders, select Enable Sharing so network users can read and write files in shared folders.
In the File Sharing Connection option, select the Use 128-bit encryption to secure shared connections (Recommended) option.
In the parameter "Sharing with password protection" activate the item "Disable sharing with password protection".

After completing the settings, click on the "Save Changes" button.
Repeat all these steps on all computers that you plan to connect to your home local network:
- check the workgroup name (the name must be the same)
- check network card settings
- in the sharing options, enable network discovery, enable file and printer sharing, disable password protected sharing
How to enable folder sharing
In this case, I have created a folder named "Public". Right-click on this folder, in the folder properties window open the "Access" tab.
Then click on the "Advanced setup" button.

In the "Advanced Sharing Settings" window, activate the item "Share this folder", and then click on the "Permissions" button.

Select permissions to use the shared folder data from another computer. There are three options to choose from:
- Full access
- The change
- Reading

To save the settings, click on the "OK" button.
Re-enter the folder properties, open the "Security" tab, and then click on the "Change ..." button.

In the window that opens, enter the name "All" (without quotes) in the "Enter the names of the selected objects" field, and then click the "OK" button.

In the folder properties window, in the Security tab, configure the permissions that you previously selected for the shared folder.

To change the permission for the "Everyone" group, click the "Advanced" button. In the Advanced Security Settings for Shared Folder window, select the Everyone group, and then click the Change button to change the permissions.
Configuring the local network in Windows is completed. In some cases, you may need to restart your computer for all changes to take effect.
Logging into your local home network
Open Explorer, in the "Network" section you will see all available computers connected to the local home network. To log in to another computer, click on the computer name, and then click on the shared folder name in order to access files and folders located in the shared folder.

Local network in Windows 10 is created and configured.
Troubleshooting some network problems
Sometimes, after setting up the network, there are problems with accessing folders on the local network. One of the possible problems may be the incorrectly selected network profile. I ran into this myself on my computer. After reinstalling the system, I created and configured a local network, but my computer did not see two laptops connected to this network. From a laptop, it was possible to access the shared folder of my computer without any problems, but the computer did not see them at all.
I checked all the settings of the local network several times, and only then I noticed that a public network is running on my computer, and not a private (home) network, as on laptops. How can you solve this problem?
Enter the "Network and Sharing Center", click on "Troubleshoot". Select the "Shared Folders" section, run diagnostics and troubleshooting. At the very end, the application will offer to configure the network as private. Apply this hotfix and then restart your computer. After performing this operation, my computer accessed shared folders on laptops in the local network.
Problems often arise due to incorrect network settings. Windows 10 has the option to reset network settings to their default settings. Enter "Settings", "Network and Internet", under "Change network settings" click on "Reset network" to apply the default network settings.
Other problems may arise, look for their solution on the Internet.
Conclusion
In Windows, you can create a local private (home) network between computers, to organize the exchange of data using shared folders, to access the printer. Computers on the same network may have different or identical operating systems (Windows 10, Windows 8, Windows 7).
In this article we will set up a local network between two or more computers with Windows 7 (Windows 8) installed, which are connected via a Wi-Fi router. In fact, setting up a local network in Windows 7, Windows 8, and Windows 10 is almost the same. Windows XP only has its own nuances, there are always some problems when setting up a network between the seven and XP. But, more on this in a separate article, and it's time to move from Windows XP, it is outdated.
It is clear that in order to set up a local network and share files, computers need to somehow be connected among themselves. This can be done with a network cable, I have a direct connection between two computers. But, it is much more interesting to connect all computers through a router, which is now installed in almost every home and office. When connecting via a router, you can already set up a local network not only between two computers. All computers, and even mobile devices that are connected to one router can be connected to a local network
For example, desktop computers can be connected to a router via a network cable, and laptops - via a Wi-Fi network. This is how it is more convenient for you, and how you do it. It doesn't matter if the computer is connected to the router via Wi-Fi or a cable, the local network will work. And it doesn't matter what operating system you have installed, but I'll show you using Windows 7 as an example.
And I will configure and show the network through a router to which my laptop is connected via Wi-Fi, and a stationary computer. Both work on Windows 7. It is between these two computers that we now set up a local network. And also, open the general access to folders and files. What is a local network between computers for? Mostly for file sharing. If you often need to transfer some files from one computer to another, then in order not to run with a flash drive, you can do this over the network. Well, you can play games over the network.
If your network still has a TV with Smart TV, then you can set up access to movies on your computer from the TV. Read more in the article.
Instructions for setting up a local network in Windows 7
Let me remind you that the computers that you want to network must be connected to the same router, or directly connected by cable. Also, all the actions that I will show in this section must be performed on both computers.
An important point! If you want to set up a network via a Wi-Fi router, to which some third-party devices (for example, your neighbor) are connected, then after setting up, he will be able to access those folders on your computer that you set up public access to. Install a good one to protect your network. If you still need to connect third-party devices to your router, but you want to set up a home network, then you can create a "guest network" for guests, as we did on the Zyxel router in.
One more point. If you are setting up a network when connecting computers directly, without a router, then you will also need to set static IP addresses in the properties of the local network connection. If you have a connection via a router, then you do not need to do anything else, continue to follow the instructions.
1 First of all, we need to check that all computers work in the same workgroup. This should be checked on all computers that will be connected to the local network.
We do this: press the key combination Win + R, and in the window that appears, specify the command sysdm.cpl... Push Ok.
On the contrary Working groupis likely to be written WORKGROUP... You can leave her. The main thing is that on the other computers the workgroup should also be WORKGROUP.

If you go to change it, for example on MSHOME, then press the button Edit, and specify a new group. Save changes and restart your computer.
2 The second step is to change the sharing settings. We perform these settings in the same way on all computers in the network. Now I'll show you what to enable.
Right-click on the internet connection icon in the notification bar, and open Network and Sharing Center... In the new window select Change advanced sharing options.

There will be two profiles. Home or Work, and General. We change the one that is written current profile... You can make these settings for both profiles.
First of all, put the switch next to Enable network discovery... Also, turn on File and Printer Sharing, and include share folders... See screenshot below.

Scroll through the settings page, find and open the tab All networks, or General, and necessarily disable Sharing with password protection.

After these steps, it is advisable to restart your computer. This is actually all the settings, the local network should already work. To check, you need to go to the explorer (My Computer) on one of the computers, and open the tab on the left Net... All computers on the network will be displayed there. In the screenshot, you can see my computer, and another one from the network.

We can already go to a computer on our home network, there will be access to shared folders.

If you do not have computers on the network, or you do not have access to a computer, then see the solutions at the end of this article.
Setting up file and folder sharing
As I wrote above, you already have access to shared folders. But, we may need to open shared access to some other folder, which is, for example, on the local drive D. This can be done without problems. After we open shared access to the folder, all computers from the local network will be able to view the files located in it, modify them, and add new files to this folder. (however, it depends on what permissions we enable).
For example, I want to share my Pictures folder. To do this, right-click on it, and select Properties... Go to the tab Access, and click on the button Advanced customization... We put a tick next to the item Share this folder, and click on the button Permissions.

In the window that opens after clicking the button Permissions, we need to set the permissions to this folder. So that netizens can only view the files, then leave a tick only opposite Reading. Well, for full access to the folder, with the ability to change files, set all three checkboxes.

Click Apply and Ok... In the window Advanced sharing setup, also press the buttons Apply and Ok.
In the folder properties, go to the tab Safety, and press the button Edit... Another window will open in which we click on the button Add to... In the field we write "All" and press Ok.

Select the group All, and from below we mark the necessary access points for this folder with checkmarks.

All, after these steps, there will be a general access to this folder from all computers on the network. Starts working without rebooting, checked. Open this folder from another computer:

Everything was done in a confusing way, until you figure it out ... It was possible somehow to make these settings more simple and understandable. But, everything works. It turns out that I have access to a folder that is located on another computer. And this is all over the air, since I have both computers connected to the router via Wi-Fi.
By the way, this folder will also be available from smartphones and tablets that are connected to this Wi-Fi router. To view network folders on Android, I advise you to install ES Explorer, or use a standard explorer. Everything is working:

Now we will also look at possible problems and errors that can very often be encountered during the configuration process.
Possible problems and errors when setting up a home local network
If during the configuration process any errors or problems appear, then first of all disable antivirus, and other programs that might block the connection. If the problem is in the antivirus, then you will need to add your connection to the exceptions.
- Computers from the local network do not appear on the Network tab. In this case, on all computers we check the workgroup and the sharing settings. Open a tab in the explorer Net, right-click an empty area, and select Refresh... Another important point, very often antivirus and firewalls block access to the local network. Try disabling your antivirus for a while. Also, you need to make sure that there is a connection to the router.
- Can't access shared folder. Another problem, when we seem to have set everything up, opened public access, but when we try to open a folder on a computer on the network, a message appears that we do not have access, we do not have permission to access this folder, we could not open the network folder, etc. Or, you are prompted for a username and password.
Be sure to check the sharing settings in the properties of this folder. There are a lot of settings, everything is confusing, perhaps something was missed. Well, again, turn off the antivirus, it can block. - A computer connected via Wi-Fi cannot be seen by other computers on the local network. Or vice versa. If your network is built from computers and laptops that are connected both wirelessly and by cable, then there may be problems with a certain connection. For example, laptops that are connected via Wi-Fi may not appear on the local network.
In this case, pay attention to which profile you enabled network discovery (settings at the beginning of the article)... Also, it is advisable to assign the status of a home network to connect to your Wi-Fi network. Well, be sure to try disabling your antivirus.
I think you did it. If something could not be configured, then ask in the comments. Also, do not forget to share your tips on this topic.
In Windows XP, the organization general access to folders, drives and printers is done at the user level. On the one hand, this is of course very convenient: when trying to access a particular folder, you do not need to remember and enter different passwords. But at the same time, it is necessary to create accounts on each computer for all users who need access to the resources of this computer over the network. If you don't want to create accounts for all users on computers, you can activate a guest account. However, in this case, any user within the local network will be able to access your shared resources. But let's talk about everything in order.
When we have at our disposal, we can proceed to its direct use. One use case for the network is to provide share drives and folders computers.
You cannot share a single file on a local network: to make the file available to other network users, you must share folderwhere it is stored. Remember that by sharing a folder, you thereby give access to all the folders and files located in it.
There are two sharing modes on Windows XP networks:
- Easy sharing of computer resources
- Advanced sharing of computer resources
Easy file and folder sharing
Simple file and folder sharing is enabled by default. You can verify this by clicking "Start" - "Control Panel" - "Folder Options" - "View" tab. There should be a checkbox opposite the item “”:  If the box is not checked, then the computer is using Advanced Sharing.
So, let's say I want to “share” the “Reports” folder, which is located on my computer on the local drive C.
To open public access to any folder or disk, you need to right-click on the required object - select "Properties" - go to the "Access" tab.
If we are sharing a disk or folder for the first time, then we will need to click on the following link:  And then select “Just turn on file sharing”:
  In the window that opens, check the box next to “Share this folder”:
  Thus, you will give network users read-only access to the files contained in this folder. They will not be able to change the files in this folder or write their own files to it.
In the “Share name” field, you can enter the network name of the folder under which it will be displayed in the list of local network shares. But this is optional.
If you check the box next to “ Allow modification of files over the network”, Then allow users to copy their files to this folder, as well as modify the documents contained in it.
Then click in this window "Apply" - "OK". After that, the folder will become public and a hand symbol will appear on it: 
For security reasons, you should not open full access to system folders (Windows, Program Files) and folders containing important data. Your best bet is to create a dedicated folder or folders for shared network files and give full access to only those folders.
In order for users of your network to be able to access shared folders - on the computer where they are located, you must enable the account “ a guest”. This will allow anyone to access the shared folder from any computer on the network.
To check if the guest account is activated on the computer - right-click on the “My Computer” icon on the desktop and select “Manage”. In the window that opens on the left in the "Utilities" section, select the item "Local users and groups". Having opened it, we stand on the “Users” folder - in the right field we find “Guest” and double-click on it:  In the next window, the checkbox “Disable account” should be unchecked:
  This is all about simple sharing to files and folders. As a rule, this mode is sufficient when working on a home network. However, in the local network of any organization, a more serious differentiation of user rights is required. In this case, you need to enable “Enhanced File and Folder Sharing”.
Advanced file and folder sharing
If you want to use advanced shared access to files and folders of computers on the network, then you need to go to "Start" - "Control Panel" - "Folder Options" - "View" tab and here uncheck the box next to " Use simple file sharing (recommended)”. The Guest account must also be disabled for security reasons.
Allowing shared access for folders in advanced mode is the same as in simple mode: Right-click on the desired folder or disk - select “Properties” - go to the “Access” tab and check the box in the “Share this folder” item :  In the “Share” field, you can enter the network name of the folder under which it will be displayed in the list of local network shares.
In the “Note” field, if you want, you can enter a description of the folder (for example, “working documents”, etc.).
You can also limit the number of users who can use the shared folder at the same time. But it only makes sense to do this on very large networks or on weak computers.
And now we come to the most interesting point in the organization of sharing - the differentiation of access rights for network users in relation to the folder. Differentiation of access rights - this is the creation of certain rules, according to which network users (each individually or a group of users) will be able to perform certain actions with the contents of a shared folder: full access, change, or only read its contents.
To set these rules, click the “ Permissions”. You will see a similar window:  Here you can add a user or group to the list and define permissions for it by checking the boxes opposite the corresponding items.
I draw your attention to the fact that the above method (advanced mode) will work without problems if both computers (on which the folder was shared, and which is trying to access it over the network) were started the same usernames with the same passwords... In other words, if you are working as a user Vova , shared the folder, then in order to access it from another computer, a user must also be created on it Vova with the same password (as on the first computer). Moreover password must not be emptyotherwise Windows will refuse to share the folder. If the above condition is not met, there may be problems with access to shared directories (drop-down boxes with the words “access denied”, etc.).
So, let's add users here and set permissions for them:
We press the button “Add”. In the next window, click "Advanced":  In the window that opens, on the right, click the "Search" button:
  I want to allow access to the folder to users on this computer (including the user Vova
). Therefore, at the bottom of the window, scroll through the entire list and find the name "Users" - select it and click "OK" - then "OK" again:
I want to allow access to the folder to users on this computer (including the user Vova
). Therefore, at the bottom of the window, scroll through the entire list and find the name "Users" - select it and click "OK" - then "OK" again: 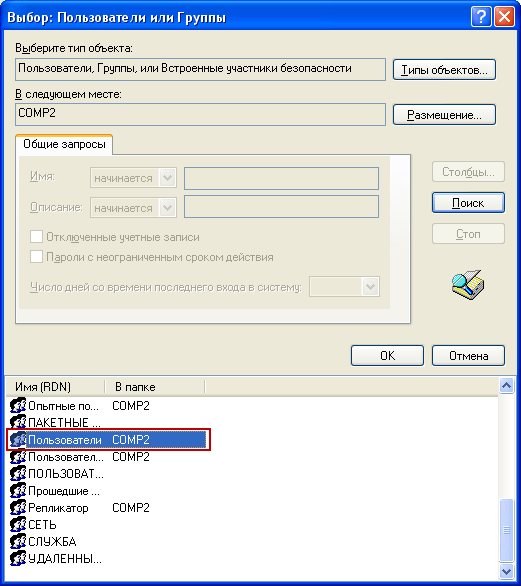 In the next window, I decided to give permission to read and modify files in this folder - so we put the appropriate checkboxes and click “Apply” - “OK”:
  That's all! Now I can easily access this folder from another computer (where the user is Vova
) and change the files in it.
That's all! Now I can easily access this folder from another computer (where the user is Vova
) and change the files in it.
To see all the resources of the computer, open for public access - go to any PC on the network in “ network environment”. Then select "Show workgroup computers". When you double-click on the name of any computer, its resources that are open for public access to other computers on the network will be displayed.


