The location map on the website with the organization's address is a very convenient reference point for users. Agree, it is very practical to go to the website and see the location of the company without opening additional tabs to search for the address on the map. This is an additional small plus in the client’s loyalty towards the organization.
Typically, the location map is placed on the contact page under the specified contact information. It is inserted using special program code (script). The easiest way to obtain such a script is to use ready-made API solutions from Google or Yandex. To insert a map onto the site, there is no need for programming knowledge; by following the instructions below, you will receive a clear and convenient map.
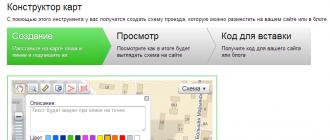
Inserting a map using Yandex Maps1. At the moment (beginning of 2013), the map designer from Yandex is available in version 2.0, very convenient and logically understandable. You don't even need to be an authorized user to create a card. The first step is to create the card itself with the address. To do this, follow the link http://api.yandex.ru/maps/tools/constructor/ and enter the company address in the lower input field. After clicking the “find” button, the system will display options for the found addresses.
2. Place a dot at the desired address and indicate the name of the organization in the description field. It is better to choose the color of the dot based on the style of the site on which the map will be located. The constructor also allows you to mark other landmarks on the map, for example, large well-known objects, stretch the map to the desired size, draw a route from a transport stop using the line drawing tool, and edit the scale.

3. Next, go to the viewing tab. Here you can choose whether your map will be static or interactive. It is better to choose the second option, so the user can view the nearby area and get his bearings.

4. The "Embed code" tab offers you to read the user agreement. After confirming it, you will see the insertion code. You can edit it a little, for example, remove the link to Yandex, adjust the size more precisely, but it is better not to make significant changes.

5. Copy this code and paste it onto the contact page using an HTML editor after the text.

6. Save the changes made and check the result on the site page.

1. The algorithm of actions is similar to that described above. Follow the link http://maps.google.ru/maps and enter the organization’s address in the search bar. You can also see what it looks like from a satellite. Next, to get the code, click on the link sign on the left. You can copy the existing code, or you can click the “set up and preview the built-in map” link.

2. When you select edit, an additional window will open where you can adjust its dimensions.

3. Copy the received code and paste it through an html editor onto the site page. It will look exactly the same as in the preview. Unlike Yandex maps, Google maps are always only interactive; there are fewer opportunities to edit the map itself, but you can look at the area from a satellite, the relief with the names of objects and a 3D map.
Once, when I decided to go to the office of a company, I was faced with the fact that the company’s office had moved. And on the door of the old office, there was a piece of paper taped to it with the new office address. One problem - according to this sheet, I looked for a new office for about an hour, although it was only a ten-minute walk from the old one. And all because there was no map on the company’s website showing the new office location.
In fact, posting a map on a website with the address marked is a piece of cake. However, unfortunately, many do not do this. Yes, if you just have a blog, then the map is unlikely to be useful to you. But if your website is a representative of a real offline office, then a map on the website is simply necessary. And it doesn’t matter whether it concerns the office of a multi-billion dollar company, or whether it’s just the website of a local workshop. Let's see how to place a map on your website or blog.
In the Russian-speaking part of the Internet, the most popular maps are from two companies: Google and Yandex. I won’t say which company’s service is better, but today I will tell you about the service from Google.
There are several ways to insert Google maps into your website, and it doesn’t matter whether the site runs on CMS WordPress or just HTML.
Method number 1.First, the service will tell you that you do not have cards. Well, you need to create it. To do this, you need to click on the “+” icon

There are a number of additional elements: select objects, add a marker, draw a line, add a route, measure distance or area.

By inserting the marker in the desired place, you can insert the name of the place and its description.

If necessary, you can add a route that is easier to travel.

Add a title and description of the map.

Set up access


And now, you can paste the resulting code onto the site, and you can immediately change the size.

And this is what will happen as a result

(good stuff), today we will again talk about the service from Yandex and again about cards, but not about plastic or playing cards, but about area maps. Let's consider the map designer from Yandex, with which you can create, for example, a map of the route to your office and hang it on the website. The article provides detailed instructions for setting up the Yandex Maps service for the contact page of a personal website.
The ability to help clients get to the right place is a significant contribution to business development; the more people get to where they need to be, the higher the revenue and profit will be. So, if your business is somehow tied to objects on the ground, then you should definitely insert a good map on your website.
Why do you need an interactive map?In the old days, office addresses, access and travel routes, various interesting objects, etc. marked on pictures depicting the map and posted on the website as a regular jpg or png file. The problem was that they could not take into account temporary repairs, traffic jams or other changes in the terrain, and were not able to suggest individual routes from different directions.
With the development of Internet services such as Yandex Maps and Google Maps, it became possible to make maps alive - interactive. These can be rotated in different directions, changed the scale, set routes from different points, plan your movement taking into account traffic jams, and much more.
The presence of a convenient directions on the contact page is now a rule of good form for any company.
And in order to help you make your web resource more welcoming to people, I will tell you how to add a Yandex map to your site; this is done very easily using a special constructor (no more difficult than).
Yandex map designerIf you do not have an account in Yandex, then you will need to create one, since without this you will not be able to construct anything; the service will ask you to log in or register. There is no need to be scared, registration means creating a mailbox on Yandex. Even if you don’t need it to work with email, it will be useful for other search engine services, for example, Yandex Metrica or Yandex Webmaster.
The procedure begins from this page – tech.yandex.ru/maps/tools/constructor/
Since you are reading this article, it means that you are logging in for the first time and you do not have any previously saved cards, all you have to do is select the left yellow button “Create a new card”. From this moment, the formation of individual map settings for the desired area begins.
The trick is that you can insert not just a Yandex map with an exact address, but a map with any number of objects highlighted with different markers and colors - objects, points, routes.
All settings are made in the visual designer, no codes will have to be edited, the adaptation work differs little from the usual use of Yandex maps by the user. Let's start by adding objects.
Adding objectsThe first tool will be the search form, which is located at the top of the map. With its help, we can find the desired point by address, coordinates or name. Enter the request data in the field, example with the address “Moscow, Red Square”:
After clicking on the find button, a point will appear on the terrain corresponding to the location of the specified object. You can insert many objects. Example with the Kremlin:
Each point can be configured so that it differs from other objects and is easily distinguishable on the map - the color and shape change, and you can also add a unique icon inside if you click on the “Content” drop-down menu. This is convenient if there are a lot of objects on the map being created and they can be classified into different groups.
On the left is a list of all addresses marked on the map.
Changing the scale and positionUsing the “+” and “-” keys located in the upper left part of the layout, the optimal scale is set. A complete map of Russia is not needed to navigate around the center of Moscow and, if you are indicating a point object in a city, it is better to adjust the scale to a level where the names of streets and surrounding houses are distinguishable.
To move the card in different directions, you need to grab it by pressing the left mouse button and move it where you want.
Object outlines (polygons) and linesIf it is necessary to highlight the outlines of any element on maps, when indicating with a point is not enough, we use the “Polygons” tool. By placing one point after another, we get a perimeter filled inside with a certain color.
There can be any number of points, therefore, the figure shaded on the map allows for any degree of complexity. You can complete the construction of the contour by clicking on the last set point or switching to any other button of the designer (for example, on a line). I highlighted the contours of the Moscow Kremlin along its wall:
Lines are drawn using the “Lines” button. All actions are similar to the previous tool, only the space between the points is not painted over. Using lines on the Yandex map, you can draw traffic routes (passage, passage).
In this way you can show the optimal route for sightseeing.
We confirm the end point by clicking it again with the mouse, there will be a “Delete” / “Finish” menu. After selecting the end, a field opens for labeling the end point and setting line parameters (thickness, color, transparency).
We complete the route by clicking on “Finish”.
Map view and traffic overlayThe final touch that allows you to give the map special properties is the application of traffic jams; there is a separate button for this. Honestly, I doubt that such an option will be often in demand for maps inserted into a website, since people more often use navigators to drive a car than built-in maps.
But switching modes between circuit, satellite and hybrid can be useful.
A satellite view gives the surrounding objects their real appearance and it is easier to recognize them on such a map than the schematic rectangles of a diagram.
Title and descriptionIn order for us to be able to return to the created map in the future to correct it or to get the embed code again, we need to come up with a name and description for it, and then save it.
Card code for inserting into the siteOur map is already ready and now we need to get its code to insert it into the site. Yandex makes it possible to do:
- interactive map (which I talked about from the very beginning);
- static - an ordinary picture, only with a sophisticated code, you cannot move anything in it, in addition, the maximum number of objects is limited;
- printed – high quality image file, not all countries are supported, mainly the CIS and Turkey, satellite and hybrid versions are not supported.
The choice between them will be displayed immediately after saving.
In the same menu you can set the final size in pixels. You can set it manually or by moving the corners of the frame around the selected area on the right. The “Stretch to width” checkbox causes the map to take up all the space on the site, resting against the edges of the block where it is displayed.
At this stage, it is possible to return to editing the map; in the upper left part of the window there is a corresponding inscription with an arrow.
The final code appears after clicking on the “Get card code” button, mine looks like this:
When you select a printed map, a choice of file format will be added - png or jpg, and, accordingly, there will be no code - a download button will appear instead. Such a file can also be inserted onto the site, but you will need to upload it to the hosting and, if your site does not have a visual editor, you will need to write the image in HTML tags (src)
How to insert a Yandex card on a websiteWe have received the code, now we need to transfer it to our web resource. Any place is suitable for placement, as long as the dimensions fit. If you use designers or visual editors, do not forget to switch them to text (HTML) mode when inserting code. Like this:
Map I madeThis is what I got after all the settings:
This element is convenient for everyone - the necessary objects are highlighted and the scale is selected as expected. In addition, the Yandex service allows the user to determine his location (the arrow in the upper left corner) and create an individual route to the desired point.
The map can be expanded to full screen using the button in the upper right corner in the form of two arrows diverging in different directions. Now about plugins.
Plugins for WordPress and other CMSPreviously, it was more difficult to make maps and many people used special plugins for these purposes, for example, for WordPress there was this one - Yandex Maps for WordPress. Now no APIs are needed and any user with minimal knowledge can figure out how to set everything up, so I don’t see the point in plugins. The plugin mentioned above is proof of this - it has not been updated for more than 2 years, apparently there is no demand.
Among the relatively relevant ones, I found the Yandex Maps API (updated 4 months ago) and Oi Yandex.Maps for WordPress (5 months ago). If you want to play with plugins, you will find them in the WordPress repository by searching, and how to install plugins.
You have seen for yourself that preparing a map and placing it on your resource is much faster than reading these instructions; now each of your resources will delight its visitors with such a convenient feature.
Today, what is important for offline businesses is not a sign, but blocks with information about the establishment on the right side of Google and Yandex results. Let's talk about how to add company data to cards.
How to add a business to Google MapsYou need to create a page in the service Google My Business.
What does this give? First of all, the possibilities:
- inform users about prices, opening hours, events and news of the organization;
- monitor reviews and respond quickly to them;
- analyze views of business information (number of views of company data, views of photos, videos);
- attach maps with the route to the organization;
- strengthen your reputation thanks to user ratings.
Google My Business block in search results
Algorithm for adding a company.
If you do not receive a letter within 3-4 weeks, feel free to write to technical support: “The letter did not arrive, what should I do?” Google will ask you to complete the manual verification process.
To do this you will need to send several photos:

9. After this you will be taken to your company’s personal account:

On the “Information” page you must provide the most complete information about your company:
- add additional categories that match your activities;
- add a description of your company;
- indicate opening hours;
- methods of payment for goods and services;
- add photos and videos;
- as well as additional information.
In your company description, try to write as accurately as possible what exactly your business is: what products or services you offer.
The more complete and high-quality information about your company is presented, the more likely it is that Google users will see it.
Quite often, when creating a website, it becomes necessary to insert a map onto it that would indicate the location of your organization. In fact, a map on the site is very convenient: first of all, for your users. They will be able to immediately, without leaving your resource, see how they can find you, what is nearby and determine how far your organization is from their location. Not everyone knows how to insert a map onto a website. And it’s very, very easy to do!
In this article I will tell and show you how, in just a few minutes, you can insert a map with the desired location on the pages of your website.
So, to insert a map onto the site, we will use a service from Google.
1. The first thing we need to do is go to the Google map website.
2. Now, in order to perform all the operations we need, it is best for us to switch to the “Classic Interface”.
To do this, click on the question mark icon in the lower right corner of the screen.
A small sliding menu panel will open in front of you, in which you need to select “Classic Interface”.
After this, another pop-up window will appear where you will be asked to tell why you want to use the Classic interface. You can tick one of the items, or you can not check it, but immediately click on the blue link “Classic interface” just below.
After this, you will go to the classic Google maps interface, where we have everything we need to place the map on the site page.
3. Now enter the required address in the address input field. Do not forget that you need to indicate the country, city, street and house, that is, the full address.
As a result, you will receive your location on the map, marked with a red marker.
4. Now we need to get the embed code into our web page, as well as set some settings.
In order to get the embed code, we need to click on the icon to get the link or code (it is located to the right of the printer icon).
5. Here we are interested in the HTML code to add to the website (second field).
Also in this code you can see some parameters that can be changed. These are the dimensions of the card, that is, its height and width. You can also set a frame for the card. By default, the frame value is zero, but you can change this by setting, for example, one.
If you need, then change these parameters, although you can do this from the web page code. If there is no need, then simply copy the entire code.
6. Now all that remains is to paste the copied code into the place on your web page where you want to see the map.
You can create a separate “div” block specifically for your map, which you can later style through a style sheet file.
I'll insert my card right here. See what it will look like.
As a result, the user will see your location marked with a marker. He will be able to move the map, zoom in and out.
A window with your address will also be displayed above the marker. And below there will be a link to view the map on an enlarged scale.
That's it, everything is very simple, functional and convenient.
Enjoy it for your health!
I will be glad if this lesson is useful for you. As a thank you, leave your comments and share the article using the social media buttons located just below.
Also subscribe to blog updates if you have not already subscribed. I promise you a lot of useful materials.
Anna Kotelnikova was with you.
Good luck to you and see you again.