Hello everyone. Good news for supporters by Easeus - updated their partition master disc manager to version 12.9. The developers made a number of corrections and improvements by making a program more stable, and also replenished its functionality support for operations with dynamic disks. Below will talk about how to use this program. I already wrote earlier, now I propose to see how its individual functions work in practice. But before - about the specifics of Easeus Partition Master.
Easeus Partition Master Disk Manager: how to use
So, Easeus Partition Master is a functional disk space manager for Windows.
This is an alternative to the well-known products like Acronis Disk Director or Aomei Partition Assistant, with a classic organization for this type, with an unauthorized interface, with a modern software feed format and a convenient scheme of its distribution: basic functionality for free, advanced - at an affordable price.
Official page Easeus Partition Master:

It is a trial, which in the case of acquiring a license key turns into one of the more functional editors of the program.

EASEUS PARTITION MASTER
Easeus Partition Master Several:
Free - basic;
Professional - with additional features;
Server is the same as Professional, but with Windows Server support and RAID 5 recovery function;
Unlimited - the same as Server, but with favorable conditions for the acquisition of a multiplayer license;
Technician is the same as unlimited, but with technical support and free lifetime updates.
For home use and small computer assistance fishery, FREE and Professional editorial capabilities are enough.
EASEUS PARTITION MASTER FREE
The main functionality supported by all the editors of the program and the Free FREE version supplied in the free editorial office:
Support for many types of information storage devices, in particular, SSD, HDD, RAID, USB drives;
Formation of partition structure on disk (full range of operations as something: creating, moving, merging, resizing, deletion, task of letters and labels);
Strewing data to the full impossibility of their recovery;
Formatting sections to FAT, NTFS, REFS, EXT2 / 3 file systems;
Restoration of sections;
Testing of the surface of carriers;
Cloning of disks and sections;
Alignment of sections and their associated optimization under SSD when conducting other operations;
Converting discs from basic to dynamic (without the possibility of operating them and convert back to the main);
Operation of sections on the MBB drives - the transformation of the main sections to logical and vice versa, the purpose of the main partitions is active;
View the full contents of the partitions, including the protected technical partitions of Windows;
Cleaning Windows from temporary and littering data disk;
Analysis of the used disk space;
Defragment HDD;
The ability to customize the program with password access;
Computer autotruncture upon completion of long-term operations.
EASEUS PARTITION MASTER PROFESSIONAL
In addition to the basic functions of the basic functions, the draft Professional Program further provides:
Converting discs from dynamic in basic and vice versa;
Operations with dynamic disks - Creating sections, change their size, movement, formatting, removal, cloning;
Transfer of the workshop to another disk;
Conversion of the section of the disk section from MBR in GPT and vice versa with the safety of sections and data;
Creating a Live disk to work with computers without Windows (or when it does not start).
Consider how individual operations are used directly using Easeus Partition Master.
How to create partitions on an empty disk
Here, for example, one of the basic disk space management operations is the markup of a new hard disk. To form partitions by clicking unassigned space (unallocated) on a table or visual disc card, and on the operation panel on the left of the program window ("Operations") select "CREATE PARTITION".

We give a name to the section, activate the checkbox "Optimize for SSD" (Optimization under SSD, i.e. alignment of sections). We set the size of the section by pulling the slider on the visual card (or fit in the table view below). Optionally, we can choose a file system other than NTFS, set a different letter for the selection or select another cluster size. As a result, click "OK".

By this principle, we distribute disk space further: again click on the unassigned area and create partitions.

When all sections are created, press the "APLY" button to apply the planned operations.

How to reduce or increase the size of the section
How to reorganize disk space? In order, for example, to squeeze between the existing sections a new section, it is necessary to reduce one of these existing ones. It is desirable that the left on the card map, in this case, the excess data movement is required. Click the reduced section and select "Resize / Move Partition" on the operation panel.

On the visual map, we pull the space slider left until the required released volume will be displayed in the column below the "Unallocated Space After:". Next, we set the checkbox to optimize the section under SSD. And click "OK".

To increase the size of one of the sections due to the other, click this one else section. On the operation panel, click "Resize / Move Partition".

On the visual map, we pull the slider to the right, while in the graph below "Unallocated Space Before:" the desired released volume will not appear. Next, we use optimization under SSD. And click "OK".

Returning to the main window of the program, click the section to enlarge. Rider again "Resize / Move Partition".

And pull the slider on the visual map to the right until it stops. Optimize SSD. Click "OK".

Apply the operation with the "APLY" button.
How to convert a hard drive from dynamic in the basic
Converting hard drives from the basic type to the dynamic is possible by means of Windows itself. But the reverse direction of the operating system is not provided. This functional space is filled with third-party disk managers, including Easeus Partition Master. Click the dynamic disk, select "Convert to Basic Disk" on the operation panel. And we are waiting until the program checks the file system.

Apply the operation.

To apply the operation, you will need to reboot.
How to convert the wheels from GPT in the MBR and vice versa
Converter styles of discs from MBR in GPT and, on the contrary, from GPT in MBR is the MUST Have functionality of any disc manager. The modern market requires this type of more - the possibility of converting not only disks with user data, but also with the work of Windows. Easeus Partition Master is able to convert disc partition styles without the need to reinstall the operating system. In our first case, we have an EFI system with a typical structure - NTFS-section "Restore", EFI-section with FAT32 and MSR-section for 16 MB. To convert a GPT hard disk to MBR, in the program window, click the operated disk, select "CONVERT TO MRR" in the operation panel.
If you needed to manage the hard disk partitions, in particular, redistribution, copying or deleting, then you will need to get a powerful, but at the same time convenient software for the implementation of the tasks. Such a program is Easeus Partition Master Free.
Easeus Partition Master Free is a popular program for managing the overwhelming majority of drives (hard drives and various removable carriers).

Key features of the Easeus Partition Master FREE program:
- Carrying out work with discs, starting with 2 GB and finishing 4 TB;
- Obtaining comprehensive information about your disks, sections and file systems;
- Converting partitions into logical and vice versa;
- Formatting sections;
- Deleting sections;
- Combining sections;
- Change the letter of the disk;
- Redistribution of the selected place for sections without risk to lose information;
- Transferring operating system to SSD or HDD;
- Restore remote sections;
- Optimization of sections for SSD;
- Cleaning and optimizing disks to increase computer performance;
- Support for various file systems;
- Full removal of information from sections without the risk of information recovery.
How to use the Easeus Partition Master FREE utility?
Probably, you have already noticed that the area of \u200b\u200busing the Easeus Partition Master Free utility is very extensive, but at the same time it is extremely convenient to use it.
For example, you needed to change the size of the section. In order to carry out this task, select the section one mouse click, and then in the left area of \u200b\u200bthe program window, click on the button RESIZE / MOVE PARTITION .

In the displayed window, enter a numeric value (in megabytes) for the section or move the strip in the top area of \u200b\u200bthe window so that you can get the required partition size.

Now a few words about disk optimization. Over time, discs begin to accumulate information, which is the main reason for reducing computer performance. To avoid clogging disks, the Easeus Partition Master FREE program provides a built-in tool for cleaning and optimizing disks.
To use this tool, you will need in the top area of \u200b\u200bthe program window. Click on the button "CLEANUP AND OPTIMIZATION" .

Your screen will display a new window with three items to your selection: cleaning garbage, deleting large files and disk optimization.

In the first case, you will need to analyze the status of the disk, as a result of which the program detects temporary files, cache and other rubbers, which does not carry any need, but at the same time strongly reduces the performance of the computer. As a result of such cleaning on your computer, it can be released to several gigabytes.

By running the second system cleaning item (delete large files), the program will need to select a disk on which the analysis will be analyzed for the presence of large files. As a result, the program displays a list of the most voluminous files in descending order, with the result that you can make a solution from which files should be getting rid of to free on the computer.

And finally, the third item that allows you to optimize the disk. Former, the program will analyze the disk specified by you, after which the defragmentation stage will come.

Advantages of Easeus Partition Master Free:
1. Extensive work with hard disk sections;
2. A simple interface that, despite the volume of functions, remains intuitive;
3. The program is distributed free of charge, but with some limitations.
Disadvantages of Easeus Partition Master Free:
1. The lack of support for the Russian language (but with a special desire for this program you can find cracks).
Easeus Partition Master Free is not only an effective tool for managing partitions, but also an excellent helper in maintaining computer performance thanks to the built-in disk cleaning and optimization tool. This version of the program is distributed absolutely free, so you have the opportunity to independently try it in business.
For normal installation and operation of Windows 7 / 8.1 / 10, there are enough 20-25 GB of a hard disk space, but in practice, to allocate under the system section there are much more, at least 50-60 GB, since in addition to the system itself, users set more packets Different applications. But over time and this volume may not be enough.
In such cases, you can delete some of the programs, and then re-install them, but already on the D disc, but this is not the best option. It is much easier to increase the volume of the system partition by borrowing a part of the disk space from other sections. There are several ways to do this, but the fastest and reliable is software. To expand the system partition it is not at all necessary to use expensive applications like Acronis Disk Director, and their complimentary analogues will rise, for example, Easeus Partition Master Free.
This program is powerful, convenient and simple. In addition to the FREE edition, there is another commercial version, but in this case it is not needed. The application knows how to work with discs of up to 4 TB, supports the transformation of the main partitions to logical and vice versa, creating copies of partitions to transfer data to another computer without reinstalling Windows, view, separation and changing the size of any types of partitions.
Additional features of the program include hiding and displaying disks, complete deleting files, as well as checking the surface of the disk for broken sectors. The Russian language in Easeus Partition Master Free is missing, but it does not matter. The application interface has a simple, and most operations are performed using intuitive graphic controls. To get to the Wizard Wizard window, after installing and starting the program, then click on the center of the Launch Application button.
In the right larger window pane, you will see a list of your partitions. Perhaps also on this list will be reserved Windows region without a letter (will be marked with an asterisk) and a bit of unallocated space. So, in order to increase the section C, we need to cut off part D, and then "solder" it to section C. Right-click on the D section and in the menu that appears, select the first option "Resize / Move Partition".


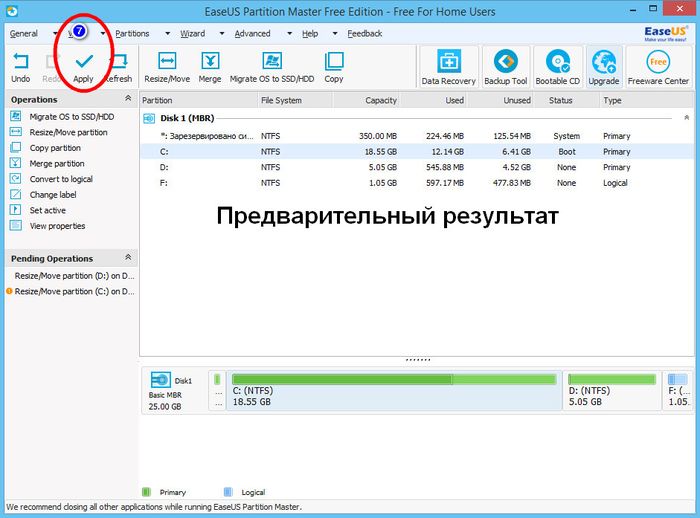

In the window that opens, drag the slider so that the resulting unallocated space borders with the system partition. Click OK. The same can be done without calling the optional wizard window, dragging the slider on the disk graphical view panel located at the bottom of the main window. We are done to the same procedure for the section C, only this time we pull the slider to the area of \u200b\u200bthe unallocated space, thereby increasing the volume of the C. again with OK, and then apply new settings by pressing the "Apply" button.
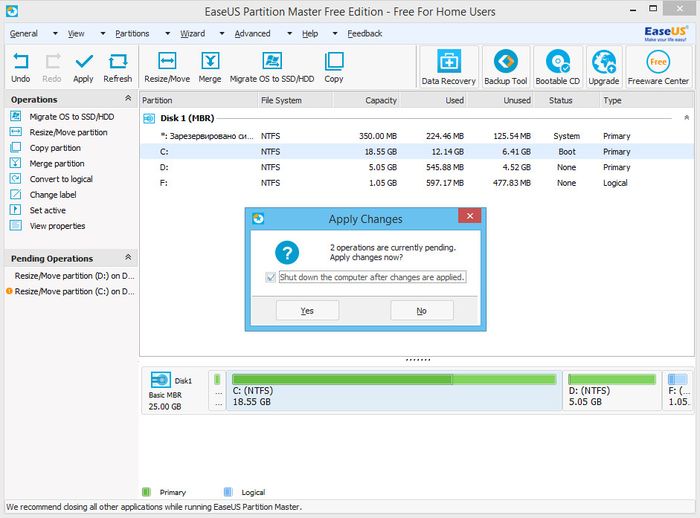
As soon as you do it, the window will pop up with a notification of the start of the operation. So that the program does not specify the extra questions, check the "SHUT DOWN THE COMPUTER After Changes Are Applied". Click YES and confirm the launch of the procedure. The computer will be rebooted, and you will see a black window with the progress of operations, after which the desktop is loaded. Wait for the procedure to complete and do not turn off the computer, even if it seems to you that it lasts too long. Otherwise, you risk damaging the file system, because of which Windows cannot boot.
the program is available for free on the developer website www.partition-tool.com/personal.htm. When installing, be careful, the free version of the application can be installed in a third-party software system.
For normal installation and operation of Windows 7 / 8.1 / 10, there are enough 20-25 GB of a hard disk space, but in practice, to allocate under the system section there are much more, at least 50-60 GB, since in addition to the system itself, users set more packets Different applications. But over time and this volume may not be enough.
In such cases, you can delete some of the programs, and then re-install them, but already on the D disc, but this is not the best option. It is much easier to increase the volume of the system partition by borrowing a part of the disk space from other sections. There are several ways to do this, but the fastest and reliable is software. To expand the system partition it is not at all necessary to use expensive applications like, both their free analogues will rise, for example, Easeus Partition Master Free.
This program is powerful, convenient and simple. In addition to the FREE edition, there is another commercial version, but in this case it is not needed. The application knows how to work with discs of up to 4 TB, supports the transformation of the main partitions to logical and vice versa, creating copies of partitions to transfer data to another computer without reinstalling Windows, view, separation and changing the size of any types of partitions.
Additional features of the program include hiding and displaying disks, complete deleting files, as well as checking the surface of the disk for broken sectors. The Russian language in Easeus Partition Master Free is missing, but it does not matter. The application interface has a simple, and most operations are performed using intuitive graphic controls. To get to the Wizard Wizard window, after installing and starting the program, then click on the center of the Launch Application button.
In the right larger window pane, you will see a list of your partitions. Perhaps also on this list will be reserved Windows region without a letter (will be marked with an asterisk) and a bit of unallocated space. So, in order to increase the section C, we need to cut off part D, and then "solder" it to section C. Right-click on the D section and in the menu that appears, select the first option "Resize / Move Partition".


In the window that opens, drag the slider so that the resulting unallocated space borders with the system partition. Click OK. The same can be done without calling the optional wizard window, dragging the slider on the disk graphical view panel located at the bottom of the main window. We are done to the same procedure for the section C, only this time we pull the slider to the area of \u200b\u200bthe unallocated space, thereby increasing the volume of the C. again with OK, and then apply new settings by pressing the "Apply" button.
As soon as you do it, the window will pop up with a notification of the start of the operation. So that the program does not specify the extra questions, check the "SHUT DOWN THE COMPUTER After Changes Are Applied". Click YES and confirm the launch of the procedure. The computer will be rebooted, and you will see a black window with the progress of operations, after which the desktop is loaded. Wait for the procedure to complete and do not turn off the computer, even if it seems to you that it lasts too long. Otherwise, you risk damaging the file system, because of which Windows cannot boot.
You can download the program for free on the developer website www.partition-tool.com/personal.htm. When installing, be careful, the free version of the application can be installed in a third-party software system.
Excellent day!
Today we continue a rather popular topic about the methods of separating the hard disk to the sections.
If you have a need to divide the disc into two or more partitions, then in this article I will tell you how to do this using a free Partition Master Free program.
Suppose you have only one or two partitions on the hard disk. You need to divide the hard dick and create another additional partition. In essence, the task is to "restart" a certain amount of gigabytes and convert them to a new section from the section of greater tank.
There are several options, including using the staff of Windows. The method of how to split the hard disk with the means of the operating system itself is described. This method does not always work and is not the most optimal solution, so we consider another option using the Partition Master Free program.
Easeus Partition Master. - Convenient program with a very good interface. The main advantage of its advantage is simplicity and free distribution. As for functionality, it is comparable with paying counterparts. With it, you can create, delete and format partitions by changing their size and location without data loss.
Download the program from the official website on the link www.partition-tool.com. Select Partition Master Free and click Download.
By the way, if you wish on the Internet, you can find a crack to this program and thereby get a Russian interface.
Carefully install the program. In the first window we agree with the conditions that we will use the program only for your family.
Since it is free, it will be offered to install additional software that you are hardly needed. Why manufacturers of free software offer installation of additional programs, I told in.
We boldly remove the extra ticks in Cheboksa (as shown in the screenshots). If necessary, if you do not want to receive extra letters, specify the fictional mailbox.
The installation process will begin, after which you will be prompted to start the program by clicking on the Finish button.
The program started, now choose the item "Easeus Partition Master Free".
Here is such a program interface. At the bottom of the window, we see the presence of one hard disk in the system, which in my case has a size of 150 GB.
On disk one section (C: \\). To make the second section, I choose the one from which I want to "restart" the place (in my case it is a section C) and click on the button Resize / Move..
Similar way, if there is a need for this, you can create a third or fourth section. When creating sections, you need to remember that on the disk with the structure of the MBR you cannot create more than four main sections.
A window will appear where we are interested in the PARTITION SIZE parameters and Unallocated Space After (the size of the future partition). I draw your attention to the Optimize for SSD item. If you have a solid-state drive (SSD), then be sure to celebrate this item. Since I have an ordinary HDD, I miss it.
Now grab the slider and move it to the left to indicate the size that we want to separate. As shown in the screenshot, I "pinched off" approximately 90 GB. Now the size of the disk from after compression will be 60 GB.
I have a conventional hard disk, and I will miss the Optimize for SSD item. Click OK.
In the main program window, the section - unallocated (unrecognized space) appears. In my case, the section has a size of 91 GB.
Select this section (unallocated) and press the button Create..
In the window that appears, indicate the volume label, i.e. the name for the future disk (Partition Label field), and set the drive letter (Drive Letter field). If necessary, mark Optimize for SSD. The remaining settings are left unchanged and click OK.
There was a new, just created section. Once again, we carefully check and that the changes finally entered into force, press the button Apply.
A warning window will appear, which will report that two operations will be performed: the disc compression of the C and the creation of a new partition. We agree with the changes made and click Yes.
Now, if I open "My Computer", I will see that I have a new section Local, which is assigned a letter E, with a size of 90 GB.