Installing operating systems using removable media has long ceased to be a big problem. If you do not have a blank CD / DVD at hand, or the drive itself is faulty or simply does not exist (for example, in netbooks and ultrabooks), then every second person currently has a 1-2 GB flash drive. So, after reading this guide, you can create a bootable USB flash drive with Windows XP (and not only) and thereby greatly simplify your transition from one OS to another.
What do you need?
- Download in advance windows XP working iso image... It is advisable to choose the distribution that does not have any third-party modifications, which means that the probability of its instability is minimal. If the standard XP does not suit you, we recommend choosing the assembly from Zver.
- Removable disk (flash drive), at least 1 GB... Later, it will be completely cleared, so copy all important data from it.
- Program WinSetupFromUSB v.1.3... You can download it absolutely free on the official website of the developer.
Creating a bootable USB drive
There are several ways to prepare a removable disk for installing Windows XP from it. But, despite this, we will use the simplest program WinSetupFromUSB and after about half an hour we will receive a ready-made bootable USB flash drive. You just need to follow these steps:

BIOS setup
Windows XP is slightly different from its Vista, 7 and 8 siblings in terms of installation. Therefore, BIOS setup needs a little more attention:
- The first step is to set the boot priority to the removable disk. Therefore, in the process of starting up the computer / laptop, press F2 or Del to get into the BIOS window.
- In the Boot section or in the Boot Device Priority list, put in the first place your bootable USB flash drive (depending on the manufacturer of the motherboard, the BIOS versions have significant differences, so these instructions are very general).
- Most modern computers work with the S-ATA data interface, while Windows XP has built-in drivers only for the outdated IDE. Therefore, in BIOS set Storage Configuration to Compatible.
- Save changes and restart your computer by pressing F10.
Installing Windows XP
- Having successfully booted from the removable disk, Windows XP will greet you. Following the instructions of the installer, press Enter (<Ввод>)

- Violation of the Microsoft product license agreement is punishable by law. So confirm by pressing the F8 button that you are confident in your actions and continue with the installation of the system.

- This window contains the entire list of hard drives on which it is possible to install Windows XP (by default, only HDDs with IDE data transfer technology are displayed). Select the drive you want and proceed to the next step.

- Formatting the hard disk is mandatory, so make sure all your files are safe and only then select the third option “Format partition in NTFS”.

- After preparing the HDD and copying the necessary system files to it, the Windows XP setup program will proceed to the final processes. First, install the System Language and Input Methods.

- Please enter your username. The organization field can be left blank.

- Enter the serial code XXXXX-XXXXX-XXXXX-XXXXX-XXXXX

- Select a computer name and set an administrator password (the latter is optional)

- Next, set up the date and time as well as the time zone.

- Leave the default network parameters

- If the computer / laptop is home, then leave it in the WORKGROUP. If the organization where you work has a domain network, then check with your system administrator.

- Congratulations! Windows XP has been successfully installed and is ready to go.

Bootable USB sticks with ready-to-install operating systems are a very convenient and useful thing for any user. Having a few of these “little rescuers” in stock, you can quickly and easily help yourself or your friends / colleagues to restore a faulty Windows OS or install a new one for them.
Enjoy your use!
I will post here a methodology for preparing a USB-flash drive and then installing Windows XP from it.
Let's get started. First, we need to download the actual program itself.
We will need:
- USB flash drive (at least 1 GB);
- original Windows XP CD;
It is desirable that the Windows XP disk is not geno modified. It is also recommended to use Windows XP with SP3 installed.
1. Preparatory actions.
Download and unpack WinSetupFromUSB somewhere. Let's create a folder where we will copy the contents of our Windows XP CD - say, As a result, this folder should look something like this:
2. Launch WinSetupFromUSB.
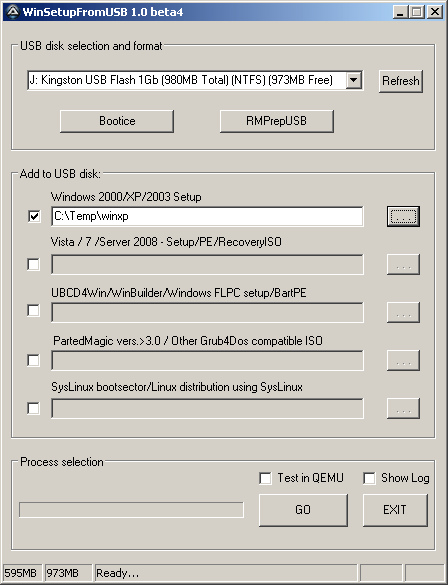
We connect the USB flash drive to the computer and run WinSetupFromUSB:

In the "Add to USB disk:" field, in advance, put a checkbox on "Windows 2000 / XP / 2003 Setup" and point to our folder with the copied Windows XP distribution kit -
3. Format the USB-flash disk.
Now we need to format our USB drive. In WinSetupFromUSB, press the "RMPrepUSB" button, we get to the formatting program window:

We place the jackdaws, as in the above screenshot, press the button "6 Prepare Drive" - ATTENTION! ALL INFORMATION THAT WAS ON THE DEVICE WILL UNDERSTAND, WILL BE MISSED!
After the formatting is complete, all we have to do now is press the "GO" button. 
4. Boot from USB-flash disk and install Windows XP!
The installation process for Windows XP in our case is slightly different from the standard one. At the first boot from a USB-flash drive, we get to the menu GRUB4DOS:
We are interested in the second point. We select it, we get into the following submenu:
1. Back to Main Menu
2. First part of Windows XP setup from partition 0
Select item number 2 - "First part of Windows XP setup ...". Then the installation process continues as usual, until a reboot. After reboot, boot from USB flash again. We get to the menu again: GRUB4DOS:
1.EXPERIMENTAL - Start PLoP boot manager
2. Windows XP / 2000/2003 Setup
Select item number 2 again, again we find ourselves in the submenu :
1. Back to Main Menu
2. First part of Windows XP<ваша версия Windows> setup from partition 0
3. Second part of 2000 / XP / 2003 Setup / Boot first internal hard disk
but here we already select item number 3 - Second part ...
Then, finally, Windows XP will be finally installed.
WinSetupFromUSB is a program for automating the process of installing various Live-CD assemblies and OS on a flash drive or USB-HDD. It uses the Grub4dos bootloader with multiple boot options. For example, let's create a bootable Kingston 1Gb flash drive with the ability to install Windows from it.
First, downloadWinSetupFromUSB we make sure that there is no necessary information on our flash drive.
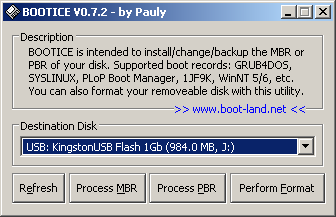
1. Launch the program itself and select our USB flash drive.
2.
Now we have to prepare the USB stick for installation. Create a partition and make it bootable. To do this, you can use two utilities Booticeand RMPrepUSB.
For example, let's use Bootice... Click on the button Booticeand choose Perform Format.
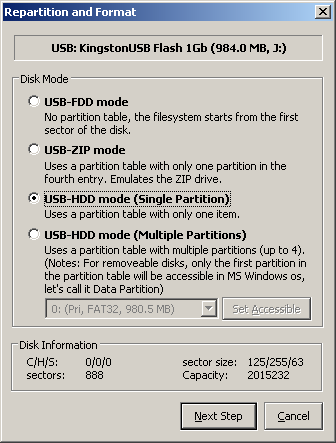
3. In the next window, select USB-HDD mode (Single Partion)and press Next Step.
4. Here we select the drive label and NTFS file system. and format the flash drive to NTFS. This will slightly increase the speed of reading files in the text mode of the installation (for some flash drives, the opposite effect of slowing down is possible).

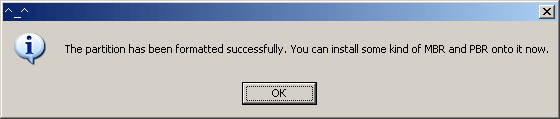
5. Push OK, the program will warn you that the flash drive will be formatted.

6.
Then we confirm the actions of the program several times. Click on OK.
7. After creating partitions, close the Bootice window and return to the main program window.
We put the flag opposite Windows 2000 / XP / 2003 Setupand select the location where the Windows XP installation files are unpacked. Having an ISO image of Windows XP, you can easily unpack it with WinRar.
8.
Click on the button GO(before starting, you can check the flag Show Logand observe in a separate window all actions performed by the program).
At the end of the work, the utility will display Job done.
After booting from the flash drive, the Grub4Dos boot menu will appear, in which you select
Windows 2000 / XP / 2003 Setup, and then First part of Windows XP Professional SP3 setup from partion 0.
After the first stage of installation and reboot, you need to boot from the flash again and now select Second part of 2000 / XP / 2003 setup / Boot first internal hard disk
If we do not do this, the installer will lose the location of the installation files on the flash and the installation will end with an error.
Congratulations, you have created a bootable USB flash drive using WinSetupFromUSB!
In this article, we will consider how to create a bootable USB stick and write Windows to it using WinSetupFromUSB.
As a flash drive, you can use not only a regular flash drive, but also a memory card. For the sake of simplicity, we will use the general name - flash drive.
This article will be useful to all those who wish to independently, using the utility WinSetupFromUSB create bootable USBto then install Windows from it.
WinSetupFromUSB Is a free program designed to create a bootable USB flash drive and write an operating system on it (Windows 2000 / XP / 2003 / Vista / 7 / Server 2008; Linux) with subsequent installation on a computer, laptop, netbook, etc.
What does that require:
1) USB flash drive with a volume of at least 4 GB;
2) Windows, which needs to be written to a USB flash drive;
3) Utility WinSetupFromUSB;
After you have downloaded the archive WinSetupFromUSBunzip it using some archiver. You will see a folder called WinSetup-1-0-beta6. Open it

First, let's prepare a USB flash drive
Connect a USB flash drive and format it to the NTFS file system. You need to format it using the Bootice utility (located in the WinSetup-1-0-beta6 / files / tools folder). When formatting, all information on your flash drive will be deleted! Copy it if necessary. So, first we run our utility called Bootice:

Select your USB device from the list and click Perform Format to continue.
In the window that opens, select USB-HDD mode (Single Partition) and click Next Step:

We select the NTFS file system instead of FAT32 and click OK, agreeing with all subsequent messages and wait for the formatting to finish:


Now we return to the original Bootice window again and click on the Process MBR button (not to be confused with the Process PBR button):


Click on the Install / Config button and agree with all subsequent messages. Examples of such messages are shown in the screenshots below:


So, we have successfully completed the first stage of formatting the flash drive and this window can be closed. Now from the WinSetup-1-0-beta6 folder, run the file WinSetupFromUSB_1-0-beta6... The program window will open WinSetupFromUSB... In the "USB disk selection and format" window, select your flash drive from the list, if it is not displayed:

Next, you need to find your folder with the Windows installation files and write to the USB flash drive. This should be done as follows: if you want to record Windows XP, then check the box next to the Windows 2000 / XP / 2003 Setup window, and if you record Windows Vista, Windows 7 - opposite the window Vista / 7 / Server2008 - Setup / PE / RecoveryISO... See screenshots:

For Windows XP

For Windows Vista, Windows 7
Then indicate where the Windows folder is located on your computer. To do this, click on the button highlighted in red in the screenshot, select the local drive and the Windows folder you want to burn.


Click OK and go to the next program window WinSetupFromUSB... Here we see that the path to the Windows folder is displayed (underlined in red), which you specified in the previous window. To start the recording process, press GO:

That's all. The recording process ended with the message: "Job Done" which means: "Job done"!

Click OK and close WinSetupFromUSB... Thus, you have created a bootable USB flash drive from which you can now install Windows.
Please write your questions, wishes, reviews in the comments.
This photo shows the finished result of the bootable USB flash drive. Used was 8 gigabyte.
As you can see in the flash drive menu there are 6 functions (you can do less and more - it all depends on your imagination).
Now everything is in order.
0 is the Live CD boot. When Windows crashed, you can save important content from disks.
There are many other possibilities. Checking disks for errors, viruses, etc.
1 - Installing Windows XP SP3
2 - Installing Windows 7 Ultimate 32/62 bit
3 - Booting the computer from the C drive (should be the last, but it turned out like this)
4 - Acronis BOOT CD 2012 - with Acronis Disk Director and Acronis True Image
5 - Acronis BOOT CD 2013 - it's just newer in case the old one doesn't see the hard drive.
I edited the menu labels so that it was clearer to me.
Now about the procedure itself. Need the program itself - WinSetupFromUSB 1.3
You can download
There are two files in the archive to run - for 32 and 64-bit Windows.
You also need disk (disk) images in iso format or bootable CD / DVD disks themselves. From them, if necessary, you can create an image, for example using Ultra ISO.
Here's an example of creating a bootable USB stick with Windows 7

Select the NTFS file system, agree that all data on the flash drive will be deleted. The formatting process starts. After that, the process of downloading the image will begin. If FAT32 is selected, the program will refuse to write images larger than 4 GB. FAT32 does not "know" about such files - an outdated system. But it will offer to format in NTFS. True in English. You can simply format without writing the image. And the next step, without formatting, write the image.
Wait for this message: 
That's it, the flash drive is ready for installing Windows 7 on a netbook.
Then you can load additional disk images on this flash drive in the same sequence. You can also download a Windows 8 image, but I haven't tried the Top Ten.
But do not check the box - Format.
There are features of booting the installation Windows XP:
You must first unpack the contents of the XP image (files, folders) into any created empty folder. In the program, use the top window (strip) accordingly:
Windows 2000 / XP / 2003 Setup

To write an Acronis Boot CD image to a USB flash drive - select the program option:
Linux ISO / Other Grub4dos compatible ISO
Accordingly, put a check mark next to this window and specify the ISO image of Acronis Boot CD
And the GO button. I do not make a screen, I think everything is clear.
For recording a Live CD used another way:
I unpacked the Live CD image (I had a Win7 Live CD x86x64 by Xemom1) into the created empty folder, the image had a single folder named XMPE.
Then I copied it to the root of the flash drive, and added the lines in the menu.lst file located on the flash drive:
Title Win7 Live CD x86 & x64 by Xemom1
At the same time, I also edited the menu lines that are displayed when the flash drive starts.
Each line begins with the word title, then a space, and then write what is more convenient for you.
Do not touch the rest. True, I changed the waiting time from 10 seconds to 30.
and save the menu file - menu.lst opens it as a regular text file.
Here's what I got - this is the text of my menu.lst file
You will of course have a different one - depending on which images you choose for this.
Color black / cyan yellow / cyan
timeout 30
#graphicsmode 0x6A
graphicsmode -1 640 480: 800 24:32 || graphicsmode -1
## Menu AutoNumber
write 0x8274 0x2001
#graphicsmode -1 800: 640 -1 24:32 || graphicsmode -1
#font /unifont.hex.gz
#clear mappings and set root in case we return from bootmgr
map --unmap \u003d 0: 0xff
map --unhook
map --rehook
ls /usbdrive.tag\u003e nul || find --set-root --devices \u003d hf /usbdrive.tag\u003e nul
ls / default\u003e nul && default / default
Title Win7 Live CD x86x64 by Xemom1
chainloader / XMPE / WinPE / bootmgr
Title Setup Windows XP SP3 2013 by Chip
map --unmap \u003d 0: 0xff
map --unhook && map --rehook
savedefault
ls /usbdrive.tag\u003e nul || find --set-root --devices \u003d hf /usbdrive.tag
configfile /winsetup.lst
Title Setup Windows 7 Ultimate 32x64 bit by Gorskiy
map --unhook
savedefault +1
ls /shifthd.bat\u003e
/shifthd.bat
root (hd% RDSK%, 0)
chainloader / BOOTMGR
Title Boot first internal disk (boot disk C or Your Windows)
map --unhook
map --unmap \u003d 0: 0xff && map --rehook
savedefault
ls /shifthd.bat\u003e nul || find --set-root --devices \u003d hf /shifthd.bat
/shifthd.bat
if "% RDSK%" \u003d\u003d "" pause Fatal error while swaping hard disk order, cannot continue! && configfile /menu.lst
pause --wait \u003d 1 Booting MBR on hd0 ...
chainloader (hd0) +1
Title Acronis BOOT CD 2012
map --unmap \u003d 0: 0xff
map --unhook && map --rehook
cat --hex [email protected] (md) 0x3D0 + 0x130\u003e
set / a dev \u003d * 0x8280 & 0xff
root (% dev%, 0)
set ISO \u003d / ISO / AcronisMedia.iso
ls% ISO%\u003e
ls% ISO%\u003e
set / a dev \u003d * 0x82a0 & 0xff
debug 1
debug off
set check \u003d% check: ~ -5.4%
map --hook
root (0xff)
chainloader (0xff)
Title Acronis BootCD WinPE-Based 2013
map --unmap \u003d 0: 0xff
map --unhook && map --rehook
cat --hex [email protected] (md) 0x3D0 + 0x130\u003e nul && echo Cannot continue if PLoP is active, please start this entry without loading PLoP first && echo && pause Press any key to return to the main menu && configfile /menu.lst
set / a dev \u003d * 0x8280 & 0xff
root (% dev%, 0)
set ISO \u003d / ISO / AcronisBootCDWinPE-Based.iso
ls% ISO%\u003e nul || find --set-root --devices \u003d hf /usbdrive.tag || echo Error! Could not find usbdrive.tag && echo && pause Press any key to return to the main menu && configfile /menu.lst
ls% ISO%\u003e nul || find --set-root --devices \u003d hf% ISO% || echo Error! Could not find% ISO% && echo && pause Press any key to return to the main menu && configfile /menu.lst
map% ISO% (0xff) || map --heads \u003d 0 --sectors-per-track \u003d 0% ISO% (0xff) || echo FATAL ERROR mapping% ISO%, please check if file is present and defragmented && pause Press any key to return to main menu && configfile /menu.lst
#http: //reboot.pro/topic/9916-grub4dos-isohybrided/page-2#entry88531
#http: //www.rmprepusb.com/tutorials/tails
set / a dev \u003d * 0x82a0 & 0xff
debug 1
parttype (% dev%, 3) | set check \u003d
debug off
set check \u003d% check: ~ -5.4%
if "% check%" \u003d\u003d "0x00" partnew (% dev%, 3) 0 0 0 && partnew (% dev%, 3) 0x00% ISO%
if not "% check%" \u003d\u003d "0x00" echo WARNING: PARTITION TABLE 4 IN BIOS DEVICE% dev% IS ALREADY IN USE! && echo && echo To prevent possible data loss will not continue further && pause && configfile /menu.lst
map --hook
root (0xff)
chainloader (0xff)


