Why do I need to install an operating system from a USB flash drive?
After all, for this, from time immemorial, there are installation discs.
The fact is that in some models it is simply missing or broken, and you need to reinstall the operating system.
And it is much more convenient to carry (and store) a USB flash drive than a CD-RW.
The installation process itself, if you understand the issue, is not so difficult.
It can be divided into several stages:
- Copy the operating system to a USB flash drive
- Prepare your computer for installation
- Configure BIOS for Boot
- Installs the operating system
Of course, if you are familiar with the computer, then you can cope with the task if you spend some time clarifying some aspects of the process on the Internet.

If knowledge on this topic is not enough, then this article will help you choose the right vector of work, and direct your energy and desire to do everything yourself in the right direction.
So, let's go over each item in more detail.
How to copy the Windows operating system to a USB flash drive

As it becomes clear from the title, the first step is to copy something somewhere. This is something - an image of the required operating system. Somewhere - our, in the future, installation, USB flash drive.
To copy, we need:
- USB flash drive with 4 Gb or more memory. It all depends on what kind of OS you want to download, and then install on your laptop or computer.
- image recording software (WinToFlash, WinSetupFromUSB), which can be downloaded from the Internet.
- the operating system image itself.
You can buy a new USB flash drive or use an existing one.
Installation programs
Download the program for recording the image from the Internet (there will be no problems with this item - you can find anything on the network)
Download the operating system image from a more or less normal torrent tracker.
Be sure to remember exactly where the image is saved on the computer: disk name, folder name.
For this purpose, you can create a special folder NOT on the desktop and NOT on the C drive. You will find out why later.
Tip: before starting work, transfer the information from the flash drive (if it is not new) that you are going to use to another medium! Since, in the process of transferring the operating system to a USB flash drive, all information on it will be erased forever.
Download the program. For example WinToFlash.
After the program is downloaded, run it.
In the window that opens, select the OS that we need to copy from the list.

In the window that opens, specify the path to the operating system image (the one that we remembered in the previous paragraph).
That is, from the drop-down list, select the drive, folder and the file itself.
And in the next drop-down line - to the medium on which this image will be stored, that is, a USB flash drive.
We boldly press the "Run" button and wait while the process of formatting the flash drive and rewriting files from the computer to it is in progress.
The first step has been taken - we have a flash drive from which you can install the operating system.
There is another option for creating an operating system image - an image of your OS directly.
To do this, go to the "Control Panel" item through the "Start" button. We select the section "Archiving and restoring".

In the window that appears on the left, we are looking for the item "Create a system image".

After clicking, a window will open in which we need to choose where the image of our operating system will be saved.
It is better not to save on your hard disk, but to use a removable hard disk for this purpose.
To do this, select the medium to which the image will be copied from the drop-down list of the "Hard disk" item.

After that, the program will offer to select the disks from which the image will be copied.
In this case, we are interested in system drives. We put a tick in front of "C (system)" and "Reserved by the system (system)". It is from them that the information will be archived.
In the next window that appears, you will need to confirm the archiving.
In it, you will also see the amount of memory that the image will take, as well as those disks that have been selected.
We do archiving
If you have no objections at this stage, then you can start the process by clicking the "Archive" button in the lower right corner of the monitor.
The duration will depend on the amount of information being archived. But the capabilities of your computer will also play an important role.
If the car slows down during operation, then it will not fly during archiving either.
After the end of this process, the system will specify if you want to write the resulting archive to a removable disk. Considering that you just saved the data there, we refuse this offer.
At the moment you are the happy owner of a backup recorded on a removable disk. Yes, the name of the created archive is WindowsImageBackup.
Preparing your computer for reinstallation
The operating system of a computer is the main part of the system software.
The OS is responsible for managing the resources of your computer. The failure of the operating system leads to the failure of the entire PC.
It sounds serious, but this does not mean that the reinstallation process itself is so complicated and incomprehensible.
All preparation of the computer, by and large, comes down to copying the files you need from drive C to another drive, for example - D or any removable media.
Perhaps these are necessary programs, network card drivers, important files saved on the C drive.
At this stage, it's best not to be lazy and go through all the files on the C drive.
This is necessary in order not to grab your head later and not waste time restoring some important, but not saved document.
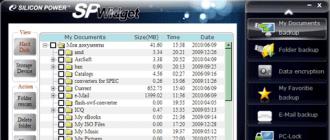
Advice: it is initially undesirable to store any files that are not involved in the operation of the system on the system drive C. If the download of files initially occurs in the "Downloads" (or "Download") folder on the C drive (Fig. 4), then they are still better to transfer to another disk. Do not clog the C drive.
After everything you need has been safely duplicated to another disk, the contents of the system disk have been checked again, you can proceed to the next step.
BIOS setup to boot OS
First, let's find out what BIOS is. BIOS is firmware that is responsible for managing the settings of the system unit components, as well as loading the operating system.
The BIOS is located in the motherboard, which controls the operation of all computer components and is responsible for their correct interaction during operation.
Advice: the mouse does not work in the BIOS, so we do not torture it to no avail, but use the arrow keys, ENTER or read the "Help" section in the same BIOS.
You can enter BIOS during computer startup during startup or reboot.
To do this, during boot, when a black screen with white letters and a logo in the upper right corner of the screen appears on the monitor, press the Delete key, or ESC, or F2.
The system itself will tell you which key to press. The tooltip will be written in white letters on a black screen at the bottom or center, depending on the brand (Fig. 5).
Entering the BIOS, you need to find and enter the menu section Bootable Device Priority or menu item BOOT. BIOS window appearance options are different .

In the Bootable Device Priority folder, select the CD-ROM Boot Priority or JetFlashTranced or USB-HDD item. The BIOS menu may look different depending on the manufacturer.
If these options do not coincide with the options for your BIOS, then we are guided in the menu, relying on our knowledge of English and intuition.
In order not to get stuck at this stage, you can, before installing Windows OS on your laptop or computer, study how your BIOS works on the Internet.
There is a lot of information on the web, both text and video.
After spending relatively little time and digging through several specialized sites, you can get information that will allow you to complete the reinstallation process without any problems.
Having selected the desired item, which will inform the computer that the next boot will occur not from the hard drive, but from USB, you can leave the BIOS, saving all the changes.
Installing an operating system from a USB flash drive
Provided that all the previous steps are performed correctly, on the monitor, during the reboot, such a window will appear.
Or as in Figure 14:
We press, as requested, any key (Press any key ...).

The Windows OS installation window appears, where, for a start, they ask you to select the language, country, time format.
Since the installation is what this whole process was started for, we press it without hesitation.
In the list that appears, you must select the version of the operating system that we need.
But there is one point. You must select the version of the OS to which you have the key.
A key is a set of symbols on a small piece of paper that should be attached to the bottom of a laptop or the case of a computer's system unit.
Therefore, before starting the installation, you need to find this sheet and rewrite the key.
It will be inconvenient to twist the laptop or move the processor at this stage of the installation.
After choosing the operating system for loading, we agree in the next window with the licensing conditions (without agreeing with these very conditions, the system will not allow you to continue installing the OS from the USB flash drive) and in the next window select the type of installation.
Click on the Full installation item.
The next window will ask us to select a partition where the Windows operating system will be installed from a USB flash drive.

From the available list, select the item, the type of which is called "System".
And click "Disk Setup". Several items will appear at the bottom of the window.
From them you must select "Format". When choosing this item, we agree with the warning about the possibility of losing files or programs from the system disk.

We agree without hesitation! After all, before reinstalling the operating system, we copied everything we needed to a safe place. From there, everything important can be restored in the new OS.
After the system disk is formatted, click the "Next" button at the bottom of the window. And we humbly wait while the installation is in progress.
The system then prompts you to enter a username and computer name.
You will be given the opportunity to set a password and enter a hint to it, just in case.
Then you just may need the same key that was recommended above to be copied from the sticker on the computer case.
This is followed by the selection of the security mode, time and date. Probably, if the necessary driver is available in the system, you will be prompted to select the type of network connection.
If this item did not appear during the installation process, then the drivers for the network connection will have to be installed separately.
This is where the installation of the operating system from the flash drive ends.
Now you can start filling the new system with the necessary (and not so) programs and drivers.
And finally: be sure to return to the BIOS and return the settings from the "USB" item to the "Hard disk" item.
You don't want to force your computer to search for a USB flash drive over and over again at boot time?
So, Windows is installed. What conclusions can be drawn after going through the process of self-installation of the OS from a USB flash drive?
Conclusion: once the time spent in the future is compensated by the savings on maintenance of your own computer.
We will keep silent about the knowledge gained in the process of reinstalling the operating system. Knowledge is power.
Installing Windows 7 from a USB flash driveI can't, help, I reviewed everything I can on the Internet, I don't have a DVD drive, I live in the area, I have no one to ask for advice and I need to prepare for the exams, nobody answered me.So, no more, no less, let's try to help, and the most impatient can read the advice at the end of the article that helped our girl install the operating system.
Installing Windows 7 from a USB flash drive
Let's start at the beginning of why you and I can fail.
- Firstly, it is difficult to understand the girl, she does not have a DVD drive, it may not be in a netbook, almost all netbooks support booting from a USB device and she simply cannot change the priority of booting from a hard drive to a USB flash drive, then we read our articles and another one. Or she has a simple computer without a floppy drive and the motherboard installed in it does not support booting from a USB device, but let's hope that everything is not so tragic.
- Once I happened to observe how a user without proper experience installed Windows 7 from a USB stick to your netbook. He failed after failure, as it later turned out due to an improperly prepared Windows 7 distribution on his USB flash drive, read how, which describes in detail how to prepare a Windows 7 distribution on a USB flash drive in nine simple and free ways.
- Use only original assemblies of Windows 7 from Microsoft, and you will get rid of many problems, the same thing may be in the flash drive itself, if it is many, many years old, try replacing it. The process itself installing Windows 7 from a USB flash drive, does not differ from the usual one, take a look at our article.
- Try to also change the USB port into which you insert the USB flash drive, preferably using the one located directly on the motherboard, read
- The flash drive must have a capacity of at least 4 GB, all your files from it must first be copied to a safe place, because it will be formatted.
You should also prepare your netbook for installing Windows 7 from a flash drive, from the partition on which you will install the operating system, you also need to copy all the data to a secluded place, it will be formatted like the flash drive. - Friends, if you have a new computer, laptop, netbook with USB 2.0 ports, as well as USB 3.0 and you decide to install Windows 7 on it from a bootable flash drive, then you need to know that you need to insert a USB flash drive into a USB 2.0 port, since Windows 7 does not support USB 3.0 (ports are usually blue). If you insert a bootable USB flash drive into a USB 3.0 port, then the installation of Windows 7 will end with this error.
"A required driver for the optical disc drive was not found. If you have a floppy disk, CD, DVD or USB flash drive with this driver, please insert this media" - You may also be interested in our other interesting articles: and.
And finally, the method of creating a bootable USB flash drive with Windows 7 in just four steps from Microsoft, the Windows 7 USB / DVD Download Tool, this method is not in the article on our site "How to Make a Bootable Windows 7 USB Flash Drive".
We download the utility from the direct link Windows 7 USB / DVD Download Tool, by the way, it can also create an installation DVD.
Microsoft .NET Framework 2.0 required (download)
Run the program, then click Browse and specify the ISO file of the Windows 7 image
Working with a computer, especially when the Internet is connected, is always walking on the edge of an abyss: any operating system is forced to withstand the most powerful attacks by hackers, all kinds of viruses on a daily basis, the purpose of which is sometimes not only to pump your Internet traffic, but also to completely destroy the system. To correct the situation, clean out destructive viruses and restore the computer's work, you can completely reinstall the system. Of course, this is a very responsible business, requiring knowledge of all the nuances of the work, but not so difficult. We will tell you further how to reinstall Windows 7 from a USB flash drive.
So, how to properly reinstall Windows 7 from a USB stick? Let's start by saving all the data we need to any storage medium. It can be a disk, flash drive or a separate hard drive - choose depending on the amount of information stored.
You need to save the information because after reinstallation, all data will be lost completely and irrevocably, and there is only one way to restore them - by loading them with a new one from a third-party memory source.
But a beginner often has a question: where to find the data necessary for saving, what to save ... As a rule, the most important files are stored in:
- folder "My Documents";
- folder "Downloads";
- Downloud folder.
When we make sure that the information necessary for further work has been saved to a third-party memory source, we can proceed to the choice of a future system, after which we will begin reinstalling.
Windows 7 versions

First of all, let's dwell on such a question as the branches of generations of the operating system:
- 32-bit, focused on RAM no more than four gigabytes;
- 64-bit, or professional, designed for serious work and supporting large amounts of memory.
In addition, Windows versions are subdivided into:
- Initial or Starter. This is the most basic version of the system and includes only a basic set of operating functions. This option is perfect for scanty amounts of memory (no more than 2 gigabytes), which are typical for office work, but are not acceptable, for example, for downloading computer games or serious programs.
- Home Basic is a more advanced version that supports memory up to eight gigabytes. Designed to work as a laptop and a stationary computer. It is the most common version of the system for the simple reason that it is not burdensome for a computer, it is easy to install, configure and, moreover, supports all major programs and games for individual use (not for enterprises where an extensive network is required that consumes much larger amounts of RAM) ...
- Home Premium or Home Premium is also the most common option and includes an even larger list of optional features than the previous option.
- The professional version is the most acceptable option for those who prefer to work at a high level and need a large amount of information, great optional capabilities.
- And finally, the last point - corporate and maximum versions. These are the top variations of the Windows7 system, which are the richest set of working functions, almost unlimited scope for work and creativity.
Based on personal preferences, the capabilities of their computer, everyone chooses their own type of system. And now we will dwell in detail on this nuance: how to reinstall Windows via a USB flash drive.
Before moving on to the main question, let's make a small digression and touch on such a topic as a program for adjusting the sound on a computer, which is designed to solve problems with the disappearance of acoustics after reinstalling the OS or improving sound quality. Read about how to connect and configure a printer on a computer.
Reinstallation instructions

At the moment, DVD drives are gradually becoming a thing of the past: not all laptops, and even more simplified miniature netbooks, are equipped with drives. And this forces us to look for alternative methods of downloading information. This method can be a regular flash drive. To the question of how to properly reinstall Windows 7 on a laptop, the answer is simple - the first step is to write the image of the reinstallation disk to a USB flash drive. The ISO image of Windows 7 is recorded using special programs (Nero, etc.) and this usually does not cause any serious difficulties, all the work takes several minutes and is performed in a few mouse clicks.
When the disk image is written, you can start the reinstallation process.
The work is carried out through the BIOS. Many novice PC users immediately experience a state of panic and horror at the mere mention of this obscure abbreviation. But do not be afraid: you will now find out how to reinstall Windows on a laptop from a USB flash drive, and believe me, there is nothing catastrophically awful - a common thing that, once done, you will be able to easily perform it later and ... who knows, maybe It is not bad to make money on this, because good, knowledgeable programmers are always in price, and there are so many dummies ... and installation via Bios is one of the mandatory and most common procedures for a programmer's work, which makes it possible to save even hopelessly clogged with viruses that are deadly for the system caught on the Internet.
So, we restart the computer and enter BIOS. Now we expose the download from our flash drive and wait for the installation process to pass. At this moment, do not press anything, just wait!
After the download occurs, exit BIOS and save the data. The computer is now ready to install Windows 7.
In order for the installation to proceed correctly, set up the date, time and click "Next".
In the window that opens, confirm the installation of Windows 7.
We choose the version that is most acceptable to you.
ATTENTION: At the next stage, you will need to enter a license key. We enter the key and confirm the license agreement, after which we proceed to the next stage of the boot process.
We put a tick under the "Full installation" box, select the partition where Windows will be installed and click "Format". At this point, the complete formatting of the logical disk will begin (this is why it is important to save the necessary information in advance).
The next stage is just confirmation of operations - feel free to click "Next". It will take a few seconds to boot, and the system will prompt you to give the name of the PC, specify a nickname. Here you can connect all your imagination, the main thing is not to forget the names that you enter in the window that opens. We specify the password and, finally! Enter the license key.
The system will automatically offer to reinstall the brandmauser - agree boldly, but in the future, install an additional antivirus.
How to properly reinstall Windows 7 without a USB flash drive

And how to reinstall Windows 7 without a USB flash drive, you ask. Elementary Watson.
We go to the Start menu and find the Control Panel, after which you need to go to "Recovery". In this tab, we are interested in the very bottom line called "Advanced recovery methods", and we need to run it in order to call the next working window for formatting the disk. We confirm the formatting and select the type of restoring the factory settings of the system. After the work is completed, you will receive a system that is clean of all viruses and is working properly.
How to reinstall other OS from a flash drive

Windows can be installed on android, tablet, other OS. It's even easier to do this than on a PC.
We connect the keyboard to the device and in order to enter the BIOS, press the "F2" button. Now we no longer need the keyboard, and in its place we connect a flash drive. We confirm the installation of Windows and wait. Every time the system asks for confirmation to continue downloading - click "Next". When the reinstallation is complete, reboot the device and start from scratch.
We have considered all the nuances of the question of how to reinstall Windows on a computer from a USB flash drive and without a flash drive, as well as how to reinstall other operating systems. Hope this article was helpful to you. Good luck!
Hello! Yesterday I got my hands on a new laptop ASUS X501A. It was necessary to install Windows, and everything you need is shorter on a turnkey basis :). I twisted it and found that there was no CD / DVD drive in it. And this means that you need to create a bootable USB flash drive and install Windows 7 from it. Also, the drivers for it on the disk are included in the kit, you also need to rewrite them to the USB flash drive. In general, it is strange, a laptop without a drive, and a driver on a disk. It is already necessary to put the driver in the kit on the USB flash drive, well, or an external drive :).
Anyway. I created a bootable USB flash drive. First created using a special program Windows 7 USB / DVD Download Tool(I wrote about this), but I’ll say running on before that for some reason the installation of Windows 7 from this flash drive did not go. The white cursor just blinked and the installation did not proceed. I wrote it down and it worked. Why so, I did not understand :).
That's it, the flash drive is ready. Now you need to install the boot from this flash drive in BIOS. Now I'll tell you how to do it.
We set the boot from a USB flash drive on an Asus laptop
We go into the BIOS. For me, and most likely for you, this is a key F2 (if not, then try DEL too)... Press it immediately after starting the laptop.
The flash drive should already be connected to the laptop!

As you can see (in the screenshot below), under me Boot Option # 1 there is a hard drive. And under Boot Option # 2 flash drive. You need to install a flash drive under # 1.
To do this, click on Boot Option # 1 and select the USB stick. And the hard drive will automatically take second place.

You can return to the previous menu by clicking on Esc and you will see a USB device is installed under Boot Option # 1.

Don't forget to click F10 and Yes to save the settings.
That's it, after restarting the laptop, boot from the USB flash drive should go (if created correctly).
There is one caveat. Perhaps I was mistaken when setting the parameters in BIOS, there probably you just had to create another rule for loading (Add New Boot Option). But that's okay.
If you did everything like me, then most likely, during the installation of Windows, after the reboot, the boot from the USB flash drive will start. And you need with drive C to proceed with the installation. I'm just at the moment of reboot pulled out a flash drive... And when the download started from the C drive, I inserted it back (although, it seems like it is no longer needed for installation, the files have already been copied, but I could be wrong).
Possible problems installing Windows 7 from a USB 3.0 flash drive
You may have noticed that my USB drive has a new USB 3.0 interface. And Windows 7 does not support USB 3.0, special drivers needed.

If the drive itself with USB 3.0, then it's okay. Just plug it into the socket on your laptop USB 2.0 and everything will work.
This is what the USB 2.0 connector looks like on a laptop:

And this is how the USB 3.0 connector looks like:
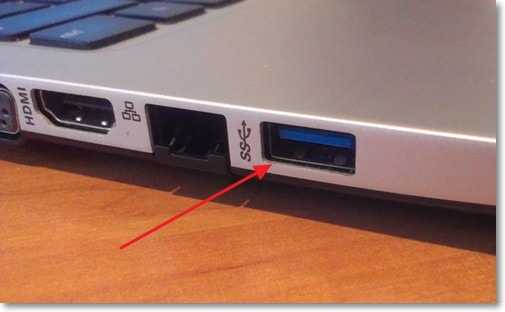
The third is blue and two letters SS near the badge.
Well, if you have all USB 3.0, then you will have to integrate the drivers into Windows 7. This is already a topic for another article. Perhaps I'll write how to do it. In the meantime, you can find this information on the Internet.
You can also find and download an assembly with Windows 7, which already has integrated drivers for USB 3.0. There are such.
On this site there is probably all the information that can be useful for installing the operating system and for solving problems that may arise during the installation process. You can use the site search. And if you can't find something, then ask in the comments, I will tell you :). Good luck!
More on the site:
How do I set the BIOS to boot from a USB flash drive on an Asus laptop? A few tips for installing Windows 7 from a USB 3.0 stick updated: February 7, 2018 by: admin
Interested in installing Windows 7 from a USB flash drive to a laptop? This means that your computer does not have a drive or it is broken.
What to do in a situation when it is not possible to boot from a CD? There is a solution: you can install the operating system from a USB flash drive.
Before starting the description of the process of installing Windows from a Flash card, we will list all the main stages of this process, and then we will consider them in more detail:
- First: preparing the laptop for installing the operating system (in this case, Windows 7)
- Second: flash drive preparation
- The third: setting up UEFI to boot "operating systems" from a Flash-card.
- Fourth: installation itself.
Note: UEFI is a replacement for the outdated BIOS.
Preparing a laptop for installing Windows 7
First, you need to transfer all the necessary files and documents from drive C to drive D. Usually they are located in the folders "My Documents" and on the "Desktop".
The installation files for some applications should be found in the Program Files folder.
Alternatively, you can transfer all important information to another flash drive (not the one with which the installation is taking place).
Preparing a flash drive for installing an operating system
First, delete or copy all the necessary information from the flash card, because files and folders will be deleted from it automatically in preparation for installation.
Flash card must be at least 4 GB in size.
Then you will need the Windows 7 installation files and folders, preferably a disk image in iso format, the UltralSO utility for installation (you can download it by typing an identical query in the search).
All is ready? Then let's get started:
Download, install and run the utility. Here's what you'll see:
Click "Trial period". A new window will open in which you need to select "File" - "Open" and point to the image from which the operating system will be installed.


Then insert the USB flash drive into your computer and select the "Format" item. After the process is complete, click "Burn".

The process will end and you will have a flash drive with the Windows 7 operating system dropped onto it. Now you can proceed to another stage, in fact, the installation itself.
Advice: It is not necessary to use the exact utility described in the article. It is just one of many programs, thanks to which you can create an installation USB flash drive.
Configuring UEFI to boot "operating systems" from a USB flash drive
It will not work just to insert the USB flash drive into the computer, it is necessary that the computer boots from it when it is turned on. How to do it? Using UEFI. It is in every computer.
It contains all the vital settings. One of them is the boot order. We will stop at it.
To enter UEFI, press a specific key on your keyboard when the system boots. (This key is different for many laptops, it is displayed on the screen. Usually it is F2 or Esc).
When you enter, a menu will open to you, you will immediately recognize it by its blue or gray color.

Many do not have time to press the Windows login key in time and the computer simply boots. In this case, you should reboot and try again.
After entering, you should enter the menu and find in the settings the order of device boot. Here are some screenshots for example:


Use the arrows to select the device to boot first. For newbies, there is a dedicated UEFI navigation help. She is always in a prominent place.
Choose USB-HDD. Then exit UEFI using the Save and Exit button. All changed information will be saved. The computer will automatically restart.
Now we move on to the next step, the very final one.
Installing Windows 7
If you did everything correctly and correctly set the settings in UEFI, then you will see the message "Press any key to boot CD or DVD".
Of course, in English, so the screenshot is attached:

Advice: It often happens that there is no inscription. This suggests that you are wrong somewhere. You should go to UEFI again and check if all the boot settings you made from the USB flash drive are saved. If everything is correct, it means that your flash card is not bootable at all, and for the operation you need to look for another image of the operating system and record it.
It may so happen that on the installation image, in addition to Windows 7, there are also utilities. In this case, you need to select the item that is suitable for starting the installation.
Good news: almost all the operations listed below will be performed automatically by the computer.
And all the settings that you don't like can be changed to your taste after the installation is complete.

A window will open in which you need to select which version of Windows 7 you will install. Click on the one for which you have a security key.
It is often glued to the lettering on the bottom of the laptop. The system will ask for it before finishing the installation.
The key does not have to be entered immediately. You can do this within a month.

A window with a license will pop up, put a tick on "Agree" and move on.

Then we select the complete installation.

Click "Disk Setup". Usually beginners have difficulties here, so let's take a closer look at this point.

Disk setup
It happens that on the hard disk, in addition to the standard partitions (C, D, E), there are several more.
This is due to the fact that when restoring the system, it was possible to bring the computer to its standard settings.
Some find hidden size, up to 100 megabytes. The operating system itself is responsible for its creation. The section performs the function of encryption of the system.
The section has a program that can decode it.
But you should get rid of it. Before installing Windows, it is necessary to prepare the hard drive for the operation in advance. This can be done using the Acronis Disk program.
In the window that appears, click "Format".
A warning will pop up that all data will be destroyed, but now it doesn't matter, because we have a backup copy of all data. Click "OK".
When the formatting happens, feel free to click on.

The installation will take some time. After it, a window will pop up, in which the user will be required to enter names: his own and the computer.
Optionally, you can come up with a password. In order not to forget him, you will be asked to come up with a hint for him.

Choose the security mode, date and time.


With the installed network card driver, you should select the type of connection.

You can install the drivers and programs you need
So that after installing Windows at startup, the laptop boots from the hard drive, and not the flash drive, you should return the UEFI settings to their original state.
This completes the installation of Windows 7 on the laptop!
As you can see, there is nothing difficult in installing an operating system from a USB flash drive. The main thing is to carefully follow the listed points, and you will succeed.
One time is enough to memorize the whole process.
The next time you need to install an operating system from a Flash card, you will do it automatically.
Video instruction on how to install WINDOWS 7 from a USB flash drive to a laptop using the example of DELL beech
Installing Windows 7 from a USB flash drive to a laptop: A guide to action