Today we will talk about why the computer slows down and how to speed up its work on the Windows 7 operating system. If this problem is urgent for you, then we will start solving it.
The slow work of the computer can unbalance the most phlegmatic. And let the witches laugh it off that trying to speed it up is like rushing a woman about to go: until the system performs some of the operations she knows, there will be no result, but it is quite possible to optimize the work of your PC. And for this you do not need to have an IT specialist diploma - it is enough to know a few secrets.
The main ways to speed up a laptop (computer) on Windows 7
All of the options below are absolutely safe for your computer (no- or laptop) to work and in no way require reinstalling the operating system after "experimenting."
- Optimization of startup programs.
- Organization of programs, cleaning of files.
- Turn off additional effects.
- Refusal to use paging files.
- Registry cleaning and RAM optimization.
- Optimized power management.
- Utilization of all processor cores.
- Getting rid of unnecessary gadgets.
Let's consider each item in more detail. It is worth recalling that the effect will be especially noticeable on low-power equipment. Please also note that most of the points are feasible without additional installation of auxiliary programs - the capabilities of the OS are wide enough and allow you to optimize work on a wide variety of devices. However, one convenient and very functional program will still not be superfluous - CCleaner... It should be installed simultaneously with the installation of the operating system.
Cleaning programs at startup
A lot of programs installed on a computer "brazenly climb" into (that is, they start working simultaneously with the OS), which significantly increases the boot time. To solve this problem, you need to install the CCleaner program or use the native Windows 7 resources.
In the first case, it is enough to start the program, select the "Startup" tab in the "Service" menu and sort the programs using the "Turn off" button.
In the second, you need to click "Start", select the "Run" application (or the keyboard shortcut WIN + R), and then type in the search field MSCONFIG. 
In the window that opens, select "Startup" and uncheck unnecessary checkboxes.

Then restart your PC. Remember that it is better not to remove the antivirus from startup!
Cleaning your computer from debris
There are two points to note here:
- first, getting rid of unused programs;
- secondly, the optimization of the file space.
The first point is quite simple to understand: click "Start" and, going to "", look for the item called "Remove Programs". Clicking on it, you will see a window with a long list of all software and applications installed on your computer. Those programs that have long lost their relevance for you can be safely deleted (with the appropriate button). This is a fairly effective way to "overclock" weak equipment if the number of programs is large.

The second part of cleaning your computer from junk is removing unnecessary files and defragmenting your hard drive. Here it is important to know the following: the OS writes almost all files to the screw according to the “where was the place” principle, so access to them can take a lot of time. Getting rid of virtual junk (old documents, watched movies, music you don't need, etc.),
- Go to "My Computer";
- Mark the required drive;
- After that, in the context menu (called by the right button), select "Properties";
- In them - "Service" and "Perform defragmentation".

The process can take a fair amount of time, but you need to do it regularly to prevent slowing down of your PC.
Avoiding visual effects
Of course, the aesthetic characteristics are at their best, but all this beauty requires certain computer resources, and quite tangible ones. Thus, by turning off a significant part of the visual effects, you can use the freed up power for your own needs. To do this, you do not need to install absolutely any additional programs, just the capabilities of the OS. You can do this by going to:
- In the "Control Panel" menu;
- By choosing "System";
- Submenu "Additional system parameters";
- Visual Effects tab.

Next, you need to select the item "Provide the best performance", and then slightly adjust the result by checking the boxes for enabling desktop composition, displaying thumbnails, smoothing uneven fonts, using icon display styles. This way you will be able to preserve the "beauty" of your OS, but at the same time significantly save the resources of your PC. The technique will of course need to be restarted to apply the new parameters.
Turn off swap files
If your equipment boasts at least 4GB of RAM, you can forget about the paging file. To convince the OS of this, do the following:
- Go to "My Computer";
- Select "Properties";
- You need "Advanced System Settings";
- Then go through the "Advanced" tab twice;
- When you see the "Virtual memory" section, click "Change";
- Then uncheck the box "Automatically select the size of the paging file";
- To independently determine its volume, put a tick on the appropriate item, and then enter the numbers;

Registry cleaning and RAM optimization
The first procedure is not difficult at all. It will allow you to get rid of all sorts of "junk" that remains in memory of deleted programs or applications. It is very convenient to use to clean the registry CCleaner, for which the program should be launched and the appropriate item selected. The process does not take much time, but it gives tangible results.

It takes longer to optimize (and before that diagnose) the "RAM", but this can be done using the resources of the OS itself. Having driven the required one into the search bar of the "Control Panel" menu (that is, "Diagnose the problem of the computer's RAM"), you will see a window in which the type of check is selected. The most effective is the first point, in which diagnostics are performed after a reboot. It can be time-consuming, however, its results are very accurate. At the end of the process, your computer will restart again.

Power management
Owners of stationary devices may overlook this point, but for those who use laptops or netbooks, it is very important. The fact is that the most economical consumption of electricity inevitably leads to a tangible decrease in the productivity of equipment. Naturally, feedback also exists.
Although many people forget about the energy plan, by optimizing it, you can speed up the work of your equipment somewhat. It is quite simple to do this: in the "Control Panel" (you need to look for it in the "Start" menu), you need to select the "Power supply" item and put the switch on "High performance".

More advanced users can customize their own plan, but caution is best here. Are you not afraid? Then select the item "Setting up the power plan" and feel free to change the parameters.
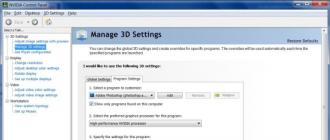
Using multiple cores
As a rule, most modern processors have more than one core (even budget models). Accordingly, this should have a positive effect on the speed of execution of various OS tasks. However, a problem arises here: although checking the processor is one of the automatic tasks of the "operating system", in most cases the OS is loaded using a single kernel.
To get rid of this problem, and, consequently, "teach" the computer to boot faster, you should perform very simple steps by going to the "Start".
- Open the Run application in Start or press two keys WIN + R;
- In the window that opens, type in the "msconfig" symbols and confirm the action.
- The result will be a configuration window, where you need the "Loading" tab, or rather, its "Additional parameters". You will see the item "Number of processors" and put a tick on it. After that, you will be presented with possible options (for example, one, two or four). The largest number must be selected.

As you can see, the method is very simple, but very effective - using it, you no longer have to languish in anticipation of the completion of the operating system loading.
Getting rid of unnecessary gadgets
Although in Windows 7 there are many convenient gadgets, not all of them are used non-stop. Meanwhile, each "slows down" the OS, therefore, slows down the operation of technology. Determine which gadgets are most in demand for you (as a rule, there are no more than three of them), and feel free to delete the rest. Remember that you can always deliver what you need when needed.
Finally, one more secret. If you have a high-speed flash drive, you can use it as a RAM expander - in particular, to access the most relevant applications. It is much cheaper than buying an additional RAM stick.
Having connected the flash drive to the equipment, open "" and select the device, then open its "Properties". When you find the tab labeled "ReadyBoost", put the switch on "Use this device." You will be able to determine how much volume on the flash drive can be used by the operating system.
Of course, the above methods are not limited to the ability to speed up the operation of the OS. But when you use them, you will be surprised how much more efficient your computer or laptop is!
Be sure to read it.
Computer performance depends not only on the hardware installed in it, but also on the settings of the system itself. The better you optimize your Windows settings, the faster and better your PC will perform at maximum performance.
Ways to tune Windows 7 for maximum performance
Improving performance can be achieved by disabling unnecessary programs and functions that load the hard disk, video card, processor and RAM of the computer, as well as changing the type of work and enabling some additional built-in Windows functions.
Cleaning up your hard drive
The first thing to do before starting the optimization is to make sure that your hard drive is not completely clogged. Please note that free space should be both on the main partition of the disk, on which the system itself is installed, and on all other additional partitions (D, F, G ...).
There are three ways to clean up a disk: manual, third-party programs, and built-in functions.
Manual option
Remove all unnecessary programs, games and files. Convenient removal of programs and applications can be performed by the following actions:
Don't forget to empty your trash and temporary files.
Using third-party applications
There are many programs that can automatically clean up your disk. One of the best of this kind is CCleaner:
- We pass to the "Cleaning" block.
- We mark in the side part of the "Cleaning" section all the items that you do not mind deleting.
- Press the "Analysis" button to start an automatic system scan for unnecessary files.
- After the end of the scan, click on the "Clear" button so that the program starts to delete all found useless elements on its own.
Using built-in functions
Disk cleaning in automatic mode is also possible without third-party programs, just follow these steps:
- Open folder explorer.
- Open the properties of the drive you want to clean up.
- Go to the General tab.
- In this section, you can view the statistics of disk clogging in a chart format. Click on the "Disk Cleanup" button.
- Check all the items you don't need, such as "Temporary files", "Sketches", etc. For each item, the system will display a description that will help you determine whether these files are needed or not.
- Click on the "OK" button to start automatic cleaning.
- After the end of the process, return to the "Disk Cleanup" window and click on the "Clean up system files" button.
- An additional window will open in which you will be prompted to clean the restore points and shadow cloning files. You can delete them only at your own peril and risk, since without them, in the event of a system breakdown, you will not be able to roll it back to the moment when it worked normally. That is, it is worth erasing this data only as a last resort.
Registry tweak
The registry is one of the main parts of the system, since all parameters and values of system settings are located in it and perform their functions. If you optimize its work, then the whole Windows will start working faster.
Clearing errors and unnecessary elements
Over time, a large number of errors, error reports, temporary and damaged tasks and other files can accumulate in the registry, slowing it down by their number. To get rid of all this in automatic mode, we will use the third-party CCleaner program:
- Download and install the program from the official website of the developer - ccleaner.org.ua/download/.
- Having opened the application, go to the "Registry" block.
- Check all the options provided.
- Run a registry scan.
- Click on the "Fix" button to give the program the right to fix all errors on its own.
Defragmentation
Over time, the registry undergoes severe fragmentation - it is divided into a large number of cells, which are not arranged in order, but in a broken one. This slows down the speed at which the registry searches for the files it needs. To reduce the level of fragmentation, you need to defragment:
- Download and install the Defraggler program from the developer's official website http://www.piriform.com/defraggler/download.
- After launching the program, expand the "Settings" tab.
- Turn on Startup Defragmentation with the Always option.
- Reboot your computer.
- When enabled, you will see command lines - this is an indication that defragmentation is in progress. It will run every time you turn on your computer until you turn it off.
Optimization by changing values
By changing the values in the registry, you can disable or enable some of the functions performed by the system to optimize it. But before that, you need to create a backup copy of the registry in order to be able to roll it back to its original state in the future if something changes for the worse:
- Expand the Run box using the Win + R key combination on your keyboard.
- Use the regedit command to navigate to the registry app.
- In the window that opens, in the block with the folder tree, right-click on the upper section "Computer" and select the "Export" function.
- Select the location to go to the registry backup. It is advisable to place it on a third-party media. If the computer stops starting due to changes in the registry settings, it will be easier to restore it from third-party media.
- To use the created copy, just open it and confirm that you want to make changes.
Now, back to the registry, you can make the following changes:
- If you do not have enough RAM, then some can be freed by unloading unused libraries. In the registry, open the section: HKEY_LOCAL_MACHINE \ SOFTWARE \ Microsoft \ Windows \ CurrentVersion \ Explorer and create a DWORD parameter named AlwaysUnloadDll. parameter value 1.
- If the computer has 2 GB or more of RAM, then applications will respond faster to user action if the kernel and driver codes remain in RAM, and are not dumped into the paging file. Open the HKEY_LOCAL_MACHINE \ SYSTEM \ CurrentControlSet \ Control \ Session Manager \ Memory Management section and find the DisablePagingExecutive parameter and change its value to 1.
- While working, confidential data may remain in the paging file, therefore, for security reasons, it is recommended to clear the paging file. In the HKEY_LOCAL_MACHINE \ SYSTEM \ CurrentControlSet \ Control \ Session Manager \ Memory Management registry key, change the value of the ClearPageFileAtShutdown parameter to 1.
- Disable application caching. Open the HKEY_CURRENT_USER \ Software \ Microsoft \ Windows \ CurrentVersion \ Explorer \ Advanced section and create a DWORD parameter named DisableThumbailCache, parameter value 1.
- Disable automatic updates. Open the registry key HKEY_LOCAL_MACHINE \ SOFTWARE \ Microsoft \ Windows \ CurrentVersion \ WindowsUpdate \ Auto Update find AUTOptions and change its value to 1.
- Improving Performance Go to HKEY_LOCAL_MACHINE \ SYSTEM \ CurrentControlSet \ Control \ FileSystem and find the NtfsDisableLastAccessUpdate parameter and set the value to 1. This will disable the last time the file was accessed. And change the value of the NtfsDisable8dot3NameCreation parameter to 1. This will disable the creation of a special file table for MS-DOS names.
- Windows applications run both in the active mode and in the background. If you want active applications to receive more resources, thereby running faster, then in the HKEY_LOCAL_MACHINE \ SYSTEM \ CurrentControlSet \ Control \ PriorityControl section, find the Win32PrioritySeparation parameter. The default value is 2. The maximum value is 26, but if your system is not powerful enough, then change this parameter carefully. A maximum value of 6 is recommended for such systems. For powerful systems, a higher value can be set.
- Tuning the Superfetch service to maintain and improve system performance. All service parameters are located in the HKEY_LOCAL_MACHINE \ SYSTEM \ CurrentControlSet \ Control \ Session Manager \ Memory Management \ PrefetchParameters section, where there are three parameters that set the mode of operation of this service.
EnableBootTrace - Disables service tracing. You only need to enable tracing when the service is not working properly.
EnablePrefetcher - enable the Prefetcher mechanism
EnableSuperfetch - Enables the Superfetch service. In this case, the EnablePrefetcher and EnableSuperfetch parameters have the following values: 0 - the function is enabled, 1 - the function is enabled during operation, but disabled at system boot, 2 - the function is enabled only for system boot, 3 - the function is enabled in all modes.
Reducing the load on the video card
The main load on the video card is rendered by the visual display of what is happening on the screen. This load can be reduced in two ways: by lowering the resolution and by changing the system parameters. The first option can have a bad effect on the picture: there will be too many pixels, and this is very inconvenient. Therefore, consider the second option:
- Open the computer control panel.
- Click the System and Security tab.
- Go to the "System" block.
- Go to advanced system settings.
- In the window that opens, open the "Advanced" tab.
- In the "Performance" block, click on the "Parameters" button.
- Check the "Provide maximum performance" option.
- Most of the checkboxes will be removed, but you can select some of them back. Find out which visual effects you are willing to sacrifice and which you are not.
- Click on the "Apply" button and wait for the screen to transform. The picture will deteriorate from a design point of view, but the computer will run much faster.
Disabling unnecessary
Disabling unnecessary programs and services will allow you to significantly reduce the load on almost all components of the computer and speed up both the speed of loading the system and its subsequent work:
- Launch the "Run" window by holding down the Win + R keys on your keyboard at the same time.
- Use the msconfig command.
- A window named "System Configuration" will open. First of all, let's go to the "Startup" tab.
- Here is a list of programs that start automatically when the PC is turned on. Uncheck all programs you don't need. This list is usually created by you, but there are often cases when programs trick themselves into assigning the autorun status and load the system.
- Go to the Services tab.
- Disable all services that are not started by the system, but by third-party programs. Make exceptions for those services that you need, for example, antivirus and programs for taking quick screenshots. It is recommended to disable everything else. In no case do not touch the system processes if you do not know what they are responsible for, otherwise it can lead to system breakdown.
- While in the "Service" tab, do the same: deactivate unnecessary service processes.
- We pass to the control panel of the computer.
- Expand the "Administration" section.
- We open the subsection "Services".
- Here is a complete list of services currently running and disabled. Disable non-system services to reduce the load on your PC.
List of system services that you can try to disable. Please note that this list may be individual for everyone, perhaps you use some services, so you should not disable them:
- Windows CardSpace
- Windows Search
- Offline files
- Network Access Protection Agent
- Adaptive brightness control
- Windows backup
- IP Helper
- Secondary login
- Grouping network participants
- Disk Defragmenter
- Remote Access Automatic Connection Manager
- Print manager (if there are no printers)
- Remote Access Connection Manager (if no VPN)
- Network Participant Identity Manager
- Performance Logs and Alerts
- Windows Defender (?)
- Secure storage
- Configuring Remote Desktop Server
- Smart Card Removal Policy
- Software Shadow Copy Provider (Microsoft)
- Homegroup listener
- Windows Event Collector
- Network login
- Tablet PC Input Service
- Windows Image Download Service (WIA) (if no scanner or camera is available)
- Windows Media Center Scheduler Service
- Smart card
- Volume shadow copy
- Diagnostic system node
- Diagnostic Service Host
- Performance Counter Library Host
- Security Center
- Windows Update
Power supply setup
The performance of a computer also depends on how much power it receives. If it turns out that the PC consumes more energy than it receives, it will begin to reduce the load on itself at the expense of performance. Therefore, it is worth setting the correct power supply mode:
- Go to your PC control panel.
- Select the Hardware and Sound section.
- Select the subsection "Power supply".
- Select "High Performance" mode and see if your computer works better or not.
- Perhaps, for your type of PC, the balanced mode is still better suited, but this can only be found out by experiment.
- Here you can change the brightness of the screen, this can affect the amount of energy consumed. It is known that most of the received power is spent on the backlight of the screen.
ReadyBoost function
This function allows you to use external drives as mini hard drives. That is, a connected USB flash drive will be able to take over the work with small files: their storage, processing and redistribution. Usually, ReadyBoost transfers temporary files to the drive so that they do not clog up the hard disk. The function can be activated by the following actions:
- Connect the storage to your computer and open File Explorer.
- Right-click on the connected drive and expand its properties.
- Go to the ReadyBoost tab.
- Turn on the function.
- Move the slider to the amount of MB that will be given from the drive for use by its function. It can be either the entire memory of the device, or only a part of it.
System performance check
To assess how well your system is performing, you can use its performance checker. It should be understood that the assessment may show not entirely objective data, but nevertheless it can give some useful information. Checking in Windows 7 is carried out constantly and in automatic mode, in order to find out its results, you must perform the following steps:
- Open the PC control panel.
- Go to the System and Security section.
- Go to the "System" subsection.
- Go to the "Performance Counters and Tools" function.
- View detailed information on how well the system is performing. The indicator is plotted relative to the maximum possible system performance. That is, how fast the computer can work, and how fast it does it at the moment. The maximum score is 7.9, normal - up to 3.5, below 3.5 - it's time to improve performance on your own or change PC components.
The second performance metric is tested as follows:
- Open the task manager.
- Go to the "Performance" tab.
- See how hard the CPU and memory are loaded. If the indicators are close to 80-100%, then it is worth starting to unload the computer, otherwise it will start to slow down, and new applications will simply not be able to open.
So, the tuning and performance evaluation of Windows 7 has been done. If your actions to speed up the system have not yielded results, then there are two ways out: reinstalling Windows, since a completely clean version will work much faster until it clogs up over time, or improving the computer components. Remember that performance does not depend on one detail, but on the interaction and power of all components as a whole. And try to install as few programs and games as possible, so that your system remains clean for as long as possible, then there will be no need to optimize it.
Speed up Windows 7 Is it possible to produce by means of the operating system itself or do you need additional programs?
Two months ago I bought a laptop with preinstalled Windows 7 and now it slows down terribly when it starts up. I carried it to a service center, where they removed several programs from startup and defragmented my hard disk, but you can do it yourself, and I paid quite a lot. On the forums, they say that only reinstalling or rolling back to factory settings will help, is this also true? Tell me your opinion, maybe there are some tricks to increase the performance of Windows 7. George.
Speed up Windows 7
You don't need to reinstall anything, dear George, first we will try all the methods I know to speed up Windows 7, as well as increase the performance of the entire operating system through general optimization. I have to do this quite often (this is my job) and the result basically suits everyone, let's start with a simple one, and finish as usual with a difficult one. In our article, we will consider the issues listed below (each of them is disclosed more fully in a separate article).
- partial disabling of visual effects.
- and cleaning up startup.
- , also you will find out in this article, how to enable the function to clear the paging file on shutdown, however, this action did not have a noticeable increase in the download speed.
- , also did not add much speed, but there is one secret here, read on.
- that's what really added speed to my laptop, read a separate article.
The first thing you need to know is that all computers support hibernation or hibernation. If you have a laptop or a simple computer and you actively use it during the day, it must be configured so that you leave it for a few minutes or even hours, do not turn it off, but simply close the laptop lid, while it will go into hibernation (a mode of very low power consumption, in which everything that happens in the running operating system is saved in memory). The next time you go to it, you just open the lid and the laptop will start up in a few seconds, rather than speed up Windows 7, to exit sleep mode, you can also assign a password and without you no one will know what you are doing there. This is very useful for a laptop, because one shutdown and restart of the computer is equivalent to 8 hours of work.
Many of us are unfamiliar with this rule, and a computer is turned on and off ten times a day, so it will not live long with us. Personally, I sometimes do not turn off my laptop for several days in a row, for you it is not necessary and you can turn on the computer in the morning, and turn it off once a day in the evening.
Start-> Control Panel-> System and Security-> Power Supply-> Action when closing the lid... Configure the action When closing the lid on battery and mains power, exactly what you need, I personally have Sleep everywhere.


Speed up Win dows 7 always starts with the elimination of numerous unnecessary programs in startup, for example, take the last laptop with which I dealt, which was not there, I counted 23 programs, about 10 of them, the owner did not even know. According to him, he turned on the computer and went to wash, then drank tea and by this time the computer was just starting up. Start-> Run->,

personally, I never let more than five programs here, if you need to remove a program from startup, uncheck its name, if you still need a program at startup, you can configure it to run later than the main files and antivirus, as I do, using good and free utility AnVir Task Manager. Firstly, it stops any program that goes to startup, even the antivirus and asks you to start up or not start up, and secondly, any program can be set to delayed loading for any period of time and it will load when the main system files of Windows 7 are already running.


You can also read our article.
Thirdly, we look at where we have the paging file (Windows 7 increase the paging file link to the article above) and what size it is. Start -> Right-click on the My Computer icon and select Properties, then-> Additional system parameters

Tab Advanced-> Performance and Parameters


and go to the dialog box Virtual memory... It is imperative that the paging file is NOT located on the same volume with the operating system and has a size twice the size of the RAM. By default, Windows 7 detects the paging file automatically. In my case, as you can see on the screenshot, my operating system is on disk C, and I transferred the paging file to disk E. The size of my RAM is 2 GB, and the paging file is, respectively, twice as large. If anyone does not know how to configure the swap file, read a separate article. Windows 7 increase paging file.

A heavily fragmented Paging file can affect the startup speed of Windows 7. The paging file is not subject to fragmentation if its size is defined, that is, it is static (Initial and Maximum sizes in this window are the same). With a dynamic paging file, in order to avoid a drop in performance, many turn on the function of clearing the paging file at shutdown in the operating system settings, my personal experiments have shown that this method does not give much noticeable speed gain, as well as constant defragmentation of the paging file.

You may also be advised to weekly clean the contents of the C: \ WINDOWS \ Prefetch folder, which stores information about the applications being launched, I want to say that this did not increase the speed during my tests either, since the programs have to re-save their information in this folder. Although my very clever acquaintance, for a long time proved to me that this folder still needs to be cleaned, but not once a week, but once a month. But here is one secret, my friends, the fact is that Windows 7 has a paging file and system cache files on our hard disk and constantly accesses them when reading many small files, the performance naturally drops. We need to provide the operating system with a place to store paging and cache files outside the hard disk, then access to these files will be much faster. “Where to locate? "- you ask. And I will answer you: - "On a flash drive."
This technology is called ReadyBoost and it can really add speed to a laptop or netbook, you do not need to buy additional RAM, free up 4 GB of free space on your flash drive using ReadyBoost technology, we have written a separate article about it and you can familiarize yourself with it ReadyBoost in Windows 7.
It is imperative to periodically delete unnecessary files from the operating system, you can trust Windows 7 itself, I tried it, it's not scary: Start -> All Programs -> Accessories -> System Tools -> Disk Cleanup, and select Run as administrator. Use a variety of cleaners with caution, you can seriously damage the system. And my advice to you is to use different third-party optimizers that do not always work correctly.

After deleting unnecessary files, it is imperative to defragment the hard disk, it must be scheduled by you and carried out regularly, this also greatly affects the boot speed of Windows 7: Start -> All Programs -> Accessories -> System Tools -> Disk Defragmenter.

- Last but not least, if you are running Windows 7 (64-bit), try to have 4GB of RAM.
Mar 03
How to speed up your computer on Windows 7 (part 1)
Hello, friends! As I promised in, I'll tell you about how to speed up Windows 7... If you are using an older version of Windows, there are some tips you can still follow. For example, points 2 and 3. In general, it is better to keep up with the times and use new versions of the software. Since they are more reliable and improved. Let's start?1. Disable visual effects.
Windows 7 itself is very beautiful. So I personally only turned off a couple of visual effects. You turn off the ones you don't need. How to do it? 1) Go to the section ... To do this, press the button Start and select a section Control Panel ... In the search box, enter "Counters and Productivity Tools" , and then from the list of results, select "Counters and productivity tools". 2) Select item "Customizing visual effects" ... 3) Uncheck the following effects (this is my opinion):- 1.Animation on Start Menu and Taskbar
- 2.Animation of windows when minimizing and expanding
- 3.Display shadows cast by windows
- 4.Fade or slip effects when prompted
2.Disable autorun of unnecessary programs.
When Windows 7 boots up, various programs start automatically. Naturally, all of them are not needed. But many do not know how to disable their automatic start. And it's easy to do it. 1) Go to the "Start" menu, then to the "Control Panel".2) In the window that appears, select the item "Administration" :
4) In the top menu of the window that appears, click on:
Here we remove the check marks from those programs that we do not need. In principle, you can uncheck all the boxes. But I have marked only 4 programs that I always need after booting the system.
3. Disable unnecessary services.
There are many services on our computer that we don't need at all. Let's turn off some of them. But before that, start all those programs that you usually use on your computer, also turn on a movie or music. Why is this needed? To identify those services that we need in our daily life. After you have launched the programs, follow the 3 steps from step 2 (Disable unnecessary programs from autorun.). 4) In the top menu of the window that appears, click on "Services"... 5) We remove the check mark from those services where State is Stopped:4. Remove unnecessary gadgets.
Windows 7 gadgets are undoubtedly easy to manage and greatly simplify our work at the computer. But on the other hand, they consume the resources of our system. Therefore, install only essential gadgets. For example, I generally have only 1 gadget - "Weather Forecast" and that's it. So clean up your desktop. For example, why do we need a gadget - a "clock", if the time can be viewed in the lower right corner. Well, the calendar still did not go far. In general, act.5. Remove unnecessary programs.
I don't think there is much to explain here. Just go to "Control Panel", then "Programs and Features" and uninstall those programs that you are not using. You don't need them, they just waste resources. So that is all. Now you can easily increase the performance of your computer. By the way, I almost forgot about the most important advice - DO NOT CLOGGER DESKTOP WITH CLOUD OF LABELS!... Now that's all for sure. See you!Perhaps all users have at least once accused their computer of slow work, while not thinking at all that there are many opportunities to speed it up. Many people think that improving PC performance is difficult and available only to advanced users, but this opinion is not entirely true. Yes, there are methods to improve performance that require a lot of skill in working with a computer, but there are many very simple ways to "overclock" a PC. Every user should know about these methods. In this article we will tell you about them using the example of the most popular version of Windows today - you will find out how to speed up Windows 7.
Disable Windows 7 visual effects
Disabling Windows 7 visual effects is the simplest and most affordable way to improve system performance. To complete this procedure, follow the instructions:

3. A new window will open in front of you, in it, click on the "Advanced" tab and in the "Performance" section, click the "Options" button.

4. In the "Options" window that appears in the "Visual Effects" tab, you will see how many visual effects are available in Windows 7. Of course, thanks to them, the platform looks more interesting and more pleasant, however, they slow down the speed of its work.
5. To disable all visual effects at once - set the "point" in the "Provide best performance" box, and if you want to disable the effects selectively, uncheck the desired windows.
6. Everything, for the changes to take effect, you must click "OK" and restart the PC.

Disabling unnecessary audio
Along with visual effects, to make the user more pleasant to work with a PC, Microsoft has also created system sounds. You will be surprised, but they also require certain resources, and turning them off can have a positive effect on the performance of Windows 7.
To turn off visual effects:
1. Press the combination Win + R, in the window that appears, write "mmsys.cpl" and click "OK".

2. A new window will open in front of you, select the "Sounds" tab, set the sound scheme "Silent", click "OK".

3. Restart your PC for the changes to take effect.
Disabling the search indexing option
For users who often search for something in the system, Microsoft has provided a very convenient search indexing option, making it easier and faster to find files. However, if you rarely use search in the system, this option is completely useless and only "steals" the performance of Windows 7. To disable it, do the following:

2. Expand the list of "Services and applications", click on the line "Services" and find the Windows Search service in the list on the right.

By default, you can also disable the following services [screenshot below], as practice shows, they rarely benefit the average home PC user.

Removing "unnecessary" programs from startup
Windows has an autorun option. She is responsible for launching a number of programs at the same time as the system boots. These programs include, as a rule, various services and applications, without which the correct operation of the PC will be impossible. But, unfortunately, completely unnecessary third-party programs are often added to these programs.
The thing is that third-party software developers include an autoload function in their products, thus making their program more "intrusive". However, when it comes to launching an antivirus along with the system, it makes sense. However, there are many programs that run with Windows when there is no need to do so. Of course, this affects the speed of the PC.
To remove the program from startup, you must:
1. Press the key combination Win + R, in the window that appears, write "msconfig" and click "OK".

2. A window will open, select the "Startup" section in it.

3. Uncheck the boxes of those programs that you do not need to start at startup.
Remember! Without some startup programs, the system will not be able to function correctly, so uncheck only those programs that you are sure are unnecessary.
4. Click OK and restart your PC.
Optimizing your hard drive
At the beginning of the article, we mentioned that we will talk about simple ways to improve the performance of Windows 7, and, for sure, after reading this heading, you thought that we had already gone into the wild, but this is not the case. We will tell you about the simplest optimization of a hard drive and try to explain in an accessible way why it is required.
The fact is that all files that are written to the hard drive are broken into fragments according to a certain law. This is required in order to maximize the rational use of PC resources. However, it turns out that when the user accesses this or that file, the system has to collect its "pieces" throughout the hard disk. If a lot of unnecessary files have accumulated on your disk, this, of course, significantly slows down the process. That's why optimizing your hard drive is a must when it comes to speeding up Windows 7.
The first and most logical way to perform optimization is to delete unnecessary files and programs. Each user has a lot of "garbage" stored on his PC and it is important to get rid of it regularly. Of course, anyone, even the most "zero" user, knows how to delete files, but sometimes problems arise with programs, although this task is not difficult. To uninstall a program from your PC:


4. You will see a list of the programs you are using, decide which of them you no longer need and uninstall them - to uninstall, click once on the "unwanted" program and click the "Uninstall" button.

5. After removing all unnecessary programs, restart your PC.
Another necessary procedure for optimizing a hard disk is its defragmentation. A difficult word, but it is performed simply:
1. Go to "Computer", right-click on the disk, select "Properties" in the drop-down menu.


2. In the window that appears, select the "Service" tab, then click on the "Run defragmentation" button.

3. After defragmentation, restart your PC.
If your system is split across multiple disks, defragment each one. Important! The defragmentation procedure, as well as the procedure for removing unnecessary files, must be carried out regularly.
Optimizing your meal plan
This method of accelerating Windows 7 is relevant for laptop users. Very often, when disconnected from the network, laptops automatically switch to a lower power consumption mode, which, of course, corresponds to the minimum performance. Therefore, it is very important to switch to high performance mode when returning to the network. Nobody, of course, prohibits the use of this mode during battery operation, however, keep in mind that the laptop in this case will be discharged faster.
To enter high performance mode:
3. Select the "Power supply" section.

4. Put a dot in the "High performance" box.

Changing boot options
By default, at startup, the system does not use all its resources, this is necessary so that the "cold" hardware is not loaded to the maximum. However, if your PC has more than 2 GB of RAM and more than one cores, you can change the boot settings, thereby significantly speeding up the boot process. For this:
1. Press the key combination Win + R, in the window that appears, write "msconfig" and click "OK".
2. Select the Download tab, check the No GUI box.

3. Next, click the "Additional parameters" button, in the "Number of processors" and "Maximum memory" boxes, check the boxes, set the maximum value and click "OK" first in the "Advanced boot parameters" window, then in the "System configuration" window.


Outcomes