From time to time, it makes sense for users of android devices to update the device's firmware. Such a need can be caused both by the release of really important additions that affect the performance and safety of the gadget, and by various technical reasons. However, in some cases, the program used for flashing may not detect the connected device, which significantly complicates the task.
Why can't Odin find the device I want?
There are quite a few reasons why odin does not see your samsung phone, which significantly hinders correct diagnosis. Nevertheless, the most common reasons for this behavior of the program can be identified.
The device may not be detected by the program if the OS installed on the computer is outdated or does not have the necessary drivers. As a rule, a necessary requirement for performing manipulations with firmware and using Odin in general is the presence of a package that can be downloaded from the manufacturer's website.
If the smartphone still cannot be detected, it is worth checking. Many users reported that the device often did not work properly when plugged into the front of the system unit. Try attaching it to the rear panel connector. The cable manufacturer is also of great importance. In some cases, when flashing the device, various errors occurred, which were eliminated only by replacing the cable with the original.
Other reasons
The above reasons are the most common, however, there are a number of others that you should pay attention to.
IMPORTANT! Before carrying out any manipulations, the gadget must be in the appropriate operating mode.
In addition, in order to prevent problems, it is worth uninstalling the existing drivers and Kies, and then reinstalling them. After carrying out such an update, you need to restart your computer so that the changes are guaranteed to take effect.
Other reasons include:
- Incorrect work of the antivirus;
- Inappropriate version of Odin;
- Incompatible OS or other hardware.

Despite the fact that incompatible devices are extremely rare, it makes sense to try flashing using a different computer. This, in most cases, allows you to solve the problem if other methods did not help the user.
All official firmwares for Samsung smartphones are released for installation via the Odin program. This program can install firmware on all Samsung smartphones using the Android operating system. If you've decided to update or restore your Samsung, then it's time to find out how to flash Samsung through Odin.
How to flash Samsung through Odin and what you need for this
Before you start flashing your smartphone, you need to make sure that the battery charge is more than 50%, otherwise the smartphone / tablet may turn off during the software installation, after which it will be very problematic to reanimate the device.
While charging the device, you need to prepare everything you need to update or restore your Samsung. Download and install the official Samsung driver, also download and unpack the Odin archive.
The instructions on how to flash Samsung via Odin will not help if the wrong firmware is selected.
How to choose firmware for Samsung
The first step is to decide how many files should be in the firmware. There are two types of released firmware for Samsung:
- Single file - simple firmware, great for updating your smartphone
- Service (Multi-file) - 4-file firmware, with which it is best to restore smartphone software
Also, firmware via Odin can help with memory re-layout, for this a PIT file is used. In simple terms, you can take memory from the built-in storage and give this memory for installing applications. It is best not to use the PIT file unless necessary.
All new Samsung devices have restrictions on system rollback which is related to the bootloader. You will not be able to install the firmware with a bootloader version lower than the one currently installed. To find out which firmware is right for you, follow these steps:
- Open Settings - about phone
- Find "Software Version"
- The first 4 characters after the device model are the bootloader version

Samsung firmware with the same bootloader version should be fine. ... If you cannot decide which firmware to download, write in the comments your device and software version, indicate your wishes and I will select the firmware for you.
Firmware via Odin
Step-by-step instructions for flashing Samsung via Odin in the video:
Text option:
- Install the drivers
- Unpack Firmware and Odin
- Turn off your phone
- Start Odin
- On the phone, hold down Volume down + Home + Power on
- Confirm the entry into the firmware mode with the Volume up button
- Connect your phone to your computer with a USB cable
- In Odin, specify the firmware files one by one
- Click Start
- Wait for the device to turn on completely
- Unplug the cable from your phone and close Odin

Done! That's how easy the firmware goes through Odin! Has your Samsung firmware ended successfully? If you have any questions - write in the comments and I will definitely answer them!
Answers on questions:
What if Odin can't see my phone?
Reinstall drivers and restart your PC, check your USB cable, it is better to connect another one. Also try using a different USB port.
Odin is going to be a very useful tool that allows Samsung brand owners to flash their devices. Below you will find detailed instructions for flashing through Odin. It should be noted that the program was developed by professionals, so you don't have to worry about the quality of the final result. Firmware through Odin is very simple and does not require deep knowledge from users in various aspects of Android devices.
Similar to Odin
The application was developed for Windows OS. After downloading the program, you get the opportunity to flash your Samsung phone or tablet. Once the Koreans used the utility only as a professional software, introducing updates for their devices. Fortunately, its files were leaked to the Internet, which allowed every Samsung fan to use it. You can download the application on many fan sites dedicated to the Korean manufacturer or Android devices in general. have long ceased to be dangerous for your devices. However, not all users dare to take such drastic measures, getting rid of stock and leaving pirated programs to float freely. It should be noted that the Samsung firmware via Odin will open up new capabilities of your device that are not available in stock solutions.
This is where a dilemma arises, because many people establish some kind of identity that looks like this: flashing \u003d high risk \u003d loss of warranty for the device. But these are all just myths based on long-standing stereotypes. Nowadays there is just an insane number of owners of Samsung devices in the world, so a measure was taken to create software that would be suitable only for these devices and only in high-quality form. It was Odin that became such an application, "having flown" from the world of Scandinavian mythology. And here you can be 100% sure that you will definitely not harm your phone or tablet by using this program.

Program versions
In order for the firmware through Odin to be successful, there are a number of various versions of the program, each of which is designed for one or another device from Samsung. The main file extensions are .bin, .tar and.md5. By the way, the most stable versions are 1.85, 3.07 and 3.10.6. Next, we will indicate how the Samsung firmware should go through Odin, and also talk about the main options of the program.
Program options
So that you don't "get lost" in the Odin program, let's take a short tour of the main options:
- Auto Reboot - if this option is checked, your device will automatically reboot after successful completion of the firmware;
- Re-Partition - allows you to redistribute the file system according to factory presets (RFS);
- F. Reset Time - the function allows you to reset the counter of previous firmware;
- PIT - if the Re-Partition function was selected in the second, you will need to specify the path to the .pit file, which will make it possible to redistribute the device's file system;
- CSC - designed to open a file that contains data specific to certain states and operators;
- PDA - this option is required to select the required firmware files;
- Phone - allows you to select the modem file that is needed for the firmware process.
You need to be extremely careful when using Odin. This is especially true for the Re-Partition function, because if you do not have a .pit file, then it is better not to check the box next to this option. Finally, it's worth remembering that the software is only for Samsung devices. Flashing other brands of phones via Odin can lead to unpleasant consequences. Alternatively, you can use FlashTools or KDZ Updater.
Preparing for the firmware process
In order for the Samsung firmware through Odin to be successful, several preparatory steps must be performed. The algorithm of actions will be as follows:
- First of all, you need to download and install USB drivers for your device. If you wish, you can use Samsung Kies, during the installation of which the drivers will be installed automatically.
- Then you need to make sure that the device contains backup copies of important files that will be lost after the firmware. It is advisable to create backups on an external memory card or computer.
- Next, we charge the phone / tablet to 100% (or at least 80%), so that the power does not disappear during the firmware process.
- In the settings, enable the "USB debugging" option, which is available in the "For Developers" section. Make sure the Samsung Keis app is not running. Otherwise, disable it through the "Device Manager".

It should be noted that when installing official firmware via Odin, the chance of damaging the device is extremely low. Of course, if you follow all the instructions. Nevertheless, all actions are carried out at your own peril and risk, so if you are not sure of the final result, it is better to take your device to a service center. Next, let's move on to the firmware process.
Flashing process
As an example, we will describe how the firmware should be done via Odin. The algorithm is as follows:
- First of all, download the official firmware for your device to your computer.
- Next, turn on the download mode on the device. As a rule, in Samsung devices, it is started by pressing the following key combination: Power (Turn on / off the device) + Volume Down (volume down key). Then we confirm the action by pressing the Volume Up button (increase the volume). Be sure to press the keys at the same time.
- Next, we launch the Odin program on the PC and make sure that there are check marks opposite the Auto Reboot and Reset Time options. This is extremely important.
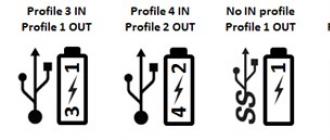
- We connect a phone or tablet to a PC using a USB cable. After detecting your device, the program will change the color of one of the ID: COM windows.
- Next, press the PDA button located in the Odin program interface and select the .tar or.md5 file.
- Click on START, after which the firmware process starts. It is strictly forbidden to disconnect your device from the PC during installation.
- As soon as your device successfully passes the firmware process, it will automatically reboot. At this stage, you can remove the cable from the PC and start using the device. As you can see, everything is very simple.
This instruction for flashing through Odin is the most common. If you stick to all the points, you will be successful!

Create Root Access to Samsung Galaxy Note 2 Phones
If you need to open the "superuser" mode, then Odin and SF-Autoroot programs can help. So, we follow the following algorithm of actions:
- Download SF-Autoroot for a specific phone model, which can be found in the "About phone" settings menu item. The files themselves can be easily found on the Internet. If you cannot find the file for a particular model, it is better to leave everything in stock mode, because other actions can harm the device.
- Download Odin and install USB drivers for your phone.
- Turn off the Galaxy Note 2 and put it into download mode. It turns on by simultaneously pressing 3 buttons: Volume Down + Home + Power. Then, to confirm the actions, press Volume Up and connect the device to the PC.
- In Odin, click on the PDA button, where we select the required file with the tar.md5 extension. Then we put a checkmark next to the Auto Reboot and F. Reset Time options. Make sure that no other functions are checked.
- Click "Start" and wait for the end of the installation.

As you can see, firmware via Odin is not the only advantage of this program. If you do everything wisely and according to the instructions, the application will be a great help for owners of devices from Samsung.
Today we will talk about the firmware of a Samsung phone using the example of the Galaxy S i9003 model. For correct operation, you need to have installed drivers for your phone. If you already have the Kies program, then most likely everything you need to already have. I really do not advise flashing through Kies, because it often freezes in half, or simply does not see the smartphone, like mine. Samsung took care of us and released an additional program called the name of the mythical god Odin. At the time of this writing, the version of the program is 1.83. Install additional drivers (you can download everything below) that will help the program work with the phone in firmware mode.
I warn you, I am not responsible for all the manipulations with the phone that you do after reading this article. In this way, I stitched several times without problems and errors. But if flashing the phone does not help with your problems, in no case tell the service center about it.
There are two types of firmware: 1 file and 5 file. They differ from each other in that 1 file updates the current firmware without affecting your stored information, while 5 files overwrite all the contents of the phone, except for the external memory card.
Flashing process with 1 file:
1. The phone must be turned off! We connect the phone to the computer via a USB cable.
2. Run the Odin program.
3. Make sure that the phone is connected, in the picture marked on the top left should be yellow, and in the message window it says "added"

4. Press the PDA button on the right and select the previously downloaded firmware file, if it is in the archive, unpack it (the extension must be.md5, .tar or smd).
5. Enter it into the firmware state by holding down the volume down + home button + power button in sequence, and hold it until the Android picture with a shovel appears.
6. If everything is in order, press the start button in the ODIN program.
7. The firmware lasts about 5 minutes and upon completion, the message PASS! Should appear in the program in the uppermost window! The device reboots itself and only when fully loaded, you can disconnect the cable.

Firmware process with 5 files:
1. We carry out all the operations as in the previous description up to the 3rd step.
2. Unpack the archive with the firmware files into a separate folder.
3. Add files to the appropriate windows:
PIT - latona_20110114.pit (with the extension pit)
PDA - I9003XXKC1-REV08-PDA-low-CL964212.tar.md5 (name must contain PDA or CODE)
PHONE - MODEM_I9003XXKC1_REV_00_CL964949.tar.md5 (the file contains the word MODEM)
CSC - CSC - GT-I9003-CSC-SERKC1.tar.md5 (in the name of the CSC file)
BOOTLOADER - APBOOT_I9003XXKPU_CL984714_REV08_user_low_ship.tar.md5 (the file name contains APBOOT)
These files may be completely different in content, but the indicated signs are required.
4. Check the Re-partition box
5. Press start and wait for the PASS message and a successful reboot.
USB driver:
Odin firmware v1.83:
Latest firmware for i9003: XXLE4 (Android v2.3.6 from 05.12) |
Despite the high level of reliability of Android devices produced by one of the leaders in the world market for smartphones and tablet computers - Samsung - users are often puzzled by the possibility or necessity of device firmware. For Android devices made by Samsung, the best solution for software manipulation and recovery is the program.
It doesn't matter for what purpose the procedure for flashing a Samsung Android device is carried out. Having resorted to using the powerful and functional Odin software, it turns out that working with a smartphone or tablet is not as difficult as it might seem at first glance. Let's figure it out step by step with the procedure for installing various types of firmware and their components.
Important! Odin application can damage the device if the user does wrong! All actions in the program are carried out by the user at his own peril and risk. The site administration and the author of the article do not bear responsibility for the possible negative consequences of following the instructions below!
Drivers will need to be installed in order for Odin to communicate with the device. Fortunately, Samsung has taken care of its users and the installation process usually doesn't cause any problems. The only inconvenience is the fact that the drivers are included in the package of Samsung branded software for servicing mobile devices - Kies (for old models) or Smart Switch (for new models). It should be noted that when flashing through Odin with Kies installed in the system at the same time, various failures and critical errors may occur. Therefore, after installing the drivers, Kies must be uninstalled.


Step 2: Put the device into download mode
Odin is able to interact with a Samsung device only if the latter is in a special Download mode.


Step 3: Firmware
Using the Odin program, installation of single and multi-file firmware (service), as well as individual software components is available.
Installing single-file firmware
- Download ODIN program and firmware. We unpack everything into a separate folder on the C drive.
- Run Odin as Administrator. The program does not require installation, so to start it you need to right-click on the file Odin3.exe in the folder containing the application. Then, in the menu that opens, select the item "Run as Administrator".
- We charge the battery of the device at least 60%, put it into the mode "Download" and connect to the USB port located on the back of the PC, i.e. directly to the motherboard. When connected, Odin must identify the device, as evidenced by the filling in the blue color of the field "ID: COM", display in the same field of the port number, as well as the inscription "Added !!" in the log field (tab "Log").
- To add a single-file firmware image to Odin, press the button "AP" (in versions One up to 3.09 - button "PDA")
- We indicate the program path to the file.
- After pressing the button "Open" in the Explorer window, Odin will start to check the MD5 amount of the proposed file. Upon completion of the hash check, the name of the image file is displayed in the field "AP (PDA)"... Go to the tab "Options".
- When using single-file firmware in the tab "Options" must be unchecked except F. Reset Time " and "Auto Reboot".
- Having determined the necessary parameters, press the button "Start".
- The process of writing information to the device memory sections will begin, accompanied by the display of the names of the recorded sections of the device memory in the upper right corner of the window and filling in the progress bar located above the field "ID: COM"... Also, in the process, the log field is filled with inscriptions about the procedures taking place.
- Upon completion of the process, the inscription is displayed in the square in the upper left corner of the program on a green background "PASS"... This indicates the successful completion of the firmware. You can disconnect the device from the USB port of the computer and start it by long pressing the power button. When installing a single-file firmware, user data, unless it is explicitly indicated in the Odin settings, in most cases is not affected.

Necessarily! If installed, uninstall Samsung Kies! We follow the path: "Control Panel" — "Programs and Features" — "Delete".


Installing multi-file (service) firmware
When restoring a Samsung device after serious failures, installing modified software, and in some other cases, you will need so-called multi-file firmware. In fact, it is a service solution, but the described method is widely used by ordinary users.
Multi-file firmware is called because it is a collection of several image files, and, in some cases, a PIT file.

Firmware with PIT file
The PIT file and adding it to ODIN are tools used to repartition the device memory into sections. This method of carrying out the device recovery process can be used in conjunction with both single-file and multi-file firmware.
The use of a PIT file for flashing is permissible only in extreme cases, for example, if there are serious problems with the device's performance.


Installing individual software components
In addition to installing the entire firmware, Odin makes it possible to write to the device individual components of the software platform - the kernel, modem, recovery, etc.
For example, consider installing custom recovery via ODIN.

It should be noted that the above methods of working with Odin are applicable for most Samsung devices. At the same time, they cannot claim the role of absolutely universal instructions due to the presence of a wide variety of firmware, a large model range of devices and small differences in the list of options used in specific applications.