Friends, a lot of letters come with the question of how to properly reinstall or update the Windows 7 operating system and what is the actual difference between these two concepts.
Letter No. 1. Please clarify a question that is vague for many, than reinstalling Windows 7 is different from the update and which is better to prefer? The operating system 7 installed in me behaves extremely unstable, it takes a long time to load, many programs have stopped installing, sometimes errors of this content appear, for example, some system file or dynamic library is missing. Rolling back with a restore point a significant amount of time back did not help. I do not want to reinstall again, since many programs are installed. You said in your comment that you need to restore system files, put things in order at startup, optimize Windows 7, or, in extreme cases, update or reinstall Windows 7, but unfortunately I have not heard anything about the latter.
I would like to know, firstly:
How to actually carry out this update or reinstallation of the operating system and what will happen to my personal files on the system partition, will they disappear?
Second: they say that the update is launched only from a running operating system. Is it so? After all, in XP it was possible to launch an update even when the system did not boot at all. Thank you in advance, Pavel.
Reinstall Windows 7
To make everything clear to you, I will guide you through the process of updating my operating system, and then I will show you how to reinstall Windows 7 in two ways and you will see everything with your own eyes, but first I will explain to you what an Update is and Reinstall Windows 7.

What is Windows 7 Update?
this is an installation of the system over the old one, that is, you insert the disk with the Windows 7 distribution and start the installation of the system right in the working seven, but in the installation menu you choose not a full installation, but an update. What does it give?
First of all, the damaged system files will be replaced, the working system files will not be replaced, with your own personal data: installed applications, documents, music, nothing will happen, all your programs will start and your entire economy on all disks will remain intact. Also, user accounts will be transferred without changes, all this will be done by the tool - Windows Transfer Tool (very important files, it is still better to transfer manually). I also want to say that you will have to re-enter the product key, select the language, region, set the time, and so on. Warning. If you have an unlicensed Windows 7, then after the update you will have a window in the lower right corner of your desktop warning that your copy of Windows is not genuine.
- Another frequently asked question is how Data Transfer works? When updating Windows 7, temporary folders of your data will be created containing information about accounts and user settings, your email, files in the "Favorites" folder, personal files and user folders - music, images, videos, as well as settings for installed programs ... As your system is updated, all data will fall into place, and temporary folders will be deleted. When upgrading, the Transfer Tool does not allow the user to select the files to transfer, but when reinstalling, you can choose what you want to transfer (more details below).
Will the update solve all your Windows 7 problems? In most cases, Yes, but unfortunately no one can guarantee a 100% result here. In my opinion, if possible, it is better to delete and reformat a partition with a poorly working operating system, first transferring all important files to other hard drive volumes or a USB portable media and reinstall the system with all the programs.
- Note: Windows XP has the same update mechanism and you can run it both in a running operating system and in those cases when you cannot log into Windows XP due to problems, then you can boot from the XP installation disk and select setup menu option,. Be aware that, unfortunately, there is no such possibility in Windows 7 and the update can only be carried out in a working operating system.
What is reinstalling Windows 7?
Reinstallation is a complete replacement of all operating system files, that is, formatting a partition with an unstable system and installing Windows 7 again. Naturally, all your files and the system itself from the disk (C :) will be deleted. In order to transfer all your files from the system drive (C :), you will need to use Windows Easy Transfer, but it will no longer work automatically, as in the case of an update, but we will use it ourselves and what we need to transfer from the old system to the new one, we will also choose ourselves.
- Now the question arises: What is the difference between reinstalling the system and reinstalling it? Friends are simple here. When reinstalling Windows 7, if you wish, you can use the File Transfer Tool, since you already had the system once installed, but with a simple reinstallation of the system, you install the system on the partition of the new hard disk you created. In short, I don’t know how to explain it more clearly!
But what can I say, let's first update my Windows 7 together, and at the end of the article we will reinstall the system using the file transfer tool, it has also been working with errors for me lately and you will see it with your own eyes, and then choose what you need.
Windows 7 update
We insert the installation disk with Windows 7 into the floppy drive, if you do not have autorun, click setup.exe.

Before updating, we can connect to the Internet and download the latest updates from the official Microsoft website

Choose Update

Compatibility check

Copying Windows Files

Collecting files, settings and programs, Unpacking Windows files, Installing components and updates, Transferring settings and programs files


The computer restarts.
At this point, you need to boot from your hard drive, and not a bootable USB flash drive or boot disk with Win 7.
Updating registry settings

Enter the key


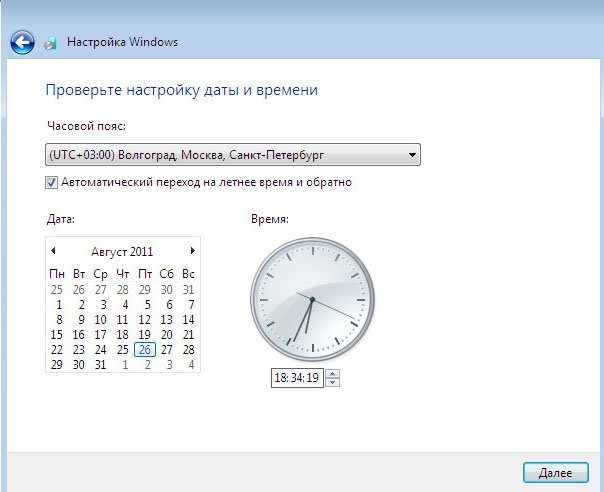
We set the time
The update process is completed, the accounts are saved

All the files are in my place, all programs are launched.

Reinstall Windows 7
Now let's find out what Reinstalling Windows 7 is. According to the rules, we will reinstall Windows 7 on the same disk on which the old operating system is installed. If earlier Windows was installed, for example, on the (C :) partition, then you also need to reinstall it on the (C :) partition and NO to any other partition (otherwise this will already be the installation of the second operating system). All your files on the (C :) partition will be replaced by the files of the newly installed Windows 7 operating system.
- First of all, we will launch the Data Transfer Tool, which will copy all our personal data from the Windows 7 partition to a portable media or another hard disk partition, then boot from the Windows 7 installation disk (how to set it to) and reinstall the system. Immediately after installing Windows 7, we will launch the Data Transfer Tool and copy back all our files, as a result, we will receive with you a new operating system and all our data: music, documents, personal folders, and so on.
- Note: You may ask: Can't start installing a new system directly from running Windows 7 and not go into BIOS. Answer: This method is given at the end and we will also consider it.
Let's now see what the Data Transfer Tool will transfer from our files, launch it.
Start, write in the input field Data transfer tool

In this window, we see detailed information about which files we can transfer from the old operating system to the new one, now we will choose.

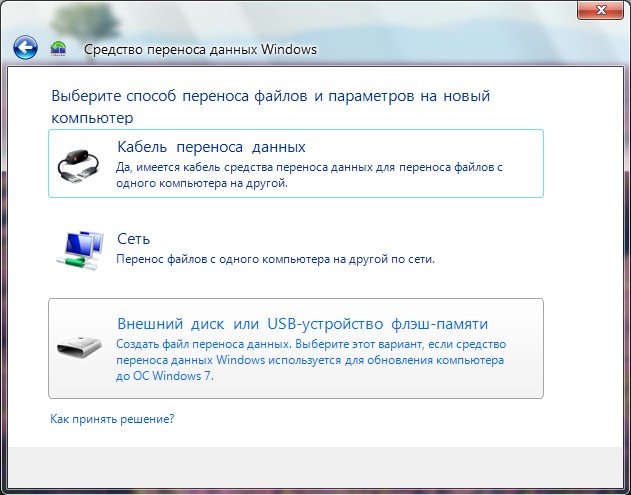
The data port invites us to use:
- Data transfer cable - a cable specially designed for this purpose, which still needs to be purchased, is used to transfer files between two computers, in principle we do not need this, because we have one computer.
- Network - Transferring files over a network is also not our option.
- External drive or USB flash drive. What we need. If you don't have much data, you can even use an 8GB or 16GB flash drive. By the way, if you do not have a flash drive or a USB portable drive, you can use another partition of your hard drive for storage, like me.
So you have selected External drive or USB flash drive, and I am the partition on the hard drive (D :).
We select This is my original computer, that is, the data needs to be transferred from it.

The data that can be transferred to the new system is analyzed in paragraph Usernames and General Elements, click Settings, and if you click Advanced, you will see a full picture of what Data Transfer will include in the archive.

Please note that the archive includes the folders of both operating system users and personal data, this is correct. But the data on all partitions of the hard disk, except for the system (C :), we definitely do not need to transfer, since we will reinstall Windows 7 located on (C :) and the reinstallation process in our case will affect only the system partition ( FROM:). We remove the check marks from all hard drives.


However, if you decide to transfer data from all partitions, then you can leave the checkboxes unchecked, just keep in mind that the data transfer file in this case will take up a very large volume.
What else does not need to be included in the archive that the Data Transfer creates? For example, you may not include the C: \\ Program Files folder, it will be safer to reinstall all programs after reinstalling Windows 7.
So click Save, you can assign a password


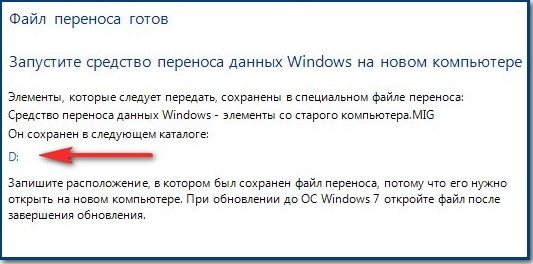
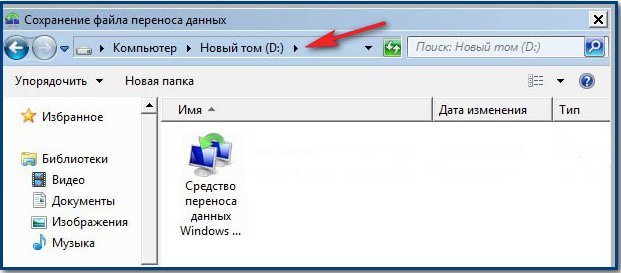
The files are being transferred. A migration file with the extension (MIG) is created on disk (D :)
Now it's the turn to reinstall Windows 7, insert the installation disc with the seven into the drive and reboot, at the beginning of the installation it is better to click on the Disk Setup button and select Format the partition from the previous Windows 7, but in general the whole process is step by step, starting from changing the priority of the boot device in the BIOS and before installing the operating system itself, is described in our article.
I think you've done it and installed the system, now let's use our Data Transfer Tool again.

Let's select This is my new computer (you need to transfer files and settings to this computer)

Your external hard drive with the data transfer file should already be connected.
I, in turn, indicate the partition of the hard drive (D :), the transfer file is located there.


We can click Settings and select files for transfer to the new system manually, as we have already done with you, or simply click Transfer.
In today's article we will consider the issue of reinstalling the operating system (hereinafter referred to as OS) Windows 7.
Most users greatly exaggerate the complexity of reinstalling Windows 7, in reality this process is quite simple, the main thing is not to rush and carefully follow the recommendations outlined in the article.
So let's get started.
Step 1. Back up your data
Before reinstalling Windows 7, you need to copy all important data from the system drive.
As a rule, these are the contents of the standard folders Videos, Documents, Downloads, Pictures, Music, Desktop, etc.


In the BIOS menu, we need to select boot from the DVD drive, save the changes, after which the computer will reboot.
After all the manipulations in the BIOS, it will boot not from the computer's hard drive, but from the installation one.
If everything is done correctly, then after rebooting you should see the following image on the monitor screen:

Step 3. Reinstall Windows 7
At this stage, the contents of the installation media are loaded into the computer's RAM.
The following 2 screenshots show the initialization of the Windows 7 installer:


Starting from this window, we have the opportunity to customize our OS.
At this stage, we can select the language (the "Set language" field), the display of the time format (the "Time and currency format" field), the keyboard layout or the input method on the tab of the same name.
As a rule, there is no need to change anything here and you can safely press "Next".

And if this item was not performed initially, you should restart the computer, go into the BIOS, select boot from the hard disk, perform a backup, and then do all the previous steps again.
If all data is saved, select the system drive and click "Format".
Important: Do not confuse the system drive where the OS is installed and the logical drive (s) where you store data. In our case, "Partition 2" is the system drive, "Partition 3" is the logical drive on which the data is stored.

The system once again warns that all data on the disk being formatted will be deleted. Click "OK".


After that, the direct installation of the OS on the hard disk begins, which is divided into several stages.
At all stages, installation occurs automatically, without user intervention.
Installation time, on average, takes 10-15 minutes and depends on the characteristics of your computer.

 After rebooting, you need to go to the BIOS menu and choose to boot from the hard drive, saving the settings.
If you did not have time to complete the BIOS setup procedure at this stage, it can be done later.
You can remove the installation media and the operating system is installed on the hard drive but not configured.


The next step is to enter the username and PC name. Usernames and PC names can be absolutely any; they can contain uppercase or lowercase Latin and Cyrillic letters, numbers.
To switch the language, use the layout switching panel (located at the top). Click "Next".

Hello dear users!
Surely many of you are interested in how to quickly and without errors install the Windows 7 operating system on your computer using a boot disk. We can say in advance that this operation is much easier than it might seem at first glance - in just a few minutes you will learn how to configure the BIOS bootloader to install the system from various media and perform the initial OS configuration.
Immediately after reading, you can easily put a fresh system on your PC - a step-by-step installation of Windows 7 from a disk will become simple and as accessible as possible for you.
PREPARING THE LOADER
So that when you turn on the computer, it starts to boot from the media on which the OS you need is installed, you need to correctly configure the bootloader. To do this, we perform the following simple steps:
1. Turn on your laptop, insert the disc into the drive, and then restart the device.
2. When the PC boots up, press the key DEL... In different versions of BIOS, these can be keys F2 or F11.
3. In the window that appears, select the item called Boot, located in the top menu.
4. Select the item "Boot Device Priority" in the opened list
5. In line 1 Boot Device- press Enter and select CD-ROM Drive this is your Windows 7 media.
After configuring the BIOS menu, press the key F10 and confirm saving of actions. As soon as you do this, the device will reboot and the boot process will go, in other words, the installation will begin.
PUT OS ON PC
The installation program for Windows 7 is designed in such a way that it does not cause problems for most people - this is facilitated by an intuitive interface and a step-by-step structure. Despite this, in some points you can get confused, and to prevent this from happening, carefully study the presented order:
1. After the PC boots up, wait for a black window with the words "Press any key to boot from CD or DVD" to appear. To continue the process, press any key on the keyboard and wait for the OS files to load.

2 On the program page that opens, select the desired language, currency format, and keyboard layout - (default parameters). After that click on the "Next" button.

3. On the page that opens, select the "Install" item. If you are an advanced user who needs to restore the old OS instead of installing a new one, pay attention to "System Restore".

4. Select the Windows version in the next window, then confirm the action with the "Next" button.

5. Read the software license agreement and continue.

6. On the new page, click "Full Installation", then select the drive partition for the subsequent installation of Windows 7. Before that, do not forget to format the desired partition.

After confirming the drive selection, the operating system will begin installing on the device. Progress will be displayed as a percentage. When the installation is complete, the program will require a reboot, which, in the absence of user action, is performed automatically. Now let's move on to setting up.
BASIC SETTINGS
The following instructions for setting up the OS delivered on a PC will help you understand the basic parameters:
Fill in the lines with the names of the user and computer - here you can show your imagination.

In the next window, set a password for accessing the PC and a hint. You can also skip this item.

Enter the activation code to confirm the registration of the OS, if you have a licensed version.

Select the appropriate system security options for you in the next window.

Set the time, time zone, and current date.

The last item is the choice of Internet connection parameters. For a home PC, it is advisable to select the home network settings. After that, the OS saves the settings and can be considered installed. You can also install Windows directly from under the working system.
To do this, simply insert the carrier with the "seven" into the drive and follow the instructions of the program. Remember that you cannot format the drive in this way, so it is not recommended to choose this method - it is better to prefer installing Windows from the BIOS.
Reinstalling Windows 7 is done in the same way as described above - there is nothing difficult in this process. After all this, it will be useful for you to read the article: This is where I end.
Let's digress a little from the topic. Guys, a cool clutch wallet for a gift or for personal use is a great option. Of course, there are departments for money, many departments for cards, you can put a driver's license. Positive reviews, great price!
Self-installation of Windows 7 made easy
Sooner or later, everyone faces the need to install an operating system on a PC or laptop. Someone, without making any attempts to figure it out, calls a master for this, and someone else decides to do everything himself and in the end wins - saves money and gains useful experience. Why do some users lack the determination to install Windows? Most likely, for fear of breaking something, losing valuable data, or ... because at the right time there was no clear instruction at hand.
Is it difficult to put Windows on your computer yourself? Is it possible to damage the hardware during installation or permanently lose information on the hard drive? We answer:
- installing the system is absolutely easy - the installation process of Windows of the latest releases (7 and 8) is as automated as possible and practically does not depend on the user (with the exception of individual user settings);
- the only way to damage the data is by mistakenly formatting the wrong partition where the OS will be installed (we will focus on this point);
- physical breakdown of hardware devices due to failures of OS installation - excluded. Even if the electricity is cut off at this time, the only problem will be the need to install Windows again.
Failures during the installation of Windows 7 are rare: in 90% of cases, everything goes smoothly from start to finish. Unlike other types of operating systems, a novice user, who has never dealt with this before, will be able to put the “seven” on a computer. And the instructions we have prepared will help you figure it out.
Preparing to install the "seven"
DVD-disks and flash drives are most often used as OS distribution media. A pre-made Windows 7 disc can be purchased in stores, but many users choose to create one themselves.
It doesn't take much to burn the installation CD:
- blank DVD;
- an optical drive on a computer (built-in or external);
- program for burning discs (UltraISO, Nero, Daemon Tools, etc.);
- distribution kit in * iso format.
You don't need to do anything with the iso file beforehand - it is transferred to the disk as it is.
To prepare the installation flash drive you will need:
- the drive itself, with a capacity of 2 Gb or more - depends on the size of the distribution;
- windows 7 distribution as an iso image or on DVD, as in the previous case;
- program for creating installation flash drives, for example, WinSetupFromUSB, Rufus, UltraISO, Windows 7 USB / DVD Download Tool from Microsoft, etc.
Let's look at the procedure for creating an installation USB stick using a tool from Microsoft. It takes place in 4 stages.
- Run the pre-installed Windows 7 USB / DVD Download Tool. Specify the location of the "seven" distribution kit (iso file).

- Select the type of drive (in our case, it is a USB device).

- From the list of available drives, select a USB flash drive of a suitable capacity and click “Begin copying”.

- Wait until the files are copied.

After that, the flash drive will be ready to install Windows.
Installing Windows 7
BIOS setup
Before installing the system, you need to slightly change the BIOS settings of your computer - assign a DVD-disk or USB-flash drive as the first boot device.
To do this, immediately after turning on the computer, you need to hold down the key assigned to enter the BIOS Setup. For different manufacturers, it can be F2, F4, F10, F12, Delete or something else - more precisely, you can find out from the instructions for the motherboard or the inscription under the logo of its manufacturer, which appears first on the screen after starting the PC.

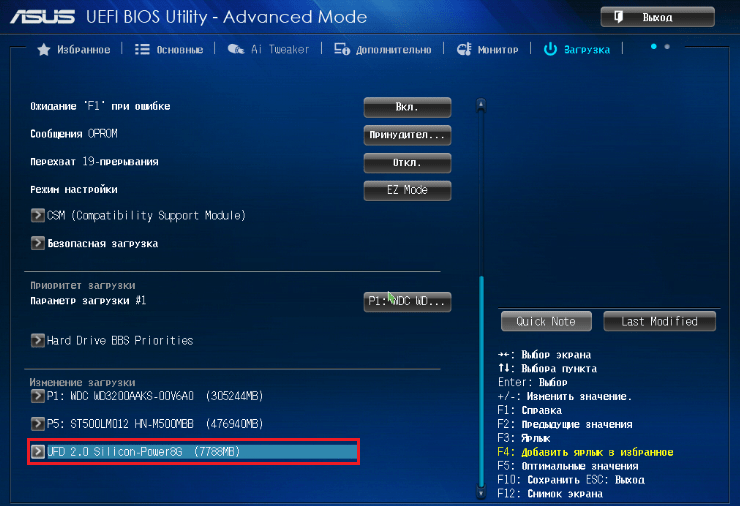
In the console interface of older BIOS versions, as well as on laptops, the keys used to navigate and select the desired menu items are indicated at the bottom of the screen.
In the UEFI graphical menu, all operations can be performed using the mouse.
The main part of the installation
Having reconfigured the order of boot devices, proceed to installing Windows. If you are going to install "Windows" from a DVD-disk - mark it in the drive, if from a USB flash drive - connect it to a free port and restart the computer.
After restarting you will see the following picture.

Everything here is intuitively clear - from the lists of this screen you need to select the language in which your Windows 7 will "speak". The further installation process and all dialogues will be conducted in the selected language.

Accept the license agreement.

The next window will ask you to choose the type of installation - update or full. The update is available only when a copy of Windows 7 or Vista is already installed on the PC and the installation disc is launched from under it. In all other cases, you must choose a complete (clean) installation.

Next, you have to select a hard disk partition where Windows will be installed. If it is divided into several partitions and some of them store important data, in the course of further actions, be extremely careful: formatting, deleting and breaking partitions into parts will destroy all information on them.
When installing the system on a disk that has an MBR structure (in most cases such disks are used for Windows 7), the system partition must be of the “Primary” type.
Click the “Disc Setup” button.

Here, using the menu at the bottom of the window, you can control the size of the partitions (shrink and expand), as well as delete them, create new ones and format them.

If you want to completely free the partition where you will put the "Windows", click "Format" and agree to the destruction of all data.

In the case when the information in the system partition needs to be saved, continue the installation without formatting. The old copy of the Windows directory will be renamed to Windows.0, and all files in the partition will remain in place.
After choosing a place to install Windows, click the "Next" button.

Now, we can assume that the main work is over. The next step is copying files and installing Windows itself. During this "action" the PC will be rebooted several times without your participation, and after 25-30 minutes the system will notify you of the end of the installation by inviting you to make the initial settings.
Completing the installation and initial configuration
After installation, you need a little more of your input to make the initial settings. In the first window, you need to specify the name of the user account, as well as the name of the computer.


Next, you will be asked to enter your product key. If you do not have it, you can skip this item.

Set security settings.

Select time zone, set time and date.

When connected to a network, you can immediately configure your network location. If you install Windows on your home computer, choose your home network. If using a public connection, choose a public one.

After that, it will take a little more time to apply the settings. From the moment the desktop opens - your “seven” is completely ready to work. As you can see, putting Windows on your computer turned out to be quite easy.

The next mandatory step should be to install the drivers - without them you will not be able to get Windows and hardware to work properly. Next, you need to download and install the Servise Pack 1 update package, install an anti-virus program and you can fill the G7 with software.
How to install Windows 7Topic self-install Windows, one of the most popular among computer and laptop users.
Sooner or later, everyone is faced with the need to install or reinstall their operating system and then the search for friends begins who can do this. It is not uncommon for such acquaintances to provide this service for money, but there is a demand for where to go in the market, which means that you can make money on it.
Well, I suggest you learn how to cope with this task yourself and no longer spend money on it. To install, we need a disk or flash drive with the Windows distribution kit. Articles that can be useful if you do not know how to burn a disc and how to set the boot to CD-ROM:
- How to burn a disc image quickly
- How to put a boot disk in BIOS
- How to set boot from a flash drive in BIOS
- How to extract files from an ISO image
- How to create a bootable USB flash drive with Windows
So, if you have everything ready, then you can proceed. I will give one piece of advice, if you are installing Windows on a laptop, then write off the product key immediately so that you do not turn it over during the installation process.

I will install Windows 7 from a flash drive, the settings in the BIOS are set, so immediately after restarting the computer, the installation begins. If you are installing from a CD, then at the very beginning, you may have to press any key on the keyboard to confirm the launch of the installation

At the very beginning, we are offered to choose a language, I leave "Russian" and click "Next"

Everything is clear here, one button "Install"

We accept the terms of the license

At this step, we are asked to choose whether to update the existing Windows or make a new (full) installation, I choose the second option

Be especially careful here, my hard drive is divided into two (C :) and (D :), as well as a small system partition, 100 Mb in size. For a correct installation, if you are reinstalling an existing system, I recommend formatting the system drive where Windows is already installed and this small partition. I transferred all important data to the disk (D :) in advance, I do not touch it! Click on the link "Disk settings"

Now, one by one, I select the necessary disks and click "Format" (Be careful, all data will be permanently deleted, save them in advance!)


The required disks have been formatted, proceed to installation, click the "Next" button

The process of installing data from a disk (flash drive) starts

At the end of the process, the system will automatically reboot, at this moment do not forget to set the default settings in the BIOS or remove the USB flash drive, otherwise this stage may be repeated :)

We see the familiar installation window, we sit and wait, we do not touch anything, the computer will restart itself

After the reboot, the equipment will be automatically checked and configured.

The final stage of the installation, here we need to enter a username and come up with a computer name, a username, as you guessed, you also need to come up with, you can write your own :)

You can immediately screw up your account, just just in case, write down the password somewhere, they often forget it later

In this window, you need to enter the same (license) product key that is on the sticker on the bottom of the laptop or on the system unit. Click "Next"


Checking if the date and time are correct

Windows finishes applying parameters

Done, the desktop appears, the installation is complete!

Now all that remains is install drivers and necessary software ... As you can see, everything is very simple, now you can earn money by installing only licensed software!


