Using the Basic Input Output System, your computer's hardware is tested and configured, and the operating system is loaded. Resetting the BIOS settings to factory settings differs from resetting them to default only in that it resets the time in the BIOS.
The most common cases when a PC user may need to reset the BIOS:
- Startup errors or computer malfunctions.
- The PC does not turn on at all.
- Critical errors made when setting up the BIOS.
- If you have set and lost a password to enter the BIOS.
- You need to reset or boot the OS.
- A user of a used computer wants to configure it correctly.
Sometimes resetting the BIOS is the only way to resolve the problem of your computer starting or not working correctly.
How to reset using the menu
 If there is access to the BIOS when turning on the PC, the user can reset bios on computer by changing CMOS Setup Utility. Use the settings window enable button to enter the menu. Motherboard manufacturers and BIOS manufacturers use different hotkeys. If the button name is not indicated in the start launch window, use the Del key; in case of an error, use the F2, F1, F8, F10 keys in turn until the system menu appears on the screen.
If the user knows the BIOS version of the motherboard, resetting the BIOS on a laptop or computer will be much easier.
How to rollback BIOS settings in Award Bios
Find the menu item “Load Optimized Defaults”, place the cursor on it and press Enter, confirm the selection “OK” using the arrows and the Enter key.
Use the keyboard to navigate to “Save & Exit Setup” and select with the Enter key; It will reboot with the default BIOS settings.
How to reset Phoenix Bios to factory settings
Using the keyboard, go to the “Exit” tab in the top menu and select “Load Setup Defaults” by pressing the Enter button. In the confirmation window, select “OK” and click.
After that, select Exit & Save Changes from the menu and press Enter. When asked for confirmation, answer “OK”. The computer will start with standard settings.
Reset for ASUS UEFI
Find the item “Default (F5)” in the lower right corner and select (Enter key). In the window that appears, confirm your choice: go to “OK” and press Enter.
In the main menu that opens, go to “Exit/Advanced Mode” (in the upper right corner), select it, and then set the cursor to Save Changes & Reset and press Enter.
The machine will reboot with the default BIOS settings.
Reset settings to factory defaults in ASRock UEFI
 Find the “Exit” tab in the top menu and go to it using the keyboard. Find “Load UEFI Defaults” and select this menu item. Answer “Yes” in the “Load UEFI Defaults?” confirmation window.
Go to the menu item “Save Changes and Exit”. Answer affirmatively to the question “Save configuration changes and exit setup?” (select “Yes”).
will happen resetting BIOS settings and reboot the computer.
In the main menu tab “Mainboard settings” (“Settings”) go to “Save & Exit”. Select “Restore Defaults” from the menu. Confirm the action “Load Optimized Defaults?” - answer “YES” in the window that appears.
To exit and save the settings, select “Save Changes and Reboot”. Answer “YES” to the question about rebooting - Save configuration and reset.
The computer will restart with default settings.
Hardware reinstallation
In addition to many advantages, the hardware method of resetting the BIOS has one very important drawback. If the computer's warranty has not yet expired, you cannot break the seals from the system unit case. Since resetting the BIOS requires access to the system board, you will need to open the system unit.
Disassembly order:
- Find the power supply button on the system unit case and turn it off. If the button is missing, you need to remove the power cord from the connector.
- Disconnect peripheral devices from the PC.
- To remove the side panel of the personal computer case, you will need to unscrew the bolts using a Phillips screwdriver and remove it from the grooves.
- First remove the DVD drive and power supply from the laptop; Unscrew the fastening bolts and remove the back cover.
- All hardware that interferes with working with the motherboard must be removed.
Jumper reset
Find the switch called Clear CMOS, CLRTC, CCMOS, CL_RTC, CL_CMOS near the battery; on a laptop it may be located under it. Using a jumper, you can change the operating mode of the device by closing and opening contacts.
Typically manufacturers sell ability to clear CMOS memory in the form of a two-pin or three-pin connector with an installed jumper. You can reset the BIOS by closing the contacts with a jumper. In the case of a two-pin configuration, it is put on 2 pins or removed; for a three-pin configuration, the position is changed: instead of 1-2 there should be 2-3. To discharge any residual electrical charge, press the download button for 12 seconds. After this, you need to return the jumper to its original position.
Resetting with a battery
Find the location of the CR2032 battery on the system board and remove it from the connector. You can remove the battery by pressing the holder or latch. To save CMOS data, constant power is required; If the battery is missing for 24 hours, the BIOS will be cleared.
After the battery is removed, the PC power button is pressed for 15 seconds, which leads to the computer being completely discharged from the accumulated electrical charge. The BIOS settings are being reset.
The battery is inserted into the connector with light pressure. Screw the cover back onto the system unit, connect the power cord and turn on the power supply. When booting the computer from the BIOS, set the time, new password and other settings.
Problems arise when removing the battery on some motherboard models: additional tools may be required, or the battery may not be removable; do not try to remove it by force. On some laptop models, there may be neither a jumper nor a removable battery, or it may be difficult to disassemble.
In addition, on high-quality motherboards, the BIOS can be retained for a long time even after removing the battery from the connector. Therefore, it is better to reset the settings in another way.
As for how to reset the BIOS settings to factory settings using a button, there is a special button for clearing BIOS settings on a premium class. If you find a CLR CMOS button on the board, unplug the power cord, turn off the power and BIOS press the button. The BIOS will be reset instantly. You can reboot and check the settings.
Software method
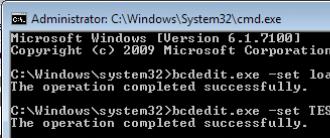
Use an MS-DOS boot disk or a Windows installation disk that provides command line loading.
You can do without boot disks if you have the ability to log into Windows as an administrator.
To reset the BIOS, enter the following commands:
For Phoenix BIOS:
- DEBUG;
- -O 70 FF;
- -O 71 FF;
For AMI BIOS and AWARD:
- DEBUG;
- -O 70 17;
- -O 71 17;
Entering all commands is completed by pressing “Enter”.
After restarting the computer, a CMOS error message will appear and a prompt to change the BIOS settings. The BIOS will be reset, then you can restore the factory settings or configure the BIOS on your computer. The advantage of the software method is that the user can do without opening the system unit.
It’s rare to find a working computer that has not experienced hardware failures over a long period of use. The following picture is often observed: after pressing the power button, power is supplied to the motherboard, coolers are spinning, hard drives are working, but there is no characteristic sound produced by the motherboard, as well as images on the screen. Under such circumstances, users immediately agree to have their PC diagnosed and repaired at service centers. But before you waste time and money, try resetting the BIOS on your computer, returning the motherboard to factory settings.
Why reset BIOS settings?
Resetting (resetting) BIOS settings helps in the following situations:
- The computer turns on, but there are no sounds made by the motherboard when loading the BIOS. Also images on the screen.
- You have forgotten the password to enter the BIOS (or the password to continue booting the OS).
- Periodic crashes in the PC, the BIOS loads every once in a while.
- Windows won't boot.
- Changes have been made to the BIOS Setup settings configuration and you want to return them to their original form.
Reset on PC
You can reset BIOS settings either hardware or software.
Hard reset
Depending on the motherboard, you can reset the BIOS by hardware using a jumper or a special button.
Jumper
Cheap motherboards (for example from ASUS) suffer from periodic glitches. Since the BIOS did not boot, you will have to reset using a jumper marked Clear CMOS:
- Turn off the power supply (so that the standby voltage of 5 V does not flow to the motherboard).
- Open the system unit to access the motherboard.
- Look for the Clear CMOS marking near the jumper pins (may be labeled CCMOS, Clear RTC, CLRTC, CRTC). Look for batteries in the area.


- Turn on the power supply. We check the work.
Advice! If there are more than 3 jumpers, don't worry. Close the required contacts from left to right, as indicated in the instructions. Subsequent contacts do not need to be closed.
Button
Modern or mat. Premium boards are increasingly equipped with a button to reset the BIOS settings:

Advice! If you remove the battery for 10 - 20 minutes, the BIOS may reset the settings. The date and time will also be lost and you will have to set it again.
Soft reset
If the BIOS boots, a factory reset can be done using the commands.
In BIOS Setup
Using the Debug utility
The Debug.exe utility is part of the Windows family. The debugger migrated from DOC OS. To use it, press Win+R and run the command
- If you have AMI BIOS or AWARD, enter the following commands: O 70 17 O 73 17 Q
- For Phoenix BIOS: O 70 FF O 71 FF Q
Important! Debug.exe is only available on 32-bit versions of Windows. If you have the x64 version, use other methods to reset BIOS settings.
Resetting on a laptop
The procedure for resetting the BIOS on a laptop is similar. The only difficulty is that the laptop is compactly equipped and getting to the motherboard is not so easy. If software zeroing occurs exactly like this, then for hardware we do the following:
- Disconnect all peripherals from the laptop (including the charger) and turn it over with the screen down.

- Remove the back cover, remove the battery, hard drive, and RAM cards.
- If there are two of them, close for a few seconds with a metal jumper (for example, a screwdriver, just be careful). If there is a jumper, short-circuit the other contacts for a few seconds. .
- Assemble your laptop and check your work.
Instead of jumpers, the laptop may have a reset button. Using a pencil or pen, press and hold for a few seconds.
It happens that after making changes to the settings, the computer begins to work unstable or refuses to start at all. This is unpleasant, but completely fixable.
You just need to reset the BIOS settings to factory settings and then try to optimize them again. So, let's look at two options for resetting the BIOS and its settings.
- First option useful if the machine starts and you can go into settings BIOS. To return them to the factory state, in the Exit section, select Load Setup Defaults. This action will reset all BIOS settings to their original values. As a rule, with such settings the machine operates stably. Different versions of BIOS settings have different reset options. For example, sometimes you may encounter parameters such as Load Optimized Defaults(Load optimized default settings) or Load Fail-Safe Defaults(Load secure defaults). The first parameter allows you to get a more productive configuration, the second - more resistant to failures.
- Second option will help you if, as a result of the settings changes made, you cannot start the computer or access the BIOS settings at all. Any motherboard allows you to hardware reset the BIOS settings to factory settings, to their original value.
How to reset BIOS (Clear CMOS)
Also so that reset BIOS You need to find in the documentation for the motherboard the location of the button or contacts called Clear CMOS. The contacts must be briefly closed using any suitable metal object, such as a screwdriver. The button, which is typical for expensive motherboard models, just needs to be pressed and released.

If for some reason you do not have documentation for your motherboard, try to find the Clear CMOS inscription on the board itself (sometimes abbreviated CLR CMS). Typically, such a button or contacts are located near the battery installed on the motherboard.
It’s rare to find a working computer that has not experienced hardware failures over a long period of use. The following picture is often observed: after pressing the power button, power is supplied to the motherboard, coolers are spinning, hard drives are working, but there is no characteristic sound produced by the motherboard, as well as images on the screen. Under such circumstances, users immediately agree to have their PC diagnosed and repaired at service centers. But before you waste time and money, try resetting the BIOS on your computer, returning the motherboard to factory settings.
Why reset BIOS settings?
Resetting (resetting) BIOS settings helps in the following situations:
- The computer turns on, but there are no sounds made by the motherboard when loading the BIOS. Also images on the screen.
- You have forgotten the password to enter the BIOS (or the password to continue booting the OS).
- Periodic crashes in the PC, the BIOS loads every once in a while.
- Windows won't boot.
- Changes have been made to the BIOS Setup settings configuration and you want to return them to their original form.
Reset on PC
You can reset BIOS settings either hardware or software.
Hard reset
Depending on the motherboard, you can reset the BIOS by hardware using a jumper or a special button.
Jumper
Cheap motherboards (for example from ASUS) suffer from periodic glitches. Since the BIOS did not boot, you will have to reset using a jumper marked Clear CMOS:
- Turn off the power supply (so that the standby voltage of 5 V does not flow to the motherboard).
- Open the system unit to access the motherboard.
- Look for the Clear CMOS marking near the jumper pins (may be labeled CCMOS, Clear RTC, CLRTC, CRTC). Look for batteries in the area.
- Turn on the power supply. We check the work.
Advice! If there are more than 3 jumpers, don't worry. Close the required contacts from left to right, as indicated in the instructions. Subsequent contacts do not need to be closed.
Button
Modern or mat. Premium boards are increasingly equipped with a button to reset the BIOS settings:
Advice! If you remove the battery for 10 - 20 minutes, the BIOS may reset the settings. The date and time will also be lost and you will have to set it again.
Soft reset
If the BIOS boots, a factory reset can be done using the commands.
In BIOS Setup
Using the Debug utility
The Debug.exe utility is part of the Windows family. The debugger migrated from DOC OS. To use it, press Win+R and run the command
- If you have AMI BIOS or AWARD, enter the following commands: O 70 17 O 73 17 Q
- For Phoenix BIOS: O 70 FF O 71 FF Q
Important! Debug.exe is only available on 32-bit versions of Windows. If you have the x64 version, use other methods to reset BIOS settings.
Resetting on a laptop
The procedure for resetting the BIOS on a laptop is similar. The only difficulty is that the laptop is compactly equipped and getting to the motherboard is not so easy. If software zeroing occurs exactly like this, then for hardware we do the following:
- Disconnect all peripherals from the laptop (including the charger) and turn it over with the screen down.
- Remove the back cover, remove the battery, hard drive, and RAM cards.
- If there are two of them, close for a few seconds with a metal jumper (for example, a screwdriver, just be careful). If there is a jumper, short-circuit the other contacts for a few seconds. .
- Assemble your laptop and check your work.
Instead of jumpers, the laptop may have a reset button. Using a pencil or pen, press and hold for a few seconds.
The user has access to a large number of different settings that relate to the operation of the computer. Therefore, if they are used carelessly, the computer may begin to work unstably or may not start at all. In this case, you need to reset the BIOS to factory settings. In this material we will talk about how to reset the BIOS settings to factory settings and thereby correct unstable computer operation.
Resetting BIOS settings via BIOS Setup
The easiest and safest way to reset the BIOS settings to factory settings is to use a special option in the BIOS settings themselves, that is, in BIOS Setup. In any BIOS version there is always an option that allows you to return to factory settings; you just need to activate it, confirm the reset and exit the settings, saving the changes. After restarting the computer, it will start working with factory settings.
Using this method, you do not risk damaging your computer, so it should be used whenever possible. The remaining reset options involve some risk and can damage something if done incorrectly. Therefore, they are only for emergency cases when the computer does not turn on.
Therefore, if your computer boots and you are able to enter the BIOS, then you must reset the settings through the BIOS Setup interface. To do this, find the menu item that resets the BIOS settings to standard. Typically, this item is located in the “Exit” section and is called “Load Setup Defaults” (Load standard settings).
For example, in the case of PhoenixBIOS, you need to open the “ Exit" section and select " Load Setup Defaults"

And then exit the BIOS saving the settings by selecting “ Exit Saving Changes" and clicking on the " Yes" button.

Some BIOS versions have two options to restore default settings. For example, in the screenshot below you can select “Load Fail-Safe Defaults" and "Load Optimized Defaults". Both of these options work the same, they load the default settings. Only the first option loads a more secure profile, which the computer should work with in any case, and the second option loads a profile with optimal settings.

On modern motherboards with UEFI BIOS there is also always an option that allows you to return the default settings. But, due to the bright and non-standard interface, it may be more difficult to find. For example, the screenshot below shows UEFI from ASUS. Here, to return to standard settings, you need to click on the “Default” button at the bottom of the screen or press F5. Then you need to exit using the “Save & Exit” option or press F10.

Also, on this board from Asus, you can first go into the advanced settings by clicking on “Advanced Mode" or pressing F7. After this, you will need to go to the “Exit” section, activate the “Load Optimized Defaults” option and exit using the “Save Changes & Reset” option.

There are many different versions of BIOS and UEFI, so your experience will vary. But, in general, the reset procedure is always very similar and should not cause you any problems.
Resetting BIOS Settings Using a Jumper
If the computer does not boot or you do not have access to the BIOS, you can reset the settings using a special jumper on the motherboard. Such a jumper is on any board, but it can be located in different places and can be labeled differently. For example, it may be called CLRTC, CLR_CMOS, JCMOS, RESET CMOS, CCMOS, CONFIG, BIOS CONFIG etc. Therefore, if you do not have sufficient experience, it is better to first read the instructions from the motherboard. Such instructions should come with the board, and can also be downloaded for free on the board’s page from the manufacturer’s official website.

In order to reset the BIOS settings using a jumper, you must turn off the computer and completely disconnect it from power. After this, remove the side cover of the system unit and find the jumper on the motherboard. To reset, the jumper must be moved to a different position for a few seconds and then returned back. If there are only 2 reset contacts and there is no jumper, then these contacts just need to be closed for a few seconds.
In addition, some expensive ones may have a special button installed. This button can be located directly on the board or can be placed on the back of the computer, on a panel with ports.

If there is such a button, to reset the settings, it will be enough to simply turn off the computer and press it for a few seconds.
Resetting BIOS settings using a battery
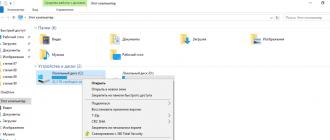
If you are not sure that you have found the right jumper, then you can simply disconnect the battery on the motherboard. By disabling it for just a few seconds, you will reset the settings and return the BIOS to factory settings. This option is quite simple and works in any case.
In order to disconnect the battery, as in the previous method, you must first turn off the computer and completely turn off the power. After that, remove the side cover and find the battery on the motherboard. This is a small CR2032 battery, as a rule, it is located closer to the bottom of it.

Next you need to remove the battery using a screwdriver, wait a few seconds and install it back. This must be done as carefully as possible in order not to damage the motherboard. If the screwdriver comes off the battery, you can knock out small components on the board, which will inevitably result in the need for repairs.