After reading this article, you will learn how to disable the touchpad on a laptop, even if it does not have an on / off key.
The touchpad is an integral part of the laptop (touchscreen), which is an alternative to the usual mouse manipulator.
The creation technology is based on the use of a capacitive sensor.
It does not respond to touch of third-party objects, only to fingers.
In this way, the user experience can be facilitated.
Different manufacturers use different methods to disable touchpads.
As a rule, in absolutely all cases, the sensor can be turned off by pressing the hotkey combination on the computer keyboard.
This method is suitable if you have not found the official device drivers on your computer or if the control panel does not have a specialized window for working with the touchpad.
Remember! Do not install drivers for input devices from third-party resources. All driver software must be supplied exclusively by your laptop manufacturer. If it is missing, drivers may be under development. By downloading utilities from other sites, you run the risk of infecting your computer with malware and damaging the touchpad and mouse.
In order to disable the touchpad on absolutely all laptops of the popular manufacturer Asus, press on the keyboard the combination of the following buttons: Fn + F7, you can also use the Fn + F9 buttons. It depends on the laptop release series.

If you are an HP laptop user, you just need to click on the upper left corner of the touchpad to turn it off.
If a shutdown occurs, the LED next to the sensor will turn red.
You can also enable the touchpad by clicking on its upper left corner.

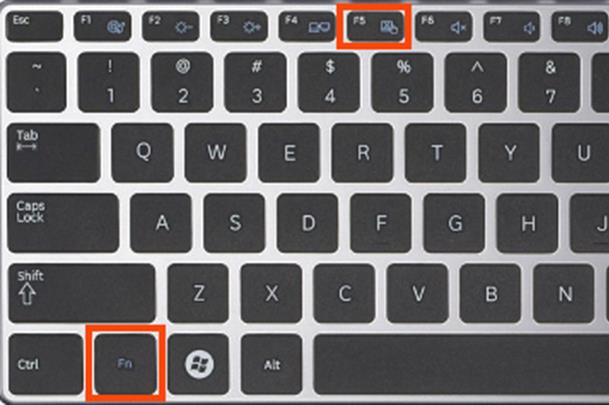
To disable the sensor on Lenovo, press the Fn and F5 buttons simultaneously.

The touch panel (touchpad) allows you to control the laptop in the absence of a computer mouse. Use taps on the touchpad to simulate a mouse click and a right-click, as well as to select items. For convenience, it is possible to perform actions on the touch panel in Windows with two, three or four fingers.
But what to do when the touchpad causes false clicks, for example in games or in the process of typing. That is why you need to know how to disable the touch panel on a Windows 10 laptop. There are really a lot of ways to turn off the touch panel, from key combinations to turn off the touchpad and ending with installing third-party utilities.
Keyboard shortcut
The easiest way to enable or disable the touchpad on a laptop is to use a key combination. Each laptop manufacturer added the ability to disable the touchpad with a key combination. In most cases, it is necessary to clamp the function button Fn and press one of the keys F1-F12. To determine the desired key combination, you can use our table or it is better to look for the crossed out or inverted touchpad on the keys.
| Acer | Fn + f7 |
| Asus | Fn + F7 or Fn + F9 |
| Dell | Fn + f5 |
| Lenovo | Fn + F5 or Fn + F8 |
| Samsung | Fn + f5 |
| Sony | Fn + f1 |
| Toshiba | Fn + f5 |
Please note that different manufacturers install different keyboard shortcuts on their laptops. Another interesting feature of some laptops is there is no need to use the Fn key to turn off the touch panel. But from to use the hot keys F1-F12 already have to hold down the Fn key.
And also note that disabling the touch panel on HP laptops is done using the sometimes hidden button on the panel itself (touchpad). By double clicking on this button, the touch panel is actually turned off.
Windows 10 Options
The current method works with the latest versions of the original drivers for the touch panel (touchpad).
It was also noted that there was no way to disable the touchpad using this method in the latest version of the Windows 10 operating system. Instead, only the touch panel sensitivity change is available. When setting low sensitivity, you may no longer need to turn off the touch panel completely.
Control Panel

The current section can be called differently, starting from the name Device Parameters and ending with Synaptics, depending on the manufacturer and version of the drivers. Regardless of the name of the section, the ability to disable the touch panel or touchpad is present on all laptops.
And also we want to draw your attention to the item Disconnect when connecting an external USB mouseactivating which touchpad will automatically turn off when using the mouse. The advantage of this feature is that the user does not have to disconnect the device every time.
device Manager

If there are no recent drivers, you may have to look for a touchpad in the HID Devices section. There it can already be called a HID-compatible touchpad.
Windows Mobility Center
On laptops of some manufacturers it is possible to turn off the touch panel directly from the window of the Windows Mobility Center.

Disable touchpad program
There are many free utilities that block clicks on the touch panel. Among the most popular, you can choose Touchpad Blocker, TouchFreeze or Touchpad Pal. If the Touchpad Blocker has various settings, then TouchFreeze and Touchpad Pal work immediately after launch.
- If you need to completely lock the touch panel then download Touchpad Blocker.
- If you need to lock the touchpad only during typing, then you can use Touchfreeze and Touchpad pal.
Enabling and disabling the touchpad in the BIOS
For more experienced users, there is a way to disable the laptop’s touchpad in the BIOS. In new laptops, you will have to look for possible disabling options already in the UEFI interface. How to open go into BIOS on your laptop, we will not consider. I will show you the possible location of the button responsible for the operation of the touch panel of the laptop.
- Advanced\u003e Internal Pointing Device\u003e Disabled.
- Boot\u003e Touch Pad Mouse\u003e Disabled.
findings
To know how to disable and enable the touch panel (touchpad) on a laptop, it is simply necessary for each user, regardless of the operating system. We examined the disconnection process using the Windows 10 operating system as an example. In principle, it does not differ from the options for disabling the touchpad on previous operating systems, by excluding the use of the new control interface, Windows 10 settings.
Instruction manual
Carefully examine your keyboard for special control buttons screen monitor. Pay special attention to the multimedia keyboard - sometimes the key with the desired command is located there. Press it and deactivate the touch screen, returning it to its normal state, if necessary. Also look at the touchpad with touch buttons, if available for your laptop model.
Read the instructions for your device for special combinations. Usually they use the system keys: Ctrl, Fn, Alt, Shift and so on. If you have an Fn key, look at the top numeric keypad for the presence of a button with a touch screen disable icon, also use the F1, F2, F5 buttons, and so on.
Go into the BIOS of your computer. To do this, when downloading it, press the special button that is responsible for entering this menu. It can be Delete, F8, F1, F2, Fn + F1 and so on, combinations can vary depending on the model. Also, pay attention to the boot screen when you turn it on, there should be the line “Press ... to enter setup”, instead of the dots the desired combination will be written.
Find the control of your monitor in the BIOS and turn off the touch control using the specially assigned keys listed in the menu below. They may be different depending on the model of the device. Exit the BIOS program, after saving the changes.
Start the computer and see if the touch screen turns off. If this does not help, carefully read the instructions. Going into the configuration, or browse the information you are interested in on the official website of the computer manufacturer, by searching for your model, you can also find out from the seller of your computer when buying.
note
Touch screen off is not available on all models.
In the latest version of its main product, Windows 7, Microsoft has developed new technologies for finding files and folders on hard drives. For quick searches in this environment, constant indexing of the file is used. The result was "on the face." Search really began to fulfill queries and find key queries much faster than in previous versions of Windows operating systems. But the constant indexing of files leads to the "freezing" of processes on weak computer solutions. Therefore, disabling the search service in the operating system can increase the speed of the entire computer.
You will need
- Change settings for Windows components.
Instruction manual
In the window that opens, select "Large Icons", then click "Programs and Features" (Programs and Features).

In the left pane of this window, click Turn Windows features on or off.

In the list that opens, find the Windows Search item and uncheck (check).

A dialog box will appear in which you must click Yes.

The Windows Components window appears again. Click OK.

In a new window, you can monitor the process of disabling Windows Search. A running bar will indicate the trip.

As soon as the strip is filled with color, a window will appear that tells you about the need to reboot, otherwise the changes will not take effect.

Related videos
In the process of operating a personal computer, it becomes necessary to turn off but. This may be due to savings in energy consumption, a long break in working with a computer, and the replacement of monitor or video card, as well as maintenance (cleaning) of the system unit.

You will need
- 1) Read the operating instructions for the monitor and personal computer
- 2) Know the purpose of the monitor and computer controls
- 3) Learn to connect and disconnect the interface cable to the video card
- 4) Have a universal screwdriver (if necessary)
Instruction manual
If you do not have a numeric keypad, look at the individual Num Pad devices that are sold in computer stores. They connect to a computer or laptop via a USB port and work exactly the same as a regular full keyboard with. Wireless models of these devices are also available.
Use them in cases where you have a laptop with a shortened keyboard, and you often have to use applications that use numbers and signs of mathematical actions, for example, or “1C Accounting”. Also, the keys from the numeric keypad are often used in different ways, usually they will perform some functions when the Num Lock mode is disabled, for example, the functions of the arrow keys and so on. It is also convenient to use them in ordinary computers, if there is a shortened version of the keyboard. In some cases, a separate Num Pad is even more convenient than the one that is built in as a side keyboard.
A laptop is a complete computer in a compact form. This means that its components can be used as elements of a conventional computer. A display laptop can be used to display the video signal of another computer. This problem can be solved with the help of additional software: MaxiVista application.

Instruction manual
Connect your laptop and computer to the network. To do this, you need to configure wi-fi data transfer or create a network based on wired technologies: you will need one switch and two patch cords. Download the program of the same name from the official website www.maxivista.com and install the server version of the program on the computer’s hard drive. On the laptop you need to install the client part of the viewer. Before installation, it is recommended to complete the execution of all utilities that relate to video cards. As a rule, both types of software on personal computers should be installed in the system local disk of the operating system.
Run the program on both computers. The program on the server will detect the client part over the network and establish a connection. The full version of the program supports connecting up to four computers into a single unit for transmitting a video signal. If you have four computers, then you need to connect them together with special cables or also a wi-fi network.
Disable the Windows firewall and firewall programs. Make sure that the program can use ports 6100, 6151, 6951 and others specified in the instructions for the program. Select "second" - specify in the desktop settings to transfer data to the second screen. MaxiVista is a paid software. For the use of program features, developers ask about $ 50.
The demo version of the program is also available for download, however, it has some limitations in the list of features. If you are sure that you will need this software for a long time, it is better to buy the full version, since all parameters are not available in the demo.
Sources:
- laptop like monitor
The touchpad, also known as the touchpad, is an integral part of laptops and is used to navigate the operating system. If you prefer to use a computer mouse for this, the touchpad can be disabled.

Instruction manual
Try disabling the touchpad using a special key combination. To do this, hold down the Fn button, which is located at the bottom of the keyboard, and one of the function keys. Usually it is F6 or F7. The touchpad icon may be indicated on the corresponding key. Pressing the same keys again activates the touch panel.
Pay attention to the area of \u200b\u200bthe taskbar located in the lower right part of the desktop. The touchpad activation icon may be located here. Click on it with the left or right mouse button and select the corresponding menu item. Deactivate the touchpad by selecting the desired option.
If the combination of function keys on the keyboard does not work, and the touchpad icon is not on the taskbar, most likely the drivers on the device are not installed. Check for the installation program on the CD that came with the laptop or download it online. To do this, you can indicate in the search engine the model name of your laptop and enter the additional word “touchpad”. In the search results you will see links to resources from where you can download the desired installation program. Immediately after installation, the touchpad icon appears on the desktop, and you can disable it using the settings menu.
Check if additional device settings are activated if you still cannot disconnect the touchpad. Restart the computer and press the Del key immediately after starting the boot to launch the BIOS menu. Locate the Internal Pointing Device tab and set “Disabled” or “Enabled” to deactivate or activate the touchpad. Save the settings and restart the computer.
Sometimes when working with a laptop, users notice that the F1-F12 function keys have an unusual purpose. When they are pressed, the screen brightness and sound level change, WI-FI turns on and off, or even the laptop goes into sleep mode. And to return these keys to their usual functionality, you have to press Fn each time. This interferes with the user and slows down the work.

You will need
- - a laptop;
- - user's manual;
- - Toshiba HDD Protector utility.
Instruction manual
In most cases, to disable the Fn function, just press the Fn + NumLock keys simultaneously. But, depending on the manufacturer of the laptop, other keyboard shortcuts can be used. And in some cases, to solve this problem, you need to install a special utility or deactivate the Fn key in the BIOS.
If you purchased a laptop from the manufacturer HP, then to disable the Fn function, you will have to deactivate it in the BIOS. To do this, when you turn on the laptop, hold down the F2 or Del key (depending on the model). Sometimes the keys F10 or Esc are used for this purpose. If you can’t enter the BIOS, look for information about the motherboard in the “User Guide”.
To navigate through the BIOS, use the left / right / up / down arrow keys. Go to the System Configuration tab and select the Action Keys Mode parameter. The function is enabled by default - the switch is in the Enabled position. Change the value of the parameter to Disabled and press the F10 key to save the changes and exit the BIOS.
To disable the Fn function on Toshiba laptops, use the HDD Protector utility. The program has a Russian interface. You can download it from the website of the manufacturer of the laptop. Launch the application and open the “Optimization” tab. Click on the "Accessibility" label and in the window that appears, uncheck the "Use Fn-StickyKey" box.
Related videos
note
Most often, problems with the function keys and using the Fn key arise when installing an operating system on a laptop that is different from the manufacturer's version. The reason is the lack of the necessary drivers, which can be difficult to find. To correct the situation, try installing a hotkey manager, with which you can set their values \u200b\u200bmanually.
Helpful advice
On some Asus laptop models, the Fn function can be turned off by pressing the keyboard shortcuts: Fn + F11, Fn + F12, Fn + Insert, or just NumLock. The same combinations can help with a Samsung laptop.
Netbook and laptop users know that many of their models are equipped with an additional key - Fn. With it, you can increase the volume, switch music, etc.

Function key
Laptops (netbooks) from HP, Asus, Smasung, Compaq and others are equipped with special function keys with which the user can quickly switch between music, start wireless networks, increase or decrease the volume, and perform other manipulations with the device. Sometimes these function keys can be inconvenient, and therefore there is a need to disable them. For example, when buying a computer from HP, the user may find that, after the usual pressing of the F1-F12 keys (without the Fn button), they will activate additional functions.
Disabling the Fn Key
Of course, you can change the settings for these keys or even disable the Fn button on your own. First, I must say that this method is far from being, but if everything is done correctly, many different problems can be avoided. On HP laptops (netbooks), you need to disable the function key directly from the BIOS "a. In order to enter the BIOS, you must turn on (restart) the computer and press the ESC or F10 key (depending on the model of your device). After the BIOS window" and it opens, you need to go to the System Configuration tab. There are many different options here, but you need the Action Keys parameter to disable or change the function keys. It must be changed to Disabled and the changes saved using the F10 button. After that, the Fn key will be disabled.
On devices from Asus, Samsung and Fujitsu, disabling the function key is easier. For example, on Asus laptops (netbooks), the Fn key is disabled using the Fn and NumLk key combinations. On other models, other key combinations may work, for example: Fn and Insert, Fn and F11, Fn and F12, or even NumLk.
It is worth noting that most of the problems with disabling the function key will be caused by Toshiba laptops (netbooks), since for this you will have to download and install special software - HDD Protector. After installing and running this program, go to the “Optimization” tab, where you need to find the “Accessibility” item. When a new window opens, uncheck the "Use Fn key" box. These changes must be confirmed using the OK button. As a result, the function key is disabled.
Modern car radio performs a wide range of functions. This is playing music, and receiving radio programs and TV programs, and viewing photos, and playing movies. The car radio is controlled both by the remote control and by using the touch panel.

Instruction manual
The touch screen is still an innovation in the device. However, it allows you to control its functions without using keys. Thus, the process of selecting the desired parameters is significantly accelerated. Touch interactive is a thin self-adhesive plate, which is located on top of the LCD screen. The sensitivity of the panel is so high that the output signal changes even from the lightest touch. This leads to the fact that the choice is made by touching a finger or a special pen on the desired image on the screen.
Lightly tap with the stylus or finger on that part of the surface of the touch screen the power button. It is depicted as a circle, which is crossed by a vertical line at the top, and is located in the upper left corner of the screen.
If you want to either turn on the sound while listening, use the same power on and off button. Next to the circle you will see the inscription MUTE. - While playing an audio file, tap on the desired area of \u200b\u200bthe touch panel once with a light motion and the sound will mute. - Press the MUTE touch button again and music playback will continue.
Probably, many are familiar with the problem of loss of touch sensitivity screen on the PDA. In the event that you considered it not economical to carry it for repair to a service center and think that you can repair it yourself, this article will help you.

Currently, all laptops are equipped with touchpads. This is a touchpad whose function is to replace computer mouse. In some cases, the touchpad may interfere with normal operation. For example, when typing in the editor, accidentally clicked on it, and the cursor moved to another part of the screen. With repeated repetition, this state of affairs can be annoying.
There are reverse situations, TouchPad for some reason stopped working, what should I do? We will talk about both cases in more detail. It is worth noting that turning on touch mouse is similar to turning off, only held in reverse order.
Using function keys
On almost all modern laptops, there is the ability to disable / enable the touchpad using a special function key combinations. For different models of laptops, their options are different. It should be noted that this method works with native drivers. 
Many laptops have a combination of simultaneously pressed buttons. Fn + f9. But based on which modeloptions may vary. 
If your laptop is not among the above, pay attention to the function keys, for the presence of them pictures with crossed out touchpad. 
If you don’t find the pictures, it remains to try brute force (be careful not to disable other necessary functions). Probably, in this case, you do not have special drivers installed, you can update them or resort to other methods described below.
Disabling the touch mouse via BIOS
Although the previous method is convenient, the disadvantage is that immediately after rebooting the TouchPad will be back in operation and you will need to press the above combination again.
Completely disable it can be through BIOS. The BIOS contains settings for all major components, including this one.
Restart your laptop. When turned on, press F2 or Del (or other options, depending on the BIOS version).
Go to the field Advanced and find the parameter Internal pointing device. « Enabled"- for inclusion," Disabled"- to turn off. 
Another parameter may look like this. (Read in the manual on your laptop where this parameter is located in your BIOS). 
Use the button on the touchpad itself
On some laptops and netbooks, the shutdown button is present on the touchpad itself. 
Then it just takes to press on this button in the upper left.
Disable using synaptics
Many laptops use the manufacturer’s touchpad Synaptics. If you have such a case, then the TouchPad can easily turn off in, which you will find in the button Start.
There we choose Equipment and sound.
Next select Mouse and its properties, where we go to the tab Pointer Options.
Here you can completely disable Touchpad, but you can make it disconnect itself when a mouse is connected to the laptop.
Turn on and off through Device Manager
We launch device Manager convenient for you, for example, by typing in a window Run (Win + R) command devmgnt.msc.
In the Dispatcher we find our touchpad, it is most likely located in the Mice and other pointing devices section. 
Click on it with the right button, and in the properties disconnect.
In case you have a native official driver on the TouchPad, you can find its advanced settings. For example, from the manufacturer Dell, this can be done as follows.
Open settings at Mouse propertieswhere I found the Dell touchpad tab. See the link below for the opening and change settings devices. 
A window opens in which there is an opportunity inclusion and off touch panel. 
If there are no advanced settings, then you can download "Native" driver from the official website of the manufacturer of your laptop.
This is primarily a mobile device. When developing a new model, engineers are trying to make the laptop more convenient for use outside the home or office. That is why all laptops are equipped with a touchpad.
But, if the touchpad is very useful outside the usual workplace, then at home or in the office, where it is possible to connect a mouse, it brings more inconvenience than benefit. Therefore, many users are interested in the question of how to disable the touchpad on a laptop.
Method number 1. Disabling the touchpad using the button.
If you want to disable the touchpad on a laptop, then the first thing to do is to carefully examine the touchpad itself. On many laptop models, a special button is placed next to the touchpad to turn it off. If there is such a button, then you just need to click on it.
If there is no separate button, then perhaps there is a touch button on the touchpad itself. Usually such a button is marked with a dot. In order to disable the touchpad using the touch button, you just need to click on it twice in a row (double click).

Method number 2. Disable the touchpad using the Fn button.
On laptops there is a function key Fn. She also uses to turn off various functions of the laptop. If the laptop does not have a button to disable the touchpad, then it should be with the Fn button, which implements this function.
In most cases, the following key combinations are used:
- On ASUS laptops: Fn + F9 or F7
- On Lenovo laptops: Fn + F8 or F5
- On DELL laptops: Fn + F5
- On ACER laptops: Fn + F7;
- On Samsung laptops: Fn + F5 or F6;
- On Sony Vaio laptops: Fn + F1;
- On Toshiba laptops: Fn + F5;
WITH manual number 3. Software disable the touchpad.
In order to disable the touchpad in the Windows settings, you need to go to the "Hardware and Sound - Mouse" section.

In the window that opens, you need to go to the "Device Settings" tab. In some cases, this tab may be called differently, for example, “ELAN”.
On the “Device Settings” tab, click on the “Disable” button. After that, the touchpad of your laptop will be disabled.

Also, in some cases, on the “Device Settings” tab, there is a “Disconnect when connecting an external mouse” function. When this function is activated, the touchpad will only work when it is not connected to the laptop.
An important note, if you opened the "Hardware and Sound - Mouse" window, but there is no "Device Settings" or "ELAN" tab, then you do not have drivers from the touchpad. Install the driver and restart the computer. After that, the desired tab will appear.
Method number 4. Disabling the touchpad via BIOS
If you want to disable the touchpad on a laptop once and for all, then you can do it through the BIOS. To do this, find the function called “Internal Pointing Device”. Typically, this function is located in the Advanced section.

Find the function “Internal Pointing Device” and change its value from “Enabled” to “Disabled”. After that we exit the BIOS saving the settings (this can be done by pressing the F10 button). After rebooting the laptop, your touchpad will be completely disabled.