As I promised in the comments to the post "Deployment Manager or where else you can deploy files", I dug a little more in the file system (or rather in the Directory Hierarchy). The basis for this article was a question from Dmitry Kuzmenko, I really hope that I was able to answer it in the required volume. Let's talk a little about Android OS, manufacturers of devices running this operating system, and I will also show several options for obtaining a list of available storage devices.
Continuation for Android 4.4. * Here: Android 4.4 and recording to an external memory card ...
Upd (17.02.14). Based on the comments, we made edits to the applications.
Upd2 (17.02.14). A false positive of the 3rd option was detected, the feature was fixed. Slightly improved search.
Upd (03/30/14). The third method works on Android versions below 4.3. I won't write the code for versions higher than 4.3. I do not have devices with this version of Android to analyze the new structure.
Upd (04.21.14). Checked the code for Delphi XE6
Upd3 (07/15/14). Updating the source code, not working correctly (AV error) on some devices
I will try to summarize the whole point briefly so as not to get 10 pages of text.
Let's start with the basics.
The Android operating system is based on the Linux kernel. On Unix-like operating systems, there is only one root directory, and all other files and directories are nested within it. In most UNIX-like systems, removable disks, flash drives and other external storage devices are mounted in the / mnt, / mount, or / media directory (in our case, this is the / mnt folder). UNIX-like operating systems also allow disks to be automatically mounted when the operating system boots.
We determine the list of available storage devices.
I must say right away that in the Android API, I did not find a method that allows you to define such a list. Therefore, the first thing that comes to mind is checking possible paths on your own, and here the first "BUT" appears. Everything would be simple if it were not for the device manufacturers who want to change something in Android, so in this case they tried. I experimented and found out that the number of possible path options is quite large and it is almost impossible to find out all of them, except to start collecting a common database of such options from all owners of Android devices.
They participated in my experiments (mine is only one - SGS2 :):
- Samsung Galaxy S Plus - Android 2.3.6
- Samsung Galaxy S2 - Android 4.1.2
- HTC Sensation Z710e - Android 4.0.3
- HTC One X - Android 4.2.2
- HTC Rhyme - Android 4.0.3
Now let's see what paths are available on these devices, the path to the internal card (if any), external card (if any) and usb devices (if any) is important to us.
As you can see, the paths are different everywhere.
Option 1.
We compose an array of possible values \u200b\u200band in a loop we check each for accessibility using the usual check for the existence of a folder ( TDirectory.Exists), as well as the empty folder ( TDirectory.IsEmpty).
I made a general list for these devices and wrote a small application for verification.
My list (based on 5 popular devices):
- / mnt / sdcard
- / mnt / sdcard / external_sd
- / mnt / extSdCard
- / mnt / usb
- / mnt / UsbDriveA
- / mnt / UsbDriveB
- / mnt / UsbDriveC
- / mnt / UsbDriveD
- / mnt / UsbDriveE
- / mnt / UsbDriveF
Having looked for similar ways on the Internet, I found 3 more possible points:
- / mnt / external_sd
- / mnt / usb_storage
- / mnt / external
Supplement fromDmitry Kuzmenko:
Sony Xperia V - 4.1.2
- / mnt / sdcard
- / mnt / ext_card
- / mnt / usbdisk
Some more:
Sony Xperia Go - 4.1.2
- / mnt / sdcard
- / mnt / ext_card
- / mnt / usbdisk
- / mnt / sdcard
- / mnt / extSdCard
- / mnt / UsbDriveA
- / mnt / UsbDriveB
- / mnt / UsbDriveC
- / mnt / UsbDriveD
- / mnt / UsbDriveE
- / mnt / UsbDriveF
Device name - Android version
Direct path to internal memory
Direct path to external memory card
Direct paths to USB devices
All paths start with the / mnt / folder.
Or copy and send me the file "/etc/vold.fstab" to infocean @ gmail.com mail or in comments (do not forget to indicate the device model and Android version "a). Please also indicate all the folders that are in the / mnt directory /, it is very important.
Application:
Uses System.IOUtils; const pathmnt: Array of String \u003d ("/ mnt / sdcard", "/ mnt / sdcard / external_sd", "/ mnt / extSdCard", "/ mnt / usb", "/ mnt / UsbDriveA", "/ mnt / UsbDriveB "," / mnt / UsbDriveC "," / mnt / UsbDriveD "," / mnt / UsbDriveE "," / mnt / UsbDriveF "," / mnt / external_sd "," / mnt / usb_storage "," / mnt / external " , "/ mnt / ext_card", "/ mnt / usbdisk"); procedure TForm1.Button1Click (Sender: TObject); var i: integer; begin Memo1.Lines.Clear; Memo2.Lines.Clear; for i: \u003d 0 to Length (pathmnt) - 1 do begin if TDirectory.Exists (pathmnt [i]) AND not TDirectory.IsEmpty (pathmnt [i]) then begin Memo1.Lines.Add (pathmnt [i]); Memo2.Lines.Add ("True"); end else begin Memo1.Lines.Add (pathmnt [i]); Memo2.Lines.Add ("False"); end; end; end;
Option # 2.
The first option has both pros and cons (the main of which is the incompleteness of the list of possible paths), so we will try to solve this problem in a different way.
There is such a file “ vold.fstab", Lies here" / etc / "(" / system / etc / "). It is one of the configuration files in UNIX-like systems that contains information about various file systems and storage devices. Describes how the disk (partition) will be used or how it will be integrated into the system.
And there is a file “ mounts", Lies here" / proc / ". Contains information about all mount points used on the device. It is important to understand that if the memory card is not mentioned in this file, then it is not connected. This means that the file is constantly being updated.
Step by step:
- We read the file “ vold.fstab»
- We check each device for accessibility by reading the file “ mounts"And search for the required string in it.
There will be no code in this version yet, because for some reason unknown to me, I cannot read the file "mounts". In this regard, I propose a third option.
Option # 3.
We combine the first and second options. We will take the list from the file “ vold.fstab", But check it on your own, without opening the file" mounts". Why torture two files every time when you can work with only one.
Step by step:
- We read the file “ vold.fstab»
- We make a list of storage devices (half done)
- Now, in a loop, we go through the list and check each path using “ TDirectory.Exists"And" TDirectory.IsEmpty»
- We make a list of really available storage devices
Update-17.02.14: Thanks to Dmitry Kuzmenko and common efforts, we found out that the file "/etc/vold.fstab" in Sony Xperia V is slightly different from the others, so changes were made to the source code of the application. We checked everything, it works! :) The sources have been updated everywhere.
Update2-17.02.14:In the file "/etc/vold.fstab" sometimes there are (on some devices) commented out lines that are very similar to the ones I was looking for in my code, which led to a false positive. I fixed this feature in the new version of the code.
We also fixed the search for the desired lines, now it is more versatile!
In general, the code should now work fine on different devices. Try it, unsubscribe to comments, attach your file "/etc/vold.fstab" (do not forget to indicate the device model and Android version).
Update3 - 07/15/14:
Blog reader Sergey Yakimenko, found the third option not working correctly (reading the file) on devices Huawei Ascend P6 and Reellex TAB-07, as reported in the comments.
After personal correspondence and some analysis, I found out what the problems were interfering with the work.
Issues found and fixed:
- Spaces at the beginning of each line found. Fixed with "Trim"
- The lines found use tabs instead of spaces. Fixed by replacing tabs with spaces.
Application:
Uses System.StrUtils, System.IOUtils; procedure TForm1.Button1Click (Sender: TObject); var OpenFileVold: TStringList; i: Integer; pathtemp: TStringDynArray; begin OpenFileVold: \u003d TStringList.Create; try // Read the file OpenFileVold.LoadFromFile ("/ etc / vold.fstab"); for i: \u003d 0 to OpenFileVold.Count - 1 do begin if (Pos ("dev_mount", OpenFileVold.Strings [i])\u003e 0) OR (Pos ("fuse_mount", OpenFileVold.Strings [i])\u003e 0) then begin // Update (07/15/14) // 1 - Remove spaces at the beginning and end of the string (get rid of AV) // 2 - Replace tabs with spaces pathtemp: \u003d SplitString (StringReplace (Trim (OpenFileVold.Strings [i] ), #nine, " ", ), " "); // Check the first character of the string for a match with the "#" or "##" character, // so that there are no false positives if (pathtemp<> "#") AND (pathtemp<> "##") then begin if TDirectory.Exists (pathtemp) AND not TDirectory.IsEmpty (pathtemp) then begin Memo1.Lines.Add (pathtemp); end; end; end; end; finally OpenFileVold.Free; // FreeAndNil (SourceFile); end; end;
Outcome: We learned how to get a list of available storage devices (I would use the third option). The text (without code and pictures) came out on 3 pages, most likely, they did not have time to get bored :)
Thank you all for your attention and successful development.
P.s. Add-ons are welcome.
p.s.2. I spent a lot of time just experimenting and comparing files vold.fstab, mounts, from different devices ...
p.s.3. In the next article, I will show you how to get rid of the problem of updating the database when manually updating the application.
The capabilities of the device can be seriously expanded by replacing the internal Android memory with a memory card. This will allow you to install many more applications on a tablet or other gadget, but the main requirement for this update is to have root rights on the device. Let us consider the methods allowing to use the SD-card as the system memory of the device, as well as the related conditions.
Risks and conditions of replacing the internal memory of the gadget with an SD card
Before repeating the steps described below, the user should consider several important points:
- The lifespan of an SD card will be greatly reduced due to the frequent repetition of read / write cycles when launching applications.
- The speed of the gadget can drop noticeably if you use a low-end MicroSD card.
- If you make a mistake while editing the system file, the phone may not boot next time - you will have to reflash it.
In general, the procedure (especially for inexperienced users) is quite risky, so it makes sense to carry it out exclusively for old gadgets with a small amount of their own memory.
Using the Root Browser utility and editing the vold.fstab file
To swap memory, you will need to install Root Browser from Google Play.
We repeat that it is possible to fully work with it only on rooted devices. After launching the above application:

In Android, sdcard stands for internal memory, and extsd stands for external, i.e. SD card. By replacing these lines, we actually swapped these types of memory. On some systems, these pieces of code may look different, like this:
You need to replace them as follows:
After completing the described procedure, restart the gadget. Before that, be sure to check that there are no errors in the changed code so that in the future there is no need for a flashing.
The second way to increase memory using Link2SD

The app is available in the Play Market and works only on devices with root rights. This file manager does not physically replace the internal memory of the device with an external drive, but it is able to transfer any utilities to an SD card, significantly saving the resources of the gadget.
The peculiarity of the application in question is that the MicroSD itself will have to be broken and properly formatted. Therefore, copy everything of value from your card to your computer and start dividing the drive into partitions.
Dividing the device card into partitions with custom Recovery
Each Android device has a recovery mode, but the method described below is suitable only for devices not with the standard one, but with. If you've never heard of CWM, skip to the second option for partitioning the drive. Next, we will tell you how to solve the problem if your device recovery mode has a Partition SD Card item:

Partitioning a MicroSD card through a computer
Connect the card to a laptop or PC. To do this, you can use a card reader or other equipment, the main thing is that it should be defined as a drive, and not an MTP media device. Further:

Most owners of Android devices sooner or later face the problem of insufficient internal space for storing files. Regular installation of applications gradually reduces the amount of free space in the gadget, which leads to braking, improper operation, or even a complete failure of the system to work normally. In this case, replacing the internal Android memory with a memory card will help. How to do this and what other ways there are to deal with such a nuisance, we will consider further.
Before delving into the settings and transferring all applications to a USB flash drive at once, you need to understand what types of memory exist on your Android device:
- operational - necessary for the correct operation of applications, programs and other processes that are performed on a phone or tablet;
- ROM - stores information about the operating system during flashing and this data cannot be transferred to third-party media;
- internal - applications are installed here automatically, as well as any user information; how much free space is left by the system when installing new software;
- expansion card - an external drive that is designed to expand the internal memory of the device and store applications, user information.
Why can't I save apps to my SD card?
In many gadgets, it will not work automatically to allow the installation of new applications on a USB flash drive. This applies to phones and tablets from version 4.4.2 to 6.0.1. In this case, replacing the internal memory with an SD card is simply necessary, and this can be done in several ways (including using third-party applications). But first you need to find out the version of Android that is installed on your gadget. To do this, click successively on:
- Menu;
- Settings;
- About the phone.

In the list that opens, the OS version will be indicated.
Programs for transferring applications to a memory card
The developers took care of the users and created programs in order to make the memory of the flash drive the main one on Android. This is especially useful for older versions of the system like 2.2 or even earlier.

Convenient software that contains all the necessary tools for transferring information from internal memory to an external drive. The interface is intuitive and simple. Applications available for moving are marked with icons, when you click on which, all available information about them opens, as well as possible actions (move, copy, delete).
Move2SD Enablerv
This software is interesting to users for two reasons. First, it is compatible with different versions of Android (including later ones). And the second is the ability to migrate data and applications that are marked in the system as "invalid for migration."

Another interesting development that simplifies the life of Android users. The main advantages are simple software installation (without the need to additionally download scripts and libraries) and the ability to transfer information not with complete libraries, but only with their parts.
What other methods are there?
There is another option, how to make an SD card with internal memory on Android. If the version of your gadget is from 2.2 to 4.2.2, then the instructions are extremely simple, click on:
- Settings;
- Memory;
- Default disc for recording;
- SD card.
A check mark or a circle will appear opposite the flash drive, which indicates a change in settings. Now the installation of applications will automatically go to the flash drive.
For Android KitKat users and above, the process will be more difficult and dreary. The main problem is that you will need to root your device. This can be done at home, but there is a risk of turning your device into a "brick" that either cannot be repaired, or it will only be brought to life in a service center for an additional fee.
Remember that by independently installing root-rights, you deprive your device of the warranty and act at your own peril and risk. Whether it is worth it or not is up to you. Is it less risky to manually migrate new applications every time?
What do you think? Tell us in the comments if you had to get root rights, if it was successful, or maybe you know other ways to switch the memory of your tablet / phone to a memory card.
How to swap memory on Android and what is it for? Should such manipulations be carried out at all and are they capable of causing irreparable harm to our device? Such questions are often of interest to people who are in control of a device with a small amount of built-in memory. If your smartphone has a corresponding volume equal to, for example, four gigabytes, then you know that using such a device is nothing but a pain. For uploading enough multimedia files to it is very, very problematic. So how do you swap memory from internal to external on Android?
Introduction to the problem
By the way, one should not think that only the Android operating system suffers from such a problem as a small amount of built-in memory. It is also on the "Ayos". These two systems are in constant competition with each other. Occasionally, “Windows Fawn” also interferes in single combat, but it soon turns out to be thrown out behind the tatami. Why is the IOS subject? There are facts that invariably prove the "exposure" of this operating system to users. Its code was originally a mystery. Nevertheless, a similar trend is taking place. But the operating system "Android", developed by the specialists of the company "Google", is now becoming more and more closed to potential developers with each update. This is what annoys people who are so used to this operating system.
Why do you need to know the answer to the question of how to swap memory on Android?

Currently, the OS we are talking about no longer allows users to install applications with the appropriate software - the so-called cache - on an external memory drive. In our case, let it be a microSD memory card. Probably, the owners of devices with a volume of 32 gigabytes and above will grin, but what about people who have at their disposal from 4 to 8 GB, some of which (note this!) Goes to the maintenance of the operating system? The optimal way out of this situation is only to perform certain manipulations. And here it is more important than ever to know the answer to the question of how to swap memory on Android. Actually, this is not difficult to do. However, extreme attention is required and, by the way, straight arms. If you have these parameters, then we will move on to considering the meaning of the operation in order to understand what and why will be performed.
How can I swap memory in Android 5? What to do with other versions?

There is a way out of this situation, when we have only a couple of gigabytes at our disposal for the location of the multimedia contingent. It consists, firstly, in the acquisition of external And, secondly, in the software replacement of a certain code that can convince our device that the internal is external. Well, and, of course, vice versa. Thus, the smartphone will perceive the microSD card as an internal card. I would like to note that the question of how to swap memory cards in places on Android sounds fundamentally incorrect, since several external drives cannot take part in this process.
What do you need to replace?
Regardless of what version of the operating system you have installed and the device of which manufacturer you have, we need the same set of utilities. These are programs called Total Commander (which is known by a huge number of users). Additionally, you will need to obtain for the device
Replacement process
In order to start the operation, open the Root Explorer program. We move to / system / etc. There you need to find a file called vold.fstab. In it, you should find the lines and parameters that are responsible for the mount points of external and internal memory. They are called, respectively, like this: SDcard and extsd. After that, it will be necessary to swap the parameters. This will complete the active phase of the operation. Do not forget to make backup copies of your files, and remember that such operations are performed by the user at their own risk.
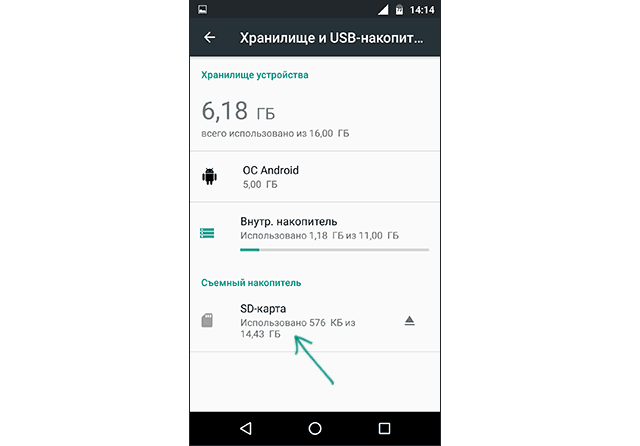
If your device does not have enough internal memory, can use SD card as internal storage for your android phone. This feature, called Adoptable Storage, allows the Android OS to format external storage media as permanent internal storage. The information on the installed SD-card is encrypted and cannot be further used on another device.
SD Card is a very convenient option for storing photos, songs and videos. Even if you have a large amount of internal storage on your Android smartphone, you may always need a large chunk of storage to store long videos captured by your phone's high-definition camera.
It is important to know
There is one drawback, the LED chip may lag when recording high definition video.
Android by default in internal memory and only occasionally uploads data to the SD card. Thus, you are deprived of installing any additional applications if your phone lacks the amount of internal storage, for example, in the case of budget devices on Android One.
What is cumulative storage?
Accumulative storage is the main memory of your smartphone, but if necessary, it can be expanded by using an SD card. This on Android is called Adoptable Storage. This will allow the removable microSD card installed on your Android phone to be used as primary storage. Thus, you can easily solve the problem of how to make an SD card the main memory on Android and overcome the lack of space if the phone has a small internal volume.
Features of using the map as the main storage
There are some important things to consider in this procedure.
Will be useful
When using a storage device, be it an SD-flash drive or a USB-drive, it is important to remember what format this device is in and whether the Android operating system supports it, and there are four types of main file formats: FAT32 or exFAT, ext4 or f2fs.
How to change phone memory to android memory card? The question is not entirely correct, it is impossible to completely replace it, you can only "increase" the additional volume.
Using your SD-card as your primary storage device can be a great solution for music lovers and TV shows on the way to work or on a long trip. But, as often happens, memory expansion always depends on the cost of the required device, because they differ both in speed and volume, as well as in the adaptable function of storing information. Here are some nuances that can be viewed from different angles - both in the negative direction and in the positive:
How to use SD card as internal storage on Android?
How to replace internal phone memory with external sd card on android? Configuring your SD card to act as internal storage on Android is essentially a fairly straightforward process. There is nothing complicated about this, and you will see for yourself later on.
It is possible that the Adoptable Storage function is not supported by your device, even if the smartphone is running Android 6.0 or higher (it also happens, it all depends on the model and brand of the smartphone). The device manufacturer may have disabled this feature. However, there are command line techniques that force the use of a flash drive for storing data.
The following are the basic steps for formatting.
On the next screen, you have one last chance to decide for yourself if you want to change your mind.

It is important to know
Do not forget to back up your data, after formatting the information will disappear without a trace!

After completing the formatting process, you can use the removable CD-drive as a "temporary" or "removable" permanent place. But keep in mind that hot swapping and retrieval will no longer be available, as you may have done previously. therefore do not eject the USB stick without using the Eject parameter. In addition, you can practically delete the place accepted by the operating system, which, accordingly, is not recommended, since this can cause certain errors in the operation of the device. Now you know how to make a memory card the main memory on Android.


