Problems connecting to the Internet are common operating system failures. However, in some cases the cause may be a malfunction of the gadget itself, as well as communication problems. Our article will help you understand the causes of such problems, and will also tell you the main ways to eliminate them.
When diagnosing possible problems, you should start with the most common reasons for lack of communication. They may not be at all related to the operation of the device itself, but may directly reflect system or software problems with the smartphone.
Why there is no connection:
- The period for replenishing the mobile Internet, or bonus megabytes and other services has expired. Even if the time to top up your balance has not yet come, there is always the risk of an unexpected change in tariff, in which wireless Internet services have become more expensive (and “eaten up” the money remaining in the account), or the period for providing these services has expired.
- Lack of mobile phone coverage. There are still remote places or “anomalous zones” where the signal is very weak or absent altogether. Of course, if you are not in the mountains or on a trip, this reason disappears by itself.
- Cellular connection problems. In general, signal transmission may be weak during heavy rainfall and other weather events. Breakdowns or replacement of wired connection equipment, as well as possible failures in the system - all this can lead to a lack of Internet.
- Incorrect network settings. You should definitely check the correctness of the entered data: login and password when connecting to a new point or when using a trusted router. In some cases, the password may be changed without your notice (by overly greedy neighbors), or accidentally reset from the settings of the smartphone itself.
All of the above reasons can be attributed to communication problems, and not to the smartphone itself. It is not always possible to eliminate such errors, unless you can complain to the operator about a poor connection or quality of communication.
Internet does not work on Android: common problems and errors
To do this, it is advisable to conduct a series of “tests”, the result of which will indicate a possible problem.
What to do if you cannot connect:
- Check your data service connection. To do this, you can call your operator or establish a connection through your personal account.
- Check the Internet connection indicator. If less than two bars are displayed on the screen, the problem is with the connection quality, not with the device.
- For non-critical system errors, rebooting the phone helps. It also doesn’t hurt to check your device for viruses and malware, the effects of which can slow down reception.
An outdated phone can also cause unstable connections. In this case, updates or flashing the system can partially solve the problem. At the same time, the physical and moral wear and tear of the device will not allow you to fully take advantage of the Internet connection, so for some purposes it is preferable to use more modern gadgets.
Why the Internet does not turn on on Android: on the phone
If everything is fine with the connection and connection, you should definitely exclude possible damage to the device. Systematic connection problems require contacting a specialist, as well as diagnosing the device. In some cases, flashing or resetting the user settings helps. It should be noted that connection problems may occur periodically, for example, on weekends or holidays when the number of users increases. In this case, problems with mobile communications will remain unresolved, and the only possible option will be to connect to the nearest Wi-Fi network.
The reason for the lack of communication may be falls or mechanical damage to the gadget, shocks, and even overheating of the battery. In case of such troubles, it would be more advisable to take your phone (tablet) for repair rather than try to fix the problem yourself, which can lead to even more serious consequences.

Mobile Internet does not work on an Android tablet
If a similar problem occurs with your tablet, the above methods may not help. In this case, you can use some tricks, which, according to experts, often work with this type of device.
What actions will help restore the connection:
- Turn off the device for a while and remove the battery from the case.
- After some time, install the battery in its original place.
- Turn on the tablet and try to find a connection.
If it is impossible to find the cause of the system failure, a radical solution to the problem may be to reset the settings to factory settings. This will delete all data and settings entered by the user, as well as system updates. In fact, the tablet will be exactly the same as the day it was purchased, so all the necessary applications will need to be installed again. A big plus will be the acceleration of the device, as well as clearing the memory of “traces” of previously running applications. The downside is the loss of all information and achievements in games, saved applications and other acquired information “baggage”.

Internet does not work on Android: how to set it up
The connection is carried out according to your mobile network service package. Such actions are also called online registration. In some cases, these settings may be reset automatically, for example, if there are viruses in the device or the signal is weak. To eliminate such situations, it is enough to check some of the previously entered parameters.
In the main phone settings you also need to check your data connection. You should look for the required section in the menu item “Wireless networks” - “Advanced”. Then you need to go to the “wireless networks” category, where you activate the data service.
Many users are interested in the question of why the Internet does not work on Android when it is connected, but does not go online. You can deal with all possible situations only by diagnosing the device at a service center. Minor problems, settings failures and other troubles can be easily corrected on your own using the tips in our article.
The Android system is the most popular among users.
All modern manufacturers of modern devices use the Android operating system:
- Motorola;
- Sony;
- Samsung.
Nowadays, not only expensive phone models have the Android operating system, but also budget options. Therefore, most touch models currently use this operating system.
At the moment, the absolute owner of the Android company is Google.
In July 2005, Google acquired Android Inc.
The first version of the Android system was released in September 2008.
Living in the modern world, modern gadgets have become a part of our lives; when they stop working, we often panic. Not turning on your favorite Android smartphone is a headache for many users.
First you need to understand the reason for the device’s failure to work normally. The reasons for this are varied, they can be hardware or software in nature.
Reason #1
One of the reasons for the device not turning on may be that the battery is completely discharged.
Therefore, remove the battery from the device and charge it with an external charger like a “toad”. Since the standard “charging” is not powerful enough, and will not help you if the battery is completely discharged.
Such a charger will boost your battery, and in half an hour you can use your smartphone.
Sometimes, to reboot the device, it is enough to remove the battery from it, wait a few minutes, reinstall it and press power.
Reason #2
If your mobile phone's screen lights up when you turn it on, but then won't turn on, then a full reset of Android settings may help you.
Let's describe step by step how to do this:
- We take out the battery, after 30 seconds we put it in place.
- Press the volume key, where + and at the same time the power button of the device.
- Use the volume up or down button to select the Settings menu – confirm with the power button;
- Then select the system formatting line - Factory reset;
- In the next window, select the line Reboot system now.
- Your smartphone will then automatically restart.
- And when the auto-reboot ends, you will be able to successfully use your device.
A significant disadvantage of previously installed programs will not be present; pictures and contacts saved on the device will also be deleted.
Reason #3
If you drop your phone, it may not turn on again. Here you will no longer be able to cope with the problem on your own; you will need to turn to specialists for help. Moreover, if after a fall the sensor on the phone does not work, then this will help you figure it out. 
Since you cannot do without phone repair skills, do not disassemble the device yourself, but take it to a workshop or an official service center for the model of your device.
Reason #4
Often, after contact with water, the device stops turning on. It is urgent to remove the cover and remove the battery, dry the smartphone with a hairdryer with a cold stream of air. Or a warm stream at low speeds. Alternatively, lower your smartphone into the rice. Rice tends to quickly absorb moisture.
After burying your smartphone, you will have to wait 2–3 hours until the moisture is completely absorbed.
Reason #4
Another possible reason for the smartphone not turning on could be a broken power button. When your device is under warranty, contact the store where you bought it or a service center; if not, then go to a repair shop.
There can be many reasons for such a breakdown, from a manufacturing defect to the device falling and the button contacts coming off.
Reason #5
It happens that after installing an application, after a while you receive a request to update it, and the update is not suitable for your phone model. After installing it, you will encounter various problems like turning off your smartphone; to fix the problem, remove the battery and wait a couple of minutes. But from this article you can find out why the phone turns off by itself and how to fix this problem.
Then turn on the device and remove the frozen application. If these manipulations do not help, then use the reset described above.
In the video, what to do if the phone does not turn on Android:
What to do if nothing helps
If the tips described above for bringing your smartphone back to life did not help you, then repairs will be necessary.
The cost of services will vary depending on the cause of the breakdown and the high cost of the spare part itself that will have to be replaced:
- If your contact comes loose when you fall, it won't cost much.
- Reflashing the device is also an excellent option for solving many problems with turning on the device; you should not be afraid of it. Most often, after flashing the device, it works better than before.
- Diagnosis of breakdowns in all service centers is free. If you ask for diagnostics, they will find out if your device is broken within half an hour. They will tell you the cost of repairs, we will consider approximate prices.
- The cost of replacing the battery at a service center will cost from 1 thousand to 1200 rubles.
- Replacing the charger costs about 600 rubles.
- Replacing smartphone firmware costs 1000–1300 rubles.
A phone or tablet ceases to be so useful and interesting if you have no internet access, social networks, the latest news and the ability to get an answer to any question. If you still have a problem connecting to the Internet on your Android device (tablet or phone), you can always find out the reason and fix it.
The very first action that needs to be taken if it is impossible to use the global network is check balance, the operator often restricts access to the Internet with a zero or minimal negative balance, even if there is free Internet traffic. If the balance is positive but there is no access, we check the device further.

Most phones provide presence of two SIM cards, in the phone settings there is an item “SIM card manager”, there you need to select which card will be responsible for access to the Internet (a situation may arise when it is set in the phone that SIM card number two is responsible for access to the Internet, and its not there at all).


If the balance is positive, the desired SIM is selected, but there is no access, check whether it is enabled data transfer, to do this, lower the top curtain on the device’s working screen and turn on mobile data; if a miracle does not happen, it means it is not installed on the phone settings.

The easiest way to get automatic settings- call your mobile operator. There you can also check whether your room has all the necessary services for accessing the Internet (data transfer service). The operator number is most often indicated on the SIM card itself or in the service agreement.
There is another simple way to get automatic settings - remove the SIM card from the phone and install it again, the cellular operator reacts to the new registration of the SIM on the network and sends the settings as an SMS message independently. Settings are enough install and reboot the device. It happens that the device does not support automatic settings (for example, the device is not certified).

If for any reason the automatic settings did not come to you or did not suit you, you need to register manual settings.
Manual Internet setup
Open the phone menu and look for “Settings”

Select from the menu “Wireless networks” (or “More...”, or “Advanced”) → “Mobile network” (or “Mobile networks”, or another similar name) → “Access point” (or “Access points”, or “ APN").

Press the soft key (touch key) with the image of a square (or the + icon in the upper right corner of the screen), select “Create” or “New access point”

We register the operator settings (access point name, APN, password, username). Video on manually setting up mobile Internet for the main operators in Russia, Ukraine, Kazakhstan, Belarus can be found at Settings are written in Latin. Each operator has its own settings, which can be found on the official website.

Press the soft key (touch key) with the image of a square (three dots in the upper right corner of the screen can also perform this function), select “Save”.
We mark the access point with a tick.

Reboot the device. An Internet connection icon should appear at the top of the screen.

The settings for tablets and phones are identical.
If you followed all the instructions correctly, then most likely you are already using this benefit of civilization and are aware of the latest events. If, however, difficulties arise and you are unable to cope with them on your own, contact a communication shop or Internet provider, they will certainly help you.
Alexander Grishin

Sooner or later, every owner of a mobile device is faced with a situation where it freezes and does not turn on. In this instruction, we will tell you what to do if your Android phone does not turn on. Let's look at several ways to fix this problem.
1. First of all, connect your phone to the charger. There is a chance that you simply did not notice how the battery ran out. Wait a few minutes, then try to turn on your smartphone without disconnecting it from charging. If this attempt is unsuccessful, then proceed to the next step.
2. Your phone may not turn on because it's frozen. In this case, a forced reboot can help, which can be done by simultaneously holding down the “Power” and “Volume Up” buttons for 10 seconds until a characteristic vibration appears. If this doesn't help, try holding down the Power and Volume Down buttons. This scheme allows you to reboot almost all Android phones.

3. Try removing the battery, waiting about 10 seconds, and reinserting it. Of course, this can only be done on smartphones with removable batteries. As a rule, if there are no serious problems with the device, this method always helps.
4. Try turning on your smartphone in recovery mode and resetting the settings. Its disadvantage is that after resetting the settings, all data will be deleted, and the phone will appear before you in its “pristine” form, in which you turned it on for the first time after purchase.
Starting recovery mode depends on the brand of the device:
- Samsung and many other phones: Press and hold the Power, Volume Up, and Home buttons at the same time.
- Nexus, LG, Motorola - Press and hold the Power, Volume Down and Home buttons at the same time.
Continue holding the buttons until the Android boot menu appears. To navigate the menu, use the volume up and down keys. Select “Recovery” and press the Power button to confirm your selection. Next, you need to select “Hard Reset” and wait for the recovery to complete.
If none of the above methods helped, and your Android phone does not turn on, then take it to the service, most likely there is a problem with the hardware that you cannot fix on your own.
We hope we were able to help you. If you have any questions, ask them in the comments.
It’s strange to start the instructions with this, but if you already have mobile Internet, then there is no need to get into the jungle of your smartphone’s settings and tweak anything there. This text is for those for whom, suddenly, something went wrong.
If your smartphone is connected to the MTS network (you see MTS at the top of the smartphone screen), but you cannot load the page in the browser, or the mobile application reports that there is no Internet access, let's look for a solution. Just in case, first of all, make sure that you have connected the “Mobile Internet” service, which provides access to... mobile Internet. If your tariff includes a certain mobile Internet package, make sure that the amount of traffic allocated to you is not exhausted - this can be done in your personal account on the MTS website or using a free SMS to the number 5340 . You can also try going to the internet.mts.ru page from your smartphone and see everything there. If the packages are in place, or something just didn’t work out for you, let’s play some magic with the settings of your gadget.
Why do we need any settings at all?
The set of certain parameters that a smartphone “remembers” to access the Internet is akin to a set of keys to your apartment. Let's say your front door has two locks. In order to get inside, you need to have two keys, one is not enough, and any third is superfluous. You, all your household members, and also your kind neighbor Baba Zoya, who kindly waters the flowers when you go on vacation, have the necessary set.
It's about the same with the Internet. The first required key to access the network is the SIM card of a specific operator, which is installed in your smartphone. In addition, you also need a suitable set of setting keys.
Is it really true that in the 21st century they didn’t come up with anything so that the subscriber didn’t have to think about the settings?
They came up with it, of course. Firstly, as soon as you change your phone by installing a SIM card in the new device, the necessary settings will come to you in the form of messages that you only need to save. Secondly, there is a free “Access without settings” service, which allows you to use the mobile Internet even if the gadget is for some reason not configured or configured incorrectly.
But I don’t have such a service!
If the services " Access without settings“you don’t have it, you can connect it yourself - dial the command on your phone in dialing mode *111*2156# and press the call button. This same service, by the way, is also responsible for the correct transmission of MMS.
No, I want to have correct settings and understand what and how.
You can “order” automatic settings in two ways. Fastest: send a blank free SMS to a special number 1234 (what happens next is a little lower). Another way to request settings is through the MTS website, which will have to be discussed in more detail. We remember that the Internet does not work on your smartphone, so use a desktop computer.
Click the "Submit" button.
Regardless of the method in which you requested the settings, two special messages will arrive on your smartphone very soon.

This is what the first one looks like for setting up mobile Internet:

This is the second one, for MMS:

By clicking “Ok” on each of them, you will automatically configure everything as it should. That's all.
Well, let's not languish. Smartphones from different manufacturers have everything arranged differently, and therefore a very small deviation. If your gadget runs on Android, then find the “Settings” item in the menu, in it - the “Wireless Networks” section: usually it is at the very top. In this section we need the “Mobile networks” item (if you don’t see it, click on “More”). Inside, we make sure that data transfer is turned on at the very top. And after that, go to the “Access Point (APN)” item.

If you have an Apple gadget, go to “Settings” and select “Cellular Communications”. On the tab that opens, make sure that the “Cellular Data” option is turned on at the top. If you need to manually select between 3G, 4G and GSM networks, go to “Data Settings”, and then to “Voice and Data”.

The window for manually setting network parameters is hidden in the “Cellular data network” item. Here is the full path to the window where this item is: “Settings” - “Cellular” - “Data Settings”.

We'll describe what follows using Android as an example. For Apple gadgets, the setup is the same (remember about different, but identical sets of keys).
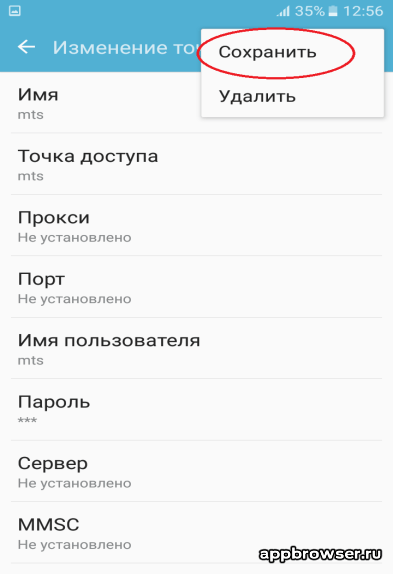
So, if you go to the “Access Point (APN)” item and inside you have nothing except the “New access point” line, that’s where you go. If there are access points there, but there is no point called MTS Internet, too.

If you already have an access point called MTS Internet, go there and check if everything is configured there as in the screenshot below. When creating a new access point, fill in all fields according to the same screenshot. In the password field you need to enter mts, that is, the login and password are the same.
If you use MMS, then for this service to work correctly you need another access point, in the same place where we just set up the mobile Internet. If it doesn't exist, create it. You need to configure it as shown in the screenshot:
Honestly, we don't know why you had to configure everything manually, but since you managed to do it, we're really proud of you. It's time to start using the mobile Internet. Check if anything interesting has appeared on VKontakte - with a sense of accomplishment.