When you install a new operating system on your computer, you have the option of splitting one hard drive into multiple volumes, be it two volumes, three, or more. If this is not done, then all files will be stored on one disk: both the system and your personal multimedia, installed programs. This is not always convenient; moreover, it is recommended to use a separate volume for the system, approximately 100 MB in size, so that no more information is stored on it, except for the needs of the OS. In this article, you will learn how to divide your hard drive into several new ones and what you need to remember when doing so.
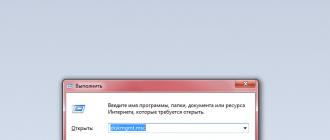
First, you need to go to the Disk Management directory. To do this, hold down the key combination Win + R or Win + k on the Russian keyboard. A search window will open in front of you. In the “Open” line, write the command:- diskmgmt.msc
And click “Ok”.

Right-click on the hard drive.


Enter in the line “Size of compressed space” the number of MB by which you are reducing Disk C.


How to partition a new hard drive? This question is often faced by people who bought a laptop or computer in a store without the Windows operating system. I will guide you through the steps of partitioning your hard drive, thereby preparing a place for installing Windows. By the way, I’m glad to see you on my blog, even if you accidentally get lost on the Internet, I’m still glad to see you on the blog
Why partition your hard drive? This is necessary, first of all, for fast operation of the system, and secondly, for your convenience. Imagine, on your hard drive (C:) there is Windows and all your music, movies and family photos. And suddenly, a fatal error, where you need to format the system disk, e-ma-e, and not only Windows, but also all your personal files. By dividing your hard drive into 2-3 or more partitions, you will avoid such situations and a heart attack.
So let's get started.

1). First of all, we need to set the BIOS to boot from the drive. You can see how to get to the BIOS menu.
Example BIOS menu.


In the BIOS menu, go to the Boot tab and use the keyboard buttons F5 / F6 or with cursor arrows Move the DVD drive to first place. This way we will boot from disk first. To save new BIOS settings, go to the Exit tab and select Save.
2). Insert the Windows8, Windows7, XP installation disk into the drive.
Let's reboot your computer or laptop. We will hear the DVD drive begin to spin up the disk when starting the laptop or PC. You should see the message on the screen "Press any key to boot from CD or DVD", it means "Press any key to boot from CD or DVD".

Press any key on the keyboard and a window like this should appear.

Select your language, you can choose Chinese (just kidding), click "next":

Click on the "Install" button.
3). When you get to the hard partition, you will see an image like in the picture, this is if you have a purchased computer or laptop.

Delete all partitions - "Delete". You should end up with one section. Format the partition - "Format".
Now that we have one section, let's move on to dividing it into sections.
4). I recommend dividing the hard drive into two partitions, local drives C and D.
First, let's create a partition for the OS operating system (drive C:). I recommend making the disk (C:) 100 GB, or more is possible. You need to enter 100000 MB, this will be 100 GB, since 1 GB is 1000 MB.
Click "Create". We write 100,000 MB in size. Click "Apply".

The system will ask you to allocate space for the reserve area, we agree. You should have three sections.
Now let's create a disk (D:) for personal files (movies, photos, music, etc.). We highlight "Unallocated disk space" and click "Create" and "Apply".

The remaining GB will be assigned to disk (D:).
That's all. To install Windows7, select the partition that we created for the operating system and click "Next".

The BIOS, or Basic Input Output System, is what boots up your computer and allows the operating system to access hardware resources. The BIOS has many customizable settings, but it cannot be used to partition a disk. To do this, you should use special utilities.
You will need
- - Acronis Disk Director program;
Instructions
How to add or change partitions on a disk (4)
Before you, the last is the fourth article in the series “How to add or change partitions on a disk.” In the previous three materials, we looked at; learned how to do this on computers or laptops running and.
Today, we’ll talk about how to partition a disk directly during the system installation process. This option, although we consider it last, is the most logical, and also the safest and most uncomplicated. Below, the process will be described for both installing Windows XP and Windows 7.
To begin with, let’s agree that we are talking exclusively about a “clean” installation. That is, when the system is installed from a boot disk or flash drive. A clean installation is used when installing the system on a new computer, or in the case when you decide to completely update the operating system and software of your device.
Since our task is to consider exclusively issues related to disk operations, we assume that all preliminary preparations have already been done. The BIOS is set to boot from a CD/DVD ROM, or from a flash drive. The boot disk (flash drive) is prepared. The hard drive is clean, all the necessary information from it, if any, has been stored on external media.
Those who lived in the pre-Windows XP era or started with a different family of operating systems remember that preparing a new hard drive required the use of special programs. The most popular utility for this was FDisk, a MS DOS component. Today, for these purposes, there are both separate programs and special functions in hard drive manager programs. But in the installers of Windows XP, Vista and Windows 7, there are built-in tools for this, so we don’t need any additional software.
First of all, let's outline the main operations that need to be performed. After that, we will briefly illustrate the entire process, separately for Windows XP and Windows 7.
If the hard drive has already been used, we will delete the existing partitions. In principle, this is not a mandatory operation, and the system can be installed in an existing partition, having previously formatted it. But we assume that the existing partitioning does not suit us, and we want to divide the disk in our own way. Those who install Windows on a new, unpartitioned disk skip this operation.
We create partitions on an unpartitioned disk. We examined the principles of disk partitioning in the first material of the series. We will not dwell on them.
We format the created sections. In principle, you can format only the first (boot) partition where we will install the system. The remaining partitions can be formatted after installation is complete. But, if you have time, it’s easier to do it right away.
We tell the installation program which partition to install the system into. Remember that no matter what partition you install the system on, the boot area and important system files will still be installed on the first (boot) partition. Therefore, if you plan to install one operating system, install it on the first partition, i.e. to logical drive C:!
That, in fact, is all we have to do. Below we briefly illustrate these operations separately for Windows XP and Windows 7:
Windows XP
After booting the computer from a disk or flash drive and starting the installation process, we will see a standard window:
Press “Enter”, in the next window, use the F8 key to accept the License Agreement:

After this, the system checks the disks and shows us a list of disks and partitions on them. If the disk is not partitioned, we will see the following:

Press the “C” key to proceed to creating partitions. If the disk already had partitions, the picture will look something like this:

Select the existing partition and press “D” to delete it. We are asked to confirm the action (using the “L” key, then “Enter”). We repeat the operation with all partitions, if there were several of them. We see the window again:
Let's start creating sections. Press “C”, a window asking you to create a new partition appears:

Enter the size of the first partition in megabytes in the window. By default, the window shows the total amount of free space on your hard drive. Press "Enter".
Let me remind you that in , we determined the optimal partition size for installing Windows XP - 50 - 120 GB, depending on the size of our hard drive.
A window will appear showing the created partition. We repeat the operation by pressing the “C” key to create the remaining partitions. If we limit ourselves to two, then under the second we take all the remaining space on the disk.
Upon completion, we again see the disk map with the created partitions:

Select drive C: and press Enter. A window appears asking you to format:

Last time - “Enter” and it’s done! After formatting the disk, the installation process will continue.
Windows 7
Here, the procedure is the same as for Windows XP, but the installation program interface is slightly different. This is what the disk map will look like:

To display the menu for working with partitions, click on the words “Disk Settings”. To create sections, click on the “Create” inscription:

Indicate in the window the size of the primary partition (in megabytes). After which, click “Apply”. The section has been created. If there were already partitions on the disk, first delete them using the “Delete” command:

In addition to the created partition, another partition reserved by the system will be automatically created on the disk. We already talked about it in the first material of the series. Let me just remind you that no operations with it are allowed!

We create the remaining sections in the same way. The interface, as can be seen in the figure, is more convenient than that of Windows XP; commands for creating, deleting, formatting and resizing partitions are located at the bottom of the window and just click on them.
Then we format the created partitions (you can limit yourself to only the one in which the system will be installed, and format the rest after the installation of Windows is completed).
With this, we will finish the conversation about creating and changing partitions on the hard drive of your computer or laptop.
If you have any questions or comments about the content of the articles, we will be glad to listen to you! You can use the comments on the material, or send us an email using the feedback form.
In the same way, you can write to us about questions that you would like to see answered on the pages of our website. We will be happy to fulfill your wishes.
We wish you success, fast Internet and a non-freezing computer! We hope to see you as regular visitors to our site.
In conclusion, a small announcement: In the next series of articles, we will tell you how to create a wireless (WiFi) access point based on your laptop or computer, i.e. without using external devices.
The BIOS, or Basic Input Output System, is what boots up your computer and allows the operating system to access hardware resources. The BIOS has many customizable settings, but it cannot be used to partition a disk. To do this, you should use special utilities.
You will need
- - Acronis Disk Director program;
Instructions
If your computer has only one disk, you should split it into several logical partitions. On partition C you will have the operating system; you can use the others to store data. Such separation significantly increases the safety of information; even in the event of a complete crash of the operating system, your data will remain intact.
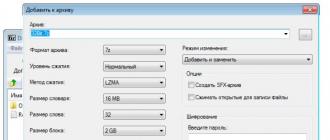
To partition the disk, use the Acronis Disk Director utility; this is one of the best programs in this class. It exists in two versions: one runs from Windows, the second from a CD. It is better to use the second one, since problems sometimes arise when partitioning a disk under Windows. In particular, the partition structure may be damaged, which can lead to data loss.
To run the utility from a CD, you must open the boot menu when the computer starts. To do this, press the F12 key or the one that displays the boot menu on your computer model. If the boot menu cannot be found, set the primary boot device in the BIOS to the CD. To enter the BIOS, you need to press Del, F1, F2, F10 - the keys used differ on different computers. Find the First Boot line and select CD as the primary boot device. Save your changes by pressing F10. If necessary, confirm your changes by typing Y and pressing Enter.
In the boot menu of the disk, select the Acronis Disk Director program, in the suggested options - “Manual”. On the right side of the program window, select the desired disk, and on the left, the required action is “Split Volume”. Following the program prompts, determine the sizes of future disks (old and new). After the program finishes, you will see the old disk, already smaller in size, and a new unallocated area.
Select the unallocated area, then the action is “Create Volume”. Determine the letter of the new volume - for example, D. The newly created partition will appear in the list of partitions.
The operations you performed were performed virtually by the program, so you can still undo them. For the changes to take effect and the new partition to be created, click the “Run” button. After finishing the program, restart your computer.