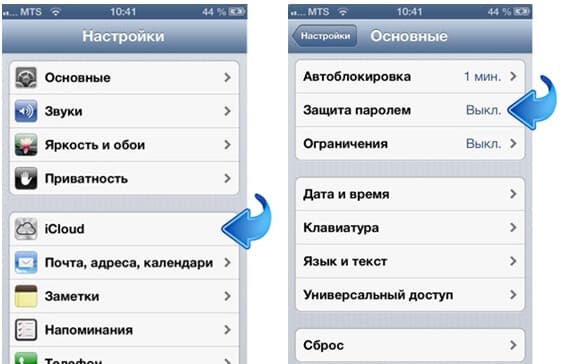
How to create a single private network for all mobile employees and remote branches
What is a VPN?

Suppose we have two offices in different parts of the city, or in different cities or countries, and each of them is connected to the Internet. To work, say, 1C in the form of a single corporate system, we need to integrate them into a single local network. (Despite the fact that we offer solutions for 1C in the form of distributed databases. Sometimes it is easier to create a single network and connect directly to 1C server as if the server is in your room)
You can of course buy a personal line between the two cities, but this solution will most likely be super expensive.
The solution through a virtual private network (VPN - Virtual Private Network) offers us to organize this leased line by creating an encrypted tunnel through the Internet. The main advantage of a VPN over leased lines is saving the company's money when the channel is completely closed.
From the consumer’s point of view, VPN is a technology that can be used to organize remote secure access through open Internet channels to servers, databases, and any resources of your corporate network. Suppose an accountant in city A can easily print an invoice on the secretary’s printer in city B to which the client arrived. Remote employees connecting via VPN from their laptops will also be able to work on the network, as if they are on the physical network of their offices.
Very often, customers encountering * brakes * cash registers when using Remote Desktop come to the need to install a VPN. This will allow you to get rid of sending data for the ticket office back and forth to the server via virtual COM via the Internet and will allow the installation of a thin client at any point that communicates directly with the ticket office, sending only the necessary information to the server via a closed channel. And broadcasting the RDP interface directly to the Internet exposes your company to very great risks.
Connection Methods
Organization methods in VPN It is most expedient to single out the following 2 main methods:
- (Client - Network ) Remote access of individual employees to the organization’s corporate network through a modem or public network.
- (Network - Network ) Combining two or more offices into a single secure virtual network via the Internet
Most manuals, especially for windows, describe the connection according to the first scheme. At the same time, you need to understand that this connection is not a tunnel, but only allows you to connect to the VPN network. To organize these tunnels, we need only 1 white IP and not by the number of remote offices, as many mistakenly believe.
The figure shows both options for connecting to head office A.
Between offices A and B, a channel is organized to ensure the integration of offices in a single network. This ensures the transparency of both offices for any devices that are located in one of them, which solves many problems. For example, the organization of a single numbering capacity within one PBX having IP phones.
All services of office A are available to mobile clients, and when office B is located in a single virtual network, its services are also available.
In this case, the method of connecting mobile clients is usually implemented by PPTP (Point-to-Point Tunneling Protocol) Point-to-point tunneling protocol, and the second IPsec or OpenVPN
PPTP
(Point-to-Point Tunneling Protocol bumagin-lohg) is the point-to-point tunnel protocol, the brainchild of Microsoft, and is an extension of PPP (Point-to-Point Protocol), therefore, uses its authentication, compression and encryption mechanisms. PPTP is built into the Windows XP Remote Access Client. With the standard choice of this protocol, Microsoft suggests using the Microsoft Point-to-Point Encryption (MPPE) encryption method. You can transfer data without encryption in clear text. PPTP encapsulation of data occurs by adding a GRE (Generic Routing Encapsulation) header and an IP header to the data processed by PPP.
Due to significant security issues, there is no reason to choose PPTP instead of other protocols except because of the incompatibility of the device with other VPN protocols. If your device supports L2TP / IPsec or OpenVPN, then it is better to choose one of these protocols.
It should be noted that almost all devices, including mobile ones, have a client built into the OS (Windows, iOS, Android) that allows you to instantly configure the connection.
L2TP
(Layer Two Tunneling Protocol) - a more advanced protocol, born as a result of the combination of PPTP (from Microsoft) and L2F (from Cisco), incorporating the best of these two protocols. It provides a more secure connection than the first option; encryption is performed using IPSec (IP-security) protocol. L2TP is also built-in to the Windows XP remote access client; moreover, when automatically detecting the type of connection, the client first tries to connect to the server using this protocol, as it is more preferable in terms of security.
At the same time, there is such a problem in the IPsec protocol as the coordination of the necessary parameters. Despite the fact that many manufacturers set their default parameters without the ability to configure, the hardware using this protocol will be incompatible.
Openvpn
An advanced open VPN solution created by OpenVPN technologies, which is now de facto a standard in VPN technologies. The solution uses SSL / TLS encryption protocols. OpenVPN uses the OpenSSL library to provide encryption. OpenSSL supports a large number of different cryptographic algorithms such as 3DES, AES, RC5, Blowfish. As in the case of IPSec, CheapVPN includes an extremely high level of encryption - AES algorithm with a key length of 256 bits.
OpenVPN - The only solution that allows you to bypass those providers that cut or charge a fee for opening additional protocols other than WEB. This makes it possible to organize channels which, in principle, impossible to track and we have such solutions
Now you have some idea of \u200b\u200bwhat a VPN is and how it works. If you are a leader - think about it, maybe this is exactly what you were looking for
An example of setting up an OpenVPN server on the pfSense platform
Create a server
- Interface: Wan (network server interface connected to the Internet)
- Protocol: UDP
- Local Port: 1194
- Description: pfSenseOVPN (any convenient name)
- Tunnel Network: 10.0.1.0/24
- Redirect Gateway: Enable (Disable this option if you do not want all client Internet traffic to be redirected through the VPN server.)
- Local Network: Leave blank (If you want the local network located behind the pfSense server to be accessible for remote VPN clients, enter the address space of this network here. Let's say 192.168.1.0/24)
- Concurrent Connections: 2 (If you purchased an additional OpenVPN Remote Access Server license, enter the number corresponding to the number of licenses purchased)
- Inter-Client Communications: Enable (If you do not want VPN clients to see each other, disable this option)
- DNS Server 1 (2, etc.): specify pfSense host DNS servers. (you can find their addresses in the section System\u003e General Setup\u003e DNS Servers)
then we create clients and to simplify the procedures for configuring client programs, pfSense provides an additional tool - “OpenVPN Client Export Utility”. This tool automatically prepares installation packages and files for clients, which avoids manual configuration of the OpenVPN client.
VPN connection between offices is covered by such business security requirements as:
- Possibility of centralized access to information from offices, as well as from the main office
- Unified Corporate Information System
- Enterprise single sign-on databases
- Corporate email with a single entry point
- Confidentiality of information transmitted between offices
If you have any difficulties in setting up or you have not yet decided on VPN technology - call us!
Although the topic is beaten, but nonetheless, many often experience difficulties - whether it is a novice system administrator or just an advanced user, whose bosses forced him to perform the functions of an enikeyschik. Paradoxically, despite the abundance of information on VPNs, finding an intelligible option is a whole problem. Moreover, one even gets the impression that one wrote - the others brazenly copied the text. As a result, search results are literally littered with an abundance of unnecessary information, from which worth it is rarely possible to isolate. Therefore, I decided in my manner to chew all the nuances (maybe someone will come in handy).
So what is a VPN? VPN (VirtualPrivateNetwork - virtual private network) - a generic name for technologies that allow one or more network connections (logical network) over another network (including the Internet). Depending on the protocols and purposes used, a VPN can provide three types of connections: knot knot, network node and network-network.As they say, no comment.
VPN Stereotype
VPN allows you to easily combine the remote host with the local network of the company or another host, as well as combine the networks into one. The benefit is quite obvious - we easily get access to the enterprise network from the VPN client. In addition, the VPN also protects your data through encryption.
I do not pretend to describe to you all the principles of VPN operation, since there is a lot of specialized literature, and to be honest, I myself don’t know much. Nevertheless, if you have a “Do it!” Task, you need to urgently join the topic.
Let's look at a task from my personal practice when it was necessary to combine two offices on a VPN — the head office and the branch. The situation was also complicated by the fact that there was a video server in the head office that should receive video from the branch’s IP camera. Here is a brief task for you.
There are many solutions. It all depends on what you have at hand. In general, a VPN is easy to build with an iron solution based on various Zyxel routers. Ideally, it may happen that the Internet is distributed to both offices by one provider and then you will not have any problems at all (just contact the provider). If the company is rich, then CISCO can also afford it. But usually everything is solved by software.
And here the choice is great - Open VPN, WinRoute (note that it is paid), operating system tools, programs like Hamanchi (frankly, in rare cases it can help out, but I do not recommend relying on it - the free version has a limit of 5 hosts and another significant minus is that your entire connection depends on the Hamanchi host, which is not always buzzing). In my case, it would be ideal to use OpenVPN - a free program that can easily create a reliable VPN connection. But we, as always, will follow the path of least resistance.
In my branch, the Internet distributes a gateway based on client Windows. I agree, this is not the best solution, but enough for the three client computers is enough. I need to make a VPN server from this gateway. Since you are reading this article, you are sure that you are new to VPN. Therefore, for you, I give the simplest example, which, in principle, suits me.
In the NT family, the rudimentary capabilities of servers are already embedded. Raise a VPN server on one of the machines is not difficult. As a server, I will give examples of screenshots of Windows 7, but the general principles will be the same as for the old XP.
Note that to connect two networks, you need to they had a different range! For example, in the head office the range can be 192.168.0.x, and in the branch - 192.168.20.x (or any range of gray ip). This is very important, so be careful. Now, you can begin to configure.
Go to the VPN server in Control Panel -\u003e Network and Sharing Center -\u003e change adapter settings.
Now press the Alt key to bring up the menu. There, in File, you need to select "New Incoming Connection".

Check the boxes for those users who can log into the system via VPN. I highly recommend Add a new user, give him a friendly name and assign a password.
After you have done this, you need to select how users will connect in the next window. Put a daw "Through the Internet." Now you need to assign a range of virtual network addresses. Moreover, you can choose how many computers can participate in the exchange of data. In the next window, select TCP / IP protocol version 4, click "Properties":

You will have what I have in the screenshot. If you want the client to get access to the local network where the server is located, just check the box “Allow callers to access local network”. In the "IP Address Assignment" section, I recommend specifying the addresses manually according to the principle that I described above. In my example, I gave the range only twenty-five addresses, although I could simply indicate two and 255.
After that, click on the button “Allow access”.

The system will automatically create a VPN server that will wait for someone to join it lonely.
Now the only thing left is to configure the VPN client. On the client machine, also go to the Network and Sharing Center and select Set up a new connection or network. Now you will need to select the item "Connection to the workplace"
Click on “Use my Internet connection and now you will be thrown into the window where you will need to enter the address of our Internet gateway at the branch. I have it looks like 95.2.x.x
Now you can call the connection, enter the username and password that you entered on the server and try to connect. If everything is correct, then you will connect. In my case, I can already send ping to any branch computer and request a camera. Now its mono is easy to cling to the video server. You may have something else.
Alternatively, an error 800 may pop up when connecting, signaling that something is wrong with the connection. This is a firewall problem for either the client or the server. Specifically, I can’t tell you - everything is determined experimentally.
This is how unpretentious we created a VPN between two offices. In the same way, you can combine the players. However, do not forget that it will still not be a full-fledged server and it is better to use more advanced tools, which I will discuss in the next parts.
In particular, in Part 2, we will discuss the configuration of OPenVPN for Windows and Linux.
Who needs a VPN?
As of March 2017, the share of remote access jobs posted on hh.ru was 1.5% or 13,339 vacancies. Over the year, their number doubled. In 2014, the number of remote employees was estimated at 600 thousand people or 1% of the economically active population (15–69 years). J "son & Partners Consulting predicts that by 2018, about 20% of all employed Russians will work remotely. For example, by the end of 2017, Beeline plans to transfer from 50% to 70% of the staff for remote cooperation.
Why do companies transfer employees to a remote site:
- Reducing the cost of renting and maintaining jobs.
- The lack of binding to one location makes it possible to assemble a team
a project that could never be assembled within the same city. An additional plus is the possibility of using cheaper labor. - Meeting the needs of employees in connection with their family circumstances.
We discovered the need for a VPN more than 10 years ago. For us, the motivation for providing VPN access to employees was the ability to quickly access the corporate network from anywhere in the world and at any time of the day or night.
The way to choose the perfect VPN solution
There are a lot of solutions. Often, a decision should be made based on what equipment and software are already used in the company, and the system administrator has the skill to configure which software. To begin with, what we refused right away, and then I will tell you what we tried in, what we ended up with.
VPN in routers
There are many so-called “Chinese solutions” in the market. Almost any router has the functionality of a built-in VPN server. Usually this is a simple on / off functionality and adding password logins for users, sometimes integration with a Radius server. Why didn’t we consider such a decision? First of all, we think about our safety and the continuity of the service. Similar pieces of iron can not boast of reliable protection (firmware usually comes out very rarely, or does not work out in principle), and the reliability of operation leaves much to be desired.
Enterprise VPN class
If you look at the Gartner square, then in the VPN market companies that produce network equipment have long been leaders. Juniper, Cisco, Check Point: they all have comprehensive solutions, which include a VPN service.

There are perhaps two disadvantages to such decisions. First and foremost - high cost. The second is that the vulnerability closure rate leaves much to be desired, and if you do not pay annual support fees, then you should not wait for security updates. Not so long ago, a third point appeared - bookmarks embedded in the software of large network vendors.
Microsoft VPN
10 years ago we were a company focused primarily on Windows. Microsoft offers a free solution for those who have the entire infrastructure built on their basis. In simple cases, the setup does not cause difficulties even for a novice system administrator. In our case, we wanted to squeeze everything out of the VPN from a security point of view, respectively, the use of passwords was excluded. Naturally, we wanted to use certificates instead of passwords and use our product Rutoken EDS to store a key pair. To implement the project, we needed: a domain controller, a radius server and a properly raised and configured PKI infrastructure. I won’t dwell on the configuration in detail, there is a lot of information on the Internet on these issues, and the correct configuration of PKI can generally draw a dozen articles. The first protocol we used at home was PPTP. For a long time, this VPN option suited us, but in the end we had to abandon it for two reasons: PPTP did not work everywhere and we started using not only Windows, but also other operating systems. Therefore, we began to look for alternatives. I note that support for PPTP was recently discontinued by apple. To begin with, we decided to see what else of the protocols it can offer on Microsoft. SSTP / L2TP. SSTP suited us all, except that it only worked on Windows. L2TP did not have this drawback, but its configuration and maintenance of it seemed to us quite costly and we decided to try alternatives. I wanted a simpler solution for both users and administrators.
Openvpn
We at Aktiv sincerely love open source. Choosing a replacement for Microsoft VPN, we could not ignore the OpenVPN solution. The main advantage for us was that the solution "out of the box" works on all platforms. Raising a server in a simple case is quite simple. Now, using docker and, for example, a ready-made image, this can be done in a few minutes. But we wanted more. We wanted to add integration with Microsoft CA to the project in order to use the certificates issued earlier. We wanted to add support for the tokens we use. How to configure OpenVPN bundle and tokens is described, for example, in this one. It was more difficult to configure the integration of Microsoft CA and OpenVPN, but in general it is also quite feasible. We used the resulting solution for about three years, but all this time we continued to look for more convenient options. The main opportunity that we got by switching to OpenVPN was access from any OS. But there were two more claims: the company employees had to go through 7 circles of hell with Microsoft CA to issue a certificate, and administrators still had to maintain a rather sophisticated VPN infrastructure.
Rootoken VPN
We have knowledge on how to use tokens in any operating systems, we have an understanding of how to properly prepare the PKI infrastructure, we can configure different versions of OpenVPN, and we have technologies that allow us to manage all this in a user-friendly way from a browser window. So the idea of \u200b\u200ba new product came about.

Configure Rootoken VPN
We really tried to make the setup simple and straightforward. All setup takes just a few minutes and is implemented as an initial setup wizard. At the first step, you need to configure the network settings of the device, I think the comments here will be superfluous.

In the second step, you need to enter the company name and wait a few minutes for the device to configure the built-in certification authority.


The third step is to configure the VPN service itself. Specify the external IP to which the connection will take place. Select the type of encryption and network addressing.

The fourth configuration step is to create local users, or add them from AD

Employee Account

Depending on the operating system and employee’s browser, you will need to install a plug-in and an extension for the browser, which are necessary for working with tokens.

After installing the plugin / extension, we only need to generate a certificate for ourselves on the Rutoken EDS.


And install the client under the desired operating system:

How does it all work?
A little bit about the hardware. Initially, we thought for a long time which “base” to use for our solution, since it was necessary to strike a balance between cost, convenience, and productivity. After researching what is offered on the market, we settled on two options for the implementation and further distribution of the solution:
- x86 (Enterprise) is a software solution that is provided to the end user in the form of a virtual machine image that can be deployed as part of its IT infrastructure.
- Raspberry Pi is already a well-known microcomputer, which has quite good performance at not the highest cost and which you can start using as a VPN server 10 minutes after it was literally taken out of the box.
So now let's look at how our solution works. First of all, I want to remind you that we have implemented two-factor authentication. As carriers of client private keys and certificates, tokens of own production are used, as well as software for working with them.
But initially, we still need to configure the services that are required for the product to work correctly. Services are currently configured by the specialists of our company in a semi-automatic mode. This means that the process of deploying software and initial settings is automated, but initialization of this process remains a privilege of man. During the initial setup, system packages are installed, python, django, OpenVPN, supervisor, OpenSSL, etc.
And then what? Next, you need to configure the entire infrastructure, which is actually responsible for security in general. Namely: CA (certification authority), PKI (public key infrastructure), write out the necessary keys and certificates.
The creation of PKI and CA, as well as the formation of the configuration file of the OpenVPN server, the generation of keys and the issuing of certificates is carried out after the product is transferred to the client. But this does not mean that for this it is necessary to have some specific knowledge and direct access to the operating system. Everything is implemented in the business logic of the backend of the administration system, access to which is provided through the Web interface. The client is only required to enter the minimum set of attributes (described above), after which the process of initializing the PKI and creating the CA starts. It makes no sense to describe specific calls to system commands, since for a long time everything has been described and chewed up to us. The main thing that we did was to automate this process, saving the user from the need to have specific knowledge in administration.
To work with keys and certificates, we decided not to reinvent the wheel (although I really wanted to and still have the idea to invent it based on our future product development plans) and use easy-rsa.
The longest process to set up your infrastructure is to generate a Diffie-Hellman file. We experimented with the parameters for a long time and reached the balance of “quality-performance”. Although there were thoughts in general to get rid of this step, to generate such files in advance, using our server capacities and simply “distributing” them during the initial initialization. Moreover, the data contained in this file is not private. But so far we have left these thoughts for further “research”.
Next, you need to provide the end user with a mechanism for independently creating key pairs, generating requests for issuing a certificate in CA and actually receiving this certificate with a token. And also a client is needed that allows you to establish a VPN connection with pre-authentication on the token.
We solved the first task thanks to our plug-in that implements the functionality of electronic signature, encryption and two-factor authentication for Web and SaaS services. In order to write out a certificate and write it to a token, the user must install this plug-in, follow the link to get to the personal account of the RutokenVPN service, after connecting the token to the computer (more about the plug-in can be found on our resource)
When the certificate issuing process is initialized, a request for a token is generated to generate a key pair, as well as a request for a certificate in CA. The private key is written to the token, and the certificate issuance request is sent to the CA, which in turn writes it out and returns it in response. After which the certificate is also written to the token.
Almost everything is ready to establish a VPN connection. There is not enough client who “knows” how to work with the server and our tokens.

Our client is implemented on Electron. Who doesn’t know what kind of animal it is, then, if very briefly, the ability to implement a desktop application using js, css and html. Without going into details, the client is a kind of “wrapper” over the OpenVPN client, allowing its calls with the necessary parameters. Why so? In fact, it was more convenient for us, although the chosen solution imposes certain restrictions.
Since we use the token as a carrier of key information necessary for authentication when establishing a VPN session, we need to configure the OpenVPN client to work with it. PKCS # 11 is a proprietary library for working with our tokens, the path to which is specified in the OpenVPN client settings. You can read more about it.
When requesting to establish a VPN connection, the key PIN is requested, if entered correctly, the certificate for client authentication is retrieved, the client handshakes the server and the VPN connection is established. Knowledgeable people may object that it is not so simple, but the purpose of this description is not to tell all the details of OpenVPN, but only to highlight the main points of our implementation.
A little about our plans. The main thing we are working on now is the implementation of GOST encryption. A fairly large research path has already been covered, allowing us to get as close as possible to its implementation. In the near future we will be able to satisfy the interest of potential customers in this functionality.
Tags:
- vpn
- openvpn
- raspberry pi
- rutoken
- openssl
The organization of VPN channels between company branches is of great importance in the work of any IT specialist. This article discusses one of the ways to implement this task based on the OpenVPN software product.
Below we will consider the network topology in which we will organize a VPN tunnel, we will analyze the configuration features of the OpenVPN program and step by step configure the routing for our offices. The article is written with the expectation that OpenVPN will be installed on the Windows 7 and Windows Server 2008 platforms.
Network topology.
The network topology we used is standard. There is a Central Office Network (let's call it SCO) and a Branch Network (let's call it SF). The task is to connect the offices in such a way that the final user computer (hereinafter PC1) of the SCO office has access to the shared resources of the user computer (hereinafter PC2) of the SF.
SCO includes:
- An Internet gateway (let's call it ISH1) with two network interfaces:
- 111.111.111.111 - issued by the provider, looks on the Internet.
- 192.168.0.1 - assigned by us, looks at the centralized reporting center.
- OpenVPN Server (hereinafter OS) on which we will raise OpenVPN with one virtual and one physical interface:
- 10.8.0.1 - address of the virtual interface (the interface is installed during the installation of the OpenVPN program). The address for this interface is assigned by the program. You and I should not change the address ourselves from managing network adapters.
- 192.168.0.2 - the physical interface, the parameters are set by us, it looks in the scl.
- PK1 - user computer 1, with a network interface of 192.168.0.3, looks similarly in the centralized communication center.
The Federation Council includes:
- Internet gateway (hereinafter ISH2) with two network interfaces:
- 222.222.222.222 - issued by the provider, looks on the Internet.
- 192.168.1.2 - assigned by us, looks in the SF.
- OpenVPN Client (hereinafter OK) on which we will raise OpenVPN with one virtual and one physical interface:
- 10.8.0.2 - address of the virtual network interface (the interface is installed during the installation of the OpenVPN program). The address for this interface is also assigned by the OpenVPN program.
- 192.168.1.2 - physical interface, parameters are set by us, looks in the SF.
- PC2 - user computer 2, with a network interface of 192.168.1.3, looks in the SF.
We configure OpenVPN server.
Now let's move on to the program itself, the basics and features of its configuration. OpenVPN is available in versions for Linux and Windows. You can download the installation package at.
The installation process itself will not cause any problems. The only thing is to disable the antivirus during installation in order to avoid additional problems. At the time of writing, for example, Kaspersky Lab products did not block the installation, but merely aroused suspicion of some installed components.
During installation, a virtual network adapter is installed in the system TAP-Win32 Adapter V9 and, accordingly, the driver for it. The OpenVPN program will assign the IP address and mask of the OpenVPN virtual network to this interface. In our case, the address 10.8.0.1 with the mask 255.255.255.0 on the OS server and 10.8.0.2 with the same mask on the OK client is assigned to it.
By standard, the program is installed in C: \\ ProgramFiles \\ OpenVPN. In this directory, immediately create an additional folder. keys (here we will store authentication keys) folder ccd (here will be the server settings configs for the client).
In the directory C: \\ ProgramFiles \\ OpenVPN \\ sample-config standard configs are presented. The configs that we will create should be placed in the directory C: \\ Program Files \\ OpenVPN \\ config.
Setting up OpenVPN begins with key generation. The generated keys are divided into:
- the main CertificateAuthority (CA) certificate and the key used to sign each server and client certificate.
- public and private keys for the server and each (this is important) client separately.
The key generation sequence is as follows (the names of the certificate and key files are indicated in brackets):
- We generate the main CA (ca.crt) certificate and CA (ca.key) key.
- Tls-auth key generation (ta.key) for packet authentication.
We will analyze each item in more detail.
We generate the main CA certificate and CA key:
We go in Start - Run we recruit cmd, click OK, go to the command line. We write:
Cd C: / Program Files / OpenVPN / easy-rsa
So we are in the directory easy-rsa:
During the execution of all key generation points, you must be in it. We execute the command:
Init-config
Without closing the command line, let's go to C: \\ ProgramFiles \\ OpenVpn \\ easy-rsa and edit the file vars.batby filling in the following parameters (indicating, of course, your data):
KEY_COUNTRY \u003d RF
KEY_PROVINCE \u003d MO
KEY_CITY \u003d Malinino
KEY_ORG \u003d Organization
[email protected]
Now create a CA certificate and a CA key. We open the command line that hung all this time somewhere on the desktop, and continue to enter the commands:
Vars
clean-all
build-ca
The last command just generates a CA certificate and a CA key. In the process of creating the key, you will be asked questions that you can answer simply by pressing Enter "a (then the values \u200b\u200bwill be taken from the vars.bat file that we edited above) or enter your own. It is worth paying attention to the question:
Common Name (eg, your name or your server "s hostname): OpenVPNS
Here you must specify a name for the server - in the example we entered OpenVPNS.
We generate the certificate (server.crt) and the key (server.key) of the server.
Without leaving the directory, we will continue to enter commands on our command line. We generate the server and key certificate with the command:
Build-key-server server
We answer the questions as in the first paragraph. To the question:
Common Name *: server
We introduce server. To the questions:
Sign the certificate?
1 out of 1 certificate requests certified, commit?
need to give a positive answer: Y.
We generate the certificate (office1.crt) and the key (office1.key) for the client.
Obviously, there can be many clients; in our example, he is one - office1. Depending on the number of clients, the following command on the command line is executed several times, and change the names of the generated keys as well:
Build-key office1
if more certificates and keys are required, say for the second client, then we enter:
Build-key office2
In the process of answering questions, do not forget that each client answers a question Commonname should get a unique name, for example: office1, office2, etc.
Generation of DiffieHellman parameters (dh1024.pem).
We enter on the command line, find in the same easy-rsa directory:
Build-dh
Tls-auth key generation (ta.key) for packet authentication
In the end, create a key for tls-authentication with the command:
Openvpn --genkey --secret ta.key
Now we will figure out which files to leave on the server and which files to transfer to the client. Only the following files should be located on the server (OC) in the keys folder that we created:
- ca.crt
- ca.key
- dh1024.pem
- server.crt
- server.key
- ta.key

On the OK client, similarly to the OS server, we will also create the keys folder, there should be:
- ca.crt
- office1.crt
- office1.key
- ta.key
All files with the .key extension are secret. It is worth transmitting them only through secure channels, preferably on a physical medium.
Next, let's start creating a config for our OS server and OK client. In the config directory, create a file with the following name and extension: server.ovpn Open it with a notebook and start writing a config:
We select the protocol for data transfer - in this case upd:
Proto udp
Standard port for OpenVPN:
Port 1194
The operating mode of the program is the L3 tunnel. In this mode, OpenVPN router:
Client Server Mode:
Tls-server
This topology is available from version 2.1 and consists in the fact that each client is issued with 1 address, without virtual router ports:
Topology subnet
Routes are added through.exe - this is important:
Route-method exe
The delay when adding a route can be reduced to 5:
Route-delay 10
This option sets the network organization. We have a virtual network 10.8.0.0 / 24. The first address from this network, that is, 10.8.0.1 is issued to the server, subsequent (10.8.0.2, 10.8.0.3, etc.) to the clients. The DHPC server receives the address 10.8.0.254:
Server 10.8.0.0 255.255.255.0
We set the gateway in openvpn network:
Route-gateway 10.8.0.1
The directory in which we must place the file with the name of our client, that is, office1 without the extension, and in it write the commands that will be executed on the client:
Client-config-dir "C: \\\\ Program Files \\\\ OpenVPN \\\\ ccd"
cert "C: \\\\ Program Files \\\\ OpenVPN \\\\ keys \\\\ server.crt"
key "C: \\\\ Program Files \\\\ OpenVPN \\\\ keys \\\\ server.key"
dh "C: \\\\ Program Files \\\\ OpenVPN \\\\ keys \\\\ dh1024.pem"
tls-auth "C: \\\\ Program Files \\\\ OpenVPN \\\\ keys \\\\ ta.key" 0
We set the OS server a route to the entire network:
Route 10.8.0.0 255.255.255.0
Choose a compression method:
Cipher BF-CBC
We set traffic compression:
Comp-lzo
OpenVPN passes non-critical network errors to the event registration system. In practice, this will reduce the contents of the status window that appears when the OpenVPN server starts:
The server pings the opposite side with an interval of 10 seconds and if the side does not respond in 60 seconds, the server will start the reconnection:
Keepalive 5 60
Next, go to the ccd directory and create a file in which the commands sent to the client from the server will lie. It must be called in the same way as we called the client himself, for example office1. The file will not have an extension.

We edit it through a notebook. All parameters set below will be automatically transferred to the client:
We set the ip and mask for our office1 client:
Ifconfig-push 10.8.0.2 255.255.255.0
We give him the route to the entire network:
Push "route 10.8.0.0 255.255.255.0"
We set the gateway for it:
Push "route-gateway 10.8.0.1"
This command tells the OS server that behind this client, namely OK (office1) is the network 192.168.1.0:
Iroute 192.168.1.0 255.255.255.0
Thus, we have finished configuring the server on the OS side.
Client setup
Next, proceed to change the client settings. Let's go by car OK to the folder config. Create a file in it office1.ovpnLet's start editing it, a number of options repeats the similar ones on the server, so we will not explain them:
Dev tun
proto udp
port 1194
Specify the external address ISH1:
Remote 111.111.111.111
The client will work in the client-client mode:
Tls-client
This option protects against server spoofing by a third party:
Remote-cert-tls server
These options are similar to the server:
Route-method exe
route-delay 10
Set the route to the network 192.168.0.0:
This command allows you to receive client configuration from the server:
Key paths:
Ca "C: \\\\ Program Files \\\\ OpenVPN \\\\ keys \\\\ ca.crt"
cert "C: \\\\ Program Files \\\\ OpenVPN \\\\ keys \\\\ office1.crt"
key "C: \\\\ Program Files \\\\ OpenVPN \\\\ keys \\\\ office1.key"
tls-auth "C: \\\\ Program Files \\\\ OpenVPN \\\\ keys \\\\ ta.key" 1
Other options are also similar to the server:
Cipher BF-CBC
comp-lzo
verb 1
keepalive 5 60
This completes the setup of the client-side program OK.
Firewall setup and routing.
And so, we have configured configs on OK and on OS. Now we will analyze very important points. We will make a reservation in advance if you are using KIS 2011 or similar anti-virus programs, then ICMP packets should be allowed in the firewall settings. This will allow you to freely ping hosts on our networks.
It is also worth adding our virtual interface of the OpenVPN program to the list of trusted networks.
On ISh1 the following actions should be done:
- Redirected port 1194 of UDP protocol from interface 111.111.111.111 to OS server interface 192.168.0.2
- In the firewall, UDP protocol must be transmitted on port 1194, otherwise ping will not even pass between the OS and OK.
Similar actions should be taken on ISH2:
- Configure port redirection 1194 UDP from the interface 222.222.222.222 to the client interface OK 192.168.1.2
- Check if port 1194 of the UDP protocol is open in the firewall.
In Usergate 5.2, for example, setting up packet forwarding on port 1194 of the UDP protocol looks like this:
At this stage, we already ping the OK and OS at their OpenVPN addresses, that is, 10.8.0.1 and 10.8.0.2. Next, we need to ensure the correct packet route from the OK client to the remote network 192.168.0.0. We do this in one of several ways:
Or we set a constant route to this network on the OK client itself:
Route -p add 192.168.0.0 mask 255.255.255.0 10.8.0.1
Or we set this route in the ccd config of the client on the server, namely, in the file office1 we will add:
Push "route 192.168.0.0 255.255.255.0"
You can also do this by adding a line directly to the client’s config OK:
Route 192.168.0.0 255.255.255.0
Then you need to provide a packet route from the OS server to the remote network 192.168.1.0. this is done similarly to the version above with a few exceptions.
Add the command to the OS server config:
Route 192.168.1.0 255.255.255.0 10.8.0.2
or add the command directly on the command line:
Route -p add 192.168.1.0 mask 255.255.255.0 10.8.0.2
It is also necessary to enable the service in the services on the OS server and the OK client Routing and Remote Access, thus providing routing to the internal network (forwarding). Without this, the internal addresses in the networks of the SCO AND SF of the OK client and the OS server will not ping.
At this stage, we are already free to ping the internal addresses of our OS and OK, i.e. typing on the server OS ping 192.168.1.2 and on the client OK ping 192.168.0.2 we get a positive result in the form:
Thus, OK and OS mutually ping on their OpenVPN and internal SCO and SF addresses. Next, we need to register a route on the command line to the network 10.8.0.0 on our PC1 and PC2. This is done with the following commands:
Route -p add 192.168.1.0 mask 255.255.255.0 192.168.0.2
Route -p add 192.168.0.0 mask 255.255.255.0 192.168.1.2
As a result, the shared resources in PC1 and PC2 will be available at their intranet address:
Tags:
In this article, we will take a closer look at the process of setting up a VPN server in the Windows Server operating system, and also answer the questions: What is a VPN and how to set up a VPN connection?
What is a VPN connection?
VPN (Virtual Private Network) is a virtual private network that is used to provide a secure connection to the network. A technology that allows you to integrate any number of devices into a private network. As a rule, via the Internet.
Although this technology is not new, but recently it has become relevant because of the desire of users to maintain data integrity or privacy in real time.
This connection method is called a VPN tunnel. You can connect to a VPN from any computer, with any operating system that supports a VPN connection. Or a VPN-Client is installed, which is able to forward ports using TCP / IP to a virtual network.
What does a VPN do
VPN provides remote connection to private networks
You can also safely combine multiple networks and servers.


Computers with ip addresses from 192.168.0.10 to 192.168.0.125 connect through a network gateway that acts as a VPN server. The server and router must first have rules for connecting to the VPN channel.
VPN allows you to safely use the Internet when connected even to open wi-fi networks in public areas (in shopping centers, hotels or airports)

As well as circumvent restrictions on the display of content in certain countries

VPN prevents cyberthreats by an intruder intercepting information on the fly, invisible to the recipient.

VPN working principle
Let's look at how a VPN connection works in principle.
Imagine that the transfer is the movement of a packet on a road from point A to point B; at the path of the packet there are checkpoints for passing the data packet. When using a VPN, this route is additionally protected by an encryption system and user authentication in order to secure the traffic that contains the data packet. This method is called “tunneling” (tunneling - using a tunnel).

In this channel, all communications are reliably protected, and all intermediate data transmission nodes deal with an encrypted packet and only when transmitting information to the addressee, the data in the packet is decrypted and made available to an authorized recipient.


VPN will ensure the privacy of your information along with a comprehensive antivirus.
VPN supports such certificates as OpenVPN, L2TP, IPSec, PPTP, PPOE and it turns out a completely secure and secure way to transfer data.

VPN tunneling is applied:
- Inside the corporate network.
- The union of remote offices, as well as small branches.
- Access to external it resources.
- To build video conferencing.
Creating a VPN selection and configuration of equipment.
For corporate communication in large organizations or combining offices that are remote from each other, hardware equipment is used that can maintain uninterrupted operation and security in the network.

To use the vpn service, the role of a network gateway can be: linux / Windows server, a router and a network gateway on which a VPN is raised.
The router must ensure reliable operation of the network without freezes. Built-in VPN allows you to change the configuration for work at home, in the organization or branch office.
Setting up a VPN server.
If you want to install and use a VPN server based on the Windows family, you need to understand that Windows XP / 7/8/10 client machines do not support this function, you need a virtualization system, or a physical server based on Windows 2000/2003/2008 / 2012/2016, but we will look at this feature on Windows Server 2008 R2.
1. First you need to install the server role "Network and Access Policy Services". To do this, open the server manager and click on the "Add Role" link:
Select the role "Network and Access Policy Services" and click next:

Select "Routing and Remote Access Services" and click Next and Install.

2. After installing the role, you must configure it. Go to the server manager, open the "Roles" branch, select the "Network and Access Policy Services" role, expand it, right-click on "Routing and Remote Access" and select "Configure and enable routing and remote access"


After starting the service, we consider the role configuration complete. Now you need to allow users access to the server and configure the issuance of ip-addresses to clients.
Ports that support VPN. After raising the service, they open in the brandmauer.
For PPTP: 1723 (TCP);
For L2TP: 1701 (TCP)
For SSTP: 443 (TCP).
The L2TP / IpSec protocol is more preferable for building VPN-networks, mainly this concerns security and higher availability, due to the fact that a single UDP session is used for data and control channels. Today we will look at configuring the L2TP / IpSec VPN server on the Windows Server 2008 r2 platform.
You can try to deploy on the protocols: PPTP, PPOE, SSTP, L2TP / L2TP / IpSec
Go to Server Manager: Roles - Routing and Remote Access, right-click on this role and select " Properties », on the “General” tab, put a check in the fields of the IPv4 router, select “local area network and call on demand”, and the IPv4 remote access server:

Now we need to enter the preliminary key. Go to the tab Security and in the field Allow special IPSec policies for L2TP connection and enter your key. (Regarding the key. You can enter there an arbitrary combination of letters and numbers, the main principle, the more complicated the combination - the safer, and still remember or write down this combination, we still need it). In the Authentication Service Provider tab, select Windows Authentication.


Now we need to configure Connection Security. To do this, go to the tab Security and choose Authentication methodscheck the box EAP and Encrypted Verification (Microsoft, version 2, MS-CHAP v2):

Next, go to the tab IPv4, we’ll indicate which interface will accept VPN connections, as well as configure the pool of issued addresses for L2TP VPN clients on the IPv4 tab (with the interface set “Allow RAS to choose an adapter”):

Now go to the tab that appears Portsright click and The propertieschoose a connection L2TP and click Tune, set in a new window Remote Access Connection (Inbound Only) and Connection on demand (incoming and outgoing) and set the maximum number of ports, the number of ports must match or exceed the estimated number of clients. It is better to disable unused protocols by removing both checkmarks in their properties.

List of ports that we have left in the indicated quantity.

This completes the server setup. It remains only to allow users to connect to the server. Go to Server Manager Active Directory – the users - find the user we want allow access press propertiesgo to bookmark incoming calls