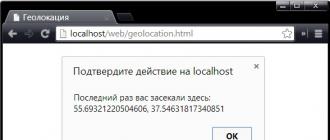
Hello.
I want to tell you about the restoration of my TeXeT TM-9750HD tablet nee Teclast P98HD from a full brick state. I bought it for 7,590 rubles at home in Chelyabinsk, a tablet with a Retina screen and an RK3188 processor for such a price immediately attracted me. For a couple of days I honestly sat on the stock firmware from the texet, but although AnTuTu showed 18.5 million parrots on it, the interface brakes and the lack of some things the developer needed made me look at the custom firmware.
After a short search, 2 candidates were found. One from the site w3bsit3-dns.com, on Android 4.2.2, which by the way was even delighted to call it good firmware, another on Android 4.1 from the rockchipfirmware site and it was a fatal error, let's call it bad firmware. At first, using RKBatchTool, I rolled a good firmware, and I had to calm down, but there is no limit to perfection. The fact is that in a good firmware there were several droplets and one big fly in the ointment. He rebooted 1, 2 times a day at the most inopportune moment for no reason, it terribly infuriated me. Then I decided to try the bad firmware. RKBatchTool wanted to warn me that this is a bad idea by persistently giving an error, but I did not give up, then using rkflashtool and Ubuntu forcibly flashed the images kernel.img, misc.img, recovery.img, boot.img, system.img, parameter by offsets written in file parameter. After rebooting, the tablet stopped showing any signs of life. It did not turn on and was not detected by USB in any operating system. Did not enter either recovery mode or bootloader. After sitting for a week without a tablet. I realized that I needed to fix it and started looking for information on how to restore it from a hard brick. After two days of searching, the keyword MaskROM was found - this is the mode into which the processor enters when it does not find flash memory chips, and since flash memory is not needed to enter this mode, in fact, you can do anything with the tablet. From the freaktab site from Finless Bob, who is familiar to many for firmware for dongles on RockChip processors, I found instructions for restoring an MK808 dongle by closing pins 8 and 9 to enter from MaskROM. There was nothing else to do and had to open the tablet.
As a little radio amateur I know that it is not worth closing any contacts just like that. Therefore, I first decided to find out about the flash memory that was installed in my tablet. I had a Micron 29F64G08CBABA. Most importantly, I learned that in my case it was necessary to close contacts 29 and 30.

It's time to act. Armed with an eye scalpel that was bought specifically for parsing the tablet, I started the operation. The instructions found said what was needed:
1 - close the leads of the flash memory chip with a sharp object
2 - connect the tablet to the computer via USB
3 - and turn on the tablet
4 - open the pins of the microcircuit when the tablet appears in the list of Windows devices.
Having done as it was written in this instruction, I succeeded. The tablet appeared in the list of devices, but why did it immediately disappear. Half a day poking a scalpel into these microcircuits. As a result, I found out that on my tablet, the power button needs to be kept pressed only then it will not disappear. Having prepared myself, I launched RKBatchTool and rolled a winning good firmware. At the end, RKBatchTool reported success. The tablet rebooted and a boot animation appeared. There was no limit to emotions. Now the tablet is in good health, it just keeps rebooting for no reason. Development companies are in no hurry to release updates.
The article was written for enthusiasts like me, I am not responsible for broken tablets.
You will need
- android tablet;
- microSD memory card with a volume of at least 512 MB;
- computer with internet connection.
1 Disassembling the caseunnamed chinese tablet
Usually this kind of malfunction is solved in one way - by replacing the tablet software, or flashing... And here it would seem that everything is simple, but we know little about the tablet. That is why it is nameless, that it is impossible to find any information on its name. Therefore, the first step is to determine what processor is this device running on... To do this, you have to get inside the tablet.
The designs of tablets can be very different, so here you can limit yourself to only general recommendations for disassembly.
- Look carefully around the perimeter, along the side edges of the tablet for screws. If there are any, unscrew them.
- If there are any plastic pads or inserts, try to separate them by picking them up with something sharp, but not hard (a plastic knife, for example).
- Try to pick up the back cover and walk around the perimeter, separating it from the front. It is convenient to do this with an unnecessary plastic card - it does not scratch the case and, at the same time, is hard enough to open it.
2 Definition of technical featuresnameless tablet
When the tablet case is opened, define the processor model... Most often, the processor is the largest chip on the motherboard of a tablet computer. For example, in this photo the processor model WM8850 (position 1). This is a fairly common inexpensive chip in Chinese tablets.
You may also need to know the model of the touchscreen controller as sometimes, after installation, it may turn out that the tablet boots up and works, but the touchscreen does not. In the photo, the controller (position 2) is called EKTF2127... This is also a fairly common microcircuit. Typically, the touchscreen controller is located near the loop that connects the touchscreen to the motherboard.

Also look at large inscriptions on the motherboardthat are not related to any specific element (position 3). Perhaps it will be the board version, its number, or even the manufacturer's name. This information will make it easier for you to find the correct firmware.
An important parameter is also screen size and resolutionif you remember.
In general, you need to collect as many features of your "anonymous" tablet as possible. This set of features is like a fingerprint that can be used to establish his "identity."
3 Finding a suitable firmwarefor an unnamed chinese tablet
Android tablets usually support several flashing options:
- via WiFi network,
- from a computer via a USB cable,
- from a bootable microSD card.
The most suitable option in our case is update using bootable microSD card... To do this, you need to find a suitable firmware, load it onto a memory card, restart the tablet and wait until the installation of the operating system is complete. The performance or malfunction of the tablet depends on how successfully you can find the firmware.
Type in a search engine a query with all the data that you found for your tablet. For example, for the case under consideration, the request may be as follows: w70 WM8850 firmware And the very first links in the Yandex search results lead us to the desired result.

Read these sites, look for what works best for your Chinese tablet. Usually, such thematic forums provide detailed sequential descriptions of the software update process for various devices and provide multiple links to firmware, both official (factory) and unofficial (developed by enthusiasts).
note
When loading an unsuitable firmware onto a tablet, there is a risk of turning the tablet into an inoperative useless "brick". Reflash your tablet at your own peril and risk or contact a service center.
Surely many owners of devices operating on the Android platform have heard about the problem of "oskirpichivaniya" smartphone. And some inexperienced experimenters are familiar with this situation and not by hearsay. What to do in this case? How to get Android out of the "brick" state? We will try to answer these questions in today's article.
Just do not panic and fall on the fifth point - the worst has already happened, so let's first calmly figure out what “oskirpichivanie” means. We are talking about the complete (maybe partial) loss of the gadget's performance as a result of careless intervention in the operating system or incorrect actions in relation to the software.
The main signs of the state of Android "brick"
- Inability to turn on the device.
- There is no reaction to buttons (physical and on-screen).
- The system constantly gives an error reporting problems with the built-in or RAM.
- When turning on the device, an error appears that it is not possible to load the Android operating system.
- Other.
In this case, an ordinary user, in a semi-faint state, will carry his Android to the service center where, realizing that a sweet pie has come, they will include a far from democratic bill for banal manipulations.
Reasons for "oskirpichivaniya" tablet or smartphone
The first and, alas, the most common one is an unsuccessful flashing. Sometimes an inexperienced user is suddenly tired of his operating system and, after reading information from wherever possible, he decides to start software upgrading of his device. And now the download of the latest and most fashionable firmware is already starting from do not understand what source. The result is, in general, predictable - from an imbalance in the system to a complete failure in work.
Conclusion - do not try to reinstall the operating system unnecessarily, and if you decide, then do it from trusted and trustworthy sources.
The second reason is some kind of failure during the flashing procedure, i.e. interrupted process. For example, they did not pay attention to the battery charge of their device, which ran out at the most inopportune moment (wireless installation method). Make a conclusion yourself.
Cases are not uncommon - a rollback to the factory software after installing a custom firmware.
Various "enhancers" designed to increase performance, transfer speed, etc., forced stop of some system applications, even a seemingly harmless installation of a new theme - all these are factors that can bring your gadget to a coma.
How to fix the situation
Standard methods:
The first way - we do hard reset (factory reset) via recovery menu (recovery menu). Our actions:
Turn off the device completely, i.e. take out the battery for a couple of minutes and reinstall it. Then we hold down and hold the volume key (usually to increase, but on some devices there may be a decrease). Now you need to press the "home" (or power) key and hold three keys until the "recovery" mode starts. In the menu that appears on the display, select (with the volume rocker) the line “ Wipe Data / Factory Reset»:

We are waiting for the system to finish the reset process and reboot.
Second way - we try to get into recovery mode and flash from there (much safer than using all kinds of software):
And choose wipе dаta / fаctory reset (see above) to delete the data. Then you need to choose wipe cаche pаrtition... This is necessary in order to erase in this case the section cache... Now we are trying to put our operating system through install zip frоm sdcаrd... To do this, select the archive with the firmware and confirm our choice
To reflash, go to the office. the website of your device manufacturer. Find the official version of your particular Android model and follow the instructions.
It is possible that your device does not react to anything at all, including buttons. In this case, you can enter the recovery using USB JIG... A penny gadget, but if you can't find it, here's a video for the handy ones:
Third way - We are trying to connect our device to another computer via USB, or replace the cable itself, and then "reflash" The fact is that there may have been a lack of power from the PC power supply for the firmware procedure (this, by the way, is a common reason for Android "turning").
Fourth way - restoration of the "brick" Android using FlashTool (video):
That, perhaps, is all on the topic. If you had a successful experience in resuscitating your device, please share it.
Many of us are familiar with an operating system such as Android. All owners of devices running this shell know that using Android is simple and convenient: your favorite applications, useful functions are always at hand, and the interface is so flexible that you can almost completely change it at your discretion.
"Brick" - what is it?
"Android" began its journey back in 2009, and since then the developers have been promoting and improving the shell, not knowing sleep and rest. Updates and new versions are systematically released. As a rule, the user buys a gadget with an operating system already installed on it, and throughout the "life" of the device, the firmware of this version (operating system version) remains. But sometimes it needs to be reinstalled due to technical problems or at the user's discretion. Then you have to carry your favorite device to a service center, to an experienced master, and some are taken for flashing themselves.
Here, many novice users who are familiar with "Android" at a level no higher than installing applications from the Play Market "grow wings". After reading various instructions on the World Wide Web, they think that reinstalling the OS is not difficult and that they will cope with it themselves. In addition, they will save a certain amount, which they would have taken at the service center. But soon such users realize that they have exaggerated their own strengths and cannot complete the flashing properly.
In this case, there are different scenarios for the development of events. The most unfortunate of these is when the phone turns into a brick. You may have heard this wording before, but did not understand what it means. "Scribbling" or "scorching" of a device means that it partially or completely stops working. That is, it does not turn on, does not respond to pressing buttons or connecting to a computer. Is it possible to restore the "Android" brick? Sure you may. Hence the name - brick, because the functionality of the gadget is now no more than that of a stone, and now you can only chop nuts with it. It is quite difficult to bring a device to this state, it takes talent. But we hasten to please you - the device must be restored in any case, if you did not take the idea of \u200b\u200bnuts seriously, and the device itself is safe and sound. So how do you restore an Android brick?
Why can a device become a brick?
In order to understand how to restore an "Android" brick, you first need to understand the mechanism by which the device turns into it. So to speak, go from the opposite. And once again, it would be nice to prove to users that without physical intervention in the case and internal structure of a smartphone or tablet, it cannot be completely "killed" and can be returned to work in the ways that we will discuss below. We will interpret in simple language. Your device has a recovery console. It is located in internal memory and has no intersection points with the operating system, that is, they are two independent substances. And even if during the flashing process failures, malfunctions or errors occur, this very console will remain intact and with the help of it it will be possible to reinstall the firmware again. In addition, you can back up the OS with all the necessary information to this console.

Don't panic
The question is brewing: "What if something goes wrong with the console itself and it disappears?" The elimination of the console happens quite rarely, but even if it happens, the operating system will remain in place, and from it using special utilities it will be possible to restore the console. There are practically no cases when both the console and the operating system "fly away", you need to have just enchanting luck to destroy these two shells at the same time, but recovery is possible in this version as well.
How to restore a brick "Android" at home
If you are good at technology, but for some reason turned the device into a brick, you can restore it at home. There are several options for which oskirpichivaniya occurs. Let us examine each case separately.

Unable to enter the operating system
That is, the gadget itself shows signs of life, you can turn it on, but the firmware endlessly freezes, is reset, or you just see the boot or turn-on window on the screen, but in fact nothing happens. First, don't jump to conclusions. For example, people who do not understand how to restore a Chinese brick "Android" begin to panic just a few minutes after the power-on screen appears, but such a device needs even more time to "think" than a high-quality device. The realization that something has gone wrong can only come about 10-15 minutes after switching on.
Then your actions are as follows: completely turn off the device and enter recovery mode again (the system console, staying in which is an integral part of the flashing itself, so it is hardly necessary to talk about what it is and how to get there). After that, you can try again to install the same firmware as the first time (Install zip from sdcard -\u003e Chooze zip from sdcard) or make a system backup (Backup and restore -\u003e Restore). Please note that if after the first attempt to reflash the device you could not enter the system, then, perhaps, the OS itself was of poor quality or not intended for your gadget, and you do not need to "install" it again. Choose a different version or restore the old one. The same problems can occur if the battery charge was not enough to complete the process or memory to install a new system (the device model is outdated for the new firmware version).

Unable to enter recovery mode after flashing
There is also such an option that after flashing the OS itself works fine, but it does not come out to the console. Everything is fixable and much easier than you think. On the Play Market of the same name, you can find special programs designed to return you to the recovery mode. For example, applications such as TWRP Manager or Installer do an excellent job. If your device is specific and similar utilities did not help you, then there are other ways to restore the "Android" -brick of the console mode.

You "killed" both the firmware and the console mode
This happens very rarely, and if you were looking for how to restore an "Android" brick through a computer, then your time has come. You can't do without a PC. You will need to go into fastboot mode and perform a series of simple steps. We do not focus on this point, because each device model has its own way of entering this mode, and it is the type of gadget that determines all further user actions. How to restore an "Android" brick on a tablet? A number of actions are not much different from the procedure with a smartphone.

We have told you how to restore an "Android" brick. Bring your gadget back to life and use it with pleasure!
fb.ru
Android turned into a brick: device recovery methods
Orifice is a complete or partial loss of performance by an Android device. Not a single user who flashes a gadget on his own is immune to the transformation of a smart phone into a meaningless "brick", so the question of how to perform recovery at home arises in various forums quite often.
Correcting the consequences of unsuccessful firmware
If the smartphone is constantly reset during boot or the logo is spinning on the screen for 5-10 minutes, but the system does not start, then technically it is not a “brick” yet. Such a device can be quickly restored through the Recovery menu by flashing it again.
- Turn off your phone.
- Hold down the volume down key and press the power button to get to the Recovery menu.
You have two options - restore the backup if you made one (this is one of the main requirements for firmware), or re-flash the phone. To start a backup, go to the "Backup and Restore" section and start restoring the previous state of the system. 
For flashing, select the "Install zip from sdcard" section and specify the required operating system file. This method fixes errors that occur with incomplete firmware: for example, when the phone turns off while writing files.
The opposite situation - the firmware starts up, you cannot get into Recovery. This problem is even easier to fix: you can use the TWRP Manager, ROM Installer, or ROM Manager applications to return the recovery console. These applications, after installation, determine the model of the smartphone and independently download the desired recovery. 
If the listed applications did not cope with the task, find the instructions for installing the recovery console for your mobile device model.
Restoration of the "brick"
Let's consider a more complicated option, when the smartphone actually turns into a "brick" - neither the system nor the Recovery menu starts up. It is also possible to restore it at home: for this you need to use the official firmware from the manufacturer. Let's consider the recovery procedure using the example of a Samsung phone:

Your "brick" will again become a workable device, returning to its original state.
Flash with Flashtool
This method is suitable for Sony phones, but it can be used on mobile devices from other manufacturers. You will need:
- The very "brick" that you want to restore.
- Official firmware in FTF format.
- Flashtool program installed on the computer with firmware drivers.
Before starting work, it is advisable to disable the antivirus and firewall in order to avoid incorrect operation of the Flashtool utility. In addition, when starting to restore the "brick", make sure that the phone is fully charged.

The recovery program will prepare the Android firmware and offer to connect the "brick" to the computer. Hold down the Volume Down key on your device and connect your phone to your computer. 
The Flashtool program must identify the "brick" connected to the computer and run the firmware on it. If the restoration is successful, you will see the message “Flashing finished” at the end of the log. After that, you can disconnect the phone from the computer and turn it on - Android should start without errors. 
Each manufacturer has its own utility for flashing, so it is better to look for recovery instructions for a specific phone model that has turned into a "brick". If at home it is impossible to return the device to a working state, then it remains to contact the service center.
recoverit.ru
Brick Recovery Android
The loss of Android's performance on a smartphone or tablet, or the so-called oskirpichivaniya, occurs for a variety of reasons. Most often, this is facilitated by incorrect firmware, which can turn an advanced phone into a brick that no one needs. The question of whether it is possible to restore the gadget on their own is of interest to many users.
How to eliminate the consequences of an unsuccessful firmware
 If, after the logo appears when you turn it on, the system does not start for several minutes, or the boot is constantly dropped, then this is not a “brick” yet and all is not lost. To get the launch, you need to go to the Recovery menu from your smartphone and make a new flashing.
To do this, follow these steps:
If the gadget is turned on, you must turn it off. Hold down the key with which the volume and the power key are reduced. The Recovery menu opens, which offers 2 ways:
- restore the backup (this is the main requirement for the firmware, if the phone was flashed, then the backup was also restored). The backup starts running in the "Backupand Restore" section when you select the previous system position.
- flashing - carried out by selecting the "Install zip fromsdcard" section, in which you need to specify the required operating system component. This option deals with the correction of incomplete recovery errors, which may arise, for example, due to the disconnection of the phone during the process of writing files.
Another situation may arise: when the firmware is launched, it is not possible to enter Recovery. This can be eliminated simply: the console is returned to fix the system by special applications TWRP Manager, ROM Manager or Installer. These applications are created to determine the model of the gadget and self-download all the necessary components to run a suitable Recovery.
If none of the aforementioned programs fixed the error, you can find instructions for downloading the recovery console for a specific brand of smartphone or tablet.
How to repair a real Android brick
We examined what can be done in the event of incomplete loss of smartphone functionality. Now it's time to talk about how to restore a completely “dead” Android when nothing starts. It is not at all necessary to immediately go to the workshop, you can try to start the system at home using simple steps.
What to do, we will consider step by step:
- Install the latest Samsung USB drivers on your computer.
- Download and install the latest version of the Odin app.
- Download licensed firmware that is suitable for a specific model and country.
- Turn off the "brick", then press the key that reduces the sound and the "Home" key. After a few seconds, a warning will be displayed on the screen.
- By pressing the button on the phone that increases the sound, switch it to Odin mode.
- Connect the gadget to your computer.
- Start Odin, press PDA, in it, designate the tar.md5 file in the firmware directory.
- Press the “Start” button, start recovery, wait for the end of the operation.
- Hurray, the "brick" is working!
How to reflash a smartphone with Flashtool
This option is 100% applicable to Sony phones, however, devices from other brands can be restored in the same way.
What do you need:
- "Brick" Android;
- licensed firmware in FTF format;
- flashtool program installed on a computer, firmware drivers for it;
- disabled antivirus, firewall, which can react to Flashtool as a virus component;
- charge your phone well enough to keep it from shutting down during recovery.
Step-by-step instructions for recovery via Flashtool

Each manufacturer of gadgets based on the Android OS has its own custom flashing utility. If it happens that the phone or tablet turns into a “brick”, you should first choose the instructions for your model. If all the above attempts to restore the device have remained in vain, you should contact a professional workshop.
AndroidKak.ru
Bringing the ruined smartphone back to life - "Hacker"
Most of the articles in the X-Mobile section are devoted to hacks and tweaks that require getting root privileges, modifying the firmware or replacing it with custom. However, not every reader is ready to subject his smartphone to such operations, fearing that they can turn the device into a brick or lead to instability in work. Today I will debunk these myths and show that even in the most stalemate situation, it is not so difficult to bring a smartphone back to life.
Let's talk about what it is all the same "to turn a smartphone into a brick" and what other pitfalls may await the user on the way to change the system and install custom firmware. What glitches can you catch and is it possible to kill a smartphone by flashing it incorrectly? Will you lose your warranty forever or can your smartphone be returned to its previous state? Can custom firmware fail the smartphone owner at the most inopportune moment and are they worth it?
Myth 1. Incorrect flashing can kill a smartphone
A fall from the fifth floor can kill a smartphone, but not a flashing. The main problem faced by anyone who wants to reflash a smartphone is that during the installation of the firmware, a failure can occur, which will lead to its inoperability, and the smartphone will actually turn into a brick.
All this is true, but only on paper. To understand why, it is enough to understand how the process of flashing a smartphone works and what system components are used in this case. To be able to install third-party firmware on a smartphone, you need to unlock the bootloader (not in all cases), get root and install a custom recovery console (ClockworkMod or TWRP) capable of installing firmware with any digital signature.
 TWRP Recovery Console
 The Recovery Console is stored in a separate section of the internal NAND memory and is not connected in any way with the installed operating system. After installing a modified version of the console, it will be possible to flash custom firmware or even another OS (Firefox OS, for example). If a failure occurs during the firmware installation, the smartphone will not be able to load it, but the recovery console will remain in place, and all that needs to be done is to reboot into recovery and reinstall the firmware.
In addition, any custom recovery console contains a backup / restore function that allows you to back up the main firmware and restore it unchanged (with all applications, settings and data) in the event that something goes wrong. In fact, the smartphone can be returned to its original state.
 Before flashing, be sure to make a backup using a custom recovery console
  You can restore a backup using the Android application Nandroid Manager
 You may be asking: what happens if a failure occurs during the installation of the Recovery Console itself? Nothing, in this case, the situation will be the opposite, when the operating system itself remains in place, and the console is lost. To deal with it, you just need to re-flash recovery directly from Android.
Hypothetically, one can imagine a situation where both the firmware and the recovery console will be killed (although this is rather difficult to do), but even in this case, the primary bootloader will always remain in place, flashed into the permanent memory of the smartphone.
Conclusion: It is impossible to kill a smartphone by installing third-party firmware via a custom recovery console. Either recovery or the primary bootloader will always remain in place.
Myth 2. Custom firmware is unreliable
Firmware firmware strife. On the vastness of the world wide web, you can find a huge number of Android assemblies for every taste and color, and most of them are really slag, which can lead to instabilities in the operation of a smartphone and the loss of some functionality. Therefore, the first thing to remember is that you should only deal with serious custom firmware developed by large teams of experienced developers. First of all, these are CyanogenMod, Paranoid Android, AOKP, OmniROM and MIUI.
Second. There are two types of firmware: officially supported and ported by third-party developers. CyanogenMod, for example, has an official version for the Nexus 4 smartphone, but does not have one for the Motorola Defy. But for Defy there is an unofficial port of CyanogenMod 11 from the developer with the nickname Quarx. Their difference lies in the fact that the CyanogenMod team is responsible for the support and proper performance of the former, while the latter is personally responsible for Quarx. Official firmware versions are usually fully functional, but the correctness of the second depends on a third-party developer.
And the third thing. There are stable and development versions of the firmware. Stable versions of CyanogenMod are indexed M (CyanogenMod 11.0 M7, for example). This firmware version usually contains no bugs. Development versions (in the case of CyanogenMod, these are daily nightly builds) may contain bugs and therefore are not recommended for everyday use.
Conclusion: if you install a stable official version of "normal" firmware on your smartphone, the risk of encountering bugs is minimal. Everything else is for the experimenters.
Myth 3. Software that requires root privileges is capable of corrupting a smartphone
In theory, a rooted app can do whatever it wants with the smartphone's firmware, including erasing it completely. Therefore, you need to be extremely careful with such software. The software that we are talking about on the pages of the magazine is completely safe and tested in our own skin. In addition, for the entire time of using smartphones on Android (and this is starting from version 1.5), I have never encountered a situation where software with root support would kill a smartphone.
The software distributed through Google Play usually fully meets the declared characteristics, and if it led to a brick or left a backdoor in the bowels of the smartphone, it would not last a week in the store. In any case, here you need to follow the "trust but verify" rule and carefully read the instructions for using root applications.
Myth 4. Root rights make a smartphone vulnerable to viruses
It is not root permissions that make a smartphone vulnerable to viruses, but bugs used to obtain them. Rooting tools and viruses can exploit the same Android vulnerabilities to gain root privileges, so the mere fact of having root on a device doesn't change anything. A well-written virus will not ask for rights in a standard way, betraying its presence; instead, it will use the same vulnerability to get them secretly.
Moreover, having root, you get the opportunity to install a fresh version of Android (in the form of custom firmware), in which these bugs have already been fixed. Also, do not forget that most custom firmwares allow you to disable root or create whitelisting applications that can use these rights.
Myth 5. A rooted smartphone can fail.
Root software does four simple things: it launches an exploit that allows you to gain root privileges on the system, mounts the / system partition in write mode, copies the su binary to the / system / xbin directory, which is required to get root privileges in the future, and installs a SuperSU or SuperUser application that will take control every time an application asks for root privileges using su.
None of these steps can crash or kill the smartphone. The only thing that can happen is that the exploit will cause a segmentation error and the smartphone will reboot, after which it will continue to work normally.
 All root requests can be tracked using SuperSU or the built-in custom firmware feature
 Myth 6. Getting root and installing custom firmware will void my warranty
The warranty is lost not from the very fact of getting root, but because of its discovery by the service center. Most devices can be unrooted using the Universal Unroot app or by reinstalling the stock firmware using the manufacturer's official app.
There are, however, two exceptions to this rule. The first is the Knox system pre-installed on new Samsung smartphones and tablets such as the Galaxy S4, S5, Note 3 and Note 10.1. Knox provides an increased level of Android security, responding to any firmware modifications and installation of third-party kernels and firmware. In the event that the user performs these actions, the system sets up a trigger that confirms the fact of modification. The trigger is implemented in hardware (eFuse chip), so you won't be able to reset it to its initial position. On the other hand, it is not entirely clear whether the service center will refuse to repair the device on this basis. Second: the eFuse chip is installed on some other devices (for example, smartphones from LG), and it also allows you to accurately determine whether the smartphone has been rooted or flashed.
If we talk about custom firmware, everything is more complicated. Typically, a flashing operation requires unlocking the bootloader, and this can be done either using special exploits or using the web service of the smartphone manufacturer. In any case, the unlocked bootloader will definitely indicate that the smartphone did not belong to a blonde.
On some smartphones it is possible to lock the bootloader back, but you should learn about this separately, and also keep in mind that a newly locked bootloader will most likely receive the Re-locked status, and not Locked, as it was originally (this is what happens on HTC smartphones, eg). The only exceptions here are smartphones and tablets of the Nexus line, the bootloader of which can be locked and unlocked in three clicks without any dancing with a tambourine, and no one will pick on anything.
On Linux, ADB and Fastboot can be installed separately from the Android SDK. On Ubuntu: sudo apt-get install android-tools-fastboot. Fedora: sudo yum install android-tools.
To prevent the Knox system from interfering with root applications, it can be disabled using the following command from the terminal: su pm disable com.sec.knox.seandroid.
conclusions
Getting root and flashing a smartphone are absolutely safe operations that cannot turn a smartphone over for purely technical reasons. The only exception is trying to hack the bootloader to unlock it. In this case, the eFuse chip (if there is one in the smartphone) may work and block the ability to turn on the smartphone.
Fortunately, today smartphone manufacturers either prefer not to block the ability to turn on a smartphone with a hacked bootloader (by setting a trigger indicating the fact of such an action, as Knox does), or they implement a special web service that allows you to painlessly unlock the bootloader with the loss of the smartphone warranty. which saves users from having to risk breaking the bootloader.
So, now let's talk about what problems can arise when getting root and flashing and how to deal with them.
Scenario one: after an unsuccessful flashing, the smartphone stopped loading
An unsuccessful flashing can be caused by several factors: the battery has run out and the firmware is only half full, the firmware turned out to be faulty or intended for another smartphone model. In the end, there was simply not enough space on the smartphone, which can happen when trying to install a fresh version of Android on a smartphone three or four years ago.
Outwardly, all these problems usually manifest themselves either in endless smartphone resets to the manufacturer's initial logo, or in the so-called boot loop, when the boot animation spins on the screen for more than five to ten minutes. Problems with the screen (multicolored ripples) and a non-working touchscreen are also possible, which also prevent the use of the smartphone.
In all these cases, it is enough to do one simple thing: turn off the smartphone by long pressing the power button, then turn it on with the volume down button held down (some smartphones use a different combination), and after you get into recovery, reinstall the firmware (Install zip from sdcard - \u003e Chooze zip from sdcard) or restore the backup (Backup and restore -\u003e Restore). Everything is easy and simple.
Scenario two: firmware works, but recovery is not available
This can happen after a failed installation or update of the Recovery Console. The problem is that after restarting the smartphone and turning it on with the volume down button held down, a black screen appears, after which the smartphone is either reset or freezes.
Solving this problem is not easy, but very simple. You can install the recovery console on the vast majority of smartphones using the TWRP Manager, ROM Manager or ROM Installer applications. They themselves determine the model of the smartphone, download and flash the desired recovery without requiring a reboot. If you cannot restore the console with their help, it is enough to find instructions on how to install recovery on your device on the Web.
 ROM Manager allows you to install recovery in two taps
 Scenario three: neither firmware nor recovery is available
To be honest, it's hard for me to imagine such a scenario, but, as practice confirms, it is quite real. There are two ways to get out of this situation: use fastboot to upload recovery to a smartphone, or use a tool from the manufacturer to install the stock firmware. We'll take a closer look at the second method in the next section, and I'll talk about fastboot here.
Fastboot is a tool that works directly with the device's primary bootloader and allows you to upload firmware to your smartphone, recover and unlock the bootloader (in Nexus devices). Fastboot support is available in many smartphones and tablets, but some manufacturers are blocking its use. So you have to consult the Internet about its availability.
To access fastboot, you need drivers and Android SDK. When they are installed, open the command line, go to the SDK installation directory, then to the platform-tools directory, turn off the smartphone, turn it on with the volume buttons held down (both) and connect it using a USB cable to the PC. Next, you need to find the recovery image in the .img format for your device and run the command:
$ fastboot flash recovery image.img
Or even force the smartphone to download recovery without actually installing it:
$ fastboot boot image.img
In the same way, you can flash an official firmware update:
$ fastboot update update-file.zip
You can find a recovery suitable for your device either on the TWRP website, or in the XDA-Developers and w3bsit3-dns.com forums.
In this section, I'll talk about ways to return a smartphone to a clean drain, no matter what state it is in. These instructions can be used both for splitting up the smartphone, and for removing traces of rooting and flashing. Unfortunately, I cannot tell you about all the possible models, so I will focus on the four most popular flagships: Nexus 5 (I call this one the control one), Galaxy S5, LG G2 and Sony Xperia Z2.
Nexus 5 and other Google phones
Returning Nexus devices to their original state is easier than any other smartphone or tablet. In fact, it is so simple that there is nothing even to talk about. In fact, all you need to do is install the ADB / fastboot drivers (in Linux, even they are not needed), download the archive with the firmware and run the script. Step by step, the whole operation looks like this:
- Download and install the Android SDK.
- Download the archive with the firmware for the desired device from the Google website.
- Turn off the device, turn it on with the volume buttons held down (both) and connect using a USB cable.
- Unpack the archive with the firmware and run the script flash-all.bat (Windows) or flash-all.sh (Linux) and wait for the operation to end.
- We launch the command line, go to the directory with the Android SDK, then platfrom-tools and execute the fastboot oem lock command to lock the bootloader.
For those wondering what the script does, here's a list of commands:
Fastboot flash bootloader bootloader-DEVICE-NAME-VERSION.img fastboot reboot-bootloader fastboot flash radio radio-DEVICE-NAME-VERSION.img fastboot reboot-bootloader fastboot flash system system.img fastboot reboot-bootloader fastboot flash.img fastboot userdata userdata recovery recovery.img fastboot flash boot boot.img fastboot erase cache fastboot flash cache cache.img
Galaxy S5
With the Galaxy S5 smartphone, things are a little more complicated, but generally quite simple. This time, you will need the Samsung Odin application, with the help of which the smartphone will be flashed. Sequencing:
- Download and install the latest Samsung USB drivers from here.
- Download and install the latest version of Odin from here.
- Go to samfirmware.com, enter the model SM-G900F in the search, find the firmware marked Russia, download and unpack it.
- Turn off the smartphone and turn it on with the volume down and Home buttons held down, wait five seconds until a warning message appears.
- Press the volume up button to put the smartphone into Odin mode.
- We connect the smartphone using a USB cable.
- Launch Odin, press the PDA button and select the file with the tar.md5 extension inside the directory with the unpacked firmware.
- Press the Start button in Odin and wait for the firmware to finish.
As I already said, this operation will return the smartphone to its original state, but will not reset the trigger set by the Knox system (if it was in the standard firmware). Therefore, the service center may refuse to repair.
 Odin in person
  Odin is even available on mobile
 LG G2
Restoring the LG G2 to its factory state shouldn't be too problematic either. The number of steps in this process is somewhat larger, but by themselves they do not require special training and knowledge. So, what to do to return the factory firmware to the G2:
- Download and install ADB Driver Installer from here.
- Download the official firmware (Europe Open 32G or Europe Open) from here.
- Download and install the LG Mobile Support Tool, as well as FlashTool (goo.gl/NE26IQ).
- Turn off the smartphone, hold down the volume up button and insert the USB cable.
- Expand the FlashTool archive and run the UpTestEX.exe file.
- In the window that opens, select Select Type -\u003e 3GQCT, Phone Mode -\u003e DIAG, in the Select KDZ file option, select the firmware downloaded in the second step.
- Press the CSE Flash button at the bottom of the screen.
- In the window that opens, click Start.
- In the next window, select the country and language and click Ok.
- We are waiting for the end of the firmware, and then turn off and turn on the smartphone.
It's all. But keep in mind that, as is the case with Samsung, the smartphone will still have Rooted status, and this cannot be fixed.
Sony Xperia Z2
Now let's talk about how to return the Sony Xperia Z2 smartphone to the factory state. As with the previous two cases, this will require a stock firmware and an official firmware utility. You run the utility on your PC, connect your smartphone with a USB cable and start the update process. Step by step it all looks like this:
- Download and install ADB Driver Installer from here.
- We reset the smartphone to factory settings.
- Download and install the Flash Tool from the Sony official website and the latest firmware from here.
- Copy the firmware file to the C: / Flashtool / Firmwares directory.
- Turn off the smartphone and turn it on with the volume down and Home keys held down.
- We connect the smartphone to the PC using a USB cable and launch the Flash Tool.
- Press the button with the lightning icon in the Flash Tool. In the window that opens, select Flashmode, double-click on the firmware in the list that opens.
On many smartphones, a jailbroken bootloader will prevent over-the-air updates.
In 90% of cases, unlocking the bootloader will result in the deletion of all data from the smartphone, including the memory card.
Flashing a smartphone, and even more so getting root access, are not at all such terrible and dangerous operations as they might seem at first glance. If you do everything correctly and do not resort to tools that unlock the smartphone's bootloader bypassing the manufacturer's tools, it will not be possible to turn the smartphone over. Yes, in some cases you will have to tinker in order to put everything back in place, but which is better - to use a locked smartphone, which does not allow you to do even half of the things that it is capable of, or to gain full control over the device? After all, reinstalling Windows on a PC doesn't scare anyone.
xakep.ru
Android brick recovery
There are cases when, after trying to install custom firmware on Android, unlock Superuser rights (root access) or delete system data, the device stops functioning. This manifests itself in the inability to log into the system of the mobile device and even load the Recovery environment. This state of the phone or tablet is popularly called "brick".
No matter how serious the problem of "oskirpichivaniya" may seem, in most cases you can reanimate the gadget at home. Let's consider how to restore Android if it has turned into a "brick".
Ways to resuscitate Android when "oskirpichivaniya"
There are three effective methods for restoring Android when it is lost:
- using the standard recovery environment;
- through custom Recovery;
- through a computer and special software.
Which method to use directly depends on the state of the system on the device.
If, when trying to enter the working area of \u200b\u200bthe device, there are constant reboots or the phone hangs on the system logo, but the Recovery environment works, then you are in luck, since you can restore the Android firmware through it. This requires:

After rebooting, the factory settings should appear on the smartphone. If Hard Reset did not help fix the problem, we try to revive the Android after an unsuccessful firmware using a previously created system backup or a file with firmware downloaded from the Internet.
To restore Android from a previously created backup, you need to do the following:

If you have not taken care of creating a return point in advance, then you can return the work to Android on a tablet or smartphone using the downloaded firmware. In this case, we animate the gadget as follows:
- Download the firmware file to your PC specifically for your Android device model. This should be done only from trusted sources.
- We take out the memory card from the device and connect it to the computer through the card reader.
- Copy the downloaded file there.
- We return the micro sd to the phone.
- We enter Recovery and select the item marked in the picture.
- We indicate the path to the firmware and start resuscitation.
After the Android "brick" has been restored, the downloaded file can be deleted.
Using custom recovery
If the "oskirpichivanie" led to the rally not only of the operating system, but also of the standard Recovery, then you can restore the system using a custom resuscitation environment - the CWM Recovery program.
Before restoring the "brick" on Android, you need to install Modrkaveri on the problem device:

The installation of CWM Recovery will begin, after which the smartphone can be disconnected from the computer and proceed directly to resuscitation:

After completing these steps and rebooting, the phone (tablet) should work.
Reanimation of the "brick" through a PC and special software
Considering how to restore Android after "oskirpichivaniya", it is worth noting the specialized software developed individually for each manufacturer of mobile devices. So, the FlashTool recovery program is used for Sony and some other brands gadgets, and Odin is used for Samsung.
Let's return the functionality to the "brick" using Odin:

The process of automatic system recovery will begin, after which you will be able to enjoy your working device again.
Unbrick is restoring a tablet after an unsuccessful firmware, or, as they say, restoring a tablet from a brick state. What do you mean by "failed" firmware? It is highly likely that the employee of the service center you contacted simply used an unofficial (stock) firmware, which is why you now have problems.
If, after returning the tablet to your hands, its display displays a picture in a mirrored position, the tablet does not respond to touching the sensor, Wi-Fi does not function correctly, or the tablet computer generally "hangs" on the Android inscription - all these are signs of a flashed firmware. But there is nothing wrong with that - there are many ways to restore the tablet bootloader.

Recovering the tablet bootloader
So the tablet shows no signs of life. The first thing an experienced technician should check is the main feeders on the board. If everything is fine with them, then the bootloader has flown.What is needed to solve the problem:
- experience and "hands from the right place";
- archive with the necessary software;
- micro-Usb cable, MicroSD card.
Step-by-step instruction
- You need to prepare a microSD card for flashing the tablet after the bootloader recovery is complete. Select the standard cluster size, FAT32 format;
- Next - reset the tablet (repairing Chinese tablets has its own characteristics, in this case - the button may not be installed, so you have to disassemble the tablet and use tweezers). In this case, it is necessary to hold down the "Power" and "Volume" keys until a message appears about the detection of a new device. We put the drivers on it. As a result, we get a new device;
- If the specialist performs all the operations correctly, but does not detect the device, it is necessary to re-clamp the "Power" and "short-circuit" the memory "legs" numbered 5 and 6 following from the speaker connector;
- The device should now show up. Next, we take a previously prepared archive with software, which must be unpacked to the root of the disk (for example, C: \\\\). Drivers from the "drivers" folder are installed on the new device;
- Now you need to disconnect the tablet from the computer and run C: \\ Android \\ AMLflash \\ ImageBurnTool.exe (under administrator rights), AmLogic Burning Tool;
- Next, you need to specify the correct path to the firmware file. A message about the missing configuration file may pop up, and it is added in the same way. like the firmware file itself;
- In the flasher, "Start" is pressed, the process starts. We are waiting for a message with a request to turn off the device, which we do. Now you need to remove the USB cable from the computer (you cannot turn off the reset "or with the button). Then click in the window that appears OK, then STOP, the Config-Reset Port Match Info option is selected in the flasher. Now it's time to connect the tablet to the computer and click" Start "- the firmware process is restarted;
- We are waiting for the progress to stop at 80% and give an error. After a maximum of a minute, the TWRP recovery menu will appear on the tablet's display - close AML;
- TWRP recovery starts, a new device appears in the device manager. The driver is set manually (folder "drivers";
- Upon completion of the installation, go to the Android / adb folder;
- We insert a memory card into the tablet;
- Next - run the TEST_adb_hero.bat file, then press any button, the recovery process should start;
- Upon completion of copying, launch the tablet via TWRP recovery;
- Disconnect the cable;
- Let's start the tablet using the Power key, the familiar Android robot will appear;
- We carry out all three WIPE .;
- Click install from SD-card, there is a ZIP file, you need to select it;
- After flashing, you need to reboot the device - the firmware is installed in the tablet. You can upgrade to something fresh if needed.

Note As you can see, the process is very tedious, and for a beginner, it may turn out to be an impossible task at all. But a specialist who has done this more than once will cope with the task quickly enough - moreover, he has the necessary software prepared, and is responsible for the result. In the service center "SMART-Service", tablet repair in Odessa includes this frightening procedure. Also, we offer you - whether it is a display replacement or a complex repair of motherboards for tablets. Like any other large center, we provide repair of tablets from Asus, Prestigio, Assistant, Apple, Goclever, HP, Wexler, Samsung, Acer, Ainol and other brands.
Please enable JavaScript to view the