Drivers are programs that serve as the connecting link between equipment and the operating system. Without this kind of application, no installed devices will work.
A digital signature of device drivers is a certificate confirming the identity of the publisher or corporation with additional information about the program. Thanks to this information, you can find the publisher and its contact information. In fact, a digital signature is some guarantee of the security of the installed driver.
The purpose of digitally signing a driver
It is important to understand that if the driver is not digitally signed (a pop-up window will tell you about this), then most likely: it is not certified or the application is certified, but it underwent a change after the procedure. Both cases are very dangerous for the computer, because if you come across a version processed by a hacker (it may be a driver of a well-known company), the application can perform absolutely any action on the computer. In fact, it is possible to catch a virus, moreover, a dangerous one. Therefore, to continue the installation, you must be sure of the program and its manufacturer.
By default, Windows verifies the digital signature of drivers to determine how trusted the program is.
This procedure can protect against many computer problems due to possible fakes. Again, there is no guarantee that if you can install the driver with a digital signature, you will not have problems with its contents.
Typically, drivers are bundled with the device, either on a micro media device, such an application is installed automatically, or on disk.
Sometimes such disks may contain a driver without a digital signature, but if the company producing the product is credible, you can install such a program.
Since Windows will block application installation by default, you will have to manually disable driver digital signature verification.
It is worth noting that you disable the check at your own peril and risk, in general, this is not recommended, but nevertheless such a function exists.
How to disable driver digital signature?
There are 4 options to achieve the result, let's start with the simplest. To use them, you will need administrator rights, because you will have to make changes to important system settings.
Method 1
2. Then you should insert bcdedit.exe / set nointegritychecks ON in the window that opens, press enter.
Method 2
Similar to the previous one, it also allows you to disable the desired setting through the command line.
1. Press Win + R and enter the cmd command;
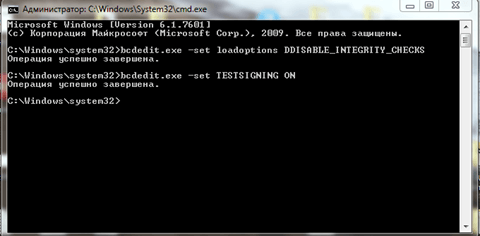
2.Now insert bcdedit.exe -set loadoptions DDISABLE_INTEGRITY_CHECKS;
3.After the verification is complete, set the line bcdedit.exe -set TESTSIGNING ON.
Method 3
This method allows you to manually go through the Group Policy Editor and change the desired installation parameter, because it was precisely his position that we changed through the console.
1.Press Win + R and paste gpedit.msc, then Enter;
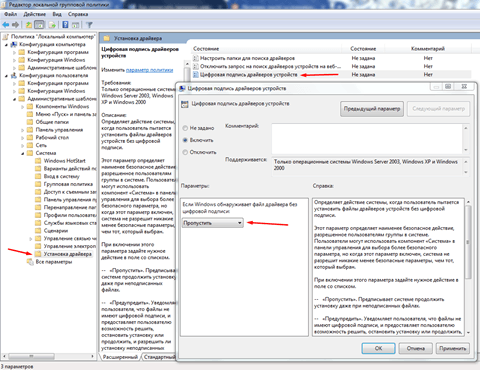
2. In the window that opens, you need to go along the path User Configuration - Administrative Templates - System - Driver Installation;

3. Changing the digital signature of the driver is done by selecting the appropriate option in the right window and setting the value to “Disabled”.

Method 4
You can simply start the system with no need to verify the digital signature of the driver. When you install all the applications you need, just start in normal mode. Windows will not verify the signature of already installed drivers, but will continue to work as before.
- Restart your computer and go to the section for specific boot options. This is done by pressing F8 at startup (usually at the time the BIOS splash screen appears);
- Select "Disable mandatory driver signature verification."
Then the computer will boot up and you can easily install the problematic driver. After completing all the steps, just restart the computer.
Installing a driver digitally increases confidence in the software and the product to which it is attached.
Also, not all users will begin to figure out how to install such an application. Therefore, most firms use certification centers and produce a driver signature.
Sometimes it happens that a person purchased a product of a well-known company, but the driver produces a similar error. In this case, you should first try to download the necessary application from the official website of the manufacturer, usually this is done without difficulty. Also, for the full operation of some equipment, additional programs are required, this is also worth considering.
View driver digital signature
In order to see information about the installed software you should:
- Open the Start menu;
- Right-click on “My Computer” and select the “Properties” option;
- Next, on the left menu, click on "Device Manager";

- You will see a list of categories, select the one you need and open it;
- Right-click on the equipment with the signature you are interested in and select "Properties";

- Go to the "Information" tab;
- You will see a drop-down list in the "Property" column. Choosing the desired option, information will be displayed in the value column.

The conclusion is simple, it is better to avoid drivers without a digital signature by all means, because they are a pig in a poke. Nevertheless, if there is no choice, of course, you can install the software, but first try to study the manufacturer.
If you still have questions about the topic “Digitally Signing the Windows 7 Driver”, you can ask them in the comments
if (function_exists ("the_ratings")) (the_ratings ();)?\u003e
The lack of a signature indicates that the driver package has been changed or is simply not ready for release and has problems if it relates to the official driver. Now we will tell you why you need a digital driver signature in Windows 7 and how to disable it.
What is driver digital signature?
Driver Signature — The digital signature (signature) matches the corresponding driver package. The system checks the signature to make sure that the data matches the declared signature and does not pose a danger to the computer. But there are often situations where verification of a signature is a big deal. For example, the firmware of some Android phones requires the installation of software and a special driver that does not have a digital signature.
The signature itself is necessary for the protection and security of your computer, as well as your information. We remind you that installing unknown drivers without an appropriate digital signature is dangerous!
In Windows 7, there are several ways to disable driver digital signature verification. Starting from the boot parameters of the system, ending with special applications. Further we will consider each of these options in more detail, as part of detailed instructions with examples and images.
Disabling driver verification through boot options
Using this option, you can disable signature verification, only until the device is rebooted. After shutting down and rebooting, an unsigned driver will not work. So, in order to disable digital signature verification through the additional boot options of Windows 7, you need to follow these steps:
- Turn off the PC (or restart it) and when turned on, press the F8 key with an interval of 1 second;
- The system will boot on the “Advanced boot options” page;
- Select download option " Disabling mandatory driver signature verification "And press Enter;
- The system will boot with the necessary parameters;
This option is quite simple, but as mentioned above, this will disable the scan only until the next reboot of the PC. Using the following options, signature verification will be disabled until you enable it yourself.
Disabling driver verification through the command line
The command line opens up great opportunities for changing the settings of Windows 7, the main thing is to know which commands to use. This method is quite simple, but you must follow the following instructions exactly:
- Click on the "Start" button, in the search enter "" or "cmd" and run the application on behalf of the Administrator;

- Enter the following commands one at a time:
- bcdedit.exe -set loadoptions DDISABLE_INTEGRITY_CHECKS
- bcdedit.exe -set TESTSIGNING ON
- Reboot the computer;
At some point, you will need to enable driver verification again, to do this, run the commands:
- bcdedit.exe -set loadoptions ENABLE_INTEGRITY_CHECKS
- bcdedit.exe -set TESTSIGNING OFF

An alternative way. You can also use the Windows registry to specify the necessary parameters; enter the following command at a command prompt on behalf of the Administrator:
- reg add "HKCU \\ Software \\ Policies \\ Microsoft \\ Windows NT \\ Driver Signing" / v BehaviorOnFailedVerify / t reg_dword / d 00000000 / f
Disabling verification through the Group Policy Editor
You can use another alternative, through the Group Policy Editor. It is worth noting that the editor is available only for versions Windows 7 Pro and Ultimate(Maximum). If your version is Home or Starter, the previous options may help.
In order to disable driver signature verification using this method, you need to do the following:
- Press Win + R and enter gpedit.msc;
- Follow the next path “User Configuration” - “Administrative Templates” - “System” - “”;
- Open "Digitally Sign Device Drivers" and set the value to "Enable" and set the value to "Skip";
- Reboot the computer;
Driver Signature Enforcement Overrider Bypass Verification
Driver Signature Enforcement Overrider (DSEO) is used to bypass Microsoft's protection system, which does not allow the installation of unsigned drivers. Unfortunately, the application cannot force the driver to sign, but it is able to replace the signature so that the system can consider it signed and correct. You can download the application on the page -.

Driver Verification Bypass Driver Signature Enforcement Overrider
For the application to work correctly, you must disable UAC. To do this, open the Run window (press Win + R), enter the command "UserAccountControlSettings.exe" and set the slider to the minimum position and click OK.
How to use Driver Signature Enforcement Overrider:
- After downloading, run the dse013b.exe application;
- Accept the terms of the license agreement;
- Enable test mode by selecting “Enable Test Mode” and clicking Next;
- After that, “sign” the driver by selecting it using the “Sign a system File” parameter;
- Restart your computer for the changes to take effect;
You can roll back all changes by disabling the test mode with the Disable Test Mode function.
All of these methods should help you solve the problem of verifying the digital signature of drivers on Windows 7. But we want to repeat that you should not install drivers if you are not completely sure of its security for your device.
Most of the problems of users who have encountered the fact that Windows cannot determine the device is connected with the fact that, starting from Windows 7 and up to the newest version of Windows 10, digital signature verification of drivers is enabled. How to get around this obstacle and install the required driver, read in this article!
What is a signed driver?
A signed driver is a digitally signed device driver. A digital signature is an electronic security label that indicates the software publisher and changes to the original contents of the driver software package. If a driver is signed by a publisher and the certification authority confirms the signature, you can be sure that the driver has been released by that publisher and has not been modified. Windows will display one of the following warnings: the driver is not signed, the signature of the publisher is not verified by the certification authority, and the driver has changed since the release.In short, if the driver was not signed by MicroSoft, then such a driver will not have a digitally signed driver for Windows. With such a driver, problems arise during installation.
This article will discuss how to disable driver digital signature verification in Windows 10, Windows 8 and 8.1, as well as Windows 7.
Method number 1 - reboot menu
Before using this method, save all the data your work data on the computer and close the program.
1. Go to “ START"And select" Options»

2. Go to " Update and Security» -> « Recovery» -> « Special boot options» -> « Reload now»

3. Next, the computer will restart in a special recovery mode of Windows, you will need to go to " Troubleshooting» -> « Extra options» -> « Download Options» -> « Reload»

F7

5. Checking the digital signature of drivers in Windows 10 is disabled for a while (until the next reboot), install the necessary driver.
WIN + R gpedit.msc and click ok

2. In the window, go to the menu " User configuration» -> « Administrative Templates» -> « System» -> « Driver installation»

3. Set the parameter to " Off"If at the bottom of the window ( If Windows detects a driver file without a digital signature:) changes will be available, set the parameter " Skip»

Method number 3 - command line (test mode)
cmd


4. Confirm the changes and restart the computer, driver digital signature verification in Windows 10 is disabled.
1. In the start menu, perform a search - enter cmd
2. Run the command line as administrator
3. Enter the command:
5. In the menu, select ""

4. Checking the digital signature of drivers in Windows 10 is disabled.
Disabling Digital Signature Verification of Windows 8.1 / 8 Drivers
Method number 1 - reboot menu
1. Press the keys simultaneously WIN + I
2. In the side menu that appears on the right, select “ Options»
3. Hold down the “Shift” button and select “” in the shutdown menu
4. Next, the computer will reboot into a special mode of restoring the health of Windows, you will need to go to " Diagnostics» -> « Extra options» -> « Download Options» -> « Reload»

4. Windows will reboot again and a menu will appear in front of you with boot options, press the key F7

5. Checking the digital signature of drivers in Windows 8.1 / 8 is disabled for a while (until the next reboot), install the necessary driver.
Method number 2 - local group policy editor
1. Hold the keys together WIN + R and in the appeared window “Run” write the command gpedit.msc and click ok
2. In the window Local Group Policy Editor go to the menu " User configuration» -> « Administrative Templates» -> « System» -> « Driver installation"And select the option to change" Digitally Sign Device Drivers»

3. Set the parameter to " Off", If at the bottom of the window (If Windows detects a driver file without a digital signature :) changes will be available, set the" Skip»

4. Confirm the changes and restart the computer; driver digital signature verification in Windows 8.1 / 8 is disabled.
1. In the start menu, perform a search - enter cmd
2. Run the command line as administrator
3. Enter the following commands one by one:
bcdedit.exe -set loadoptions DISABLE_INTEGRITY_CHECKS bcdedit.exe -set TESTSIGNING ON4. Confirm the changes and restart the computer, driver digital signature verification in Windows 10 is disabled.
Method number 4 - command line (boot option Windows 7)
1. In the start menu, perform a search - enter cmd
2. Run the command line as administrator
3. Enter the command:
bcdedit / set "(current)" bootmenupolicy legacy4. Restart the computer and at the time the computer boots, press the F8 key
5. In the menu, select " Disabling mandatory driver signature verification»

4. Checking the digital signature of drivers in Windows 8.1 / 8 is disabled.
Method number 1 - command line (permanent shutdown)
1. In the start menu, perform a search - enter cmd
2. Run the command line as administrator
3. Enter the command
bcdedit.exe / set nointegritychecks ON
4. Restart the computer, driver digital signature verification in Windows 7 is disabled.
5. In order to reactivate the scan, enter the following at the command line:
bcdedit.exe / set nointegritychecks OFF
Method number 2 - command line (temporary shutdown)
1. In the start menu, perform a search - enter cmd
2. Run the command line as administrator
3. Enter the following commands one by one:
bcdedit.exe -set loadoptions DISABLE_INTEGRITY_CHECKS bcdedit.exe -set TESTSIGNING ON4. Confirm the changes and restart the computer; driver digital signature verification in Windows 7 is disabled.
Method number 3 - reboot menu
1. Restart the computer and at the time the computer boots, press F8
2. In the menu, select " Disabling mandatory driver signature verification»

This is not to say that the driver’s digital signature is akin to the widow of a retired lieutenant who carved herself, but the analogies simply suggest themselves. To the question: “What is a digital signature of drivers and why is it needed?” - the answer will be very simple. Firstly, this is some sequence of codes inserted into the driver program code by its developer, and which the operating system (in this case, Windows) knows (or knows the algorithm for obtaining these codes).
Ways to disable Windows driver digital signature verification.
And secondly, it’s already quite simple and understandable when the driver is installed in the system, it checks its digital signature for validity. If everything matches, then the installation continues. If it does not match, then, of course, ceases. The very idea of \u200b\u200ba digital signature is not at all new, it has been used for a long time (and has been applied until now, although more advanced anti-distortion mechanisms have long been developed) in information transfer systems and has often been called the “checksum”. In its simplest form, it was just a byte-wise “modulo 2 addition” of the entire contents of the file.
Well, and then politics comes into play - for starters, the business policy of equipment manufacturing companies and, accordingly, drivers. The device is designed, its driver is developed, now you just need to convince the Microsoft company to insert information about this driver in Windows so that it recognizes the device and its driver from this manufacturer. After all, there are a lot of third-party competing developers who can develop their driver for the same device - the best or the worst, it doesn’t matter, the main thing is illegal, which means it is inadmissible for use in the system.
Further. A driver is a program, and thus an object of exposure to viruses. Moreover, such a program is an un-killed card for viruses, because the driver will in any case be launched, moreover, by the system itself. But the virus "does not know" the digital signature of the driver, and Windows will verify the signature every time it is installed - this is a way to protect against virus-infected drivers and another plus of the digital signature.
But, on the other hand, it is full, indeed, of the drivers of "third firms", which significantly surpass the official ones in their characteristics. But they do not have a digital signature, which means they can not be delivered unless you turn off the verification of digital signature of drivers in Windows. And such an opportunity was provided by Microsoft itself; it did not begin to “burn bridges behind itself” here. By default, the Windows boot options provide for mandatory verification of the driver’s digital signature, but it can be canceled if, of course, you understand the danger to which the system is exposed - either from the side of a crookedly written “non-native” driver or from viruses.
A small nuance - along the way
Disabling Windows 10 or any other version of driver signature verification is so relevant that some developers include it in an indispensable condition for the functioning of their program. Typically, all kinds of gaming applications behave this way. Here is a good example - games from the 4Game service. At the dawn of the appearance of the service, it was required to download a special client for drivers in advance, but over time they decided to simply build everything they need into browsers. Such a change led to a change in the root of the defense policy, which was called "Frost" - Frost.

The only problem is that the new policy does not work without first disabling the mandatory driver signature verification. Here, however, one will have to “disconnect” and one’s own questions about how this official service can offer to disable the official protection of the system from piracy and viruses. But in the end, Microsoft itself provides such an opportunity. Well, and then the developer’s policy in this case is not included in the current subject of the proceedings, especially if Microsoft is not against it.
Ways to disable driver digital signature verification
There are several ways to solve the problem of disabling the digital signature of Windows 7, 8 drivers and all subsequent versions. Many of them are very similar to each other. The first possibility is that you will need to work on a computer with system administrator rights. We enter the work with the command line - go to the main menu of the system by the “Start” button. Then select “My Programs” and “Standard”. In the list that opens - "Command line". In the opened "black window" in the prompt line, enter:
- bcdedit.exe / set nointegritychecks ON to disable mandatory driver signature verification.
To enable the check again - the line is similar, but c "OFF":
- bcdedit.exe / set nointegritychecks OFF
Why disabling the check is ON, and turning it ON is clear from the name of the parameter used - “nointegritychecks”, which translates as “without conducting internal checks”.
Another possibility is also associated with the use of the bcdedit.exe system utility on the command line. But here we act in two stages. First, we type and run the utility with the value of the loadoptions boot parameter:
- bcdedit.exe -set loadoptions DDISABLE_INTEGRITY_CHECKS
Then, with the value of the signature test parameter testsigning:
- bcdedit.exe -set testsigning ON
It is mandatory to wait until the message “Operation completed successfully” appears in the command window; it may appear after a short delay. Now driver digital signature verification is disabled. In order for the signature verification to work again, we enter the same commands, but in the reverse order and with different parameter values:
- Bcdedit.exe -set testsigning OFF first
- Then bcdedit.exe -set loadoptions ENABLE_INTEGRITY_CHECKS
The third option suggests disabling Windows 8 driver signature verification when the computer boots. This feature is very convenient if you just need to test the driver.

So, at boot we enter F8 on the boot menu of the system, and there we select the boot just with the cancellation of driver signatures verification - Disable driver signature enforcement. When the system boots, you can install any drivers, with or without signatures, they will not be checked. Here, however, you need to understand that this feature only works until the system reboots.
The fourth possibility involves the use of the editor of the local group policy of the operating system, although it does not work in full on all versions of Windows. We proceed as follows - in the main menu of the system we select “Run” and in the line for execution we type gpedit.msc. We start the group policy program that opens the window of the same name. In the window on the left, we go sequentially along the folder path - “User Configuration” - “Administrative Templates” - “System”. Next, select "Driver Installation" and the "Digital Signature" parameter, which you must change.

To change or double-click on the parameter with the mouse or select the inscription on the left - "Change parameter". To disable, select the “Off” switch and accept the changes (OK or Apply button). The inclusion of all the Group Policy settings in the work takes place without rebooting the system, although if there is any doubt, you can also reboot by checking once again at what condition the parameter is.
We pay attention to one feature - the “Warning” switch. His choice when using the driver without a signature will allow, however, to complete the installation of the driver, only it will not be accepted for work anyway.

Well, the last, already radical opportunity is to force the driver to sign, which can also be done through the command line with the pnputil utility:
- pnputil –a<полное имя файла драйвера>. By "full name" is meant a string in the format:
- <диск>:<путь по папкам>/<имя файла>.<расширение файла>
Conclusion
Influencing the operating system policy with digital driver signatures, you need to understand that you interfere with the system itself, change its environment, primarily security. And it's not so much the viruses, the matter is the correct operation of the “left” driver that is supposed to be used. Errors in driver implementation can be cleaner than the most dangerous virus. The result is one - the complete inoperability of the system and the need to reinstall it. Nevertheless, manipulating the work with this internal protection tool is very useful for understanding the mechanism of functioning of the operating system itself.
Sometimes it’s vital for us to install an unsigned device driver — for example, a favorite printer or scanner. But we cannot do this, because the operating system on the computer is too smart and does not allow us to do such stupidity as installing ancient "firewood" from an unknown source. Really too smart OS can not be defeated? Nothing like this! There are at least two ways to do this.
Disable driver digital signature verification in UEFI
To begin with, it should be noted that this guide will only work if your computer uses UEFI rather than an earlier BIOS. Usually UEFI is installed if you purchased your computer with Windows 8 or 10, or if the PC itself was released after 2012.
So first run UEFI. This is easy enough to do. Once in the operating system, you need to click on the notification icon and select "All Settings". After that, in the settings you should open the item “Update and Security”\u003e “Recovery”.
If UEFI opens in a blue design, select Troubleshoot. In the “Advanced Options” section, you will find “Boot Options”. This button displays all available startup options.
 In the “Advanced Options” section, you will find “Boot Options”
 Use the key to select the option “Disable mandatory driver signature verification”. After that, you can install the unsigned driver.
Disable driver digital signature verification from OS
For those who are afraid to go into the settings of the motherboard, there is another way that allows you to disable driver signature verification from the system itself. To do this, simultaneously press the keys and [X] - a small menu will open in the lower right corner of the screen.
Select the option “Run (administrator)” and confirm the request by clicking “Yes”.
In the new command window, enter the command "BCDEDIT-Set LoadOptions DDISABLE_INTEGRITY_CHECKS" without quotes and confirm with.
Then enter the command “BCDEDIT -SET TESTSIGNING ON” and confirm again with.
 In the new command window, enter the command “BCDEDIT-Set LoadOptions DDISABLE_INTEGRITY_CHECKS” without quotes and confirm with Now you can install unsigned drivers under Windows 10. However, make a reservation: if the instructions do not work, add two slashes to “-”, or two slashes, - "/".
Disabling this option is possible through the command “BCDEDIT – Set LoadOptions EENABLE_INTEGRITY_CHECKS”\u003e “BCDEDIT – Set TESTSIGNING OFF”.