OLEG FILIPPOV, ANT-Inform, Deputy Head of Development Department, [email protected]
RIB in 1C. The limits of possibilities
Distributed information base (RIB) technology in the 1C: Enterprise platform causes a lot of controversy. We will try to figure out when it is advisable to use it, and when it is better to prefer alternative solutions
Often, when reading forums or articles by online authors about RIB in 1C, you can come across conflicting opinions from "this is the best and only one that can be used" to "it is hopelessly outdated." Let's try to figure out how things really are.
In the November issue of 2016, I already wrote about some of the features of the RIB in relation to a specific practical task, so just a few words about the basics, and let's go a little deeper into the technological details.
RIB - 1C: Enterprise distributed infobase technology - not to be confused with universal exchange, with a similar technology, but fundamentally different support for centralized updating of infobase configurations. It consists of the following functional parts (which can be used separately):
- Change registration service - when enabled, starts automatically registering changes to objects or records for exchange (or other purposes). In the RIB mode, it is also used to register changes to the infobase configuration.
- Serialization of objects / records to XML. Almost any 1C: Enterprise object is serialized into XML in a regular manner.
- A mechanism for maintaining the same configuration for all nodes of a distributed infobase. In the RIB mode, data exchange between different nodes is possible only if they have the same configuration. It is transferred automatically during the exchange. At the end node, you only need to accept the changes.
- The infrastructure of messages exchanged in a distributed information system - guaranteed delivery. The registered changes are packaged in messages and sent to the end node in batches. Are removed from registration only after package delivery is confirmed.
- Application level infrastructure. Of course, all of the above will not work without developed mechanisms at the level of applied solutions, some of which are already included in the BSP. The solutions have the ability to upload data according to certain rules, change the principles of their registration, and determine the method of package delivery.
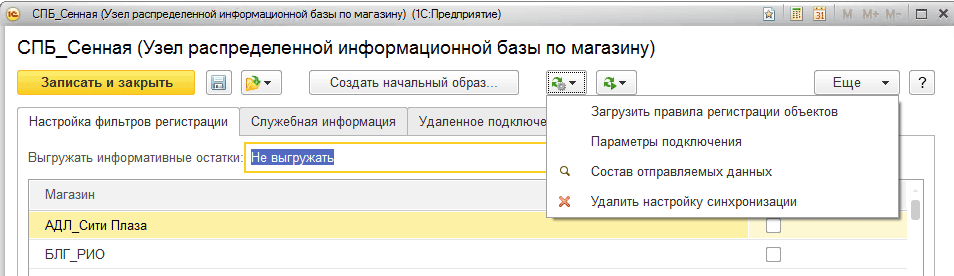
As you can see, RIB in 1C can be quite a lot. In most cases, this functionality is more than enough. For example, in fig. 1 shows the form of an infobase node in 1C, where you can see the ability to download registration rules, specify connection parameters, and see a list of objects registered for exchange.
From the description above, we can conclude about the capabilities of RIB 1C as a distributed system:
- Support for a unified infobase configuration (semi-automated).
- Change tracking support.
- Guaranteed delivery.
- Master-master schema capability.
- Possibility of the "star" scheme.
- The ability to selectively filter changes.
Not bad enough - it will satisfy the needs of a small network. But RIB has certain limitations, largely related to the architectural features of the 1C platform, which impose certain restrictions on the use of this technology:
- The need to update the infobase configuration in manual mode after shutting down users. Stopping exchanges before updating the configuration.
- Transactional restriction of message infrastructure on data fetch. When fetching changes for unloading, the database table is locked to record new changes; with large volumes of unloading, this can take a long time, stopping work.
- The overhead of maintaining a large number of sync nodes (the number of service records is equal to the number of nodes).
- Big data loading problems.
Let us now try to compare this with any "advanced" system that has a replication mechanism.
Creation and configuration of a distributed database (RIB) in 1C 8.3 Accounting (and other configurations) is necessary in cases where it is not possible to work for several users, while simultaneously connecting to one database. This is quite rare nowadays, as standard remote desktop works great and there are other programs that provide a remote connection to the central computer where the database is located.
But nevertheless, there are situations when there is simply no Internet. And the data should end up in one infobase. For this, a distributed database is created.
Usually the main base is called central, and the rest are called peripheral. The bottom line is that either in manual or automatic mode (depending on the setting), the databases are combined into one. To prevent the numbers of newly entered documents and directory codes from being duplicated, a prefix is \u200b\u200bassigned to each database.
In this tutorial, we will use an example to create a central and peripheral databases, check the exchange between them. This manual is suitable for both 1C 8.3 Accounting and 1C Trade Management (UT) and other configurations.
Setting up the main (central) distributed RIB database
Let's go to the 1C Administration menu, then follow the link “Data synchronization settings”. In the window that opens, select the "Data synchronization" checkbox. The link "Data synchronization" will become active. Immediately here we will set the prefix for the main infobase - for example, "Central Bank":
We go to the link "Data synchronization", a window will open with the button "Configure data synchronization". Clicking on this button will open a drop-down list where you need to select the "Full" mode. If you need to synchronize only one organization, you need to select "By organization ...".
In the next window, the program will offer us to make a backup. I highly recommend doing this as the following setup steps may not be reversible.
After creating the backup, click the "Next" button. In the next step, we need to decide how the synchronization will take place:
- through a local directory or a directory on a local network;
- over the Internet via FTP.
For simplicity and clarity of the example, we will choose a local directory. I indicated the following path: "D: \\ Base 1C \\ Synchronization". It will not be superfluous to check the entry to this directory, for this there is a special button:
Get 267 1C video tutorials for free:

Skip the next steps for configuring FTP and email sync. We stop at the settings for the names of the main and peripheral databases. Here we will set the prefix for the peripheral base:

Do not forget that the prefixes for each database must be unique. Otherwise, you will receive the error "The value of the prefix of the first infobase is not unique."
Click "Next", check the entered information and click "Next" again, then - "Finish". In the "Full name of the file base" field, specify the 1Cv8.1CD file in the directory that was created for synchronization. We create an initial image of a distributed 1C database:

After creating the initial image of the RIB in 1C, you can set a synchronization schedule or manually synchronize:

After synchronization, you can connect to the new database and make sure that information from the central database has been downloaded there:

Just add at least one user with Administrator rights in the new peripheral base right away.
Setting up synchronization in the peripheral database
In the 1C peripheral base, the setup is much easier. It is enough to check the "Data synchronization" box and follow the link of the same name. And we almost immediately find ourselves in the window with the "Synchronize" button. Let's try to create a test item in the peripheral database and upload it to the main one using the RIB:
In 1C 8.3 or in 1C 8.2? Configuring a distributed infobase. Step-by-step instruction.
The infobase distribution is used when it is necessary to maintain joint accounting in databases that cannot, for various reasons, have a physical connection. An example is keeping records in one company that has a division in a big city and a small village without the ability to connect to the Internet. Or, in some special cases, the periodic need to simultaneously work with the same database in the office and outside the office, for example at home. In such and similar cases, the use of a distributed information base (RIB) is justified and necessary.
In this article, we will consider the organization of the distribution of one informational database in the configuration of 1C Accounting for Russia version 8.3 through a local or network directory. In version 8.2 1C, this instruction will also be useful, because describes essentially one process with significantly small differences.
==== Setting up for the main base ====
Having opened 1C 8.3 in the "Enterprise" mode, go to the "Administration" section. In version 1C 8.2, to get started, you need to go to the main menu "Service" - "Distributed information base (RIB)" - "Configure RIB nodes".

Further, we will consider the process in the context of IS version 8.3. So, going to the "Administration" section, select "Program settings". In the settings, go to the "Data Synchronization" section. Here we tick the box "Use data synchronization" and specify the database prefix. We indicate "Central Bank", meaning the central base.
After that, the item "Data Synchronization" appears in the right menu. Let's choose it. In the opened child window, click the "Configure data synchronization" button. In the drop-down menu, you can select settings for different use cases of synchronization. We choose "Distributed Information Base ...".

For general development, get acquainted with the contents of the next window and click "Next".

In the next window, fill in the directory through which it will pass. We will indicate data compression to reduce the size of the upload, and you can immediately specify a password for the archive with data. It is important not to forget it. We confirm the filling with the "Next" button.

The next two windows are for specifying the settings for FTP and e-mail exchanges. As mentioned earlier, we are considering a way to exchange through a directory, so we skip the settings for FTP and email.


The next window is intended for specifying the exchange parameters in the part of the peripheral database. Let's indicate its name and prefix. Next - the "Next" button.

Let's check the exchange parameters we have formed and confirm their correctness with the traditional "Next" button.

The necessary set of settings for the exchange will be automatically created. It will take some time.

Important! It takes a long time to create the initial image for the slave node. The size of this significance depends on the computer resources and the volume of accounting in the main database.
Let's say we decided to create an image. After clicking on the "Finish" button in the previous window, we will enter the settings for creating an image of the subordinate information security. We will consider the simplest case for local operations. To do this, we will indicate the required details in the window that opens. Pay special attention to the "Full name of the file base" parameter. It must be specified in full UNC format, which assumes the formation of a local path in the "network" format. For example - "\\\\ Server1C \\ Databases \\ RIB". Add the name of the database file to the specified path - 1Cv8.1CD.
After clicking on the "Create initial image" button, the process of generating an image for the subordinate base starts.

After the end of the process, a database file will be created in the specified directory. This newly created base needs to be configured before full use.
==== Setting up for the peripheral base ====
To do this, you need to connect it to 1C. You will find how to do this in the instructions in our article - After connecting, you need to start the new database in the configurator mode and create users. Next, the IB must be started in 1C "Enterprise" mode.
If, for any reason, the creation of users needs to be postponed to a later time, you can simply run the database in 1C "Enterprise" mode after connecting. You will be prompted to create an Administrator user, agree to it, and the initial population will be completed.

Then you need to continue setting up the pairing with the main base. This setting is similar to the one discussed above for the main base.


A setting for communication with the main base will be created.

============================================
So, now we have created the main and peripheral bases. Synchronization settings have also been created in each of these databases. Now you can proceed to editing these settings and bringing them into a suitable form. You can create automatic exchange rules or perform manual exchange.
Let's do it in the main database. The peripheral base is configured in the same way.
Editing can be applied to rules and data sync schedule.

By clicking the "Configure" button in the "Data Synchronization Schedule" section, you need to edit the scripts for the automatic work schedule for uploading / downloading data for the selected database. You don't have to edit it, just agreeing with the default options.

To edit the parameters, just click on the link with the automatic schedule data. And then we edit the temporary parameters for starting tasks. By clicking on the tabs, you can change both the time and the dates and days of the week of the launch.

By clicking the "Run task" button in the main script window, you can manually start the task.
By clicking the "Configure" button in the "Data Synchronization Rules" section, you can perform operations to change the job start scripts, as well as view the upload / download progress log. The latter is important enough for administering access and tracking the regularity of exchanges.

After you finish creating and editing scripts for automatic start of the distributed database exchange, you can proceed to unloading and then loading data.
This, basically, completes the configuration of the distributed database for the central and peripheral nodes.
Download illustrated instructions
Distributed information base. Step-by-step instruction
Distributed Information Base (RIB) 1C: Enterprise
Creation of a distributed infobase and its configuration
how to set up ribs in 1s 8.2
How to set up a distributed infobase in 1C
How to set up in 1C
How to set up in 1C
Setting up a distributed infobase (RIB) in 1C
An example of configuring an RIB for 1C: Accounting 8
Creation of a distributed infobase and configuration
To create a distributed infobase, you need to enter the program in "1C: Enterprise" mode. To create nodes of a distributed base in the menu, select: Operations - Exchange plans. The "Select object: Exchange plan" window will open.
1. Consider a variant with a "Full" exchange plan.
The exchange will be carried out across all organizations located in the distributed information base.
Let's choose the "Full" exchange plan. The "Exchange plan complete" window will open.
We fill in two records:
We will name the first record "Main node", we will indicate the code "GU",
The second record will be called "Slave node", the code will be "PU".
As you can see from the figure, the first record has an icon with a green circle, this is the “Main node” icon.

To create a copy of the "Main node" infobase, click on the "Subordinate node" and click on the "Create initial image" icon. This will be the infobase of the "Slave Node".

The window "Creating an initial IB image" will open, select "On this computer or on a computer in the local network", click "Next".

In the "Infobase directory" field, select the location where the copy of the "Main node" will be installed, click "Finish".

After creating the "Slave node" infobase, the following message will appear:

Click "Ok".
Add the "Slave node" infobase to "1C: Enterprise". We go to the subordinate base in the "1C: Enterprise" mode. Let's open: Operations - Exchange plans. The "Select object: Exchange plan" window will open. Let's choose the "Full" exchange plan. The "Exchange plan complete" window will open. We see that the "Main node" icon is orange, which means that this node is the main one for the infobase in which we are located.

We make the following settings in both the Master and Subordinate nodes:
1.
Add a prefix for the distributed infobase.
This is done so that there are no conflicts in the numbers and codes of documents and directories created in two databases, therefore, in each database we indicate a prefix that will be added to document numbers and directory codes. Open: Service - Program settings - "Data exchange" tab. In the field "Node prefix for a distributed infobase:" in the subordinate base we enter "PU", in the main base we enter "GU".

2.
Add the setting for data exchange between nodes:
We open: Service - Distributed Information Base (RIB) - Configure RIB nodes. The "Communication settings" window will open.

Click "Add", the "Data exchange settings" window will open. Enter the "Name" of your setting.

A node will automatically appear in the "Node" field, for "Master node" it will be "Subordinate node", for "Subordinate node" there will be "Master node".
In the "Directory" field, select the folder into which the exchange data will be received; it is best to specify one directory for the main and subordinate databases.
In the "Exchange type" field, set up data transfer between databases: via a file or FTP resource. Let's choose, for example, "exchange via a file resource".
We do not change anything in the remaining fields.
Click "Ok". We see that a setting has appeared.
3.
To exchange data, do the following:
First, in the database in which the changes were made, click on the "Execute exchange using the current setting" icon, as shown in the figure.

After uploading, the upload result window will appear.

Then, in the database to which you need to transfer the changes, click on the "Execute exchange according to the current setting" icon and the data will go to the database you want.
2. Consider a variant with an exchange plan "By organization".
The exchange will be carried out by selected organizations located in a distributed information base.
To create nodes of a distributed base in the menu, select: Operations - Exchange plans. The "Select object: Exchange plan" window will open.

Let's choose the exchange plan "By organization". The "Exchange Plan By Organization" window will open.
We fill in two records:
We will name the first record "Main node", we will indicate the code "GU", we see the difference from the "Exchange Plan: Full", a table appeared in which we indicate the Organizations for which the exchange will take place.
We will name the second record "Subordinate node", indicate the code "PU", indicate the organization.

In all other respects, the setting is absolutely similar to the "Exchange Plan: Full".
| The URBD (Distributed Database Management) component is used when it is necessary to exchange information between two or more identical information bases (hereinafter - IB) over a narrow communication channel (for example, a modem, e-mail). Below is a step-by-step instruction and practical advice on setting up an URBD in 1C: Enterprise 7.7. An example is given for two information security, although it is not difficult to configure it for a larger number of bases by analogy with two bases. | Article author: romix | Editors: evGenius Last revision №7 from 22.02.08 | History Url: |
Keywords: URBD, script for auto-exchange, exchange between branches, mail, rom-mail.dll, DialMail.dll, CDO, dial-up, URIB
The URBD (Distributed Database Management) component is used when it is necessary to exchange information between two identical information bases (hereinafter - IB) over a narrow communication channel (for example, a modem, e-mail). Below is a step-by-step instruction and practical advice on setting up an URBD in 1C: Enterprise 7.7. An example is given for two information security, although it is not difficult to configure it for a larger number of bases by analogy with two bases.
1) The DistrDB.dll library in the BIN folder of the 1C: Enterprise program is responsible for the operation of the URBD component. This component is purchased and installed separately.
2) For the example of auto-exchange, we will create two infobases, placing them in folders named c: \\ 1c_base1 and c: \\ 1c_base2. Create these folders, and in each of them - subfolders with the names CP and PC (in Latin letters)
3) In the c: \\ 1c_base1 folder, place a ready-made configuration (for example, "Trade and Warehouse"). But it is better to train on the simplest information base (containing, for example, only one reference book with several entries). It is important for us to make sure that data really migrates from one information security to another as a result of URBD auto-exchange, and this can be shown both in a complex and in the simplest test case.
4) Close all windows in the Configurator and activate the "Administration - Distributed IS - Management" menu item. This menu item is available if there is a DistrDB.dll component in the 1C: Enterprise BIN folder. If the library has the wrong version or is damaged, just reinstall 1C: Enterprise over the current installation - the DistrDB.dll library will be replaced by its correct version.
5) In the window that opens, click the "Central IB" button. In the request window, specify the code of the new infobase (specify the number 1) and its description (for example, "Central IB").
6) Extinguish the appeared warning about the irreversibility of changes by clicking "OK" (below is described an undocumented method, how, if necessary, to return the base to its original state).
7) Click the New peripheral button. IB ". In the request window, specify code 2 for it and the description - "Peripheral IB".
8) Select the peripheral base with a single click and press the “Config. auto-exchange ". In the window that opens, set the switch to change the "Manual" auto-exchange mode to "Automatic" and click the "OK" button.
9) Click the "Upload Data" button. Remember (to the clipboard) the name of the downloaded file "c: \\ 1c_base1 \\ CP \\ 20.zip" - it will still be useful to us. Click OK. At the end of the upload, 1C will write "Upload successfully completed."
10) Close the Configurator and enter (also in the Configurator mode) the folder (still empty) where the second IB should be located (in our example - c: \\ 1c_base2). Indicate that the database should be in DBF / CDX format and click "OK".
11) Go to the Administration - Distributed IS - Management menu item. In response to the question “The infobase was not found. Do you want to download data? " click "Yes" and specify the name of the upload file (in our example, "c: \\ 1c_base1 \\ CP \\ 20.zip") and click "OK". After the download is complete, 1C will write "Download completed successfully". We have successfully created the Peripheral IS by downloading data from the Central IS.
12) Change something (for example, add a new reference item) in one of the infobases. Our goal is to ensure that changes in one (any) information security get into another information security through auto exchange. Use the menu item "Administration" - "Distributed information security" - "Auto exchange" alternately in each of the bases. Newly appearing unload files with the ZIP extension in the CP and PC folders should be moved (copied) between infobases according to the CP-\u003e CP, PC-\u003e PC principle (in real "field" conditions, this is usually done using e-mail).
Tips and recipes
1) To turn a distributed database into a regular one, delete the files 1SDBSET.DBF, 1SDWNLDS.DBF, 1SUPDTS.DBF and the corresponding * .CDX files, as well as 1SSYSTEM.DBF. Basically, it is enough to remove 1SSYSTEM.DBF. After that, you need to restore the point of relevance by running the program in exclusive mode. This trick is undocumented (guess why), but it works nonetheless.
2) You can change the 1C configuration, but only in the Central IS. It is very convenient - changes in peripheral information security are "rolled" automatically.
3) If you have lost (for example, as a result of a mail error) one or more uploads - do not worry, because URBD is able to track such situations, and retry sending lost data at the next auto-exchange session.
4) The standard ability to send mail to 1C is implemented through the MAPI interface, when interaction occurs with an email client (such as Outlook). My advice - do not waste your time - with MAPI and all sorts of Outlucks, in practice, problems constantly arise that require a developer to "drive quickly" between branches. I do not recommend using a direct dial up connection or FTP for the same reason. It is better to send mail with external components such as rom-mail.dll or DialMail.dll.
Another option is to use CDO
http://avb1c.narod.ru/?\u003da9
(c) avb, Mouthpiece of the absurd
5) A program that can automatically perform auto-exchange and send upload files by e-mail, you can take here:
If you correctly configure several constants (mail addresses, passwords, attendance, etc.), the user only needs to double-click on the shortcut to start Auto Exchange.
The program is implemented as a 1C: Enterprise configuration. A detailed description is contained in the attached DOC file.
6) If you need to automatically dial to your ISP, use the E-Type Dialer program. She knows how to launch external applications upon successful connection. Another option is to use an external component DialMail, which has the means of working with a modem (advice - prefix "p" in Latin before the number gives pulse dialing, 9W before the number - call through the "nine" and wait for a dial tone, etc.).
Note: Windows XP has a built-in dialer called rasdial.exe. Command line switches:
rasdial.exe Item User Password
rasdial.exe Element / DISCONNECT
7) Priority is given to changes made in the Central IS. Please note that infobase prefixes are used in typical 1C configurations (see this setting in Constants) so that the codes of catalog items and the numbers of documents created in different databases do not match, and their uniqueness is not violated.