Installing a printer without an installation disc is easier on modern hardware than outdated ones. There are two main ways to solve it in the Windows operating system. The first is to automatically download the files necessary for the device to work through the Windows system utilities. The second method will require more user involvement, since the files must be downloaded from the device manufacturer's website, and then installed independently.
Printer connection
Before installing the equipment in the system, you need to properly connect it to the computer. Newer printers use USB, Ethernet or wireless over Wi-Fi for this purpose. It may be difficult to connect old devices, since the motherboards of modern computers do not always have the required connectors. For connection via outdated LPT or COM ports, special adapters to USB are used.
Note! Quick connect instructions are often included with your printer. It can be printed at the beginning of the basic user guide, or as a separate insert.
How to automatically install a printer without an installation disc
After the device is connected, Windows will automatically start the software installation process. You just have to select the automatic program search in the dialog box that appears on the screen. Typically, the installation files for modern printers can be found and run without any problem. If you still have difficulties, make sure that the search for programs on the Internet function is not disabled on your PC. To do this, open the properties of the computer and in the left menu go to advanced options, then select the "Hardware" tab.

On this tab, click on "Device Installation Options". An additional window will open in which you can specify the desired order of downloading drivers and icons for the connected equipment. It is recommended to select the first item, as it will allow:
- Install a printer without an installation disc;
- Automatically load drivers for other connected equipment;
- Download device icons displayed in the "Devices and Printers" menu.

Important! To save the settings, you will need to confirm that you have administrative rights. This is done by clicking the "Yes" button in the opened User Account Control (UAC) window. Depending on your UAC settings, you may also need to enter your system administrator password.
After changing the settings, disconnect the printer and then reconnect it. Re-select the automatic search for installation files in the dialog box. Wait until the end of the process, and if the result is positive, print a test page. If your search doesn't find the software, go to download. You can install the downloaded files yourself without a disk.
Manual driver installation
Find the official website of your printer manufacturer. This can be done using any of the following methods:
- Enter the name of the company in a search engine (Google, Yandex or another convenient search engine);
- Clarify the URL in the instructions;
- Check the presence of the address on the box;
- Take the address on the technical information sticker on the back or bottom of the case.
Open this site in any browser, then find the section with programs. Among the possible names, the most common ones are: "Downloads", "Drivers", "Support". Select your hardware model and download the installation files for it. If they come in an archive, unpack it. Next, you need to install the software on your computer. To do this, run the installation utility (it has the extension .exe) and follow the instructions on the screen.

Important advice! Please use the latest software version compatible with your operating system. Unlike the disc, the website contains the latest software versions.
Read also:
 Coffee printer: Types and features of machines for printing on coffee foam
 How to connect a printer to a computer: An overview of how to connect home devices
Has it ever happened that it was necessary to urgently install the printer, and the installation disc was not at hand? Then here are some tips for you, how to install a printer without an installation disc.
Most people assume that a CD is required to install the printer. But this is not the case. It is easy and simple to install your printing device with or without a disk. There are two ways to install a printer without an installation disc, here they are:
Method one
- Click on the Start button.
In Windows XP, in the window that opens, click "Control Panel" and select "Printers and Other Hardware" or "Printers and Faxes".
In Windows Vista or Windows 7, select “Printers” or “Devices and Printers” from the right side of the “Start” menu.
- Click the Add Printer button.
In Windows XP, it is located in the Print Tasks column. The Add Printer Wizard will open.
When Windows Vista or Windows 7the Add Printer button is on the toolbar. The Add Printer window opens.
- Click Next to start the wizard in Windows XP.
On all operating systems, select “Add a local printer” if you are installing a printer that is connected directly to the computer.
Or select “Add network printer” to add a printer connected to your home or office network.
Windows Vista and Windows 7 also provide the ability to wirelessly connect the printer to a computer via WiFi or using Bluetuth.
Select the printer connection port from the drop-down menu (most likely USB001). Click Next. List the printer manufacturer in the Manufacturer list. Select your printer model from the Printers list. Click "Next".
In the next window, enter the name of the printer you come up with, or leave the default printer name. Click Next. Windows will install the printer on your computer.
To check the functionality in the window that opens, you can click the "Print test page" button. When finished, click “Finish”. Printer installation is complete.
Method two
If you don't have a driver disc for your printer, don't worry, just visit the manufacturer's website (HP, Dell, Epson, Canon, etc.).
Go to the support page, where you can find all the drivers for the products of this company. I have posted the addresses of these pages for some manufacturers at the end of the article.
Find and download drivers for your printer model, and note if they are compatible with your operating system.
Usually the downloaded file is an archive. Unzip it.
If as a result of unzipping you received a folder with files of different types, find and run the SETUP file. If the downloaded drivers are one or more executable (extension .exe) files, run the one that is most suitable for your operating system (usually the OS type is indicated in the file name, for example: Dell_AAY_Vista_x64_PS_sys_en).
Follow the instructions in the installer window and in a few minutes the printer drivers will be successfully installed on your operating system. Note that some models require the printer to be disabled during driver installation.
Using one of these methods, you can install the printer yourself without an installation disc. Here are the addresses of the support pages on the websites of some printer manufacturers where you can find and download the drivers you need:
- Brother
http://welcome.solutions.brother.com/bsc/Public/CountryTop.aspx?reg\u003deu&c\u003dru&lang\u003dru - Canon
http://software.canon-europe.com/ - Dell
http://www.dell.com/support/drivers/ru/ru/rudhs1/ProductSelector/Select?rquery\u003dfkey-e-Drivers_PS - Epson
http://support.epson.ru/ - HP
http://h10025.www1.hp.com/ewfrf/wc/siteHome?lc\u003dru&dlc\u003dru&cc\u003dru&lang\u003dru&product\u003dtop - Lexmark
http://support.lexmark.com/index?page\u003dproductSelection&channel\u003dsupportAndDownloads&locale\u003dRU&userlocale\u003dRU_RU - Samsung
http://www.samsung.com/ru/support/download/supportDownloadMain.do - Xerox
http://www.xerox.ru/ru/service/
The main output of information from a PC is carried out by means of a printer, the installation of which is usually carried out by professional copiers. This does not mean that an ordinary user is not able to do everything himself. The main thing is to have an idea about the installation of this device.
Checking the integrity of the printer, as well as the availability of the necessary instruction package and cable set are important elements to help in the future use of copier equipment. The model of the copier, as well as the brand of the manufacturer, must be "known by sight." You will need this information to set up your printer.


A new copier and an updated system are the keys to a successful printer installation on your PC. If you encounter problems with printing on a new printer - often this is due to drivers or a breakdown of the printer itself, you will have to use the help of the wizard.
So, half the battle is done. A brand new printer has already been purchased, the only thing left is to connect it to the computer. What could be simpler: connect it to a suitable connector, boot the computer, insert the driver disc into the floppy drive - and that's it ...
But no. You can connect the printer with your own hands, but there are some subtleties here. So let's start all over again.
Install from disk.
1. Take the printer out of the package, carefully detach all protective stickers. Insert the driver disc into the drive. In most cases, autorun will work, a window will appear prompting you to select a region of residence:

For the Canon printer - select the region of residence
(Picture 1)
2. Then the installation options will be offered:

(Figure 2)
If installing the printer is not your daily routine, select "Easy Installation" and move on.
3. We accept and agree to the license agreement:

Click - yes, accepting the license agreement. In some cases, you need to check the box confirming your choice and click - Next.
(Figure 3)
4. We are waiting until the installation program asks to connect the printer:

Printer connection - check if the printer is connected
(Figure 4)
5. Using a connecting cable (you may have to buy it separately - not all printer manufacturers complete their products with it, and not all printers accept cables.) Connect the printer to the computer as shown in the figure.
We are waiting for the installation to finish.
In my practice, there have been cases where it was not possible to install the printer driver from the CD. This usually happened for two reasons: the disc was not readily readable, or the drivers written on it did not fit the operating system installed on the computer. In this case, you had to download the necessary drivers from the Internet.
How to choose the right driver.
To select the correct driver, you need to know the name and model of your printer, and what operating system is installed on your computer.
1. Let's go to: Start / Control Panel / System and Security / System and see the name and type of the system:

(Figure 5)
2. Open the printer manufacturer's website and download the required driver.

(Figure 6)
3. Save it to your hard drive and proceed with installation.
3.1. Let's open the folder with the downloaded file. Click on the icon with the –exe extension, after which the Installation Wizard will start.
3.2. Further, the installation of the printer driver is practically the same as the above algorithm for installing from the CD.
Where can I download / find the drivers I need?
The best way to look for the right drivers is on the website of the printer or MFP manufacturer. The fact is that there you can find later versions with already fixed errors of previous versions. For hp it is http://www8.hp.com/ru/ru/support-drivers.html, for Canon - http://software.canon-europe.com/. You can also visit the site Driver.ru (http://driver.ru/).
What should I do if I can't install the printer driver the first time?
In this case, the best advice is to disconnect the printer from the computer, uninstall the installed software, carefully read the instructions, find the missing step, and reinstall the printer driver.
Good luck!
Some drivers are supplied only in the ".zip" format and do not have an ".exe" installation file. They are as easy to install as regular drivers. Now we will tell you how to install a printer driver for their archive
Notes:
- you do not need to connect the printer until it is specified in this manual;
- these instructions are applicable to all Windows operating systems, from XP to 10.
First of all, the downloaded driver must be unpacked. This can be done with the free 7-Zip program (you can download it on the official website http://7-zip.org.ua/ru/), or with the paid WinRar program. Also, archives can be unpacked using basic Windows tools (if the archive is in zip format) or if the archive is self-extracting (usually it is, exe format).
Example 1. If you take the Xerox Phaser 3010 as an example, then you will download the driver archive (in exe format), which are simply packed into one file. You need to run the downloaded archive (by clicking 2 times with the left mouse button) and you will see a window where you need to specify where to unpack the drivers.
Example 2. If we download the driver in zip format, then we need to use archivers to extract the drivers. To do this, you can install one of the above archivers and then right-click on the archive. In the context menu, select: "Extract all" or "Extract to current folder" or "Extract to (the name of the folder will be written here)".
So, the unpacked file, if you haven't changed anything, will be in the same folder as the downloaded archive. If you are offered a path where to unpack the drivers, then be sure to pay attention to this path, so that you do not later look for drivers throughout the computer.
After unpacking, make sure that the archive does not contain any files in the ".exe" format (for example, "Install.exe" or "Setup.exe"). If such a file was found, then the installation must be carried out in standard mode (run the file and use the prompts of the installer), if not, move on to this guide.
Go to "Control Panel" - "Hardware and Sound" - "Devices and Printers". In the top menu, click "Add Printer".

After that, a window with an indicator of device search will appear. Without waiting for the results, click "The required printer is not in the list."

After that, select the lowest item - "Add a local or network printer ..." and click "Next".

In the port selection menu, just click "Next" - in this window, the settings are not important.

In the next window, click the Have Disk button.

In the window that appears, click "Browse". 
Now we indicate the path to the folder that you unpacked. Next, click on the ".inf" file with the left mouse button, then click "Open".

Click "OK".

In the next window, select a printer (by clicking the left mouse button) and then click "Next".

You don't need to change anything in this window, just click "Next".

When we do these manipulations, the driver installation will begin. Now we are waiting for this process to complete on your computer. A window will appear asking you to share this printer with network users. We do not need this, so we leave the selected top parameter by default and click "Next". It is possible that this window will not be displayed for you. Then there will be a window like this:  Here you need to click "Finish". Now go to the folder where the devices and printers are located (it was described above how to enter here) and right-click on the printer that was just installed. Click "Remove device" (the drivers will remain in the system).

After that, we connect the printer to the computer, turn on the printer and Windows will automatically install the necessary driver for your device.
Driver installation via device manager
If the above method did not help you, then in this case we want to suggest another. Traditionally, the downloaded driver must be unpacked. Most often, the built-in Windows archiver is enough for this purpose. We have already discussed this archiver above.
Now you need to do the following: connect the printer to a PC or laptop. Open Start, write to the search bar "Device Manager" and press "Enter";
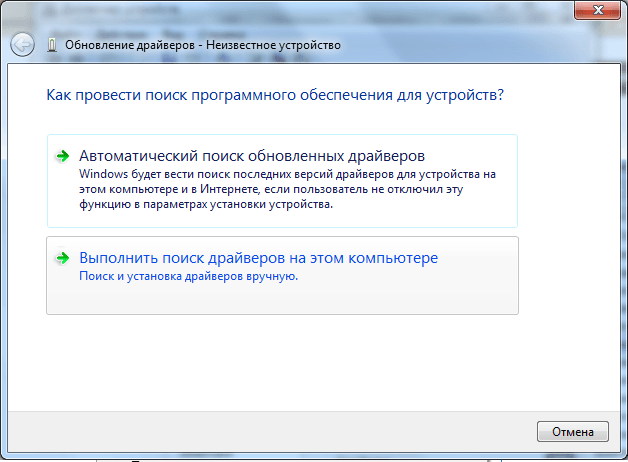
You will see a summary of all devices connected to your computer. Your printer will be located in the Other Devices section titled Unknown Device. Right-click on this device and select the "Update drivers ..." item.

In the "Driver Update" window, select the manual driver search item (item 2).
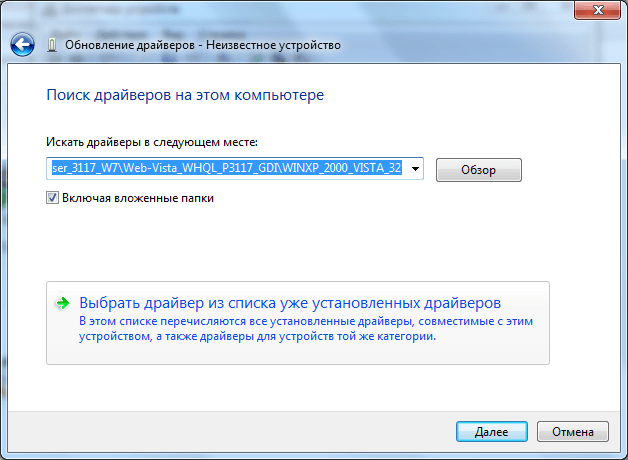
We select the item for choosing a driver from the already installed drivers.
In the menu for selecting the type of device, select "Printers" and click "Next".

And the final stage: in the "Add Printer Wizard" window, select the "Install from disk" item, then "Browse" and specify the path to the .inf file from the unpacked folder with the driver.

After that, your printer will be installed on your computer or laptop.