All instructions are written based on Android 6.0.1. Due to the variety of versions of this OS, some functions or interface elements on your gadget may differ or be missing. But the general principles for most Android devices are about the same.
Do not disturb mode
With this mode, you can quickly switch between different profiles for receiving notifications. The first is called "Complete Silence", it is a completely silent profile. The second - "Only alarm clock" - as the name implies, skips only alarm clock signals. And within the third profile - "Important only" - you will hear both alarm sounds and notifications, but only from selected contacts and programs.

You can switch between sound profiles using special buttons on the notification panel. Depending on the Android version, the panel contains either all three buttons with the names of the profiles, or one of them, and the rest appear after clicking on the first one.


A link should be displayed next to the profile buttons to quickly navigate to the settings. By clicking on it, you can select contacts and other parameters for the "Important only" mode. In addition, in the settings, you can set rules (start and end times, days of the week, etc.), in accordance with which the system will switch profiles automatically.


Thus, the "Do Not Disturb" mode allows you to instantly adapt your smartphone to the current circumstances. For example, if you have an important meeting, you pull down the notification panel, turn on the "Complete silence" mode and calmly participate in the process. And if you have configured the rules, the device itself will turn off notifications during working hours, and on the contrary, will turn on notifications during free hours.
Lock Screen Notifications
With this feature, you can customize how notifications appear on the lock screen. It is usually found in the system preferences section related to notifications.


The system offers a choice between three modes: "Show notifications in full", "Do not show notifications" and "Hide personal information". The names of the first two options speak for themselves. The latter means that the content of received messages will not be displayed on the locked screen. Outsiders will only see an inscription like "new notification" and that's it.
Turn off notifications on the lock screen or hide their personal information if you are afraid that someone else might read your correspondence.
Customized notification settings
The settings listed above are global, that is, they affect notifications from all installed programs.
But you can also manage the notifications of each program separately. To do this, you need to open system settings and go to the notifications section. There should be an item "Application notifications" or with a similar name. By clicking on it, you will see a list of all installed programs. By choosing any of them, you can customize its notifications.


The system allows you to block all notifications of the selected application, designate it as important, hide personal information and allow it to briefly display pop-up notifications on top of other programs.
As you can see, with the help of individual settings, you can, for example, block notifications from only the most annoying programs or remove the contents of the correspondence in the selected messenger from the locked screen.
Any android user knows how much software can be in the device. Finding what you need is sometimes tiresome. You don't have to do this. You can go to the cherished tick even faster. Need:
- Lower the top curtain panel.
- Click on the unwanted push notification and hold your finger until the About App button pops up.
- Uncheck the box and confirm.
On Lollipop
Data-lazy-type \u003d "image" data-src \u003d "http://androidkak.ru/wp-content/uploads/2015/10/rezhimy-uvedomlenij-v-lollipop.jpg" alt \u003d "(! LANG: rezhimy -uvedomlenij-v-lollipop" width="169" height="300">
!}
 In the new version of Android, the notification system has received a major overhaul. Now it's even easier and more convenient to configure it.
The fastest way is with the sound control buttons. When you press it, a window appears in which you can select three operating modes:
- Do not disturb.
- Important. Notifications appear only from those applications that the user has assigned the status of important. It is possible to set the duration of the mode. The user can independently make a list of important services, as well as set the automatic activation of the mode on certain days and at a specific time of day.
In addition to the above, you can go to the "Sounds and Notifications" section in the system settings.
The new version of android has a function of displaying notifications on the lock screen. You can disable it here.
You can still configure push notifications for each app. If a user is constantly worried about a particular game or program, he should:
- Go to the "Application notifications" section.
- Select the one you want.
- Block. Here you can turn off the display on the lock screen.
How to disable push (push) notifications - this question worries some users who see notifications in the browser after entering many sites on the Internet. Push technology is designed to distribute information on the Internet from a provider, in this case, a site, to a user of this site.
Push notifications for the site are needed to inform the website visitors about news, mainly about the release of new articles. In this case, the visitor receives timely notifications from the site and can immediately read the news.
Notifications on behalf of the site are sent using a third-party service that organizes the delivery of notifications to users' computers.
What is push notification on a computer? If a site visitor agrees to receive messages from this resource, then from time to time, notifications about news of this website appear on the user's desktop.
How push notifications work
When entering a site that has the function of sending notifications enabled, the visitor each time sees a request for permission to display notifications, in which it is proposed to click on the "Allow" or "Block" buttons. The names of the buttons may be different, but the meaning is the same everywhere.
The site visitor can ignore this pop-up window, because the request window for receiving push notifications is small, it does not interfere with viewing the site's pages.
The appearance of such windows is different, depending on the service with which notifications are sent from this site.
By clicking on the "Allow" button, you agree to receive push messages to your computer.
In the notification area, on the user's computer desktop, notifications about news on this website will appear. Usually, this is a message about the release of a new article. Some sites abuse the ability to send notifications, notifying about everything in a row, sometimes sending unnecessary information.
After receiving a push notification, the user can go to the site to read the article, or close the notification, ignoring this message. Such notifications from sites practically do not interfere with the work on the computer in any way, since they are displayed in the notification area and close on their own after a short period of time.
In order to no longer display the request for permission to send notifications from this website when you visit this website again, click on the "Block" button.
If you are already receiving push messages from a specific site, then the user can disable push notifications on their own in their browser, in which they have allowed to receive notifications on their computer.
How to remove push notifications after receiving a notification
In many notifications, depending on the settings of the service sending the notifications, you can disable push notifications directly in the window that opened the message.
To do this, click on the settings icon (gear), and then select "Disable notifications from the site."

After that, notifications from this site will no longer appear on your computer.
How to disable push notifications in Google Chrome
Enter the settings of the Google Chrome browser, scroll down the mouse wheel, click on the link "Show advanced settings".
In the "Personal data" section, click on the "Content settings ..." button. In the "Content Settings" window that opens, find the "Alerts" section.
Here you can configure receiving notifications from websites. By default, the option "Ask me before showing site alerts (recommended)" is selected.
In order to remove push notifications in the Google Chrome browser, activate the "Do not show notifications on sites" item.

For more flexible settings for receiving push messages, click on the "Configure exclusions ..." button.
In the "Alert exceptions" window, select a site, create a rule for it: "Allow" or "Block". After selecting the desired setting, click on the "Finish" button.

How to disable push messages in Mozilla Firefox (1 way)
Enter the Mozilla Firefox browser settings, open the "Content" section. In the Notifications section, select the Do Not Disturb setting. Don't show notifications until you restart Firefox. "
After that, Push notifications will not be shown until the Mozilla Firefox browser is disabled.
To manage alerts, click on the "Select" button. The "Permission to display notifications" window contains a list of sites from which notifications are allowed or blocked.

If the status "Block" is displayed next to the site, then notifications from this site do not appear on your computer, because you previously blocked the request to send notifications from this site.
If the status "Allow" is displayed opposite the site, then you can remove the site from the list using the "Remove site" button. Then click on the "Save Changes" button.
After that, new notifications from this site will not appear on your desktop. When you visit this site again, decline the alert request.
How to remove push notifications in Mozilla Firefox (2 way)
To completely disable notifications in the Mozilla Firefox browser, you need to enter the hidden browser settings.
Enter the expression in the address bar: "about: config" (without quotes). In the window that opens, click on the button "I accept the risk!".
In the new window, enter the expression: "dom.webnotifications.enabled" (without quotes) in the "Search" field, and then press the "Enter" key.
This setting is set to "true" by default. Select the line, right-click, select "Switch" from the context menu. The parameter value will change to "false".
How to disable push notifications in Yandex Browser
Enter the Yandex Browser settings, click on the "Show advanced settings" button.
Please note that there is a "Notifications" section in the browser settings, but there you can configure the order of notifications received from Yandex Mail and the VKontakte social network.
In the "Personal Information" section, click on the "Content Settings" button.
In the Content Settings window, select the option you want to receive push messages. To completely disable all push notifications in Yandex Browser, select "Do not show site notifications".

If you need to configure the receipt of individual notifications, click the "Manage exclusions" button. Next, select which push notifications you want to block and which ones to allow. The choice of settings is similar to the Google Chrome browser.
How to disable push notifications in Opera
Enter the Opera browser menu, click on the "Settings" context menu item. Next, select the "Sites" section, find the "Notifications" option.
To block the display of push notifications, select the "Block sites from showing system notifications" setting.

If necessary, you can select exceptions (this setting works in the Opera browser, as in the Google Chrome browser).
How to remove push notifications in Microsoft Edge
Go to Microsoft Edge browser settings. Select "Options", In the "Options" window, click on "View advanced options". In the Advanced Options window, select Notifications and then click on the Manage button.
The "Manage Notifications" window will show sites that are requesting permission to display notifications. You can change permissions for specific sites.

Conclusions of the article
The user can independently disable in the browser push (push) notifications that he receives on the desktop of his computer, allowing the sending of notifications from a specific website.
More and more often, owners of Android devices began to face message broadcasting. Moreover, it is impossible to take them and just get rid of them. Usually you have to remove them over a long time, but after that they still arrive at the device like an avalanche. As a result, such "surprises" put not only the owner of the device on the brink of madness, but the smartphone itself starts to slow down terribly.
Three ways to turn off population alert on Android
Don't be discouraged if you think you will never be able to delete such messages. At the same time, in order to get rid of the numerous spam, you need to do the steps described below.
Method 1: Disable sending push messages
The first place to start is to find the "Messages" icon on the desktop and click it. Going there we are looking for "Options" or "Settings". Having opened the found menu, you must select the section " Information messages", On some devices they may be called" Push messages ", or" Network messages ". Further, removing all the checkboxes, you will have to reboot the smartphone.
Method 2: Remove spam from informational messages
We go to "Messages" and look for the item "Parameters" or "Settings". After that, go to the found menu and look for "SMS / MMS parameters" there. Then you need to go to the "Information messages settings". In the same way, we remove all the checkboxes and reboot the device.
Method 3: Turn off the public alert function
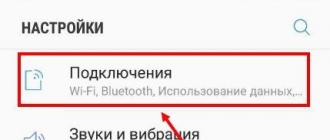
We go to "Settings", after which we look for a section with wireless networks in them. After that, click "More". In the menu that opens, we are looking for a section that would be responsible for alerting the population. We remove all marks and reload the device.
Of course, if these methods are already very difficult for you, you can try to block messages using programs Titanium or CDMaid (root). You can also go to a mobile phone salon and disable this mailing there.
In fact, on the one hand, notifications are a useful thing. Thanks to them, you are always aware of what is happening, in taking care of you, some notifications or warnings come to your smartphone. But sometimes, at least, sometimes it seems to me that they are sending them to you in order to “get it” corny, because sometimes they come in such quantity that you will be tormented to get the phone out of your bag ...
Modern Android devices are equipped with useful tools with which you can easily not only balance the display of notifications, but also get rid of them completely. And now, I will tell you how to do it.
On Android 4.1, 4.2, 4.3 (JellyBean) and 4.4. (KitKat)
In the fourth versions of Android, along with the addition of new functionality to the system, it became possible to disable push notifications separately for each application. To complete this procedure, our steps should look like this:
We go to the "Settings" menu, from there go to the "Applications" section, open and select the one that we will configure:

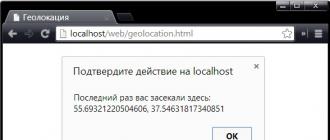
In the window that opens, uncheck the "Enable notifications" line:

At the request of the system to confirm the selected action, click "OK":

However, an active user may have quite a decent amount of software in his Android device and go figure out which program is bothering you with messages in the control panel. For such a case, there is a simplified shutdown scheme, which for some reason not many people know about.
As soon as a notification appears on the display that needs to be turned off, simply lower the curtain of the notification panel, in the window that appears, click on the notification and hold it until the "About application" button appears, click on it, and in the information window that opens, turn off the "Enable notifications" option (remove checkmark, as shown in the screenshot above) and click the "OK" button.
If, nevertheless, you decide that the notifications need to be returned, then we return the checkmark in the same way.
On Android 5.0, 5.1 (Lollipop)
In this version of the Android OS, the notification system has been radically improved. Now its setup has been greatly simplified. You can operate the function using the volume control button. By clicking it, we will open a window with a choice of operating modes - "Do not disturb", "All" and "Important" (notifications will appear here, which the user has assigned this status):

In addition, here you can set the duration of the mode, independently compile a list of services that are important for yourself, set the activation of the function in automatic mode at a certain time of day or days. It is also possible through the system settings to get to the "Sounds and notifications" section.
The function for setting up push notifications for a specific application has been saved, in order to use it, go to the "Application notifications" item, select the desired one, block it. It is possible to turn off the display of notifications on the lock screen here.
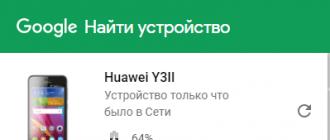
In the section "Access to notifications" you can make some notifications confidential. In this case, they can only be viewed using a special combination.
If you need to exclude the attention of a group of services, then you can use the filter section.
How to remove notifications on Android using applications
In addition to the methods described, there are a number of special utilities that will help you easily and simply cope with the problem of alerts.
We would like to present you one of them, this is a truly indispensable tool in this line - Notification Bar Deluxe, which allows you to put switches for applications, contacts, system settings, etc into the notification area:

In more detail, how the Notification Bar works can be seen in the video:
We will be glad if you found something useful in the presented material. But do not forget that if you have any questions, we will always be happy to answer them. Good luck!