I am often asked the question of how to change the Wi-Fi channel on the router. First you need to understand what it is, what it is for and if it needs to be changed at all. The channel of the router is a “pre-frequency” of the main frequency of most models of routers - 2.4 GHz or 5 GHz. Within this frequency, the ether is divided into 11 (in the USA) or 13-14 (Europe) gaps or channels. A channel is the path from our PC to the router.
Why it is necessary to change the channel
Using the settings of the router, we can set the channel to be automatically selected by the device itself or manually set the maximum free gap with a confident and strong Wi-Fi network signal. It seems nothing complicated, agree.
The question of how to change the channel on the router raises when the signals are superimposed on each other from neighboring devices using the same path. This is quite a common situation in apartment buildings or offices, where dozens of routers can "see" each other simultaneously on the network. And since there are only 13 frequencies, there are frequent cases of simultaneous use of one channel by several devices, which often leads to a malfunction of the Wi-Fi network, expressed in instability of the connection, low speed of access to the network, and freezing of devices.
The solution to this problem is partially achieved by automatic installation, when the router automatically searches for the most unloaded path and works on it (TP-LINK, for example). But what about those owners of routers that have one channel by default (in some D-Link models this is 7) and here you can’t avoid a conflict of devices when working together on the same frequency. Here, manual installation of a new channel for the router will help us.
Summing up the above, we conclude that when finding multiple Wi-Fi networks and points and access in one place, conflicts in the operation of the equipment are possible:
- low access speed;
- frequent loss of connection with the router;
- problems connecting to your network from a remote part of the room with a strong signal.
For the most part, all these problems are solved by simply changing the path in the settings of the router, if it is not associated with technical problems in the form of equipment breakdown or violation of cable integrity. So, we start with smartphones.
How to choose a Wi-Fi channel on a router via a smartphone
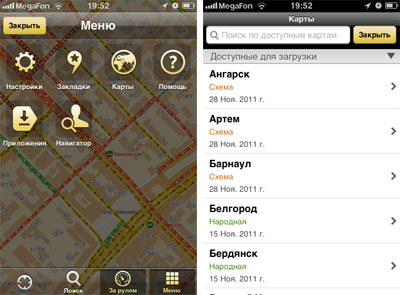
For smartphones or tablets, there are several programs for analyzing the status of networks, the most common is Wi-Fi Analyzer.
- We go on our phone in Google Play, download this program and run.
- The rating depends on the number of stars. The more there are, the higher the channel rating, the lower the interference level, the higher the priority.
Selecting a Wi-Fi channel of a router using the Wi-FiInfoView program
On a computer or laptop, they usually use either the InSSIDER program or Wi-FiInfoView for testing. Let's look at the work of the latest program that does not require installation on the disk. And though it is not as functional as InSSIDER, but it will give us all the information we are interested in.
- Download the program and run Wi-FiInfoView.exe. The Channel column shows the channel number for all found networks.
- We mark the busy channels for ourselves and select the free one, which we indicate in the router settings. At the end of the article we will discuss how to change the Wi-Fi channel on the router.
Configuring the Wi-Fi channel of the router
There is nothing complicated in the process of setting up a router for a new channel. All we need is:
- Router IP address (usually located on a sticker on the bottom of the device);
- password to enter the router menu (on the same sticker).
On TP-LINK Router
- We launch the browser and drive into the search bar 192.168.1.1. If that doesn’t work, then try tplinklogin.net
- When a menu appears that asks you to enter a username and password, enter the admin name and the admin password (default).
- In the settings menu that opens, click on Wireless (Wireless Mode) and then Wireless Settings - wireless settings.
- Left-click on Channel and select any of the 13 static channels, while making sure that your country is selected correctly (Region tab) a little higher on the page.
- We save the changes through “Save”, reboot and test the network.
In principle, all other models of routers have the same move to change the channel with small nuances. So, in the D-LINK models:
- We register 192.168.0.1 in the browser window.
- Specify the user name and password (admin and admin).
- In the "Settings" menu, open the Wi-Fi tab.
- We select the country of residence (Region) by clicking on the “Channel”, we change it.
- Save the changes using the "Apply" button.
We enter the settings menu as standard:
- We drive in the address 192.168.1.1, the same admin and admin as the name and password.
- We open on the left in the Wireless Network menu.
- On the next page, install the new channel.
- Apply button to save.
On zyxel
Repeat the previous steps:
- In the browser, enter 192.168.1.1.
- In the menu for entering the name and password, enter admin and 1234, respectively.
- In the next menu, click on “Wi-Fi Network”, check the correct country selection and change the channel.
- Saved.
On a Tenda Router
- Settings will open at 192.168.0.1.
- The username is admin, we do not enter anything in the "password" field.
- In the menu, open "Wireless settings".
- In "Channel" select the desired value for the channel.
- Saved through "Ok."
There are such cases that all methods of correcting the situation do not work - this happens in places where there are a huge number of wireless networks and devices, and no matter which channel you choose, the problem is not solved. Check if your router supports 5GHz frequency - perhaps your model is already hopelessly outdated and you should consider purchasing a more modern version.
I dare to hope that now you have learned everything about how to switch the channel on the router.
How to change the channel on the router: Video
I work as a private computer master. Professionally engaged in computer repair for more than 12 years, as an amateur since the 90s.
For two years he worked as the head of a service center specializing in connecting subscribers to the Internet and computer help.
If you live in a multi-storey building, then when you use Wi-Fi, the Internet starts to slow down. This is due to overload of the Wi-Fi communication channel. How to change the channel on the router, read this article.
Now about all this in more detail.
As a rule, most routers supporting Wi-Fi technology have 12 standard communication channels. Very rarely are routers that have 13 or 14 channels. Usually routers with more than 12 channels enter our country by chance, since in most countries 12 channels are standard. In any case, 12 or 14 channels, all the same it is very small, especially when it comes to a dense and densely populated area.
If you take a regular city block, then almost every apartment has a Wi-Fi router. Under an hour, up to 100 or more subscribers can hang on one channel at a time. Naturally, with such a load, overlays and signal interference inevitably occur. This negatively affects the quality of communication and. In this situation, it is recommended to switch to a less loaded channel.
In order for you to know how to change the channel on the router, I will give below detailed instructions for using the inSSlDer program, which will help to cope with this task.

The program scans all available Wi-Fi channels and shows their current load. All that remains to be done is to select the least loaded communication channel and reconfigure the router for it.
Instructions on how to change the channel on the router
1. Download and install inSSlDer on your computer. The program does not need to be paid and works for free under all versions of Windows.
2. Turn on InSSIDer. After the program makes a preliminary scan of the ether, you can see something like this.

Here it is necessary to pay attention to the channel numbers, as well as to the channel overlap scheme. Since, as can be seen from the screen, the channels "overlap" each other. Ideally, you should select the least loaded and overlapping channel. As can be seen in the screenshot, this is not easy.
3. Go to the control panel of the router. To enter the browser, type the address 192.168.1.1 and press "Enter". If you have a different router address and you do not know it, then you can find it using the keyboard shortcut Win + R. And in the command window that appears, enter the command: cmd A terminal window will appear, where we enter the command: ipconfig
In response, the system will issue information.

Where in the line “Main gateway” will be the address of the router.
4. Now in the control panel of the router you need to find the option responsible for managing channels. Usually it is located in the network settings management section and is called Wireless Settings.

We set in the adjustments the number of the channel which was selected using the InSSIDer program.
5. Be sure to restart the router so that it starts working with the new parameters.
Thus, within a few days, test several channels that are most suitable according to the results of testing with InSSIDer. Select from them and use in the future to have the downloaded.
One of the common causes of problems with the WiFi network is when signals from different access points overlap. This is due to the fact that when configuring the router - manually or using the setup wizard - as a rule, the same radio channel is selected - 1, 6 or 11. As a result, the user gets problems with the speed and stability of the WiFi signal. There were even cases where the user saw all the neighboring networks, except for his own. This problem affects multi-storey buildings, where now there is a WiFi router in almost every apartment. In this case, there is only one way out - to find a free WiFi channel and use it.
How to find a free WiFi channel
To find a free WiFi channel among those used by neighboring networks, you will have to use third-party programs. Very often, on various Internet forums it is advised to use a wireless analyzer - the inSSIDer program.

This is a simple free program, which however shows all the necessary information and works with most WiFi adapters.
How to change the WiFi channel
So, we found a free WiFi channel, how now to change the WiFi channel in the settings of a wireless router ?! Actually very simple - just enough. and in the menu, find the wireless network settings section - usually it is called Wi-Fi or Wireless. Then we look for the “Channe” l or “Channel” drop-down list and change its value. Below I will give some examples for the most common models of WiFi routers.
How to change the WiFi channel on D-Link routers.
The IP address of D-Link routers on the local network is 192.168.0.1, the URL of the web interface is http://192.168.0.1, the login for access is “admin”, and the default password is “admin”.
In the web interface, click the "Advanced Settings" button, then look for the "Wi-Fi" -\u003e "Basic Settings" section:

We find the “Channel” parameter and select the number of a free WiFi channel in the drop-down list. Click the "Change" button. Then in the upper right corner of the interface, click the "Save" button.
How to change the WiFi channel on Asus routers.
The IP address of Asus routers on the local network is 192.168.1.1, the URL of the web interface is http://192.168.1.1, the login for access is “admin”, and the default password is “admin”.
In the web interface in the menu on the left, click the "Wireless Network" button, the "General" tab:

We find the line “Channel” and in the drop-down list select the number of a free WiFi channel. Click the Apply button.
How to change the WiFi channel on Zyxel routers.
The IP address of the Zyxel Keenetic family of routers is 192.168.1.1, the web interface URL is http://192.168.1.1, the login for access is “admin”, and the default password is “1234”.
In the web interface in the menu at the bottom of the page, press the “WiFi” button in the form of a wireless connection indicator:

We are looking for the “Channel” item, in the drop-down list we select the number of the free WiFi channel. Click the Apply button.
How to change the WiFi channel on TP-Link routers.
The IP address of TP-Link routers is 192.168.1.1, the web interface address is http://192.168.1.1, the login for access is “admin”, the default password is “admin”.
In the menu on the left we are looking for the section “Wireless” -\u003e “Wireless Settings” (“Wireless Settings” -\u003e “Wireless Settings”):

We are looking for the item “Channel” and in the drop-down list we change the number of the WiFi channel to free. Click the “Save” button.
It often happens that for a long time the Internet over the wireless network works fine, but at one point the connection speed starts to decrease, the pages load slowly, and watching videos and downloading large files starts to pose significant difficulties.
Do not rush to buy new equipment or call the provider - as practice shows, this problem can be solved by setting a different data channel in the settings of the router. Why such situations occur and which channel to choose for WiFi will be described in this article.
Why is Internet speed slowing?
Now it is very difficult to imagine life without wireless devices - smartphones and tablets, as well as laptops and computers with WiFi modules, are firmly in everyday use. Therefore, a wireless router that distributes a home WiFi network becomes a necessary item in every home.
True, WiFi, in contrast to the wired Internet, is not the most stable technology, its operation depends on external factors.
Many of us live in apartment buildings, and almost everyone has a router. Most routers operate in the 2.4 GHz band and support 13 channels. There is a pattern that the more devices work on the same channel, the more it is overloaded, respectively, this greatly affects the connection speed. Users are wondering which channel for a WiFi router to choose and how to determine the least loaded frequency.
When you need to change the channel
It makes sense to change this value if you regularly observe the following problems:
- The speed of the Internet decreases, and when measuring the speed, the values \u200b\u200bare far behind the providers stated in the tariff plan.
- The network signal is high, and when you move away from the access point, devices stop connecting to it.
- The connection to the wireless network periodically disappears, while it does not disappear from the list of available ones.
These are the most common network problems that may arise due to congestion in the data transfer channel, then you need to decide which channel to choose for WiFi in the router settings.

Auto Channel Selection
In Russia, it is allowed to use 13 bands of a wireless network. Going into the settings of the router, you can select one of 13 channels. Which channel for WiFi is better to choose?
During the initial configuration of any router, its interface will definitely have the item "Wireless settings" (depending on the firmware, the name in the menu may be different, but the essence is the same).
By default, as a rule, Auto is set to - when this item is set, the router selects the least loaded channel automatically with each new reboot and sets it exactly. True, not all models of routers are able to correctly determine which channel to choose for Wi-Fi, especially with regard to more budget ones, so it makes sense to set these settings manually.
Many people forget or don’t know that the router works stably if you regularly restart it on power, so if you suddenly encounter a decrease in the speed of your Internet connection, it’s best to start by rebooting the equipment - then the router is most likely to choose the desired channel itself.
If this does not help, you need to manually change the channel value through the settings of the router.
Change channel in settings
Enter the settings of the router by its management address through any browser. The IP address can be seen on the sticker on the bottom of the router case, or you can enter standard data (they are suitable in most cases) - 192.168.1.1 or 192.168.0.1.
Depending on the model and firmware, the menu items may be called differently, but, as a rule, the interface is intuitive. If difficulties arise, you can use the emulator or instructions on the manufacturer’s website.
In the settings interface you need to select Wireless or "Wireless Network" and go to the main settings menu.
Using the most common TP-Link router firmware as an example, this will look like the one shown in the photo.

As you can see, in the Channel line (in the Russian version "Channel") there is an automatic value. Change it to another, most unloaded and save the settings. You can determine which channel for WiFi to choose in several ways, more on that below.
It is important to remember that if you use Apple devices or other equipment certified for distribution in the United States, you need to select channels in the range 1-11, if you select 12 or 13 channels, the network will not be displayed in the list of available ones.
Which channel is best?
There is no universal answer to this question, because in each case, devices are connected in different ways. In order to find out which channel is best suited, you need to analyze the available frequencies for the degree of congestion.
You can use the blind selection method, choosing new channels, then to check and find out what result it brought, but this method is ineffective and takes a lot of time.
It is much easier to use free applications and utilities that allow you to scan a wireless network and determine for yourself which channel for Wi-Fi will be most optimal.
For Android devices, they use the WiFi Analyzer application, which has an intuitive interface and shows both the most preferred channel and the load values \u200b\u200bof all the others.
For computers, the InSSIDer utility exists. It provides much more information, in it you can see not only which channel for WiFi to choose, but also conduct a deeper analysis of wireless networks in the 2.4 GHz and 5 GHz bands.

In conclusion
We examined the main ways of which channel to choose for 2.4 GHz WiFi if there are problems with Internet access.
If changing the channel does not work, it is better to contact the provider or replace the equipment - there may be problems with the router itself or on the network of the service provider.
Where a large coverage area is required or a large number of devices are regularly used, you can use a router that runs on a 5 GHz network - today this network is not widely used, and is usually not loaded. However, not all devices can operate at a given frequency.
The fact is that routers (routers) with Wi-Fi started to be used very widely and your housemates also installed them.
Now the Internet is in almost any apartment and it is very likely that Wi-Fi routers are installed in the apartments.
These Wi-Fi networks are located quite close, overlap each other and often work on the frequency channels installed in the routers by default by the manufacturer, creating excessive interference (congestion), creating interference with each other.
The entire band used in household Wi-Fi frequencies in the 2.4 GHz region is divided into 11-14 overlapping channels, 22 MHz each.
In the settings of the router you need to select the channel (frequency range) with the least amount of interference.
But before that, you need to make a diagnosis of all Wi-Fi networks surrounding you.
A program is well suited for these purposes. inSSIDer.
You can download the program.
Installing the program does not require any explanation, you just need to remember that it needs to be installed on a computer (laptop) with a wi-fi adapter.
We start inSSIDer.
In the upper part of the window you can immediately see which Wi-Fi points work and on which channels.
In the lower part of the window, go to the tab “2.4 GHz Channels” (or “5 GHz Channels” if your router operates at this frequency) and look at a detailed map of the channels.

After analyzing the data, select the channel number and set it in the router settings.
Keep in mind that some devices only see channels 1 to 11, so if you want maximum compatibility with all devices, then limit your choice to channels 1 to 11.
Also, in the settings of the router, you can select a higher data transfer rate by setting the option “Auto 20/40 MHz” in the router, if it is there.


You can walk around the apartment with a laptop running the inSSIDer program and determine the maximum reception points.
If something does not suit you, then try changing the installation location of the router, if possible, placing it in the center of the surrounding devices, as well as in an elevated place.
After such simple actions, you will restore normal Wi-Fi operation.
The same thing is recommended to do the same for those who had no idea about Wi-Fi channels and uses the factory settings in the router, perhaps you can improve the characteristics of your Wi-Fi network.