Welcome to our blog!
Today I will talk about another program for organizing a media server on a computer - the article is about setting up Kodi XBMC Media Center on a TV set-top box and phone. With its help we will be able to broadcast video, music and photos to other network devices, as well as receive files from them. In addition, it also allows you to control the playback of music, video, launching applications on a computer or TV set-top box directly from your Android phone.
We already got acquainted with the capabilities of the technology for distributing files over a network through a media server in, where we managed to talk about several programs and learned how to view films and other multimedia files from a Windows PC on a TV, smartphone and tablet running Android OS. If you haven't read it yet, be sure to read it to have an idea of \u200b\u200bwhat this article will be about.
It's nice when you can switch movies on your computer without getting up from the couch? In fact, this program is a universal player from all popular platforms - Windows, Linux, Mac OS, iOS, Android, etc. That is, having installed it on any portable device within the local network, we can easily connect it to another and use it as a control panel.
Installing and Configuring XBMC Media Center on Your Computer
To get started, follow the link to download the required version of the Kodi XBMC program to your PC - there are options for both Windows and MAC and for various mobile platforms. There shouldn't be any problems with the installation, so we launch this application after it and look at the main window - do not be alarmed, the program will open in full monitor screen size.
If you have an antivirus or firewall installed, it will ask for permission to connect to the Internet - we confirm that the program could receive data from the global network. There are many items in the main menu, ranging from weather to settings. First, let's go to "System\u003e Settings\u003e Appearance\u003e International" and set the Russian language we need.

The window will quickly reboot and the program will be displayed in an adverb that we all understand. Now you can close the XBMC language settings window and return to the main menu. Since we usually analyze such programs on the blog using the example of video playback, let's stick to tradition and select the appropriate item, since music and images will be imported into the program in a completely similar way. Go to "Video\u003e Files"

And click on "Add video"

Here we need to select a folder from which the files will be available to other devices. Click "Browse", look for the desired folder and then click "OK"

Next, in the previous window, enter the name of our source and also click "OK" (see the previous screen).
After that, you will be prompted to select the type of files contained in this folder - select "Movies". You can also make additional settings for loading trailers, preferred language, etc. in the "Settings" section. I'll leave everything as default and click OK.

When asked "Update information for all objects in this folder?" click "Yes". The program will start scanning and adding files to the database, which will take several minutes, after which the "Movies" folder will appear in the list.
Now we need to configure this program as a server in the local network for distributing materials. We are looking for the already known menu item "System\u003e Settings"

go to the "Services" section.

Here we go through all the points that need to be edited and remembered.
- General - Device name. By default, it is written XBMC, you can leave it, or you can enter the name of the computer so as not to get confused.
- UPnP - here you can also activate all the items to automatically configure the connection of devices in case the manual configuration fails.
- The web server is the most important point. Here, first, you need to check the box on server activation.
after that, set all values \u200b\u200b- leave the default port 80, or set your own. We set the username and password ourselves. All these parameters will need to be entered on other devices when connected, so we remember them carefully.

The rest of the points in our case are not so important, but if you use another program on your smart or second computer, and not Xbox Media Center, then in the "Remote Control" we allow the management of programs not on the XBMC platform.
If you will be using a tablet or phone from Apple (iPad, iPhone), then go and edit the "AirPlay" section in the same way to allow connection from Apple devices from their standard application.
We save all the settings and proceed to the third stage - connecting to our media server.
XBMC for Android
As I said, the program works on most modern operating systems, so you can download it either from the site, the link to which I gave at the beginning of the article, and then save the installation file to your device, or download it directly to your smartphone. I will work with Android, so we are looking for it in the Play Market.


Select "Manage XBMC Hosts" and close ("Close") the pop-up window.

After that, again click on the "Menu" button on the smartphone and select "Add Host".

Now the most crucial moment - we need to remember all the data that we configured on the computer and enter them.

Leave the rest unchanged and press the "Yes" button. After that, our new host will appear in the list. We return to the main window of the program using the "Back" arrow on the smartphone panel and see a list of file categories. We need "Movies", i.e. video.

A list of video categories will open, which are embedded in the parameters of each of the downloaded files. For greater clarity, we will click on the icon in the form of a folder so that the files are displayed in the form we are used to. We see the folder shared on the computer, and in it videos available for viewing.

We choose any and enjoy the viewing, controlling the player using the panel on the smartphone screen.

How to enable media server on Android?
However, this is not the only way to customize XBMC Media Center - after all, it can itself play files from other devices on the local network, and not only from the one on which it is installed. Today we will learn two things - how to play a video from an Android smartphone in this program and how to view a file from another computer.
Let's start with smartphones. So, as I already said in, a smartphone (or phone, tablet) can both play files on the computer on which the dlna-server program is installed, and independently be it and allow viewing its files on other devices within the local network.
To do this, you need to install a specific application on it, with the help of which a mobile DLNA server is created. In the same article, I gave one such program, but today we will analyze another, which, in my opinion, is easier to learn. It is called BubbleUPnP. As the name suggests, it works using UPnP technology, that is, devices that support it, without our participation, connect to each other without preliminary settings of names, passwords, ip addresses, etc.
Download it from the Play Market and install it. Launch and get to the main window of the player. Now let's digress a little from the smartphone and go to our computer, on which the file from the android will be played. Kodi XMBC Meida Center must be installed on your computer. And check that the items responsible for automatic UPnP communication are activated in the connection settings. This is done in the menu: "System\u003e Settings\u003e Services\u003e UPnP"

In addition, of course, both the smartphone and the computer must be connected to the same local network - a PC via cable or Wi-Fi, a smartphone via Wi-Fi.
Now back to the smartphone. We need the Devices tab from the bottom navigation menu. There are 2 sections with a list of devices with DLNA applications installed.
- Renderers are the devices that will receive files
- Libraries - those who will distribute their files
- If we want to play files from a phone / tablet on a computer, then as Renderers we check the box opposite the computer, as Libraries - opposite the gadget, that is, Local Media Server.
- If, on the contrary, we want to look at a file from a computer on a smartphone, then we do the opposite.
- As you can see, there is another device in the client list - a TV that can only receive files. If we want to view video from a smartphone on it, then select it as Renderers.
We need the first case, so we set it as in the screenshot:

Now go to the "Library" tab and select the file for playback from those available on the android. If we selected a computer as a source, then the folders added to XBMC on it would open.

We click on the selected clip and it starts playing on the computer in the XBMC program.

It's so easy and effortless to turn your smartphone into a full-fledged home media server and watch videos from it on your TV or computer! I have talked about only two options for customizing the Kodi XBMC Media Center program, but in fact there are many more. For example, in the same way, it can be used to play files on a TV set-top box that are on the same computer, smartphone, or even created on a router. To do this, simply select the appropriate server as a source and log in to it.
With the latest update, Windows 10 introduced the Connect app, which enables wireless screen display from Miracast compatible mobile devices. This means that now we can wirelessly display the phone screen on a computer without the need to install additional programs.
Here's a quick guide on how to wirelessly connect your phone to your computer and display your smartphone screen using the new built-in Connect option.
If you've ever wirelessly viewed photos from your phone on a monitor, or captured an Android or Windows 10 Mobile screen into a video file, then you've certainly come across apps to stream images from your smartphone to your computer.
Microsoft has implemented the Connect app in Windows 10 with the Anniversary Update. Thanks to this solution, we no longer need to install third-party software - now we can display the image from the phone screen directly to the computer using the built-in function.
Transfer picture from phone to PC wirelessly
Setting up a wireless connection shouldn't be too difficult for users, but there is one point to remember. Picture transmission is carried out using Miracast technology.
In the case of a phone, this should not be a problem, since most of the mobile devices are compatible with the above standard, but there may be problems with the computer itself - old laptops and desktops are not equipped with Miracast support, so it will not work to display the picture. You can see for yourself that this is really so. If you have a moderately new computer, but there should be no problems.
Open the Start menu and find the Connect app. After launch, the Connect program window will appear with information about waiting for a connection from another device. Now it's time to pick up your smartphone and connect to your computer. Let's see how to do this.
Enabling Screen Transfer in Android or Windows 10 Mobile
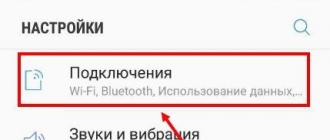
First you need to find the image transfer option in your smartphone. Unfortunately, as is often the case on Android, depending on the manufacturer, some functions have been moved to other places or are completely eliminated. Therefore, it can be a little problematic here, nevertheless, even if the manufacturer removed this function, then it can be restored.
In a pure Android OS, the corresponding option is located along the path "Settings - Display - Transfer image". When you enable this feature, a list of devices on the network to which you can transfer the image will appear - select your Windows 10 computer here.
Android wireless display
If you cannot find the image transfer function on Android, then you can install a special program that creates a shortcut on the desktop for displaying the image. The program is able to call a function even when the manufacturer has removed its link in the settings.
For this purpose, you need to download Miracast Widget & Shortcut. After installing it, go to your smartphone's app list and launch Miracast Widget & Shortcut. You will immediately be taken to the appropriate section in the settings, which is responsible for transferring images to another device. This option is called Wireless Display.
If your mobile phone has Windows 10 Mobile, go to display settings and find the wireless screen pairing feature. Your PC should be defined in the list of devices.
Further actions will no longer cause any difficulties. Your computer will appear in the list of devices - you will see its name in the Connect window. Just click on it in the list to start the connection process.
When the devices connect to each other, the picture that we see on the phone screen will appear in the Connect program window in Windows 10. Thus, you can watch photos from your phone on a big screen wirelessly, or use an Android / Windows 10 Mobile video recording app on your computer.
Now it is possible to prepare a very useful and relevant article on setting up a wireless screen on tablets and phones that run on the Andriod operating system. With the help of Miracast technology, we will display the image from the tablet on the TV. All of this will work over the air, that is, without wires.
Now, a large number of modern TVs that have Smart TV functions and have the ability to connect to the Internet via Wi-Fi, also have the ability to work as wireless screens using Intel WiDi technology, or Miracast. You can read about these technologies in more detail in a separate article. But, there I wrote more about theory, and this article will only practice.
So, this means that the TV can receive an image through the air. And our tablets and smartphones that run on Android are most likely able to transmit this image using Miracast technology. In the settings, this is called a wireless screen.
What does all this give us? We can connect our tablet or phone with a TV and everything that happens on the screen of a mobile device will be displayed on the TV. And all this wirelessly. In this way, you can display a photo on a large screen, or a video. Watch online videos, or play games on your tablet and display it all on your TV. There are some nuances, which I will write about below, but all this can be done, and now I will show how.
I just took a photo, screenshots, tested everything, checked it and now I will share it all with you. Everything is based on a real example, as always!
What do we need?
- The mobile device from which we will display the image on the TV. Tablet, or smartphone on Android. Not all Android devices can work with Miracast technology (wireless screen)... But, according to my observations, almost all modern devices can do this.
- A TV that will receive images using Miracast wireless technology from a tablet or phone. Modern TVs can do this. If your TV has built-in Wi-Fi (or external receiver), and there is a smart TV function, then most likely it can output images wirelessly.
I will show on the example of a TV LG 32LN575U and tablet Asus MeMO Pad 10.
To set up such a connection, a Wi-Fi router is not needed, compared to setting up the transfer of medical content.
We connect the tablet and TV for wireless image transmission
All we need to do is turn on Wi-Fi on the tablet, turn on Miracast on the TV, and pair the devices.
Turn on Miracast / Intel WiDi on LG TV
I will show on the example of LG TV. If you have a third-party TV, this feature may turn on slightly differently. On the menu, it may be called differently.
Turn on the TV, and press the button on the remote control SETTINGSto enter the settings.
In the settings go to the tab Network and select item Miracast / Intel's WiDi.
 Next, turn on Miracast. Just set the switch to position On.
 Everything, the TV can be left for now. But, don't turn it off.
Turn on the "Wireless Screen" on a tablet or Android smartphone
We take our tablet (in my case), and go to the settings.
I would like to point out that depending on the device (manufacturer, model, Android version, shell), activation of this function may differ. Just search for the items you want in the menu of your device.
In the settings, immediately turn on Wi-Fi, and go to the Screen (Display) tab. On the right, select the item Wireless screen (Miracast).
 Turn on Miracast by setting the switch at the top to the position Incl. Below, your TV should appear. Its name will be there. To start wirelessly transferring images to your TV, just click on the TV's name.
 We return to the TV. There should be a request to connect the device. Just confirm your connection by choosing Yes... If you want this device to be connected in the future without a request, then check the box next to the item "Connect automatically without request".
 Then the connection status will go, check and the devices will be connected. The tablet image appears on the TV.
 Everything is ready! You can use it.
To turn off the broadcast of the image on the TV, just click again on the name of the TV and select OK.

We reconnect according to the instructions.
Using wireless image transmission in practice
I played a bit and tried to understand what this technology can really be used for. The problem is that with such image transmission, there is a slight delay. That is, the page has already opened on the tablet, but on the TV it appears in a second, roughly speaking.
Perhaps, on more expensive equipment, this delay will be less, but it will most likely be. For showing photos on a big screen, this kind of connection is great. All without wires, as we love.
Sites can be viewed, or, for example, watch online videos.
 By the way, I started the video on the tablet, it is displayed well on the TV. Albeit with a delay, but the sound goes in sync with the video. Sound, by the way, is transmitted too.
Tried playing games but the lag is a little annoying.
 Afterword
An excellent technology that allows you to display the picture that you see on your tablet or phone on the big screen without any wires. Everything connects without any problems and works flawlessly. At least I didn't notice any problems.
The only drawback is the delay in updating the image on the TV. It is difficult to play games, but you can watch a photo or video. Display some kind of presentation on TV, no problem at all.
I would be glad to see your feedback and opinions on this technology. How does everything work for you, what application did you find? Share in the comments! Good luck!
More on the site:
We display the image over the air from a tablet or phone (Android) to a TV using Miracast technology (without wires). Using the Asus tablet and LG TV as an example updated: February 6, 2018 by: admin
Read, how to broadcast a phone screen to a computer monitor using standard Windows functions. How to do it from another Windows 10 PC. The Windows 10 Anniversary update brings an exciting new feature. Any PC can now act as a wireless receiver, allowing you to view the display from your smartphone, Android tablet or other computer, laptop and Windows phone.
Restricted Wifi (miracast)
On Android, miracast support was added starting with version 4.2 on October 29, 2012. The first certified consumer devices to support Miracast were LG Optimus G, Pantech Vega iRon, Samsung Galaxy S III, Google Nexus 5 smartphones. This means that not all mobile devices support this feature.
How to do it from another Windows 10 PC
To connect from another computer running Windows 10, you just need to search for devices not from your phone, but from your computer. Click on the notification icon, click "Connect"... The PC with this feature enabled should appear in the list. Click on it to connect.

Once connected, you will see a few more settings. You can note .

Another Miracast connection in Windows 10, you can press the key Win + P... There are different options for the displayed image on the screen.


To change the mode, you just need to select another. By default, it runs in "Repetitive" and duplicates your screen image. Instead, you can expand the screen or choose as a second monitor or use only the second screen.
Articles and Life Hacks
To find out, how to display an image from a phone to a computer, you need to connect these devices to each other. This can be done using a USB cable, or by establishing a Bluetooth or Wi-Fi connection. Any of these methods is as simple as knowing the meaning of each digit.
We connect the phone to the computer via a cable
Usually, when buying a phone, we also purchase a USB cable, as it is included in the set of devices from most self-respecting manufacturers. It will be useful to us not only for viewing and listening to video and audio files that are on your phone, but also for moving them from one device to another. While performing these actions, the mobile device is charged.
For photos and videos from your phone to appear on your computer screen, the USB drivers must be loaded the first time you connect both devices. They are usually loaded automatically, sometimes from the installation disc that came with the phone. You may need to download the correct drivers from your smartphone manufacturer's website.
If your computer has recognized your smartphone, you will see it among the connected devices.
- View the files on it.
- Move the necessary files from one device to another.
Wireless connection
If you decide to figure out how to get an image from your phone to your computer without using any wires, you will need to determine if both devices have built-in Bluetooth. Not required in this case. Bluetooth will need to be turned on for each device to recognize all others available for connection. Then select the connections required for this.
For the connection to work, you need to enter a control code. You can come up with it yourself or confirm the one offered by the system.
- It is better to adjust the connection settings so that you do not have to perform all these actions every time.
- On the computer screen, you can view files from your phone, as well as - perform all actions with them that are available using a USB cable.
If you have a router, you can establish a Wi-Fi connection. In this case, by downloading a free utility (for example - Connectify), you will receive your PC as an Internet distribution point. This way, any of your Wi-Fi enabled devices will be able to connect to it.
In the program settings, you will need to specify an access point, enter a password and allow access to the Network.