Friends, with this article we are opening a new section on how to work properly with a computer. We will cover such issues as how to install Windows XP correctly, as well as update drivers and other programs for everyday use.
Many will say: “ What to put there? Is everything simple there?”. And you know that the incorrect installation of the OS in most cases is the main cause of malfunctions when working on a computer, ranging from banal freezing and braking, ending with errors at the hardware level.
How you put the operating system on your computer will determine how well it will serve you. So, let's figure out how to properly install Windows XP.
We analyzed enough material on the Internet on this topic, but we did not find a simple and adequate disclosure of the topic. Also, as a simplification of perception and a better understanding of the OS installation process, a video story with a detailed description was prepared.
Little attention was paid to such trifles as “buying a disc with an operating system”, “whether it is necessary to read the license agreement”. We focused on the initial setup of the installed system.
Basic steps to install Windows XP
- 1. The first thing to do is change the boot order in BIOS to “boot from optical disk”. To do this, when loading the OS, you must click “ F2"Or" DEL", And go to the" BOOT”, Where by pressing the“ + " or " — ”, Edit the loading order so that the entry“ CD-Rom Drive”Was at the very top.

- 2. Save the settings by pressing the " F10”. When you restart your computer, the message “ Press any key to boot from CD ..”, You must press any key to start booting from the installation disk.
- 3. Next, preparation for installing the operating system will begin. When the welcome window appears, the system will once again ask you to confirm your intention to install a new OS, press the “Enter” key.
- 4. When the license agreement appears, click “ F8”To accept it and continue with the installation.
- 5. If you reinstall the OS, the installer will try to restore the installed version. We do not need this, press "Esc".
- 6. Next, perhaps the most important. Selecting a partition to install. If you already have a priori hard disk divided into logical partitions: system and one or more user, then this is very good. Then it will only be necessary to delete the system partition, then create it, format it and install a new OS on it.

If your hard drive has not been divided before, then it must be done right now. For what? Everything is very simple. By dividing the hard drive into the system part and the user part, you create an airbag for yourself. if the OS fails, in the worst case, you simply reinstall the OS on a formatted system partition, but the user data will remain safe on the user partition.
How to properly divide the hard drive, see the video. As an example, in the video tutorial, a 10 GB hard drive was considered. If your hard drive allows, make the system partition at least 20 GB.
- 7. Next, you need to format the partition with the NTFS file system type. Choose quick format.
- 8. The system will reboot, we will take a convenient moment and restore the boot from the hard disk in the BIOS settings, and not from the CD-Rom. We have already considered how to do this in the very first steps.
- 9. After reboot, the system will continue installation. The first window that appears will be “ Regional settings window”, Where you need to select the keyboard layout.
- 10. Next, the installer will ask you to enter a Name and Organization name. Enter only the Name and click next.
- 11. In the window that appears, enter the product license key. Be careful.
- 12. Set the Computer Name. Leave the admin password field blank for now.

Make the necessary date and time settings. One thing, but at the moment we have legally canceled the transition to winter time. I advise you to install the corresponding update from the official Microsoft website (WindowsXP-KB2570791-x86-RUS). This can be done after installing the OS.
- 13. Next, you need to determine whether the computer will work in the domain network or not. We do not change anything, we press “ Further”. We are waiting for the installation program to finish its work and reboot.

- 14. At the first start, the system will try to adjust the screen extension automatically. accept them if you are satisfied with the selected option. When the welcome window appears, click “ Further”, Postpone the automatic update settings, skip the settings to the Internet, postpone the registration with Microsoft.
- 15. Create an account.
- 16. Initial OS setup is mandatory. Watch the video and follow everything step by step. After completing all the settings, you will receive an optimally configured computer prepared for work.
How to install Windows XP correctly video
Watching the video, learning. If something is not clear, we ask questions.
Reinstalling the Windows system for many users remains something mysterious and unknown, when in fact it is easy and quick. If you decide to upgrade to Windows XP and complete the installation yourself, then this article will help you cope with all the difficulties and answer many questions.
What to do before installing Windows XP
During the installation process, the files on the Local C drive will be formatted. Optionally, you can delete all the contents of the computer, cleaning it completely, however, if photos and programs are dear to you, it is better not to do this.
If your file system is divided into several disks, transfer important data from drive C to any other. After reinstallation, you will lose your photos, music, programs installed on the C drive.
Capturing Windows XP Image
The system is installed from any storage medium: optical disc, usb media, flash drive. If you do not have an operating system disk, you will have to create one yourself. For this, programs for creating and recording images are suitable:
- Daemon Tools;
- Ultra Iso;
- Alcohol.
It is more convenient to use Daemon Tools, since it is distributed free of charge on the official website: https://www.daemon-tools.cc/rus/products
Go in and download the product.
For complete instructions on recording images, see the article
- Install the program following the instructions of the installer;
- Go to the section for recording the image;
- Insert the disc into your computer;
- Select media and start recording.

Installing Windows XP
When you have an operating system disk or a USB flash drive in your hands, you have saved the most important files - it's time to start installing.
- Go to BIOS. To do this, you need to reboot the system by pressing a special button when turning it on. Most often, this is F7 or F12. Pressing the correct button will take you to the BIOS menu. Be careful, as you need to have time to press the button before the boot splash screen appears.
- BIOS is different, it all depends on its version. Most often, it is designed in the form of tabs. You need to find the “Boot” tab.
- In it you will find the item “Boot Device Priority”. This section configures the primary media from which the system will boot. By default, it boots from the hard disk, but during the installation this priority must be changed to your optical disk or USB flash drive.

- Now select the primary medium with the “+ -” keys. With the help of the screenshot below you can easily understand how a memory card is translated and how a CD is translated. Your media should be on the “1st Boot Device” line.
- Remember the sequence of devices, which was originally.


- Now all that remains is to click on install and wait for the system to install. It will take up to an hour, during the process the computer may restart itself several times.
- Once the installation is complete, you will receive a completely new Windows XP system.


Things to do after installing Windows XP
This is not the end of the procedure. First of all, you need to go to BIOS again and set the boot priority to the one that was originally.
- Then download the drivers.
- If you do not have a driver disk, then use this trick:
- Go to the control panel through the Start menu.
- Find the Hardware and Sound tab.


- In this section, click on the "Task Manager" item.

- Now you can see all the devices on your computer. Right-click on them and select "Update Drivers".
As you can see, reinstalling the operating system is not that difficult.


Windows XP is one of the most popular operating systems, and although it has been around for quite a few years, many people still use it. If you have an old computer that you want to recover, or if you want to install XP on a new computer, then it shouldn't take long.
Note: Microsoft no longer supports Windows XP, which means that updates for this system are no longer available. So consider installing or.
Steps
Part 1
Customization- To run DirectX Diagnostics, open the Run dialog (press WinKey + R), enter DXDIAG and click OK.
- Minimum system requirements
- Processor: 300 MHz (Intel or AMD)
- RAM: 128 MB
- 1.5 GB of free disk space
- Video card: Super VGA (800x600)
- CD / DVD-ROM
- Keyboard and Mouse
- AC adapter (for network connection)
- Sound card and speakers or headphones
-
Find your Windows XP key. It is printed on a sticker on the disc box or on the system unit. A key is a set of 25 characters, divided into 5 groups (5 characters per group). You will need a key to complete the Windows installation.
Configure your computer to boot from a CD / DVD drive (not a hard drive). This will allow you to boot from the installation disc. You can change the boot order in the BOOT menu in the BIOS.
Part 2
Installation-
Insert the Windows XP installation disc into the optical drive, then save the changes and exit the BIOS. Your computer will restart and the “Press any key to boot from CD” message will appear on the screen. Press any key to boot from the installation disc.
- The computer downloads the files it needs to start the installation; this may take several minutes. After the download is complete, a welcome window will open.
-
The welcome window will display several options, but if you are installing or reinstalling Windows XP, press Enter to customize your system installation options.
Read the license agreement and then press F8 to agree to its terms.
A list of hard disk partitions (or multiple disks) will be displayed. If you are installing Windows XP on a new hard drive, you will see only one section called "Unallocated Space". If you already have a system installed on your disk, then, most likely, several partitions will be displayed.
- Installing Windows XP will destroy all data on the selected partition. Therefore, select an empty section or a section with the data you need.
- You can delete partitions with the D key. They will become unallocated space. If you delete a partition, you will lose all data stored in it.
-
Create a new section. Select the unallocated space and press C. A new window will open where you can set the size of the partition to be created. Enter the size in megabytes (MB) and press Enter.
- By default, the size of the created partition will be equal to the size of the entire unallocated space. If you do not plan to create multiple sections, leave everything as default.
- Windows XP itself requires at least 1.5 GB (1536 MB) of free space. Therefore, create a partition that is at least 5 GB (5120 MB) or larger if you plan to install a lot of programs.
- You can create multiple partitions on one disk. This will allow you to store programs and media files in different partitions or install a different operating system. Windows XP can only be installed on one partition.
-
Highlight a new section. After creating the section, you will be returned to the window where you can select the section. The new partition is usually called "C: Partition 1". Select it and press Enter.
Select "Format the partition with NTFS" and press Enter. NTFS can handle large files and is more secure than FAT. NTFS also supports system-level compression.
- If the partition is larger than 32 GB, then you cannot select FAT.
- Do not select the "Quick Format" option, as in this case the hard disk will not be checked for errors or bad sectors. Therefore, format the disk completely. If the disc is damaged, it is best to replace it immediately.
-
The duration of the formatting process depends on the size of the selected partition (the larger the size, the longer it will take).
Windows will now begin copying files from the installation disc and ask you to restart your computer when this process is complete. Press Enter when you are prompted to restart your computer, or after 15 seconds the system will do it automatically.
When you restart, you will see a message again prompting you to press a key to boot from CD. Ignore this suggestion and let the computer boot from the hard drive.
The Windows logo will appear on the screen, and then the left half of the screen will display a list of steps to install the system, and the right half will display tips for operating the system. The time remaining until the installation is complete will be displayed below the list of steps.
- During the installation process, the screen may flicker, black out, or resize the image.
-
Select your language and regional settings in the appropriate window that opens during the installation of the system. Select the appropriate options and click Next.
- Enter your name (if you like). This can be done in the "Owner" window; the name will be used in certain situations, such as when creating documents.
-
Enter the key. You will not be able to complete the installation process without a valid product key. Click Next to continue.
- Some versions of Windows do not require you to enter a key until the installation process is complete.
-
Give the computer a name. This name will show the computer on the network. Windows enters a default name, but you can change it if you like. You can also set a password for the administrator account. This is optional, but recommended for shared computers.
Select your time zone and set the date and time. Click Next to continue.
Set network parameters. Most users can leave the default network settings or consult with a professional (system administrator) for network settings.
- In the next window, most users can select "This computer is not connected to the network or is connected to a network without a domain." Or contact your system administrator for help.
- You can leave the default workgroup name.
-
Wait for the installation process to complete. This will take a few minutes, after which the computer will restart. After rebooting, you will be taken to the Windows XP desktop. The installation is complete, but there are a few more things to do.
Part 3
Completion-
Adjust the display settings. After Windows starts, you will be prompted to customize the screen image. Click OK to start configuration. The screen blinks a few times, and then a message appears asking if you can make out the screen image.
-
-
Your computer must meet (or exceed) the minimum system requirements to run Windows XP. You can find information about the components of your computer in its instruction manual or using DirectX diagnostics.
Unlike XP, Windows 7 uses a new bootloader, so installing two operating systems with different bootloaders on the same computer is sometimes a daunting task for a beginner. It is good that Microsoft allows you to keep the old XP bootloader, installing a newer "seven" instead, and add an item to the boot menu to boot an outdated OS.
Today we will consider a picture when a user needs to install Windows XP next to an already installed "seven". The salt of the situation is as follows: if you install Windows XP after Windows 7, then the latter stops loading, and to get out of the situation, you will have to manually restore the boot loader "seven".
Installing XP after Windows 7
To install XP on a computer running Windows 7, it is recommended to use different partitions, hard disks, or install the "7" on an SSD, and XP on a magnetic disk if you have a solid state drive. Never install two systems on the same volume - it may end badly.
Let's consider a classic situation when the installation is performed on different volumes of the same hard drive or different HDDs when the partition with installed Windows 7 is active (that is, without physically disconnecting or in the BIOS of the second hard drive).
Preparing a section for installing XP
We start the computer under Windows 7 and prepare a partition for installing XP on it. Under no circumstances use the program built into the XP installer for this (with its help you can only format the partition).
If you need to create a disk for installing an old OS, use Windows tools called "Disk Management" or one of the popular free programs created to manage partitions. With their help, it is easy to split an existing partition with user data, "cutting off" part of the free space from it, and create a new system disk in the unallocated area.
After creating a new partition, be sure to set its label, so as not to be mistaken when choosing a location to install Windows XP.
Installing Windows XP
We boot from a CD or a bootable USB-drive by entering the BIOS boot menu. Depending on the assembly, we select the XP installation option, wait for the preparatory stage, when the compressed files of the future OS are copied from the removable media. Now we indicate the section prepared in advance or created in the previous step, focusing on the size and letter label.

After pressing "Enter", we launch the installation or, if necessary, perform a quick formatting of the partition in the NTFS file system.

When the installation is complete, install the application software and device drivers and configure the system and start restoring the boot loader "seven".
Reanimating the Windows 7 bootloader
Download two console utilities "bootsect" and "bcdedit" from any trusted source. Unpack the downloaded archive or archives to the system drive (C :). As a result, the directory "C: \\ FixBoot" should appear, if this does not happen, move the downloaded files into it.
![]()
You will need programs to restore the MBR boot record and boot loader that were replaced during the XP installation. First, we will reanimate the new bootloader used in the "seven", and then add an entry about XP to it to display a window with an option to select the operating system to be loaded.
Launch the command interpreter through the Start menu.

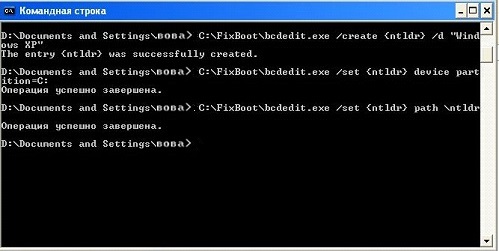
We enter the command "c: \\ FixBoot \\ bootsect.exe / NT60 all", which applies the main boot loader to all partitions designated as bootable (these are disks with Windows 7 and XP installed). We press "Enter".

At the end of the procedure, we add a new entry to the reanimated bootloader, which allows you to display the bootable OS selection menu, where XP will flaunt along with Windows 7. Enter the code below and press "Enter":
The command will create a new entry in the boot loader configuration for the legacy ntldr boot loader used in XP. The text in quotes can be anything - this is the name of the item in the bootloader selection menu.

The XP loader (ntldr) is located on the C: drive. We indicate the path to it using the command:

We set the name of the loader:
We restart the laptop or PC and get into the OS selection menu.

If you use XP on a regular basis, the boot item should be set last in the list:

That's all. We reboot the laptop and see such a menu with the choice of the operating system to boot.

Reanimating the bootloader using the graphical interface
Using the Shell and unknown commands can seem daunting to most users. To simplify and visualize the above actions, there is a graphical shell with advanced functionality.
Stage one - bootloader recovery
- Download, run the EasyBCD installation file and wait for the application installation to complete. For the utility to function, you must install the .NET Framework 2.0 from Microsoft.
- Launch the application and go to the "Installing BCD" section.
- We select the volume where the bootloader was located before the XP installation (usually, this is the 1st partition with a volume of ~ 100 MB).
- We select the type of bootloader.
- Click "Overwrite MBR".

- We restart the PC.
Windows 7 should start due to the destruction of the XP bootloader.
Stage two - adding an XP boot record to the repaired Windows 7 boot loader
- Click "Add Record".
- We indicate the type of bootloader and enter its name displayed in the computer boot menu.
- We mark the "Autosearch disk with a working operating system" checkbox.
- Click on the "Add" button.

- Go to "Current Settings" and make sure that the program was able to add a new boot record.

If necessary, go to the "Edit boot menu" to edit the order of displaying the OS in the list and the delay time before loading the operating system by default. Click "Save".

(Visited 7 808 times, 2 visits today)
Every day, computer technologies are developing more and more, as is the software for them. But today, many still have computers that do not meet the stated technical requirements. An example of such software is Windows 7, which requires at least 1 GB of RAM for comfortable operation.
And what about those who have only 512 MB of memory? In this case, our good old friend Windows Xp comes to our aid. It is in this article that you will learn how to install Windows Xp... This operating system is the second most popular in the Microsoft lineup. But this is not even strange, because the quality and convenience of work was and is at a height.
Let's compare Xp with its older brother Windows Vista, this OS somehow didn't take root in our country, as it had many shortcomings. And this was proved by the same users who worked on XP, without becoming a switch to the new OS. And most people, having bought a laptop or computer already with Vista, eventually rearranged it to XP or Windows 7.
If you are ready to learn how to reinstall Windows XP correctly, then proceed to our installation, starting with preparing your computer.
Preparing to install Windows Xp
To install, first of all, we need an installation CD with Windows xp. Or, alternatively, it can be a bootable USB flash drive, 2GB or more. You can learn how to create a bootable USB stick. If your choice fell on a CD - disc, then be sure to read how to burn a disc with a Windows image
Of course, we will need to save all our data to disk "D" in case you reinstall Windows. And you may need it. For example, I have a lot of bookmarks of the pages I like, and it would be expensive to search for everything again after reinstallation. But after exporting, I saved all my favorites in one file, and after installation I restored them in a few clicks, and it's pretty convenient.
Having saved all the data, the last step remains, we need to put it in or flash drive. Having done all this, you can proceed to the installation itself.
Installing Windows Xp
After preparing the computer and putting everything in the BIOS as recommended, after inserting the CD into the drive, the boot from it should begin. A window will open asking you to press a key to continue the installation. The main thing is to react in time and have time to press, because if there is nothing not to do, the computer will start to turn on as always with the previously installed OS.
By pressing any key, a blue screen will appear on which the configuration of your computer will be checked. You have to wait a bit here.

After checking, the installer will offer to install a new Windows XP or restore the existing one. Since we will be installing a clean system, we press " Enter».


To install Windows XP, I used a blank disk and created one partition by simply pressing Enter. But if you want to divide the disk into 2 partitions, press "C" and indicate the size that suits you, for example a 20GB drive "C: \\" and confirm. Selecting the "Unallocated area" again, press the "C" key and indicate the remaining 20GB, thus creating a second logical drive "D: \\".

Having finished with the allocation of free space, select "Format the partition in the NTFS system<Быстрое>».

The formatting process will begin, it will take a few seconds, but if you chose simple formatting, you will have to wait a little longer.

After formatting, copying of the installation files will automatically start, again here we do not need to click anything, we just wait.

After copying all the files, the system will reboot and proceed to the installation itself.

Our computer rebooted and the installation of Windows XP began, with an approximate time until its completion.

At 33 minutes, a window will appear for configuring regional settings, changing the layout and adding a language, just click "Next". Thus, you will leave the standard set of languages \u200b\u200bEnglish and Russian. As a rule, I expose additional languages \u200b\u200bafter installation.

In the next window, we need to specify a Name.


We give a name to our computer.

We set the time zone and set the date and time.

We choose the usual parameters.

We just skip this step without changing anything.

Attention!!! If you set booting from a CD-drive, then a window will appear again asking you to press any key to boot from a disc. Your task is not to press anything, because Windows XP is almost installed and we will not need the disk further. After the reboot, the auto-adjustment of the image will start, we agree with everything by clicking "OK".


Windows greets us and thanks for your choice, go to the next step with the "Next" button.

"Postpone this action" is what we need to choose. The screenshot scored to change the selection.

If Windows XP was able to install drivers on the network card and the cable was plugged in, it may start checking the Internet connection. But we just need to click on "Skip".

Again, if there is a connection, then Windows will offer to register with Microsoft. Select "No" and click "Next".

Be sure to enter your account name.

Finishing the setup of Windows XP SP 3

Everything is ready Windows Xp is installed.


