Almost every laptop has the ability to connect to wireless.
With the help of this technology, computers exchange data with each other and network devices (printers, access points, etc.), and also go to the "World Wide Web".
There are many laptop models, but they all work according to the same communication standards. Can you imagine what their owners would have had if it was done differently on each laptop?
Many laptops - Wi-Fi one
The procedure for setting up a wireless network depends only on the operating system.
Some manufacturers equip their laptops with networking utilities, but this does nothing new, except that it makes the setup process more convenient.
Of course, you can use them, but it is more useful to be able to work with the OS tools.
If you figure out how to configure WIFI on Windows 7, 8 and XP using the system, you can do it on any laptop, regardless of model.
Three conditions for turning on Wi-Fi for the first time
Before connecting your laptop to the Wi-Fi network for the first time, you need to do three things:
- enable the wireless adapter (also called a WLAN or wireless network card);
- start the WLAN autoconfiguration service.
Step 1. Turning on the Wi-Fi adapter
To turn on the Wi-Fi adapter on a laptop, a button or key combination can be provided: Fn + [one of the F1-F12 keys, where the Wi-Fi icon is displayed].
The fact that the adapter is turned on can be understood by the glow of the indicator on the laptop case:
Step 2. Driver Installation
Important! Networks marked with an exclamation point shield icon do not require a password. They are not protected by anything, and data is transmitted over them in clear text.
Step 4. Connecting to a hidden network and changing the communication profile
To connect to an invisible grid, the name of which is hidden, as well as to create a new wireless access profile, right-click on the "Network" icon in the tray and enter "Network Control Center ...".

In the Change network settings list in Windows 7, click Set up a new connection or network, and in Windows 8 (8.1), click Create and configure a new connection or network.

Select "Connect to a wireless network manually". This window, like the following ones, looks the same in Windows 8 and 7, so let's analyze the setting using Windows 8 as an example.

Enter the access point name (SSID), security type, encryption and password. If you are going to use this network all the time, check the "Start connection automatically" checkbox.
The "Connect if the network does not broadcast" option should be checked when the access point is not visible in the list.

In the next window, you can change the connection parameters by clicking the button of the same name.

Basic parameters - name (SSID), mesh type and availability, cannot be changed. You can change the security settings, but they must be the same as those assigned to the access point.

Step 5. Connecting and configuring Wi-Fi on Windows XP
To connect the laptop to existing Wi-Fi networks, right-click on the "Network" icon in the tray and open "View available wireless networks".

Select the desired access point from the list and click "Connect".

Enter the password (security key) and its confirmation. After clicking on the "Connect" button, the connection will be established.

Introduction
The use of various devices with WiFi is rapidly breaking into our life, now WiFi is equipped not only with sophisticated equipment such as laptops and communicators, but even such simple gadgets as a photo frame. Configuring them to connect to wireless networks can be tricky, so it's no surprise that technologies are emerging that can greatly simplify the setup process.
Creating a new wireless network begins directly with configuring the access point (wireless router) and connecting computers and other wireless equipment to it.
Technology
From the point of view of an ordinary user, the traditional method of configuration looks very complicated: you need to perform difficult actions with connecting to an access point for the first configuration, you need to manually create a name for the wireless network, specify a complex and difficult to reproduce security key. And this whole setup process requires the user to have a basic knowledge of WiFi. It will be much easier for him to just click on a button or enter a PIN, so that everything is set up and connected by itself.
Wireless Protected Setup (WiFi Protected Setup - WPS) is just invented to quickly, as simply and securely configure network devices and computers. For example, one way to connect a WiFi gaming console to a wireless network is to press the WPS buttons on the wireless router and on the gaming console.
WiFi Protected Setupis now the standard for simple and secure wireless networking. In Microsoft terminology, this is Windows Connect Now (WCN).

The configuration environment for wireless devices can be different: Ethernet, WiFi, USB cableor USB flash drive.Wireless configuration can be done via Pin (PIN - Personal Identification Number), by pressing the configuration buttons (PBC - Push Button Configuration, short for Push Button) or via import of network settings.
Configuring a Wireless Router
The device is unpacked and connected to the mains. It can be configured via Ethernet using a patch cord (which is included in the package) or via WiFi, but the setup process itself does not depend on this. On a laptop or desktop, you need to go to Control Panel - - Setting up a new connection or networkwhere to choose Creating and configuring a new network.

Wireless devices with WCN support will be visible in the list of devices. We choose exactly our access point (wireless router) (not a neighbor's one if we are setting up via WiFi).

The next step is to enter the PIN code from the label on the router.


Or set your own, if there is a need for this: the name of the wireless network, the password for accessing the network, the security level and the type of encryption.


After completing the setup, you can print detailed instructions for connecting other computers to the access point (wireless router), as well as prepare a USB flash drive with settings for importing the network profile to other wireless devices. If at the moment this is not necessary, then it can be done later, in the properties of the wireless network.
Connecting to an access point via Push Button
When connecting to our wireless network from a computer running Windows 7, you do not need to enter the security key, but press the WCN button on the router. It will connect to the wireless network automatically.

On wireless devices that support the PBC method, just press the WPS button on the router, and then on the wireless device, and then the device will connect to the wireless network.
On computers running older Windows operating systems, as well as on wireless devices that do not support the Push Button method, you must import the wireless network connection profile.
Connecting to an access point by importing a network connection profile
If the USB flash drive with the network profile settings was not created after completing the configuration of the access point (wireless router), then you need to create it. To do this, you need to connect a USB flash drive, center of connections summon properties wireless network and choose Copy this network profile to USB Flash memory device. You can also open properties wireless network through Control Panel- Network and Sharing Center - Wireless network management.


After completing the wizard, the USB flash drive can be used to connect various wireless devices, as well as computers equipped with a wireless adapter and running Windows XP / Vista / Windows 7.
For devices with a wireless adapter, such as photo frames, printers, game consoles, you must connect a USB flash drive with a network profile to them and agree to import the settings. When the setup is complete, the device will automatically connect to the wireless network. Similar actions for Windows operating systems: connect a USB flash drive with a network profile,

in the window Autostart select Connecting to a wireless network using Windows Connect Now,

agree to import settings.

If the autorun function is disabled on a Windows computer, you need to open the USB flash drive, run the file SetupSNK.Exe and agree to import the settings for connecting to the wireless network.

Windows Connect Now greatly simplifies setting up a wireless network, so you don't have to remember network credentials and spend a lot of time connecting new PCs.
To connect the Internet on a laptop via a wireless network, you need not only a WiFi module, but also a working access point. To do this, you will need to buy a router at home, and to access the Internet, sitting somewhere in a cafe, it will be enough to turn on Wi-Fi on a laptop and enter a password for the desired network: installing an access point is the task of the owners of the establishment.
A WiFi module is installed in almost all modern laptops, and it's easy to check if your device has such a function. This will require:
- Open "Control Panel";
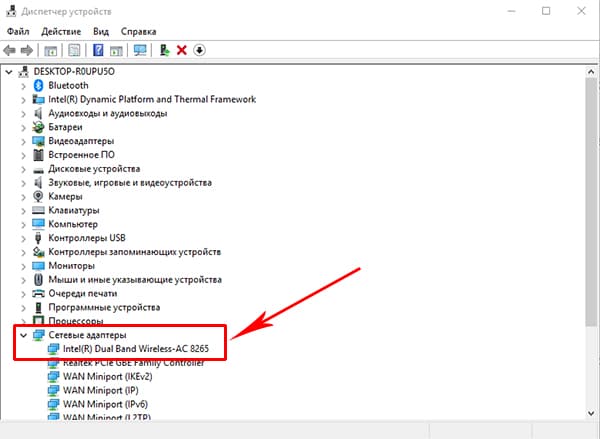
- Launch "Device Manager" (you can use the search bar);
- Expand the "Network adapters" block.
The existing device with the word "Wireless" in the name means that your laptop supports wireless internet.
Enabling Wi-Fi on a laptop using the keyboard
Most often, "Wi-Fi" can be turned on with hot keys, usually two, pressed simultaneously. Different laptop manufacturers may vary their combination, but the main Fn key, as a rule, is always there. The second key required to turn it on has a special WiFi icon and is located on the keyboard in the F1-F12 function row.
For more information on how to enable Wi-Fi on a laptop of a particular brand, see the following table.
In devices of the previous generation, "Wi-Fi" is enabled by a special slider on the laptop case, but the network icon remains the same.
How to enable Wi-Fi on Windows 10
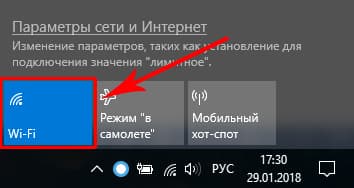
On laptops with "ten" "Wi-Fi" can be enabled either in the system parameters or using the notification area, and the second method is more convenient and faster:
1. On the taskbar, open system notifications.
2. Click the Networking tab.

3. Turn on WiFi by clicking on the corresponding thumbnail.
To enable "Wi-Fi" on Windows 10 using the options menu, you must:
1. Open "Options" and select the "Network and Internet" block.
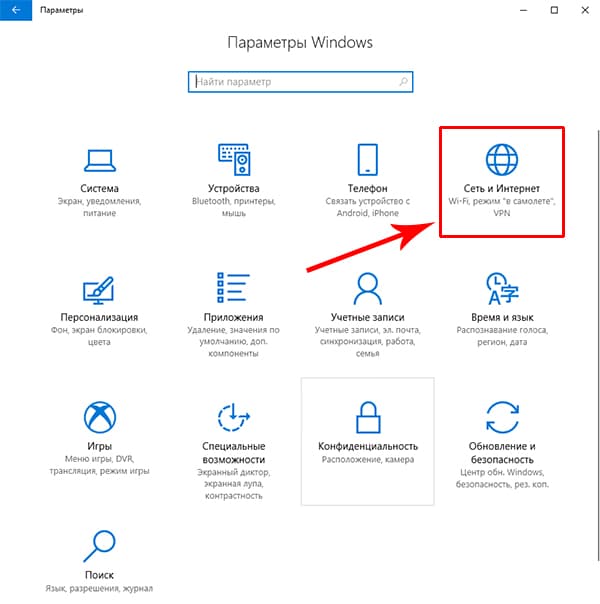
2. Click on the WiFi menu and enable the slider for the wireless network status.

After these steps, the laptop will start searching for all available wireless networks. If it is already in memory, it will connect automatically; if the access point for your device is new and protected (you will see a lock icon), you need to select it and enter the password to connect to the Internet.
WiFi connection on Windows 7 and 8
For laptops on previous versions of Windows, the wi-fi software activation algorithm is different.
1. Go to "Control Panel" - "Network and Internet", or right-click on the computer icon in the notification bar next to the clock.
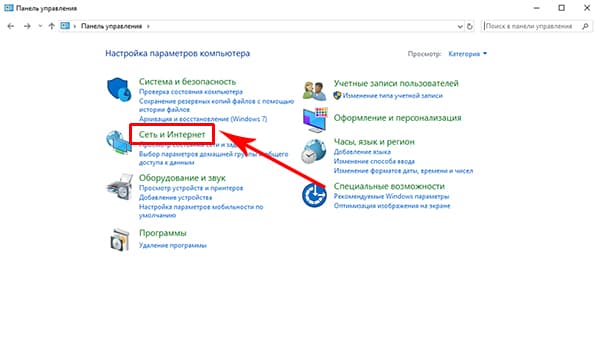
2. Select "Network and Sharing Center".
3. Click on the "Change adapter settings" menu.
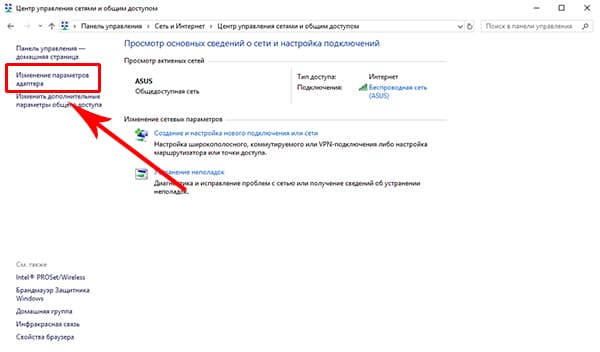
4. Use the right mouse button to enable the wireless network.
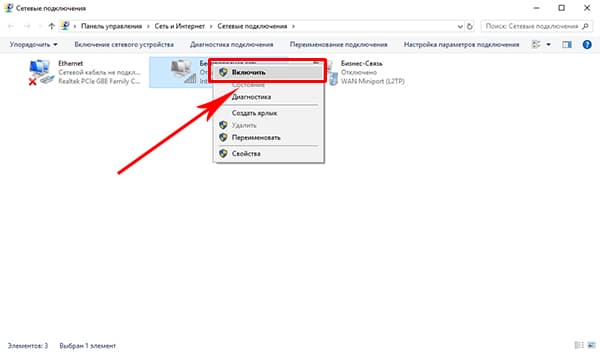
When the "Wi-Fi" module starts working, you need to select an access point (the list will open by clicking on the WiFi icon in the notification area) and, entering the password if necessary, connect to it.
If the Internet does not turn on via Wi-Fi
If Internet access on a laptop still does not appear after all of the above, connect the network cable to the computer directly, open Device Manager through the Control Panel, select the Network Adapters tab, find your Wifi module in the list and try to update the driver. After that, unplug the internet cable and restart your laptop.

If you still cannot turn on the Internet after that, there may be problems on the provider's side, or incorrect router settings, or the "wi-fi" module is faulty. The cost of repairs in the service center ranges from 1,000 to 2,000 rubles, but you can also get by with an external WiFi module - on Aliexpress such devices cost about 150 rubles.
Imagine being able to surf the Internet from your couch in your room, chat with friends over the Internet in the cozy evening in a soft bed, or send documents from a computer in the kitchen to a printer in your home office. The wireless network is as flexible as possible and does not require complex configuration. This article describes the steps to set up and start a wireless network.
The right choice of equipment
Before you start configuring your wireless network, you need the following items.
A broadband Internet connection is a high-speed connection, as opposed to a dial-up connection, which has a slow data transfer rate and is not powerful enough for a wireless network. The most common broadband connections are DSL lines and cable. To get a broadband connection, you need to contact your Internet service provider. Internet connections using DSL lines are usually provided by telephone companies, and cable connections are available from cable TV companies. Internet service providers usually provide high-speed modems and can even connect them to your computer. Some vendors may even offer kit - modem and wireless routers. This equipment can also be found in stores selling computers and electronics.
Example of a cable modem (left) and a DSL modem (right)
| Wireless router |
The router provides data exchange between the local network and the Internet. With a wireless router, computers are connected to a local area network using radio signals instead of wires and cables. There are several different types of wireless networking technologies, including the 802.11a, 802.11b, 802.11g, and 802.11n standards. We recommend using routers that support 802.11g or 802.11n because these routers provide high bandwidth and strong radio signal. For more information on wireless LAN technologies, see Wireless & networks FAQ.
Example of a wireless router
| Wireless adapters |
A network adapter is a device that connects a computer to a local area network. To connect your laptop or desktop computer to a wireless LAN, you need a wireless adapter. Many laptops and desktops have built-in wireless LAN adapters. To check if your computer has a wireless adapter installed, follow these steps.
Device Manager showing the wireless adapter
If your computer does not have a wireless network adapter installed, you can buy it from a computer or electronics store and install it yourself. We recommend using Universal Serial Bus (USB) adapters. These adapters are small in size, easy to install and carry from one computer to another. Make sure the adapters are the same type as the wireless router. The type of adapter is usually indicated on the packaging - usually a letter such as G or A.
Examples of USB wireless adapters
Installing a modem and setting up an Internet connection
After all the equipment is purchased, you will need to install a modem and set up an Internet connection. If the modem was not installed by an ISP representative, follow the instructions in the documentation for your modem to connect the modem to your computer and the Internet. If you are using a DSL line, plug the modem into a telephone wall jack. If using a cable, connect the modem to a cable outlet. For more information, see Set up your high speed cable or DSL connection.
Placement of the wireless router
Install the wireless router in a location where it can receive the strongest signal with the least interference. For best results, follow the tips below.
Place your wireless router in the center of your service area.Install the router as close to the center of your home as possible to ensure the best possible radio signal throughout the entire home.
Place the wireless router higher off the floor and away from walls and metal objects such as metal cabinets. The fewer physical obstacles between the computer and the router, the more likely the router's signal strength is to be used to its full.
Reduce interference. 802.11g networking equipment uses 2.4 GHz radio frequencies. Many microwave ovens and cordless phones use this same frequency. If you turn on the microwave oven and make a cordless phone call, the radio signal may be interfered with. Many problems can be avoided by using a cordless phone operating at a higher frequency, such as 5.8 GHz.
Wireless Security
Ensuring security is always important, but especially in the case of a wireless network, since the network signal can go outside the building. If you do not protect your network, then nearby people with a computer can access information stored on network computers and access the Internet through your connection. To keep your local network secure, follow these steps.
Creating a network security key
Write down the security key and keep it in a safe place. You can also save the security key to a USB flash drive by following the instructions in the wizard.
Use a firewall. A firewall is software or hardware that helps protect your computer from attackers or malware. By using a firewall on each computer on the local network, you can control the spread of malware over the network and also protect computers when accessing the Internet. Windows Firewall is included with this version of Windows. For more information, see Firewall FAQ.
Adding computers to the network
To connect your laptop or desktop computer to a wireless network, follow these steps:
File and Printer Sharing
Many users have wireless networks that allow them to access the Internet from anywhere in the house, but would like to have wireless access to files and printers.
The easiest way to share files on the network is to set up sharing with your homegroup. If you don't have a homegroup, you can share your files by placing them in one of the shared folders. Any file or folder placed in a shared folder automatically becomes available to other users connected to the local network. To share a shared folder, follow these steps:
Enable sharing so that network users can read and write files in shared folders.
Disable sharing (users who are logged into this computer will have access to shared folders).
Open the "Advanced Sharing Options" section. To do this, click the Start button and select Control Panel... Enter network in the search box, select Network and Sharing Center, and then in the Navigation Pane, click Change advanced sharing options.
Click the double quotes icon to expand the current network profile.
In section Accessing shared folders select one of the following options.
Setting up a WiFi connection in Windows 7 is a snap. In the tray, on the "Network" icon, you need to click on the left mouse button and then, in the menu, select one of the WiFi access points, click on it, and then click the "Connect" button:
After that, a window will open in which you need to enter the password for this access point:

Enter the password, click "OK" and if the password is correct, then in half a minute or a minute the connection will be established. The network icon in the tray will change its appearance, and if you click on it, the one to which you are connected will be highlighted in the list of networks:

At the same time, Windows 7 will automatically install all other parameters, except for the password, for a new connection.
But there is another way to create a wifi connection to the Internet, a little more complicated, but it allows you to manually specify some parameters of the new connection. On the same network icon, in the tray, you need to right-click and then select "Network Control Center" from the menu:


Then, in the dialog box, select manual setting:

In the next window, enter the name of the access point, type of security and encryption, password:

After that, the created connection will be available through the network icon in the tray.
If you need to change the settings of a connection that has already been created, then for this you need to click the left button on the network icon, and then the right button on the connection that you want to change and select "Properties" from the menu:

In the dialog box, you can change the connection parameters:


How to use wifi
Using wifi is very easy. After you have created a connection, you can turn it on and off through the network icon in the tray. However, you need to understand that the ability to use wifi is highly dependent on external factors. Since the radio signal is affected by the external environment. Obstacles such as walls, ceilings, floors weaken both the signal of the access point and the signal of the client device. Windows shows the signal strength from the access point in sticks. The pictures at the beginning of the article show the signal level in one or two short sticks. This is a very weak signal. with such a signal, you will most likely not be able to use the Internet.
There are programs that show the signal level in numbers - dBm, for example, 60 dBm or 40 dBm. The larger this figure, the weaker the signal - a good signal is a figure less than 50 dBm. However, you need to understand that the accuracy of such numbers varies depending on the adapter and the driver of this adapter. Under the same conditions, one adapter can show for example 71 dBm, and another adapter 82 dBm.
In addition to passive barriers, the quality of wifi signal transmission can be adversely affected by sources of electromagnetic radiation. So, even if you have the best wifi adapter installed on your laptop, this does not mean that you can always use the Internet via wifi.
In situations with a bad signal, using an adapter with an external antenna can help. For example, the TP-Link TL-WN722N / C USB wifi adapter is equipped with an external antenna. Moreover, it is removable and, if necessary, can be replaced with another one with a high gain.
What does the presence of an external antenna give? Continuing the same example - under equal conditions - the same access point, the same time and place of connection, the presence of passive barriers between the access point and the client - as a result, a weak signal in both directions:
- The internal "native" wifi adapter of the laptop connects to the access point, but practically does not make it possible to use the Internet due to low speed and frequent drops.
- TP-Link TL-WN722NC with its own antenna provides a stable Internet connection at a good speed.
If wifi does not work
If your computer does not have a "Wireless Network Connection", the reason may be one of the following:
- There is no wifi adapter on your computer at all. You can find out through the Device Manager. There must be a wireless network card in the device list.
- Your computer has a wifi adapter but it is disabled. For example, many laptops have buttons to turn off the wifi adapter. It can be a separate button or one of the F buttons in combination with the Fn button. If the wifi adapter is built into the motherboard, it can be disabled in the BIOS.
- There is an adapter, but no drivers are installed on it, in this case it will appear in the list of devices as an unrecognized device.
- There is an adapter, but it is disabled by software.


If there is a "Wireless Network Connection", it shows a list of networks, but it cannot connect to the desired network, then the reason may be that:
- The signal between your adapter and the access point is too weak. Long distance, thick walls, etc. Moreover, the signal level of the access point may be decent, but the signal of your adapter does not "finish off" the access point. Because the signal of the adapter is generally weaker than the signal of the access point. Especially if the adapter is built-in, such as in a laptop.
- You entered an incorrect password. This is especially true for Windws XP because the password characters cannot be seen there.
If the connection to the access point is established, but the Internet does not work, then the reasons may be:
- The wifi router (access point) is not connected to the Internet. For example, a technical failure with a provider, or a lack of funds in your account with a provider.
- A technical failure of the provider's DNS servers.
Home WiFi networks
WiFi security
Since when using wifi, all information is transmitted over the radio wave, this makes wifi networks much more vulnerable than wired networks. The fact is that the radio signals sent by the access point (wifi router) and devices that are connected to the access point are available for interception by any similar device that is within the "audible" radius of the access point or from the client of this access point. That is, interception of network traffic becomes very simple, affordable and invisible. And interception of network traffic allows you to collect information necessary to attack a wifi network. As more access points become available, wifi increases and the number of people willing to "hack" the wifi network increases.
The most common motivation for hacking wifi hotspots is connecting to the internet via wifi for free. A fairly common picture today - you have a wifi router installed in your apartment and not only your devices, but also the computer of one of your neighbors are connected to it. You pay for the Internet, and your tech-savvy neighbor gets the Internet for free.
But “stealing” the Internet is not the only reason wifi networks are “hacked”. The fact is that if an intruder gains access to your access point, he can get access to all devices that are connected to your wifi router through it. And this gives him the opportunity to steal your personal data. For example, passwords to mail, to Internet banks, your documents - in one word to everything you own.
Therefore, use wifi with caution. Here are a few rules to follow.
Do not connect to open public wifi networks through a laptop on which you store valuable information. And if you need access to the Internet through open wifi networks, then use a firewall and antivirus on your laptop. It's even better if you install two operating systems on your laptop. One main one, which will store all your valuable information. And the other is empty, only to access the Internet through open wifi networks.
If you use a wifi router at home or in the office, you need to correctly configure the wifi router:
- Use WPA2 security type.
- The password for protection must be long - preferably 50 - 60 characters, and must consist of an arbitrary set of characters. Password marina1234 very bad - it will be hacked in a few minutes. Password nvysue57k-sjehr)