Description of the dll file: NVIDIA Display Properties Extension
Possible DLL error: when running nvcpl.dll
Compatible operating system: Windows 7, Windows 8
Our catalog contains the following versions of this library:
How to download nvcpl.dll and install it
Open the zip file downloaded from the site. Extract nvcpl.dll to a folder on your computer. We recommend that you unpack it into the directory of the program that requests nvcpl.dll. If this does not work, you will have to extract nvcpl.dll to your system directory. The default is:
C:\Windows\System (Windows 95/98/Me)
C:\WINNT\System32 (Windows NT/2000)
C:\Windows\System32 (Windows XP, Vista, 7)
If you are using a 64-bit version of Windows, you must also put nvcpl.dll in C:\Windows\SysWOW64\. Make sure you overwrite existing files (but don't forget to back up the original file). Restart your computer. If the dll error persists, try the following: Open the Start menu and select Run. Type CMD and press Enter (or if you're using Windows ME, type COMMAND). Type regsvr32 nvcpl.dll and press Enter.
Attention! It is very easy to download nvcpl.dll from the Internet, but there is a high probability that your computer will be infected with malicious code. Please check ALL files downloaded from the Internet with an antivirus! The site administration is not responsible for the performance of your computer.
Also note that each file has a version and a bit depth. DLL files with the same name can be either 32-bit or 64-bit. Installing DLL files into the system does not help in 100% of cases, but basically problems with programs and games are solved by such a simple method. Most often, you encounter DLLs with errors in the operating system. Some libraries come with Windows and are available for any Windows program. Replacing DLL files from one version to another allows you to independently grow the system without affecting application programs. You can learn more about what a dll is from the source - what is a dll.
dll error? Our experts will help!
Can't figure it out? Game won't start? Do you keep getting DLL errors? Describe your problem in detail and our specialists will quickly and professionally find a solution to the problem. Don't be afraid to ask a question!
The NvCpl.dll file belongs to a program unknown from an unknown manufacturer. His task: NVCPL.DLL Ð Ð Ð Ð Ð Ð Ð Ð ²Ð Ð Ð Ð Ð Ð Ð Ð ² Ð Ð Ð Ð Ð Ð Ð Ð Ð Ð Ð ² nvidia Ð Ð Ð Ð Ð Ð Ð Ð μñ Ð Ð Ð Ð Ð Ð Ð Ð Ð Ð Ð Ð Ð Ð Ð Ð Ð Ð Ð Ð Ð Ð Ð Ð Ð Ð Ð Ð Ð Ð Ð Ð Ð Ð Ð Ð Ð Ð Ð Ð Ð Ð Ð Ð Ð Ð Ð Ð Ð Ð Ð Ð »ÐµÐ½Ð¸Ñ Ѻрана при Ð·Ð°Ð¿ÑƒÑ ÐºÐµ приложений ии¸Ð¸ €.
NvCpl.dll is usually located in the %sysdir% directory. If this file is located in a different folder on your computer, you may have chosen that location when installing this software. However, it can also indicate a virus infection.
Fix NvCpl.dll Error
If NvCpl.dll is causing errors, the cause may be corrupted registry entries.
In most cases, it helps to check the Windows registry for NvCpl.dll errors!
If this does not fix NvCpl.dll errors, we recommend uninstalling the program using the Control Panel and then running a scan of the Windows registry again.
NvCpl.dll slows down my computer!
Programs and files can severely limit Windows performance. In some cases, the NvCpl.dll file also causes this effect. If in doubt, uninstall the corresponding program.
If NvCpl.dll is in the Windows startup list, it can slow down your computer. РРРОññ Ð Ð Ð Ð Ð Ð Ð Ð Ð Ð Ð Ð Ð Ð Ð Ð Ð Ð Ð Ð Ð Ð Ð Ð Ð Ð Ð Ð Ð Ð Ð Ð Ð Ð Ð Ð Ð Ð Ð Ð Ð Ð Ð Ð Ð Ð Ð Ð Ð Ð Ð Ð Ð Ð Ð
Our advice: AVG TuneUp™ disables unnecessary startup programs as well as Windows processes, thereby reducing the load on your computer.
Is NvCpl.dll dangerous for my computer?
NvCpl.dll is considered to be адежно. If it is not in the default directory, it may indicate a virus infection. Check your computer with an up-to-date antivirus program. Our advice: AVG Anti-Virus Free.
All information about NvCpl.dll:
- Determine the bitness of your operating system (32 or 64 bits)
- Choose the appropriate language and the latest DLL
- Download and unzip the archive to the folder with the program
If it didn't help me
Do not worry! There are many more options for installing the file. Read more about this in a separate article.Download nvcpl.dll for Windows
We have found 3nvcpl.dll versions for youErrors Related to nvcpl.dll
If you've landed on this page, you've most likely encountered one of the following messages:- Entry point not found nvcpl.dll
- nvcpl.dll is missing
- Error loading nvcpl.dll. The specified module could not be found.
- nvcpl.dll is either not designed to run on Windows or it contains an error.
- Starting is not possible because there is no library on the computer
- The program cannot be started because nvcpl.dll is missing
- The program can"t start because nvcpl.dll is missing from your computer.
- Procedure entry point dll not found nvcpl.dll
- There was a problem starting nvcpl.dll. The specified module could not be found
- DLL entry not found
DLL- This is a file with a specific set of functions necessary for the operation of a particular program. In our database, nvcpl.dll is responsible for:
NVIDIA Display Properties Extension
Without this file, the program that requires it will not run.
Why is nvcpl.dll not found on my computer?
If it is not on your computer, then there can be many reasons for this:- First run of the program
- Developer miscalculation
- Wrong OS setup
- Unlicensed Windows
- Illegal copy of the program (game)
The last version of the Nvcpl.dll file is the 8.17.13.3788 version released on 2014-07-31 for 32bit and 8.17.13.3788 version for 64bit. There have been 3 versions previously released. All versions of the Dll file are listed below from newest to oldest.
- 8.17.13.3788 - 32 Bit (x86) ( 2014-07-31 )
- 8.17.13.3788 - 64 Bit (x64)
- 5.13.1.1520 - 32 Bit (x86) ( 2003-07-31 )
- 5.13.1.1520 - 32 Bit (x86)
Steps to Download Nvcpl.dll File
Methods to Solve the Nvcpl.dll Errors
ATTENTION! Before starting the installation Nvcpl.dll file needs to be downloaded. If you have not downloaded it, download the file before continuing with the installation steps. If you don't know how to download it, you can immediately browse the dll download guide above.
Method 1: Solving the DLL Error by Copying the Nvcpl.dll File to the Windows System Folder
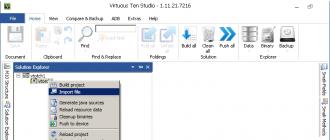
- The file you downloaded is a compressed file with the extension " .zip". This file cannot be installed. To be able to install it, first you need to extract the dll file from within it. So, first double-click the file with the " .zip" extension and open file.
- You will see the file named" Nvcpl.dll" in the window that opens. This is the file you need to install. Click on the dll file with the left button of the mouse. By doing this, you select the file.
 Step 2:
 - click on the " Extract To" button, which is marked in the picture. In order to do this, you will need the Winrar software. If you don't have the software, it can be found doing a quick search on the Internet and you can download it (The Winrar software is free).
- After clicking the " Extract to" button, a window where you can choose the location you want will open. Choose the " Desktop" location in this window and extract the dll file to the desktop by clicking the " Ok"button.
 Step 3:
 - Copy the " Nvcpl.dll"file you extracted and paste it into the" C:\Windows\System32"folder.
 Step 3:
 - If you are using a 64 bit operating system, copy the " Nvcpl.dll"file and paste it into the" C:\Windows\sysWOW64"as well.
NOTE! On Windows operating systems with 64 Bit architecture, the dll file must be in both the " sysWOW64"folder as well as the" System32" folder. In other words, you must copy the " Nvcpl.dll" file into both folders.
 Step 4:
 - In order to run the command line as an administrator, complete the following steps.
NOTE! In this explanation, we ran the command line on Windows 10. If you are using one of the Windows 8.1, Windows 8, Windows 7, Windows Vista or Windows XP operating systems, you can use the same methods to run the Command Line as an administrator. Even though the pictures are taken from Windows 10, the processes are similar.
- First, open the start menu and before clicking anywhere, type " cmd"but do not press Enter.
- When you see the command line" option among the search results, hit the " CTRL" + "SHIFT" + "ENTER" keys on your keyboard.
- A window will pop up asking, " Do you want to run this process?". Confirm it by clicking to " Yes"button.
 Step 5:
 - Let's copy the command below and paste it in the command line that comes up, then let's press Enter. This command deletes the Nvcpl.dll file "s problematic registry in the Windows Registry Editor (The file that we copied to the System32 folder does not perform any action with the file, it just deletes the registry in the Windows Registry Editor. The file that we pasted into the System32 folder will not be damaged).
%windir%\System32\regsvr32.exe /u Nvcpl.dll
 Step 6: Deleting the Nvcpl.dll file"s problematic registry in the Windows Registry Editor
 - If you have a 64 bit operating system, after running the command above, you must run the command below. This command will clean the Nvcpl.dll file's damaged registry in 64bit well (The cleaning process will be in the registries in the Registry Editor only. In other words, the dll file you paste into the SysWoW64 folder will stay as it)
.
%windir%\SysWoW64\regsvr32.exe /u Nvcpl.dll
 Step 7: Uninstalling the Nvcpl.dll file's broken registry from the Registry Editor (for 64 Bit)
 - We need to make a new registry for the dll file in place of the one we deleted from the Windows Registry Editor. In order to do this process, copy the command below and after pasting it in the command line, press Enter.
%windir%\System32\regsvr32.exe /i Nvcpl.dll
 Step 8:
 - Windows 64 Bit users must run the command below after running the previous command. With this command, we will create a clean and good registry for the Nvcpl.dll file we deleted.
%windir%\SysWoW64\regsvr32.exe /i Nvcpl.dll
 Step 9:
 - If you did all the processes correctly, the missing dll file will have been installed. You may have made some mistakes when running the command line processes. Generally, these errors will not prevent the Nvcpl.dll file from being installed. In other words, the installation will be completed, but it may give an error due to some incompatibility issues. You can try running the program that was giving you this dll file error after restarting your computer. If you are still getting the dll file error when running the program, please try the 2nd method.

This error may occur for users of an NVIDIA video card, in fact, the error itself is caused by one of the components of this video card. It is enough to reinstall the driver to get rid of this error. If you do not know how to do this, then read this article!
The appearance of this error is not critical for the computer itself, it will continue to work, however, users may experience problems with launching video games and watching movies and videos. Of course, this is very inconvenient, so you should solve this problem and forget about it once and for all.
If you have not updated your drivers for a long time, then perhaps the problem will be solved by a simple update. For this:
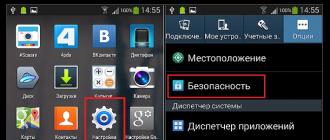
Go to Device Manager (Control Panel > View: Large Icons > Device Manager);

Find and expand " Video adapters»;
switch to the section " Driver" and press " Refresh»;
in the window that opens, select " Automatic search for updated drivers».
If you know for sure that you have not updated the driver to the latest version, and do not know the model of your video card, then click here and select "". Here it is proposed to find " Graphics drivers" And " Motherboard drivers". We need to choose " Graphics drivers».

After downloading the driver, simply update it by running the installer.
If you recently installed the driver and this error occurred after that, then you need to completely uninstall the video driver.
To do this, first download the installer by clicking here. If you know the model of your video card, then download the driver via " Option 1: Manually find drivers for my NVIDIA products". If you do not know the model of your video card, then download the driver through " Option 2: Automatically find the right NVIDIA drivers».
Now you can uninstall the driver. For this:
Go to Device Manager (Control Panel > View: Large Icons > Device Manager);
Find and expand " Video adapters»;
select your video card and double-click on it with the left mouse button;
switch to the section " Driver" and press " Delete».
After uninstalling the driver, install the installer you downloaded earlier.
Please note that drivers can be automatically found and installed using . However, this method is less recommended, because. there is a possibility that the program will incorrectly detect the device installed in the computer. After these steps, you will no longer receive an error message.