Adobe Photoshop is an extremely interesting software product. Its developers have really done a great job, allowing us to use a gigantic set of tools, the use of which is simply limitless. One of the most interesting facts is that we can come up with a combination of actions that did not exist before, because the creators themselves cannot fully describe the capabilities of their offspring.
In this tutorial, I'll show you the endless possibilities of this program. Now we are going to break down a very interesting combination to create a rather interesting element, very often used by website designers and photographers. Well, it looks very interesting, but extremely simple. You just need a couple of minutes. Right now I'm burning about the sunburst effect in Photoshop.
So let's try to make diverging rays of the sun in Photoshop. We don't have to spend long hours for that. To draw perfect lines at the right angles. How would we have to do it on a sheet. I'll show you two variations. Which, respectively, have two ways of creating.
First, let's take a look at how to create graphical divergent rays. Create a new 1000 x 1000 px document and fill it with # beff8e. You can use yours.
We will use the text tool, with which we will draw a dotted line. Font size 60, color # 60a42e.

Rasterize the text in the layers window.

Now, with the help of the "Move" tool, stretch it up and down. You should get something like this.

We are looking for the filter distortion - polar coordinates tab.

Well, we set the following settings:

These are the diverging rays of the sun we have.

Now let's take a look at the second method of creating diverging sun rays closer to natural ones.
Create a new document of the same size, but with a darker background. I took color # 3b8604.
Create a new layer.

Take a hard brush with a large diameter and click on a new layer. We increase it to similar sizes.
Now go to the layers window. Reduce Opacity to 50% and Blending Mode to Fade.

Convert the layer to a smart object. And we combine with the previous one.

Now let's finish the work. Filter Blur - Radial Blur.


Now we have got such sunbeams.

Such interesting combinations exist for creating sunbeams in Photoshop. It looks pretty interesting, and we spent only a few minutes creating this effect. Another proof of the limitless possibilities of Photoshop.
In this tutorial, you will learn how to create beautiful rays of sun passing through tree branches in Photoshop. Not only is it a great way to make photography more interesting, but it's also very simple. Much easier than you might imagine!
Finally, to make the picture more realistic, we will create streaks of sunlight falling on the ground.
So here's the image I'll be working with:
Original image
And here's the same shot, but after applying the effect:

Result
Let's start.
Step 1: Highest Contrast Color Channel
After you open the original photo in the program, the first step is to determine which of the three color channels (Red, Green or Blue) is the most contrasting. To do this, in the Layers panel, go to the Channels tab. You will see three channels, Red, Green and Blue, which, when combined, create all the colors of your photo. You will also see a fourth channel called RGB at the top of the panel, which is actually a junction of the three main channels:

Channels panel
We are interested in which of these three channels gives the greatest contrast. To find out, alternately leave only one of the channels visible and watch how the image changes at the same time.
Let's start with the Red Channel, turning on which we will see our photo in black and white. Then we will go to the Green channel, while turning off the visibility of the Red and Blue channels. Remember how the image changes; you will be presented with three versions of your photo in black and white, your task is to choose the most contrasting one. For my shot, the strongest option is the Blue channel (which I demonstrated below). The sky in the background is displayed quite brightly and distinctly, while the tree itself and the earth, on the contrary, are very dark. Exactly what I needed.

The black and white version of Blue Channel gives the greatest contrast between sky and tree.
Step 2: create a copy of the channel
Now that I know that the Blue Channel contains the highest contrast, I need to make a copy of it. To do this, simply select the desired channel and drag it to the New Channel icon at the bottom of the Channels panel:

When you release the mouse button, you will see the newly created copy of the channel, located under all the other channels, it will be named Blue copy.

Step 3: Darken the shadow areas with the Levels command
We need to further increase the contrast in the copied channel, making the dark areas completely black. This can be done using the Levels command. To do this, go to the Image menu at the top of the screen, choose Adjustments and then Levels. To make it faster, use the keyboard shortcuts Ctrl + L (Win) / Command + L (Mac). In the dialog box that appears, you will see a graph and three sliders located below this graph: a black slider on the left, a gray one in the middle, and a white one on the right. Drag the black slider to the right, as you move the slider, the dark areas of the image will get even darker. Let me remind you that we need to make the dark areas completely black.

Move the slider to the right until the dark areas are completely black.
When finished, click on the Ok button to close the dialog box. The photo below shows the image after manipulations in Levels. The dark areas are now filled with black, while the background sky remains unchanged.

A copy of the Blue channel after shading the shadow areas
Step 4: Load the channel as a selection
Hold down the Ctrl (Win) / Command (Mac) key and click on a channel in the Channels panel:

This will load the channel as a selection.

Step 5: create a new blank layer
Go to the Layers panel and click on the New Layer icon to create a new empty layer.

You will see that after creating a new empty layer, the image will turn from black and white to color again.

A new empty layer, Layer 1, is added above the Background layer.
Step 6: fill the selection with white
Press the D key on your keyboard to set the original colors for the foreground and background: black for the foreground and white for the background. Then use the keyboard shortcut Ctrl + Backspace (Win) / Command + Delete (Mac) to fill the selection with white on a new layer. You will not notice any changes if the sky in the background of your photo was already white, but we will use this filling in the future to create the sun's rays.
Step 7: make a copy of the new layer
To make a copy of Layer 1, use the keyboard shortcut Ctrl + J (Win) / Command + J (Mac), with the layer selected in the Layers panel. A copy of the layer will appear under the name Layer 2.

Step 8: apply a Radial Blur filter to Layer 2
Now it's time for the sun's rays themselves. Select the just created Layer 2 in the Layers panel. Go to the Filter menu, choose Blur - Radial Blur. The Radial Blur filter dialog box will appear on the screen. Increase the Amount to about 80, however this value depends on the size of your image and how you want the rays to be. The more you set the value, the longer the rays will be, so at this stage you can experiment.
In the Blur Mode column, select Zoom, and set the Quality to Best. If you are working on a low-power computer or are just experimenting, the quality of the blur can be made lower by choosing “Good” or “Draft” in the Quality item.
In the lower right corner of the dialog there is a Blur Center function, where you can select the point from which the blur starts, and in our case, the sun's rays. The square frame represents our image. Click on the point from which you would like to shoot rays. I wanted the rays in my photo to start from about the top quarter and from the center, so I positioned the point like this:

Click on the Ok button as soon as you are done with these manipulations. That's what I did:

The rays don't seem realistic yet, but we'll fix that.
Step 9: change the layer style to Outer Glow
To make the rays stand out a little more, you need to add a glow. To do this, click on the Layer Style icon located at the bottom of the layers panel:

Then from the list of styles select Outer Glow (outer glow):

The Outer Glow style dialog box appears before us. There is absolutely no need to change any settings here. The default settings are great for creating sunburst. Just click on the Ok button to leave the dialog and apply the effect:

The rays now look much better:

Step 10: change the layer's blend mode to Soft Light
Now the sunbeams look better, but still not realistic enough, we need to soften their intensity a little. We can do this simply by changing the blend mode of the layer we are working with. Remaining on Layer 2, go to the Blend Mode menu located in the upper left corner of the Layers panel and change the mode from Normal to Soft Light:

So, here is the image I got after applying the layer's blend mode Soft Light (Soft light):

Step 11: Duplicate Layer 2
Copy layer Layer 2, for this use the hotkeys Ctrl + J (Win) / Command + J (Mac). The program copied the layer and named it “Layer 2 copy”.

Step 12: lengthen the sun's rays
We now have two copies with rays, one on Layer 2 and the other on Layer 2 copy. Let's make the rays on Layer 2 copy longer to give them a more natural look using the Free Transform command. If you are working with an image open inside the document window, then press the F key to switch to Full Screen Mode. You will better see all the manipulations that take place, which in turn will facilitate your work. Then press the keyboard shortcut Ctrl + T (Win) / Ctrl + T (Mac) to bring up the Free Transform dialog box.
If you look closely at the center of the photo, you will notice a small icon. Hover over it and drag to the point where the rays are coming from:

Now hold down Shift + Alt (Win) / Shift + Option (Mac) and move any of the corner handles to the side to extend the rays. By holding down the Shift key while moving the marker, you instruct the program to maintain the proportions of the image, while holding down the Alt key, you keep the stationary center point that you yourself specified.
Press Enter to apply the transformation.

Step 13: resize and position Layer 1 to create a reflection of the resulting rays on the ground
At this point we have finished creating the rays themselves, but to make the image look more natural, let's create the glowing areas on the ground. As you remember, at the very beginning of the lesson we made a selection of the copied channel, then created a new layer (Layer 1) and filled it with white. We haven't used it until now, but now it comes in handy to create a glow from the sun's rays on the ground.
To do this, first click on the Layer 1 layer in the Layers panel to select the layer you need to work with. Then again use the hotkeys Ctrl + T (Win) / Command + T (Mac) to bring up the transform window. Click on any area in the transform window, and then move its top border of the frame downward, thereby creating a mirror reflection of the sunburst effect. Experiment with the position and size of the reflection to get the most realistic result.

Press the Enter key when finished manipulating.
Step 14: Change the Blend Mode of Layer 1
So, to make the areas filled with white look like the reflections of the sun's rays, and not as white spots, change the layer's blend mode to Overlay (Overlap). Again go to the pull-down menu located in the upper left corner of the layers panel and select the Overlay mode.

That's all. Let's take a look at the original image and compare it with what we got:

And here's the result after we changed the Blend Mode of Layer 1 to Overly:

In this uncomplicated way, you can create the effect of sunlight.
With just a couple of simple steps, you can create a beautiful evening sunlight effect in Photoshop that will definitely brighten your picture. True, in order for the effect to look harmonious, you need to choose a suitable photo in which there is already a sunset. For the experiment, I selected a photo of a girl against the backdrop of the setting sun.

First, I will boost the sunlight by applying a gradient fill on a new layer. Gradient Tool (G), in hand, in the Options bar, set the radial one.
Double click on the gradient stretch to bring up the properties selection dialog. I'll set a three color gradient from white through orange to red. Hex color code: #ffffff; # ffa200; # ff0000

Fill this layer with this gradient, but it doesn't look like the light of the setting sun, for more believability create a mask of this layer. With the help of (M) create an area of \u200b\u200bthe future sun, now using the corresponding button at the bottom of the layers palette create a mask.

Change the layer's blending mode to "Screen" (), using a Gaussian blur filter applied to the layer mask, I will get rid of sharp edges.

This concludes the work on creating a “new evening sun"Almost completed. If necessary, you can move it to a new location, or work with the dimensions using the Ctrl + T key combination. In this case, you need to break the connection between the layer and the mask so that you can freely transform it. To do this, just click on the chain icon between the mask and the layer.

Toning the picture
The next processing step will be picture toning according to the colors of the "new evening sun". You can do this in several ways, one of them is described in the post. In the same case, I will do the following: Create a corr above the background. the curves layer and in each channel I will perform color correction manipulations. Boosting the reds and greens and slightly softening the blues from the middle of the tonal range.

Invert the mask of this layer (Ctrl + I). Using a soft brush, read about the settings, with a lowered opacity, show the resulting tint with varying degrees of intensity, my version is in front of you.

Now I will balance the whole picture in color and use, oddly enough, "Color Balance" () create which with the help of (Adjustments) the top layer. In the Ton list, select the “Mids” Midtones. Using the color sliders, I will slightly increase the red and green, and also decrease the blue levels of the colors.

After carrying out this correction, you may need to balance the previously made settings; it is convenient to use for this change the opacity parameter for the layers. The layer with the effect of the setting sun may require transforming both the mask and the gradient together separately or one by one, use the "magic keys" Ctrl + T
Shade treatment
There is literally the final touch to get a realistic picture of the evening lighting. It consists in adding blue to the shadow areas of the image, I think it will look great. Using the button at the bottom of the "Layers" palette create a solid fill layer "Solid Color" in the palette, "Color Picker" set a dark blue color

(blending) this layer will change to "Lighten" so that the effect corrected in the shady areas in the photo. If necessary, you can easily change the selected color by calling the "Color Picker" again, or reduce the strength of the layer's influence by adjusting the "Opacity" parameter. As a result of this operation, I got a current picture:

That's all for today, I hope this method of image processing will find application in your practice.
In this quick tutorial, we will learn how to create sun rays using tools such as gradients, blending modes, and adjustment layers, with which we will make the rays more realistic.
Creating sun rays in the program AdobePhotoshop are pretty easy to do, and since there are many ways to create them, I'll show you how to do this using gradients. To complete this tutorial, I advise you to use the version AdobePhotoshopCC.
Step 1
Transfer the image to AdobePhotoshop or just open it in the program ( Ctrl +O).

Now let's go to the filter Camera rawby selecting it in the tab Filter(Filter) and apply the same settings as in the screenshot with the already existing result:


Step 2
Now let's create a new layer ( Shift +Ctrl +N)and let's call it raysand then apply an adjustment layer to it Gradient (Gradient).
Translator's note: in the window for choosing a color transition, by default, there will be those colors that were originally standing as the background foreground color. The author did not deliberately choose the colors that he had, but it is better to put the same as his, or similar, so that the effect is maximally matched.
Translator's note: in the selection windowGradient Type (Gradient type)select # ise (Noise).


Using the button Randomize (Randomize). (Translator's note: either generate) you need to combine the gradients, choosing the one that is obtained in the screenshot or similar:

After increasing the value Roughness(Roughness) up to 100% , we get the following result:

Also, you will need to change the color model. RGB on Lab,

and also hide the light alpha-channel sliders under the dark ones until the result in the screenshot:

Then, use the button again Randomize(Randomize) with which Adobe Photoshop excludes colors that are too out of the general range.

and remove the label next to the inscription Restrict Colors (Limit Colors) (excludes particularly bright or oversaturated colors from the noise gradient).
And here's what you should get:

Then change in the gradient settings window Style(Style) on Angle(Angle) with the resulting result:

Change the blending mode of this layer to Screen(Screen).

Then click again on the adjustment layer thumbnail. Gradient Fill(Gradient fill) and drag the resulting result to the same place where the light source is supposed to be and change the settings a little:


Author's note: due to the fact that to soften the edges of the sun's rays, we will use a filterGaussian Blur (Gaussian blur),with the subsequent possibility of editing, let's convert this layer to S mart Object (Smart Object) (right click on the layer in the layers palette).This action will help us change all the numerical values \u200b\u200bthat we set for this layer.
Let's put this layer in the mode Smart Object(Smart Object).
Translator's note: as a result of this action, the layer mask will be applied to the layer. Then go to Filter - Blur - Gaussian Blur (Filter - Blur - Gaussian Blur) and set the blur radius in the area 47 pixels. And here's the result:

Step 3
Translator's note: for a more realistic effect, use adjustment layers Hue / Saturation(Hue / Saturation) orCurves (Curves) andLevels (Levels) asClipping mask (Clipping Mask)to layerrays and add some yellow tone withCurves (Curves)orLevels (Levels).
Create a new adjustment layer Hue / Saturation(Hue / Saturation) and apply it as Clipping Maskto layer rays.Set the same settings as in the screenshot:

Then, create a new adjustment layer. Curves(Curves) and also apply it as Clipping mask (Clipping Mask). Adjust the same settings as in the screenshot:

Step 4
Double click on the layer raysand change the gradient settings to the ones shown in the screenshot. Again, combine the gradient options with the button Randomize(Randomize):


Translator's note: the author uses the button very often R andomize (Randomize)in order to make future sunbeams as realistic as possible.
Then create Layer mask(Layer mask) for a layer raysand, on it, with the tool Gradient (Gradient) (G) (black to white) with Angle(Corner) style stretch it as shown in the screenshot:

Translator's note: the author masks the sun's rays so that they look as real as possible because of the trees through which they must seep.
Double click on the previously created adjustment layer Hue / Saturation(Hue / Saturation) and slightly correct it, as in the screenshot:

Step 5
Create a new layer Shift + Ctrl + Nand immediately change its blending mode to Screen(Screen). On it, with a tool Brush (Brush) (B), medium diameter , with color # a99446bmake 1 click in the area where the sun is shining.

Also, let's double click on the adjustment layer we created earlier. Hue / Saturation (Hue / Saturation) and move the slider Lightness(Brightness) slightly to the left, as in the screenshot:

Now let's create a new adjustment layer Color Lookup(Search for color) at the very top of the layers palette and apply the same settings as in the screenshot:

Then change the blending mode of this adjustment layer to Hue (Hue) and reduce Opacity (Opacity) to 35-40% ... The resulting result:

Finally, create a new adjustment layer. Curves(Curves) and apply the same settings as in the screenshot:

Result:
That's it! It turns out that you can easily draw the sun's rays. Hope you enjoyed the tutorial.
Today I want to tell you how in Photoshop you can make an original background pattern in the form of diverging sun rays in a few steps. In the first method, we will use dashed text, which we will rasterize and stretch across the entire document. Then apply the Polar Coordinates filter and get nice sunbeams. In the second method, we will use a hard brush, change its blending mode, and then apply the Radial Blur filter using the linear method. The result looks more like a star burst, but looks pretty anyway.
Step 1.1
Create a new 500x500 px square document in Photoshop and fill it with # 0488e4. 
Step 1.2
Select the Type Tool, select the text color # 46a9ee and use a regular dash to write a dotted line from edge to edge in the middle of the document. The text settings are as shown below. 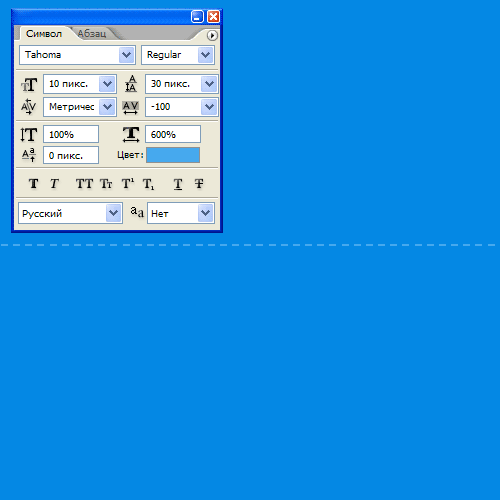
Step 1.3
After that, on the layer, press the right mouse button and select the item "Rasterize Type". Then press Ctrl + T and stretch the dotted line up and down to the edges of the document. 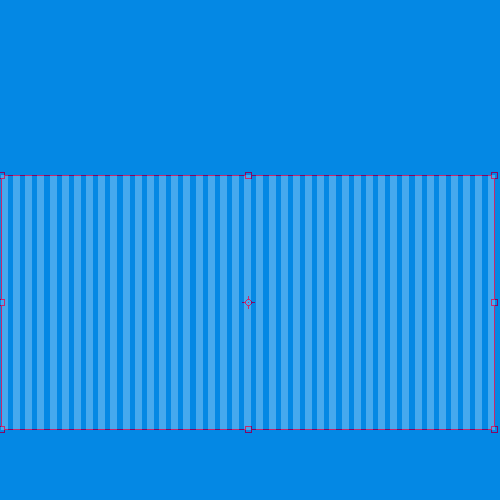
Step 1.4 
Step 1.5
After that in the menu choose "Filter" (Filter)\u003e "Distortion" (Distort)\u003e "Polar coordinates" (Polar Coordinates). Set the settings as in the picture below and click the "Yes" button. 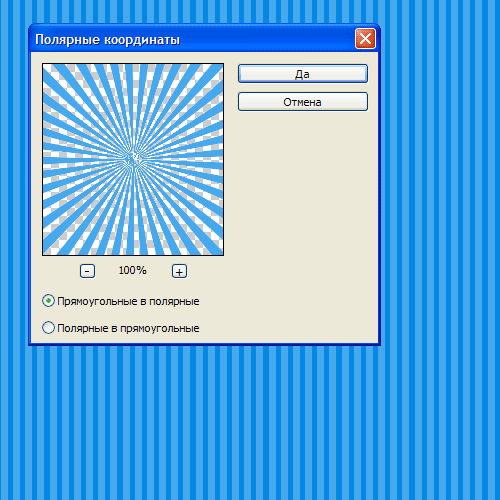
Step 1.6
You should get the following result. 
Step 2.1
This is the second way to get divergent rays. To do this, with a 300px hard brush on a new layer, click in the center of the document. 
Step 2.2
Set this layer to "Dissolve" (Fading) (Dissolve) and reduce the opacity of the layer to 10%. Now you need to right-click on the layer and select "Convert to Smart Object". Then again right-click on the layer and select the item "Rasterize layer" (Rasterize Layer). 


