Today we will cover the topic of how to add a Windows 10 account in different ways. There are two types of accounts in Windows 10. The former are tied to a Microsoft account and require a password from the corresponding email. The latter are local, similar to those in earlier versions of operating systems. In this case, in the future, an account of any type can be converted to the opposite or. Let's get started.
The latest OS from Microsoft has new settings. It is with their help that we will now create a user. Throughout the article, the material is presented in the form of step-by-step instructions, each stage of which is accompanied by screenshots.
- First, let's open Windows options. To do this, go to the Start menu and click on the gear icon, which can be found in the lower left side of the window.

- In the window that opens, click on the tile, which we marked in the picture with a red frame.

- Another window will open. On the left side there are sections - select "Family and other people". In the right half you will see the inscription "add a family member" - we marked it with the number "2". This mode is used, for example, when you need to use one PC by several family members and, in order not to get confused, each of them creates his own account. Click on the marked button.

- After the button is pressed, you will be taken to the next screen. Here you can choose who the created account belongs to: a child or an adult. You also need to enter your email address to recover your password. We do this and click "Next".

- We will be asked to confirm the intention of creating an account - we do this by clicking on the appropriate button.

After that, the invitation will be sent to the specified e-mail and the user can become a member of your virtual family.
Below you can create a new user who will not be a member of the family and will be monitored by Windows 10. Let's see how this is done.
- On the left side of the window, which we opened a step earlier, click on the inscription "Family and other people", and on the right, click on the item marked in the screenshot with the number "2".

- Next, we will be asked to enter the email of a new user, but if you want to create an account without linking to Microsoft, click on the item marked in the screenshot with the number "3".

- We will create just a local user, therefore, in the newly opened window, click on the inscription enclosed in a red rectangle.

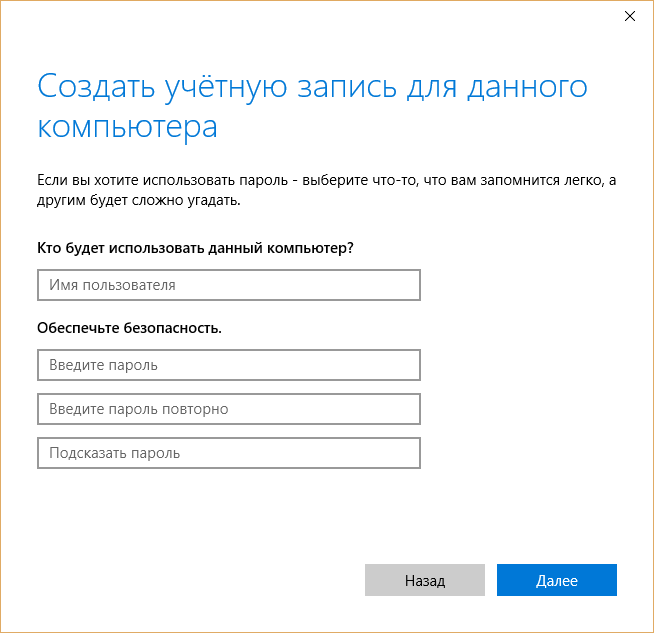
- Now you need to specify the name of the new user, the password for his account and a hint that will be needed in case of losing the password to recover it. After completing the data entry, click "Next".

After that, the new account will appear in the system.

The user we created does not have administrator rights. Let's consider how to endow it with them. Please note that in order to do this, you yourself must have such powers.
- We follow the same path that we used to create a new user. We find there the account that we will edit, and click on it with the left mouse button. A button "Change account type" will appear - that's what we need.

- In the next window, select the desired item from the drop-down list and apply the changes.

As you can see, the user has become an administrator. That's all. Now you can work with the new account by ending the current session and selecting a user on the start screen.

How to add a user on the command line
In order to create another user using the OS command line, be sure to run it with administrator rights. This is done as follows:
- Click on the magnifying glass icon on the taskbar and enter the command in the line that opens cmd, and then press Enter. When the result we need appears, we right-click on it and select the item to launch the utility with administrator rights.

- When the command prompt opens, enter the operator into it: net user username password / add (replace with the desired nickname of the future account and enter the password for it), then press Enter.

- After a couple of seconds of waiting, the system will notify us of the successful completion of the operation, and the user will be added to the system. If you want to make it an administrator, add one more operator (if the command does not work, try specifying the English administrators instead of the Russian word Administrators):

Now the user we created will appear in the system. And it will not just appear, but will receive administrator privileges.

Create a new account through " Local Users and Groups "
There is another option for creating a new user in Windows 10, let's take a closer look at it.
Important: the method is applicable only on Windows 10 Pro and higher - there is no Group Policy Editor in the home version.
- Initially, we launch the utility itself - we will do this through the "Run" program. To launch it, use the Win + R hotkey combination. When the window opens, enter the command into it msc and press Enter.

- When local users and groups are open, select the "Users" folder on the left side, then right-click on an empty space and select "New User".

- We indicate the name of the new user, his password and password repeat, and then click on "Create".

As a result, the user will be created - you can see it right here.

- If we want to give the account administrator privileges, we right-click on its name and select "Properties".

- Go to the "Group Membership" tab, select the user you want to make an administrator, and click the "Add" button (it is indicated by the number "3" in the screenshot).

- In the window that opens, in the empty field indicated by the number "1", enter the word Administrators and click "OK".

Done. The user is now given administrator privileges.
Using control userpasswords2
For the sake of completeness, consider another method for creating a local windows 10 account. Take the following steps:
- As in the previous case, run the Run utility using the Win + R keyboard shortcut, enter the words in the window that opens: control userpasswords2 and press Enter.

- In the next window, click on the button labeled "Add" - its name speaks for itself.

- Here you can select the type of account to create. We, similar to the previous options, will make a local academic record, but you, if you wish, can bind it to Microsoft. When the choice is made, click on "Next".

- On the next screen, Windows 10 praises Microsoft accounts and scolds local accounts - you still have a chance to change your mind. In our case, the answer is no: we choose a local account.

- Enter the account name, password and hint to it, and then click on "Next".

- The user is created, we just have to click on "Finish".

- By tradition, we will tell you how to give a new account administrator rights. To do this, select it and click on the "Properties" button.

- Go to the "Group Membership" tab and switch the trigger to the position marked in the screenshot with the "2" button. At the end we press OK.

As you can see, the new user is now the administrator of the computer or laptop.

In this article, we looked at how to add a user in Windows 10 in different ways. If you still have questions on the topic, ask them in the comments and we will give you an exhaustive answer as soon as possible.
Video about how to add an account toWindows 10
For some, having their own personal computer is a luxury. It is not uncommon when more than two people use a single computer in the house. But there is information that is better hidden from strangers. That is why the operating system from Microsoft has the ability to create several owners of a computer and set a password for any of them individually. Thanks to this, each person can store their own documents in specific folders that other people cannot get into.
Quite often, several PC owners are already present on purchased personal computers. The reason for this is to limit the ability to access data. When customers walk into a store and test laptops, they might download malicious software on purpose. That is why a new person is created in the operating system without administrator rights, where the person does not have the ability to delete, edit and install files.
User additions via Start
You must go to Start and, using the item "", find a section with a list of all PC owners. This section has a subsection of family and other accounts. This is where you can create a new person to control your computer. When adding a new PC owner, you must fill in the name and come up with a password.

Adding a user via the command line
To display Command line you need to right-click on the menu Start and select the Command line item. Be sure to run it as administrator. It serves to perform various actions by a personal computer using specially developed commands.
IN Command line you need to enter the command net user Admin password / add where Admin is the name of the new person using the personal computer, and password is the password. If everything is done correctly, then in Command line the message “Command completed successfully” appears.
Adding a user through the Control Panel
Of course, any setting in the Windows operating system is solved through Control Panel... You must select the item "", the tab " Control Panel"And find the section" user accounts».

The Users tab will have an Add button. After that, it will be possible to add a new person, but it is worth deciding which account you need to create:
- microsoft accounting;
- local accounting.
When new microsoft account is created, the owner will be able to use the standard Windows store, automatically update standard applications and synchronize software applications.
When local recording the owner of the personal computer will be created, a new owner of the PC will appear in Windows 10. This method is recommended for those who already have a Microsoft account and just need to differentiate access rights on their own computer.
If you choose either option, the PC owner will have to enter an account name and generate a password to log into the system.

Adding local users
The Win + R key combination will display the " Execute", In which you must enter the command" ". Click OK and see several folders in the window that appears: “ Users"And" Groups". In groups, rights are created to files and folders on a computer for various accounts. Here you can set up full access to all files and folders on your computer, or prohibit this person from most operations, such as editing, installing and deleting new files. In folder " Users»All local records of the computer owners located in Windows are present.

By clicking on the folder " Users", Using the right mouse button, select the operation" New user". Next, you need to come up with a name for the new owner and generate a password. If you want the Windows user to have full access to all files and folders in this operating system, then you need to go to the folder " Users", Select the created user and in the" Group memberships»Set the value to administrator. Then the new user will be able to fully manage the files and folders of the PC, installing various new programs, deleting old ones, editing the data and making all the permissible system settings.
Adding new users to the Windows 10 operating system is not significantly different from other operating systems. Similarly, through Control Panel it is possible to create new accounts, both in the eighth version and in the seventh.
Related Videos
Like almost all previous versions of Windows, it is a multiuser OS. This means that one Windows 10 computer can be used by multiple users, each user has their own desktop settings, user profiles, etc. Windows 10 also has three types of user accounts (administrator, standard, and kids), giving varying degrees of rights and OS control to users.
However, when it comes to adding new users to Windows 10 (especially when compared to older versions of Windows like Vista and Win7, although the process is pretty much similar to Windows 8), things are a little different.
How to add a new user to Windows 10?
Adding a new user to Windows 10 is pretty easy, you just need to dig a little through your PC settings. So:
Step 1: Run attachment H pC settings, select Users and accounts in the left pane.

Step 2: Next select Other users in the left column. Now some user management options will appear in the right box. D to get startedpress Add user.

Step 3: Now you have the account creation screen. Here you can choose whether to link the new user account to an existing Microsoft account (required to sync apps, settings, etc. across different systems), or create it as a local account. Click on Further,how did you decide from Choice.

Step 4: The next step is to provide the credentials (username, password, etc.) for the new user account. Enter information and click Furtherto complete the settings.

Step 5: Everything! You have just added a new user to Windows 10. As an administrator, you can always control and change important settings related to standard accounts and children. IN Any time myou can change the type of account (administrator, standard, or child).
Conclusion
Windows 10 has a redesigned but much easier way to add new users. You can easily add and manage multiple user accounts, change account types, and more.
Leave your comment!
In today's instructions, we will consider how to create a new user on Windows 10 using all the methods available in the operating system. We will also look at ways to give it administrator privileges or do the opposite - turn an account into an account with limited rights.
Most likely, all Windows 10 users are familiar with both types of accounts, from under which you can work in the "tens" environment. The first are local user accounts, which are no different from the accounts of previous editions of the operating system. The second are Microsoft accounts that require registration on the operating system developer's site. With such an account, all parameters will be regularly synchronized with those stored on the server of the software giant.
If you don't want Microsoft to store all your account data, or vice versa, if you want to use the privileges of a Microsoft account, in Windows 10 there is the possibility of turning one type of account into another in any direction.
Unlike previous OS editions, where accounts were created and edited through a special Control Panel applet, in the top ten its functionality actually replaces the "Settings" section of the menu, which is called "Accounts".
1. To gain access to the "Parameters" menu, use the "Win + I" hotkey combination.
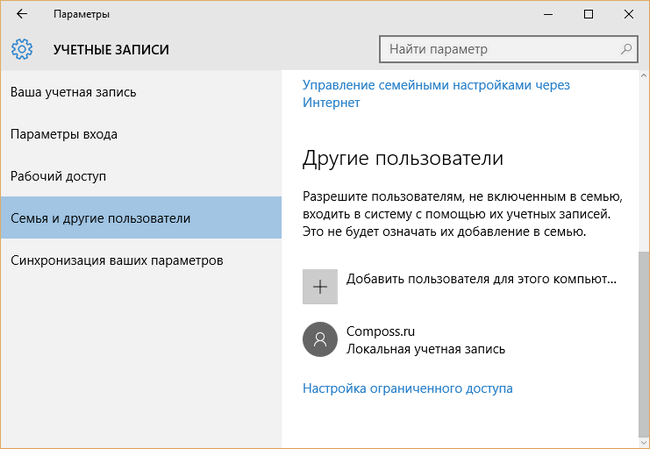
2. Go to the "Accounts" section.
3. Activate the tab "Family and other users" located in the vertical menu.
The first section, "Your Family", if you have a Microsoft account, will allow you to create accounts with limited rights for other family members, such as children.
The next section provides options for creating a local account with administrator or normal privileges. We will consider this option below.
4. We go down to the bottom of the right frame and click on the icon for adding a new user for this computer, located in the "Other users" section.

5. If you do not intend to create a Microsoft account (or want to get one, but do not yet have an email address for it), click on the link at the bottom of the window "I do not have login information for this user."

After that, a new window will open with a proposal to create a Microsoft account.
6. If you want to create it, fill out all the forms and click "Next", otherwise follow the link "Add a user without a Microsoft account", which is located at the bottom of the window.


In Windows 10, any new user has normal (limited) privileges. To obtain administrator rights on a computer, you need to take several steps.
- We go to the subsection "Family and other users", located in the "Accounts" section of the "Options" menu.
- In the lower part of the right frame of the window, we find the desired user and click on his icon or name.
- Click on the "Change account type" button.
- In the drop-down list with account types, select "Administrator" and click "OK" to save the new parameters.


Creating a new account via the command line
There is also an easier way to get an account in Windows 10. To do this, we will use text commands executed through the command line.
Note that all actions will be similar to the first option, with the only difference that the commands will be executed in text mode.
To be able to create and edit existing accounts, you will need administrator privileges.
1. Run the command line with extended privileges, for example, through the search bar.

2. Enter a command like "net user UserName Pass / add" and run it by clicking "Enter".
Here UserName is the name of the new account, Pass is the password for authorization in the system.

After completing all the steps in the Windows 10 environment, a new account with limited privileges will appear. To give it administrator rights, run the following command in the command prompt window: "net localgroup Administrators UserName / add".

For people using an unactivated or unlicensed copy of Windows 10, it is recommended to replace the word "administrators" with its English equivalent "administrators" in case of an error.
Creating a new account through the MMC snap-in
Back in XP, a system console appeared with a variety of snap-ins for creating system management consoles. One of them is the Local Users and Groups item.
1. Launch the tool using the "lusrmgr.msc" command executed in the search bar or in the "Run" window (run by "Win + R").
2. Open the "Users" directory.
3. Call the context menu of the free area of \u200b\u200bthe right frame and select the "New user" command.

4. Fill in all the forms and click "Create".

5. Call the "Properties" of the newly created account through the context menu of its icon / name.
6. Go to the "Group Membership" tab and click "Add".
7. In the field for entering object names, enter “Administrators” and save the parameters.
 The selected User now has administrator privileges.
Command "control userpasswords2"
The last method to get an account in Windows 10 is to run the command "control userpasswords2" in the "Run" window.

Click "Add".

All further operations will be similar to the first of the considered methods of adding an account in Windows 10.

You create a new account during the installation process. But what if you want to add additional local accounts? Read on and we'll show you how to do it.
Why do you need to do this?
Millions of Windows users never create additional accounts on their computers, but use their primary accounts with administrative privileges. As practice shows, this is not secure, and users would need to get rid of this habit, or be lazy to create a new account, whatever you like.
Creating a secondary, non-admin account for yourself and additional accounts for your children (so that dubious downloads from malicious sites don't infect your computer) is a great idea and one of the important things that significantly increases the security of your machine.
You might prefer the online and synced features of Microsoft's online account, but we found many of the benefits of a local account that lacks the online bells and whistles and potential privacy concerns. A standard local account is great for people who don't want to associate their personal information with Microsoft, and it's also perfect for kids who don't need add-ons (and may not even have an email address to link to an account).
Let's take a look at the process of creating a secondary account in Windows 10.
How to create a new local user account in Windows 10
The first step is to access the Accounts menu. To do this, click on the search icon to the right of the Start menu and type "Accounts."
Select "Add, change, or remove other users" from the search results. Clicking on it will open the Accounts menu, as shown in the screenshot below. Alternatively, you can go to Start -\u003e Settings -\u003e Accounts, then select "Family and other users" to get to the same menu.

Select "Add a user for this computer". Microsoft has made it so that in the process of creating an account, you will be greatly carried away towards the online account instead of the local one. So let's be careful.

Ignore the prompts for your email or phone number. Instead, click on the link at the bottom of the window: "The user I want to add does not have an email address."

Since we don't have an email address, Windows will prompt us to create an online account. It is logical. But as we said, Microsoft is quite persistent that we create an online account instead of a local one, and suggests creating a new email address via @ outlook.com. But ignore this information and click on the link below "Add a user without a Microsoft account."
If anyone remembers, in Windows, ten years ago, the account creation screen looked very simple: just a username and password and nothing more. But now, as we can see, everything is different .. And you enter your username and password and click the "Next" button.
After clicking the Next button, you will be taken back to the account settings screen, and now, you can see the new account. By default, limited rights are set for the local account (there is no way to install applications or make administrative changes on the machine).
If you have a good reason to change the account type to a type with administrative privileges, click on the account, select "Change account type" and set "Administrator".

Alternatively, you can select Remove to remove an account that no longer needs to be present. If you need to make more changes (like child accounts or parental controls) be sure to check out for a closer look.