How to connect a Tricolor receiver?


If it is not possible to connect conventional cable TV, people install satellite TV. One of the best companies providing this service is Tricolor.
However, for your TV to show satellite TV, you need a receiver. But not everyone knows how to properly connect a receiver from the Tricolor company and how to set it up.
Connecting the Tricolor receiver
Receiver connection can be conditionally divided into three options:
- Analogue high frequency connection.
- Connection via analog low frequency connectors.
- Connection via other outputs.
All three options have their own pros and cons. Let's consider each one separately.
Analog high frequency connection
This is the easiest way to connect. It requires only one antenna cable, which is inserted into the LNB OUT on the receiver, and into the LNB IN on the TV. However, this connection option is the worst option of all, because the picture, picture and sound quality will be very low, at the level of conventional television of the previous generation.
After connecting, it remains only to find TV channels through autosearch.
Connecting via analog low frequency connectors
These connectors include three:
- SCART connector. It is connected using a special SCART cable that is inserted into the desired socket in the receiver and TV. At the same time, the picture quality will be slightly better than that of the analog high-frequency connector.
- RCA connector. Or in our "tulips". This is the easiest and most affordable way to connect. You just need to insert tulips into the connectors of the desired color in the receiver and in the TV. Tulips divide the signal into three - image, left and right audio channels. Thanks to this, the picture and sound on the TV will be better. In the TV settings, you must select the desired input.
- YPbPr connector. These are the same tulips, but they are connected to the connectors labeled "component videoout". These connectors are not always present on the receiver and TV. But if they are, then the quality of the picture and sound will be higher than when connected via an RCA connector. In the TV settings, you also need to select the desired input.
These connectors outperform analog high-frequency connectors in quality, but are inferior to high-quality connectors from the next section.
Connection via other high quality connectors
High quality connectors include:
- S-Video connector. To connect to this jack, you need an S-Video cable, which can be purchased at any hardware store. It is inserted into the correct socket on the receiver and TV. The quality of the S-Video connector is slightly better than the YPbPr-type connector, but the difference is very difficult to notice. The advantage of this connector is that it is available on any receiver, unlike the YPbPr-type connector. However, it transmits only an image, and an additional input is used to transmit high-quality sound.
- SPDIF output. Used to deliver high quality sound to home theater speakers or TV. An optical SPDIF cable is used for connection. Often, video is transmitted via an S-Video cable, and audio via an SPDIF cable.
- HDMI connector. Today's best way to transmit audio and video signals to television. Has the best image and sound quality. For transmission, an HDMI cable is used, which is connected to the necessary connectors on the TV and receiver. However, the cable is quite expensive.
After installing the receiver, you need to set up your TV to receive video and audio signals correctly.
Setting up the Tricolor receiver
After connecting to the TV via the receiver wires, you need to insert the smart card into the receiver's connector and turn it on. The first time you start, you need to set up the receiver correctly.
A receiver is a device that sends signals from a DVD player to the television. Both video and audio signals are processed by the receiver before entering the TV and speakers, respectively. In this article, we will analyze how to connect your existing receiver to your TV.
For the best signal quality to the TV, connect the receiver with just one wire. In this case, you can switch all signal sources on the receiver itself. On the TV, the power button will remain pressed.
The best way to connect to the receiver is with an HDMI cable. You connect one end of such a cable to the socket on the back of the TV, and the other to the output on the receiver. Such a cable not only improves the quality of the transmitted image, but also allows the transmission of audio signals.
If your TV or video player has a component output (which is common), then you can connect the receiver using the component wires. In any case, no matter what wires you use, do not forget to look into the operating instructions - there should be a receiver connection diagram.
Connecting the Tricolor receiver to a TV

Connecting the Tricolor satellite receiver to the TV is slightly different from the diagram disassembled above. Such a receiver can be connected with an antenna cable. To do this, we connect the receiver through the antenna cable through the antenna jack on the TV. We turn on the receiver and TV. The channel number will be displayed on the display of the receiver. Then on the TV remote you should press "0" and start channel search. Scanning should automatically stop at the frequency of your receiver. “No signal” should appear on the TV screen, indicating that the receiver is connected correctly.
Another way to connect the Tricolor digital receiver to an LCD TV is to use a Bell or Scart cable. We connect the receiver to the TV with the appropriate cable. Then we turn it on. The channel number should light up on the receiver display. On the TV remote, press the A / V button to enter video mode. Then you will need to select the required connection connector in the menu. On the screen, as in the first case, the message "No signal" will appear.
If there is no inscription, or it does not look as it should (in the instructions and on the Internet you can see exactly how the corresponding inscription should look on the TV screen), the receiver is not connected correctly, and the TV does not see the desired signal. Then you should press the buttons "0" and "1" on the remote control simultaneously.
As soon as the signal from the satellite is caught, the Tricolor TV information channel will show a picture. At the bottom of the screen, information about the enabled channel will appear. You need to press the "i" button twice on the receiver's remote control to see the "Signal quality" scale and the "Signal strength" scale on the screen. It is on these scales that you will be able to orient yourself when you start looking for a signal from a satellite.
Tricolor TV satellite television has come to many homes in our country. Their sets are in a well-deserved and constant demand among the population due to the high quality of the signal, low cost and ease of purchase via the Internet. After you purchase a satellite dish and a receiver, you can order the service of a full range of works on the installation of the Tricolor TV set from a specialized company. In this article, you will learn how to independently install, connect and fully configure the Tricolor TV satellite system.
Assembling the kit
Even a person who is completely unfamiliar with the technique can independently assemble the purchased kit. If you decide to independently install and configure the dish and the receiver, we advise you to study the instructions and remember the names of the components of the satellite dish. You should also understand exactly where and how the Tricolor TV receiver is connected.
Prepare a TV cable with plugs. The first step is to place the converter in the holder.
Pay attention to the connector, it should be directed downward so that rain drops do not flow into it.
The mounting sleeve must be securely fixed to the converter working area. Before installing the antenna, we advise you to check and tighten all the bolts again. In order to correctly tune the head and find the exact direction to the Tricolor TV satellite, this will have to be done more than once during the installation process.
Antenna mounting
To obtain a high-quality image on the TV screen, coming through the receiver output, it is necessary to fine-tune the antenna to the Tricolor TV satellite and the absence of visible interference on a straight line mentally drawn between them.
Before proceeding with the installation, carefully read the documents of the equipment set and find the name of your set there: "Center" or "Siberia".
The saucer must face due south and must be attached exclusively to an outer wall or mast. In no case can it be installed between high-rise buildings or trees, covering an imaginary axis drawn between the plate and the satellite.

If it was decided to independently install the receiving device on the outer wall of the house, then the bracket should be fixed with reliable anchors. If this rule is not followed, strong winds can tear off the mounts and the antenna can cause a lot of trouble. The mounting location should be chosen from a simple calculation: as close as possible to the location where the receiver is installed.
Even when using a double-braided cable with a thick copper core, this distance is limited to one hundred meters. If it is impossible to install the kit so close, we recommend purchasing and setting up an additional amplifier. The process of acquiring it is not complicated, it is usually available in any store selling television equipment.
After the purchase, the antenna is first assembled and installed on the already fixed bracket. We clean the television cable from the top layer of insulation at both ends by one and a half centimeters. In the direction from the end to the middle, carefully wrap the shielded braid and screw the F-connector onto the freed part. We leave the main copper core protruding two millimeters beyond the connector, bite off the rest with pliers. Now you need to connect the receiver with the cable that goes to the antenna converter.
We connect the receiver
There are two ways to connect the Tricolor TV receiver to the TV yourself:
- high-frequency connection with an antenna cable;
- low-frequency connection of the receiver with an ordinary cable with "bells" or a "scart" connector.
For HF connection: plug the cable into the antenna jack of the TV and connect it to the receiver's RF Out. Then we connect the receiver with a cord to an electrical outlet and turn on the power switch. The screen should display "BOOT" and the channel number. Then we start the automatic channel search in the TV receiver and look for a channel with the inscription "No signal", indicating to us that the receiver is connected correctly.

With LF connection: the receiver is connected with a cable with "tulips" or "Scart". We turn on the receiver into the network and wait for the word “BOOT” to appear on the screen, and then the numbers of the channel number. On the control panel of the television receiver, the video mode is set with the "A / V" key. If we see the inscription "No signal", then the receiver is connected correctly.
Next, you need to check the presence of a strong signal from the satellite to the receiver. We try to display any random channel on the TV. The screen will display the channel number, the broadcast from the satellite to the dish and the time. Since the antenna is not tuned, the TV screen will have a blue color over the entire background.
We are looking for the inscription "i" on the remote control of the receiver and turn on this button. Two scales "Signal strength" and "Signal quality" should appear on the screen, according to which the settings should be set, and then we will independently adjust the satellite dish.
Customization
The last important stage of work required to obtain a high-quality image on the TV is the correct setting of the satellite dish and the Tricolor TV receiver. You can do this yourself, keeping the antenna pointing strictly to the south. It is advisable to carry out further actions to establish signal reception from the antenna together with family members or any assistant.
Put it in front of the TV and wait for commands from it about the result on the screen, independently and gradually turning the satellite dish up and down an inch, right and left.
The presence of a neighboring antenna "Tricolor TV" greatly facilitates the setup. Just copy its direction and slope, achieving the most complete filling of the fields of both scales on the screen.
You need to start adjusting the signal from the vertical position of the dish mirror, gradually moving it in the horizontal plane. We look at the screen: if both scales are full, it means we have caught a good signal. Soon, a high-quality image appears on the television receiver. If only one scale is full - the signal does not come from the Tricolor TV satellite, you need to look further. Little by little, independently turning the antenna mirror, first horizontally, then vertically, we adjust the maximum filling of the scales and the highest quality image on the TV screen.

check in
To register the receiver you will need:
- tricolor TV card number;
- receiver serial number;
- the code indicated on the card;
- owner's passport;
- kit installation address.
The easiest way to register your receiver number is through the Tricolor TV website. After filling out a special registration form, your agreement number will be shown in the window and the card will be activated. The agreement can be downloaded from the website, printed, signed and sent to the address indicated on the website by regular mail to the company for signature.
You can register the installation by calling the company phone numbers listed on the site. It will take a little time, and the result will be the same, the contract will be sent to you by mail. The most important thing is that along with the purchase of your favorite TV shows, you get a guarantee for the entire set of equipment! We wish you that self-installation and tuning of the satellite dish and receiver "Tricolor TV" was successful and good mood as a result of watching interesting TV programs!
Tricolor TV, like a modern satellite TV, can be configured without the help of a specialist, saving a decent amount of money. The work front is very laborious, but not difficult if you know the sequence of actions. Below it will be described in detail how to set up Tricolor TV.
What is needed in the work
Before answering the main question, how to set up a satellite dish, you will need to prepare the following working tools:
- wrenches of different sizes;
- puncher;
- screwdrivers of different sizes;
- elements for fasteners;
- insulating tape;
- working level;
- drawing pencil or pen.
Choosing an antenna location
Setting up the Tricolor TV antenna begins from the place of choosing its future installation. The main factor that you should rely on when choosing is the free access of the device towards the satellite, that is, the signal source. In other words, if you visually draw a straight line between the satellite and the antenna, you should not find an obstacle on it in the form of trees and structures on roofs or buildings. This will be the first step towards how to set up the Tricolor satellite dish yourself.
Please note that the closer the dish is installed in relation to your TV, the better signal quality you can be guaranteed. Plus, this way you can set up your cymbal much easier and faster.
Locations unfavorable for antenna installation:
- glazed loggias;
- areas that may be exposed to precipitation in the form of snow or rain;
- gable, gable or asymmetrical roofs;
- places near the spillway.
Assembling the Tricolor TV antenna and installing its main elements
Contrary to popular belief, assembling and tuning an antenna and a dish is not so difficult. To do this, you need to follow the established algorithm of actions and rely on the proposed scheme.
- The massive bracket that comes with the Tricolor package should be securely fixed to the wall. The installation feature and the choice of fastening tools will depend on the wall (load-bearing or main).
- When fixing the bracket, keep in mind that the converter in the holder must be installed downward with it. So, you will protect your Tricolor plate from precipitation.
- Connect the cable and the converter securely with the F-connector. To do this, you will need to free the cable from the top insulation by no more than 10 mm. Then, wrap the cable tightly with braided shield and foil. The inner insulation layer must also be removed 10 mm and the connector tightened as much as possible.
- Prepare stitches and insulating tape in advance in order to install the cable in the arc of the converter holder.
- Sealing is a necessary procedure that must extend over the entire length of the cable. In some cases, you may need silicone sealant.
- Next, fix the antenna to the bracket. Install it so that you can rotate it in different directions at any time.
- At the last stage of assembly, you will again need electrical tape and zip ties, since, in addition to the antenna, the cable must also be fixed on the bracket. If you fasten the cable with a small margin, then this will later make it easier for you to install and repair the device, if necessary.
If you are still wondering how to set up a Tricolor TV antenna without the help of a specialist, then keep in mind that you have already overcome the first and most difficult stage. And as you can see, it was not so difficult to do it. In addition, the procedure for assembling the antenna is universal and does not depend on what you are using and what image format will be displayed on the screen, in particular, the Ultra HD format.
Mounting the TV connector
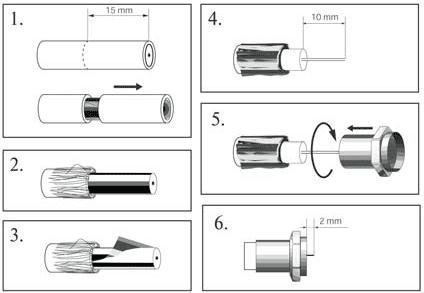
Based on the presented diagram, proceed progressively:
- for fear of damaging the braided shield, remove 15 mm of top insulation from the cable;
- shielding braid, and then, and foil should be located along the entire length of the cable;
- save the cable also from 10 mm of inner insulation layer;
- screw in the connector as much as possible and disconnect the conductor with pliers, which should not protrude beyond the edges by no more than 3 mm.
The video transmitted to the TV using the installed Tricolor dish will directly depend on the quality of your work. Therefore, carefully follow the order of the instructions and make every effort to the process. Setting up Tricolor TV requires progressive action.
Adjusting the Tricolor TV antenna
The more precisely the antenna is adjusted from a geographic point of view, the better the channels will be shown on Tricolor TV. The peculiarity of these manipulations also depends on two factors: the angle of elevation and azimuth. Both quantities are measured in degrees.
The difficulty is that for each individual settlement and region, the indicators can differ significantly. For example, for Bryansk, the elevation angle will be 29 degrees, and the azimuth - 178 degrees. Take this into account when adjusting the antenna.
If you have lost channels for one reason or another, then perhaps the reason for the failure is precisely the incorrect adjustment of the cymbal.
You can determine the azimuth yourself if you know how to use a compass and determine its exact indicators.
Refer to the advice provided by your satellite TV provider with high quality Ultra HD images, and run the cable from the converter to the signal receiver. This will be very easy to do, since you have already completed the installation of the television connector. After that, connect the receiver to the TV and check the presence of the signal and its quality.
Setting the signal "Tricolor TV"
In order to tune free Tricolor TV channels and their signal, you will need to go to the Antenna Settings menu. Next, move the antenna cursor in the plane to such an extent until you get a signal that suits you.

There should be no interference, ripples and small dots, in addition, the sound should be of high quality and perfect.
Please note that if during operation you lost channels, then as one of the options for eliminating the breakdown, you can go to the above menu.
The next step is to open the Received Signal Strength tab.
- Pick up the receiver's remote control and press the "MENU" button.
- Use the arrow buttons, find the "Settings" tab, then confirm the command by pressing "OK".
- For further installation, a password is provided. At the first stage, the provider provides for the introduction of four zeros. You can later change it yourself.
- Next, get to the "System Settings" tab and again approve the command by clicking "OK".
- Enter the Antenna Settings menu and confirm the request.
After you select the antenna installation mode and channel list, determine the satellite that corresponds to your region: Eutelsat 36A or Eutelsat 36B. Find in the tab of the antenna installation menu two scales that characterize the signal level and its transmission to the satellite. If both of them are filled up to the 70% mark, then all your work was done correctly and the channels on Tricolor TV will be shown with high quality.

In the event that the indicators are below the desired level, it makes sense to refer to the cable connection. Perhaps it transmits a weak signal to the satellite, which simply does not pick it up.
Do not forget that your plate is still on the street, you cannot exclude the effect of weather conditions on it. Thunderstorms, lightning, heavy rain, or any other precipitation can affect the signal strength. But it will return to normal immediately after the weather conditions improve.
Video tutorial for setting up
The video clearly presents all the stages of assembly and installation of the Tricolor TV antenna. A visual demonstration allows you to more easily imagine how the work process will look like.
Now you know how to set up Tricolor TV yourself, how to assemble an antenna, how to check the signal strength and what to do if the channels are missing. This will save you money that would otherwise have been spent on customization services.
In contact with
Many users, after purchasing a set-top box, ask themselves a completely natural question: "How to connect a digital receiver to a TV and what is needed for this?" Some models are replete with a large number of connectors, wires and other interfaces that can confuse inexperienced owners in this matter. Nevertheless, despite all the seeming heap of problems, you can learn how to connect a TV receiver to a TV without the help of a wizard.
First of all, let's figure out what it is - a receiver. Basically, the only purpose of a set-top box is to decode various signals: video, audio, digital, analog, and radio. After passing all this information through the main unit of the device, the device redirects them to the TV already in its (correct) encoding. Thus, thanks to the set-top box, you can get rid of the heap of cables in your home. In addition, if there is such a need, you can configure the transmission of channels to multiple devices. Also keep this in mind before connecting two TVs to one receiver.
Connectors
Most TV box models have a large number of connectors and interfaces. Of course, it would be easier to equip the device with one universal output for convenience, but not every home has a TV, for example, with a modern HDMI interface. Yes, such an output is capable of transmitting video and audio signal as correctly as possible, but such models are not cheap and not everyone can afford.
Some people still cannot part with "ancient" TVs, so many set-top boxes are burdened with versatility for the sake of convenience. Nevertheless, it will not be superfluous in any way to clarify the presence of this or that connector / interface for your TV before purchasing a set-top box. Also keep this in mind before connecting the TV to the receiver.
Signal quality
You can count more than a dozen nuances that are responsible for the quality of the decoded image. Here is the source signal from the satellite, which the receiver receives, and the technical capabilities of the interface unit of the device, the type of cable used and much more.
Choosing a set-top box interface should be extremely balanced, taking into account not only the capabilities of your TV, but also the future provider, the type of satellite dish, up to the weather conditions of your region.
So, how to connect a TV to the receiver: interfaces, methods and additional equipment.
Tulip (RCA)
At one time, this interface was the only link between various set-top boxes and the TV itself. It got its name from three tulip-like connectors: white, red and yellow.

Each color represents a specific channel: white and red are audio outputs, and yellow is video. For everything to work as it should, you need, according to the color coding, to connect to the appropriate interfaces by connecting yellow and yellow (Video IN c Video OUT) on the TV and set-top box. Do the same with the rest of the "petals".
One of the main disadvantages of this connection method is the mediocre digital signal transmission, so high definition video will be output with noise (very small ripples). If your TV screen is less than 30 inches diagonal, then the interference is subtle. Obvious problems are visible on devices with a large scan. Keep this in mind before connecting the TV to the receiver using tulips.
S-Video
This interface is required for game consoles and DVD players, but not every TV is equipped with this connector. If we compare the S-Video output and the "tulip", then the first differs in better picture decoding. In addition, its signal frequency is much higher, which means that the output image is more colorful and juicy.

The only problem with the interface is the mandatory presence of a separate loop for playing soundtracks (we buy it separately), so you can't call it universal. Also remember this and check everything before connecting the TV to the receiver via the S-Video-out.
SCART
The "SCART" interface, or, in common people, "comb", is much more versatile, in contrast to the previous options. In order to connect a TV through a receiver with this output, you just need to connect the appropriate connectors, and everything will start working.

The interface, although outdated due to its bulkiness, meets almost all modern requirements: support for stereo sound, S-Video channel and RGB format. This method of connection, in addition to TV set-top boxes, is commonly used on old DVD players.
RF interface
The RF-type interface allows you to connect not only satellite broadcasting, but also cable TV. The quality of transmission through this output does not differ with a good picture, so watching TV programs in high definition has mesh ripples that are already familiar from the tulips, as well as a problem with large diagonals of devices.

One of the main advantages of such an interface is the ability to connect the receiver to a second TV. The only condition that must be strictly observed is the presence of a high-frequency RF modulator and a corresponding output in the set-top box. And not all TV boxes have such components. So keep in mind this nuance before connecting the Tricolor receiver to the TV, because many devices from this provider are deprived of such a technical capability.
YPbPr and YCbCr interfaces (component)
These outputs carry high frequency signals similar to the tulip. Unlike the RCA interface (3 lobes), the component system (5 lobes) allows you to decode signals with high fidelity and the same quality. That is, with the help of such a connection, you can view video in Full HD with the proper comfort.

The only difference between the YPbPr and YCbCr component interfaces is the decoding system, where in the first case it processes an analog signal, and in the second - a digital one.
The connection is as follows: green, red and blue "petals" (aluminum) are connected to the corresponding outputs on the panel marked "Video", and the other two - white and red (plastic) to the platform with "Audio".
The green cable is responsible for the synchronization of the image and the brightness level. The red "petal" transmits the inter-level difference in brightness and red, just like a blue cable. A two-pin RCA interface is responsible for the output of the audio signal.
HDMI
HDMI is the most modern and versatile method for connecting a receiver to a TV. The set-top box, as well as the TV, equipped with these outputs, is able to reproduce images in high quality and with amazing clarity.

This type of connection is suitable for absolutely all TVs with any diagonal that have a similar connector. In addition, the HDMI interface is capable of simultaneously digitizing both audio and video streams, so you do not need to connect anything additional for correct operation. All you need is one single cable.
Summarizing
Before buying such a far from cheap thing as a receiver, be sure to check the availability of certain outputs on your TV. If you have a new model, then for sure it is equipped with an HDMI interface, which means there will be no problems with the connection, as well as with the image quality.
In second place are the component tulips for analog and digital signals - YPbPr and YCbCr. Slightly worse than HDMI in terms of connection, but nevertheless the output picture pleases the eye in the same high Full HD quality.
The third and fourth places are taken by the SCART and S-Video interfaces. The main thing here is not to overdo it with the screen size, otherwise small ripples will be noticeable in high-resolution pictures.
The fifth and sixth positions went to the RF and RCA connectors ("tulip"). The quality of the decoded signal on these interfaces is noticeably lower than on the others: low audio bitrate, slightly "blurry" picture and finicky connectors for certain TV models.
You should also remember that before connecting the set-top box to the TV, you need to follow the following rules:
- Be sure to disconnect all appliances from the mains at the time of connection.
- Study the manual carefully, especially the "Connection" item.
- Based on the second point, strictly follow the sequence of actions performed.
- Use normal cables (branded RG-6), not Chinese thin knockoffs.
- There is no need to use long cables as this directly affects the image stability.
After you have connected the receiver, it will be superfluous to double-check everything (whether the cables, markings, etc. are tightly seated), and only then turn on the equipment.