in front of you detailed step by step instructions about how to flash a Xiaomi MiPad 2 tablet. Our editors have chosen the most suitable method for flashing this Xiaomi model. If this instruction fails try flashing with another method: TWRP Recovery, ROM Manager, Fastboot or classic OTA.
A warning! After flashing the device, all your data from the internal memory will be erased, so in order to save your contacts, settings and applications, first save all the data from the tablet.
Installing the system using CWM Recovery 1. Charge your flash tablet at least 80%. 2. We save from a flash drive, sim card and tablet memory all the data that cannot be lost. Simka (if any) can be pulled out. 3. We place the necessary firmware in the memory of the tablet. The firmware file must be in archive format zip. You can select and download the firmware. 4. All Xiaomi tablets have Recovery from the manufacturer, so we change it to ClockWorkMod Recovery. We do it according to the following instructions: Install the app from Google Play on your tablet. Launch it and grant Root rights. If there are no root rights on the tablet, we get them by. Select "CWM Recovery" from the list of options.
  The application will then show a list of available Recovery. In the example, Rashr showed 2 options: ClockworkMod with support for tapping the screen and the classic version (controlled by the volume and power buttons).
  You will be prompted to download. Click Yes.
  Then the download of the CWM Recovery image for the tablet will begin.
  A notification will appear that the firmware was successful and you now have a modified recovery installed. We immediately go into it, for this, click "Yes".
  Ready. If you already had ClockworkMod Recovery installed, then simply enter it by holding any of the combinations for 3-5 seconds: - Volume up + power button - Volume down + power button - Volume up / down + power button + "Home" - Volume up + volume down + power button 5.
Movement in the Recovery menu is carried out using the volume buttons, and confirmation of the selection with the power button. Before installing the firmware, you must first reset the settings. So choose from the menu wipe data/factory reset.
Ready. If you already had ClockworkMod Recovery installed, then simply enter it by holding any of the combinations for 3-5 seconds: - Volume up + power button - Volume down + power button - Volume up / down + power button + "Home" - Volume up + volume down + power button 5.
Movement in the Recovery menu is carried out using the volume buttons, and confirmation of the selection with the power button. Before installing the firmware, you must first reset the settings. So choose from the menu wipe data/factory reset.
 6.
Next, simply confirm that you agree to reset: Yes - Wipe all user data.
6.
Next, simply confirm that you agree to reset: Yes - Wipe all user data.
 7.
Now in the main menu of the Recovery, select install zip.
7.
Now in the main menu of the Recovery, select install zip.
 8.
After that select Choose zip from /sdcard.
8.
After that select Choose zip from /sdcard.
 9.
Navigate to the folder where you saved the firmware zip file and select it.
9.
Navigate to the folder where you saved the firmware zip file and select it.  10.
You will be prompted to confirm the action. Select Yes - Install....
10.
You will be prompted to confirm the action. Select Yes - Install....
 11.
The firmware installation process will begin and the inscription will appear at the end Install from sdcard complete.
The firmware is finished. We return to the main menu of CWM Recovery and reboot the tablet. For this we choose reboot system now.
11.
The firmware installation process will begin and the inscription will appear at the end Install from sdcard complete.
The firmware is finished. We return to the main menu of CWM Recovery and reboot the tablet. For this we choose reboot system now.
 12.
Ready. The tablet will start downloading from the already installed firmware. Other materials
12.
Ready. The tablet will start downloading from the already installed firmware. Other materials
The iOS operating system is constantly being improved. Bugs are fixed, new features and capabilities appear. For the good functioning of the device, it is necessary to periodically install new software. This will allow your gadget to use updated or new features. Often, users have difficulties with the firmware procedure on the iPad 2. But if you are familiar with this procedure, the difficulties will be minimized. Let's look into the intricacies of this issue.
You might think that it could be easier than doing a tablet restore through iTunes. If you look at the general algorithm, nothing complicated, everything is clear. But, nevertheless, for many it causes difficulties. Separately, we can highlight the difficulty of transferring the gadget to DFU mode. In addition, it does not yet have a graphic display on the display when activated. At the same time, it is important and necessary to understand what is the difference between the processes of updating the OS and its recovery. These concepts can also cause user confusion.
Update
During the update, the iOS firmware version increases, while the data of the owner and all the applications installed by him are preserved. It is not necessary to make a backup copy before performing the upgrade, but it is recommended. Indeed, in the course of work, failures can occur. Sometimes the only way to fix software failures is through disaster recovery.
The easiest way to update is to download the necessary files directly to the tablet itself. This can be done if you have a good Wi-Fi connection signal. To install, you need to go to the settings and go to the "basic" section. Here you will have access to the item "software updates". Open this item and act according to the proposed instructions.
Press the "install" button. Next, you will be asked to read the terms and conditions. Be sure to read these documents. By clicking "accept" you agree to them. After that, the updates will be automatically installed. This method has its advantages, because it does not require the use of a computer and iTunes. Update files are usually 50 to 150 MB in size. And yes, you don't have to do anything.
The update method through the iTunes program is almost completely identical to the restore process. In order to implement it, you need to download the iTunes program from the official website, install it. Next, use the USB cable to connect the tablet to the PC. Use only original accessories, this will allow the device to transfer data faster and work longer. Open the program. The iPad icon will appear in the upper left corner. You need to click on it.
A window will open where you will be prompted to update or restore the firmware. To start the update, you need to click the button of the same name. Upon completion of this procedure, all your personal information will be saved. The process itself will start and end automatically. At the end of the procedure, disconnect the tablet from the PC.
Recovery
Increases the OS version while deleting all personal information of the owner, since all settings are reset to factory settings. This procedure is usually done if there are any software failures, in order to install the latest current iOS firmware in order to get a cleaned system and start everything from scratch. This procedure is performed when you want to transfer your iPad 2 to another user or intend to jailbreak the gadget.

A common question when changing firmware: is it possible to downgrade iOS? The answer is no. Apple officially allows the installation of only the latest released version. However, there is a small period of time (about two weeks) which is called the "time window". This is the period when a new firmware version is released, when you can still install the previous version.
It is also possible to return to the latest official iOS from the beta version of the OS. In addition to these features, hackers often release software that allows you to downgrade the iOS version. For example, RedSn0w or TinyUmbrella. But, most often, such a rollback can only be done on older versions of the iPad and iPhone.
If your iPad Mini 2 has been jailbroken, don't use recovery. You have a Cydia icon on your desktop. Recovery will start the process of "eternal apple" or "loop of eternal recovery". This means that any device will not be able to boot normally.
If for some reason you still started the recovery, then you can bring the tablet back to life using recovery through the iTunes program. Before you restore, make a backup copy of your personal data, because. upon completion of the process, the data will be deleted.
Flash iPad using iTunes
Flashing is carried out in two ways: through the normal mode and through the low-level DFU mode. In order to carry out this process through the use of normal mode, you must download and install the latest version of iTunes. You can find it on the official Apple website.
On the official website, you can find the latest official version of iOS for your tablet. Now you need to click on the settings icon and go to the "iCloud" section. Here you need to disable the device search function. It is not necessary to do this if you are going to flash the iPad 2 yourself. If you are giving the gadget to a repair service, then in order not to transfer your personal data (Apple ID login and password), disable this function in advance.
Now you can connect your tablet via USB cable to your computer and open iTunes. The program will automatically recognize the gadget and an icon in the form of a tablet will appear in the upper left corner. Click on this icon, a workspace will open in front of you. If you are using Windows, then hold down the Shift key and click on the "restore" button. If you're using a Mac, hold down the Alt key and the Restore button.
A window will open in front of you in which you need to find the downloaded firmware file. Select it and click the "open" button located at the bottom of the window on the right. This will start the device recovery process. After you click on "recovery" all your personal data will be deleted.

Firmware for iPad through DFU mode is also not a complicated procedure. To work, you also need the latest version of iTunes. You can download it on the official website, it is available for free. Also download the latest firmware for iPad 2.
Next, click on the settings icon and go to the "iCloud" section. Here you need to deactivate the iPad search function. It is not necessary to do this. If you're doing the restore yourself, you'll enter your Apple ID when prompted. If you will be restoring your tablet at a repair service, disable this feature so that you do not share your personal data with others.
Now you need to put the tablet into DFU mode. Connect the tablet to the computer using the original USB cable. There are two ways to activate DFU Mode:
- Simultaneously hold down the two keys "Home" and "Power". Hold them for about ten seconds. You can count to ten in your mind. As soon as ten seconds have passed, press the "Power" key while continuing to press the "Home" button for about twelve more seconds.

- The second method is considered more correct. For an inexperienced user, it may be more difficult. Turn off the gadget completely and wait a couple of minutes for all processes to complete. Now hold down the "Power" button and count to three. Then hold down the "Home" key as well. Keep them pressed for ten seconds. You can count or count up to 10 in your mind. Then press the "Power" button and hold down the "Home" key for a couple more seconds.
Nothing should be displayed on the tablet screen. If a logo or "lace" appears, it means that the mode has not been activated. You need to try again. Do not be upset and do not panic, few people succeed the first time. When this mode is activated, iTunes will automatically send you a notification that a device is connected in "disaster recovery" mode. An iPad icon will appear in the upper left corner.
Further, if you are using Windows, then hold down the Shift button on the keyboard and press the "restore" key. If you are using a Mac, press the Alt key and at the same time click on the "recovery" button. A window will open in which you need to find the downloaded firmware file. Specify it and click on the "open" button. It is in the lower right corner. A tab will appear on which you need to click "restore". The process will start automatically, as a result, all user data will be deleted.
Before using DFU mode, try to make the firmware in a softer Recovery mode. It allows you to do a hard reset and reflash the device. This mode works at the operating system level. To activate it, you will need to connect the USB cable to the tablet, but do not connect it to the Computer yet. Now turn off the gadget and wait a couple of minutes for the complete completion of all processes.

Next, you need to press the "Home" key and, without releasing, connect the cable to the PC. After a while, the display will show a connection cord and a logo in the form of a melody. After that, you can press the key. Next, you need to open iTunes on your PC and flash it.
Jailbreak iPad Recovery
Tablets that have undergone a jailbreak procedure cannot be restored by conventional methods. This will lead to what is called the "eternal apple" or, in fact, an endless renewal from which there is no way out. In order to restore jailbroken devices, a utility called Semi-Restore was invented. It is distributed free of charge.
This program is able to reset the settings to factory settings without changing the firmware version while not deleting the Cydia application. Using the app is easy. You need to download it, open it and connect your gadget. After that, click on the "SemiRestore" button on the screen. This program is supported by Windows and OS X.
It is not always worth resorting to this application to fix system problems. For example, if Safe Mode often appears , then you can fix this problem by reinstalling the Mobile Substrate package in Cydia . After using the utility, nothing superfluous will remain on your tablet, whether it be repositories or personal data, so before the procedure it is better to make a copy of personal data through iTunes.
If you use this utility, be sure to close Xcode and iTunes. The utility also supports iOS from 5.0 to 6.1.2. While using this program, the tablet reboots several times, so don't worry, this is normal.

Restoring an iPad with SHSH
This method is suitable for older versions of gadgets. Many tablets do not support this method (these are models 4, 3, 2 and those with an Apple A5 processor). To make the firmware you need to use the TinyUmbrella application. First, download and install the latest version of the iTunes program. Now you need to find and download Java.
On the official website, find and download the required version of iOS OS. Now find and download a utility called TinyUmbrella . When you open the utility archive, you need to move its contents to a folder called "programs". Now open the utility.
In the window that opens, find the section called "Advanced" and go to it. You need to check the following boxes: “Save All Avalable…”, “Request SHSH…”, “When connecting a device…”. In the remaining paragraphs, you need to uncheck the checkboxes, if they are placed. Next, there are differences for Mac and Windows users.
For Windows
If you prepared SHSH hashes in advance, then through the use of "explorer" go to your home daddy. Add "\.shsh" to the line with the path. Then press the Enter key. So you went to the folder where the hashes are located. Here you need to copy the hashes that you prepared in advance. If you have not saved anything in advance, then do the following.
Connect the tablet to the PC and specify the TinyUmbrella utility in the sitebar. In the workspace, find the section "Log ' and go into it. There will be a button "Save SHSH “It needs to be pressed. Next, you will be presented with information about the presence or absence of hashes in Cydia. If the "log" is marked in red, then there are no firmware for it. The mark is green, which means that there is a firmware.
If the required file is available, click the "Start TSS Server" button. TinyUmbrella Program must be open while the flashing process is in progress, so do not close it. Now you need to simultaneously press and hold the "Home" and "Power" keys for 12 seconds. You can mentally count to twelve.
Now press the "Power" button while holding down the "Home" key. Hold for eight seconds, when iTunes opens the window, release. The window will contain information about the tablet, and offer to restore the firmware. You need to find and click the "check" button. After a confirmation message appears, confirm the request.
Now hold down the Shift key on your character bar if you're using Windows and hit "restore". Here you will need to provide the path to operating system iOS that you previously saved. Next, you need to wait for the completion of all processes and load the gadget in normal operating mode. In TinyUmbrella click on the "Stop TSS Server" button. Ready.
For Mac

If you have prepared hashes in advance, then you need to go to Finder. Now press three keys at the same time: G, Shift and Cmd. A line will appear to navigate to the folder. You need to enter "~/.shsh » in an empty column. Click Enter and you will be taken to the hashes folder. Here you need to paste a copy of the pre-prepared files. If you haven't prepared them ahead of time, move on to the next step.
Now you need to do all the steps described above for Windows users from the moment you connect the tablet to the PC until the moment you press the “check” key. After agreeing, you need to hold down the Option (Alt) key and press "restore". Now you need to wait for the process to complete, and then download the gadget in working mode. In the window of the TinyUmbrella program, click on the "Stop TSS Server" button. Everything, the firmware is done.
Before resetting to factory settings, back up your personal data. This is necessary for their subsequent return to the tablet, because during the reset process, all data that is set by the user is deleted.
During flashing, errors may occur due to which the device may not work. In such situations, try to repeat the flashing procedure. If the repeated actions did not give results, it is better for you to contact the service center for diagnostics and repair. Sometimes when installing a newer version of the OS, the device starts to slow down. This is due to the fact that a more “good” system loads older gadget models more heavily after you have “lived in” them.
In such a situation, optimizing the tablet settings can help. For starters, you can change the parallax effect of the graphics. You can find the regulator in the accessibility settings, which is located in the "general" section. Activate the toggle switch opposite "decrease movement".
Turn off background app updates and automatic content downloads. You can do this in the "iTunes Store and App Store" section, which is located in the settings. Background updates are disabled in the "basic", "content update" section. Disabling unnecessary applications in the "SportLight" section will add speed to the gadget. Remove "heavy" applications that you do not use.
Many users are upset by the fact that the Xiaomi Mi Pad 2 tablets they purchased often have home-made firmware and “crooked” Russification. This is due to the fact that the manufacturer has not yet released the official Russian version of the firmware, and therefore users have to install stock recovery and firmware on their gadgets on their own in order to work with the device as comfortably as possible. If you are one of these users and want to know how to flash Xiaomi Mi Pad 2, read on. Attention! You perform all actions at your own peril and risk and are solely responsible for their consequences.
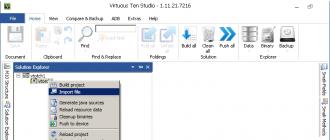
First you need to download and install the program, and then download and unpack and. By the way, if you have Windows 8 and above, you must disable mandatory driver signature verification.
Disable Driver Signature Verification
For Windows 8
- Press a combination of buttons Win+I. On the right they will come out "Parameters".
- We clamp "shift" and press .
- After the reboot, a window will appear "Action Choice". Choose "Diagnostics" -> "Extra options" -> "Download Options" -> "Reload".
After the reboot, we will see the window " Reboot Options » press "F7" and wait for Windows to reboot.
For Windows 7
While turning on the computer, after the BIOS boot stage, we often press F8. Menu will appear "Additional download options". choose "Disabling Mandatory Driver Signing".
P.S: F8 does not always work the first time, so if it doesn’t work out, you can either repeat 2-3 times, or resort to an alternative method.
Open the folder with the drivers and run all the files in turn. If any of the files does not open, you need to do the following:
- Rename it, for example to driver.exe, and move it, for example, to the root folder of the disk so that the file path looks like this: C:\driver.exe.
- Run the command prompt as administrator, and then write the path to the file that was renamed there.

Give gifts
Getting Started with Firmware
After all the steps have been completed, launch the MiFlash program and turn off the Xiaomi Mi Pad 2 tablet. Then simultaneously hold down the power key and the volume down button, and after the logo appears on the screen, release the button power- you will see a picture with a hare in a hat. If the download repeats endlessly, hold down the power key for 10-15 seconds, and when the display goes out, press and hold the volume down button until a hare appears. Now you can release the button and connect the tablet to the PC via the USB cable.
In the MiFlash program, click on Refresh - Select and specify the path to the directory containing the unpacked firmware. At the bottom you will see two options - Clean All And Save userdata. The first option involves a complete cleaning of the tablet, and the second will save some data. But we recommend that you simply make a full backup before starting the flashing, and at this stage do a full cleanup. When cleaning is complete, press the button Flash and wait until the firmware on the MiPad is reinstalled - you will see that the progress bar has reached the end, and in the column result on the right will be the inscription success on a light green background. But the main sign of successful completion will be a reboot of the device.
Ready! We hope that this instruction helped you to correctly flash your Mi Pad 2. If you have any questions or suggestions, write in the comments.
I have to warn you! I, as the author of this article, am not responsible for the actions done with your device! Therefore, I recommend not to flash your Xiaomi MiPad 2 if you do not understand what you are doing.
Now let's get started. How to flash Xiaomi MiPad 2? Our action plan is the following:
- Installing the ADB Interface driver and rebooting into bootloader mode.
- Installing the Android Bootloader Interface driver and unlocking the bootloader.
- Firmware image userdata.img, firmware custom recovery TWRP and boot into it.
- Installing custom firmware on Xiaomi MiPad 2.
All the necessary drivers can be downloaded from this link, and the archive with fastboot, adb, custom recovery (TWRP) and userdata.img from this one.
Installing the ADB Interface driver and rebooting into bootloader mode (bootloader)
To complete this step, we need to enable USB debugging mode on the tablet.
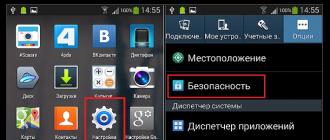
To do this, go to the menu for developers. It's located in Settings - Advanced - Developer options. If it is not there, go to "Settings - About phone" and click 5 times on the inscription "MIUI Version". The message "You have become a developer" or similar will be displayed. And now the item "For Developers" should appear. We go into it and turn on "Developer Mode", "Factory Unlock" and "USB Debugging".

We connect the tablet to a Windows computer and go to the device manager. We find the ADB Interface device and right-click on it - "Update driver". I have an English version of Windows, so everything in the screenshot is in English. But, I think this should not be a problem for you. In the pop-up window, select "Search for drivers on this computer" and in the next menu "Select a driver from the list of already installed drivers."


If not, then select "Install from disk" and specify the path to the folder that you downloaded. After selection, the driver “Manufactured by Google, Inc.” should appear. Model - ADB Interface "- select it. After the operation, in the device manager, you should have an Android Phone device - Android ADB Interface.


Now we need an archive with fastboot, adb, TWRP and userdata.img. Unpack it into a folder and go to its root. Hold Shift on your keyboard and press the right mouse button and select "Open Command Window Here". By the way, do not close the console. We still need it.

In the terminal that appears, write the command adb reboot bootloader, after which the tablet should reboot into bootloader mode.

If everything went well, then the screen of the tablet will show a hare that is poking around in the robot.

If you see the same bunny, this part of our plan is done!
Installing the Android Bootloader Interface driver and unlocking the bootloader
Now we need to install the drivers in the same way as we did earlier, but to work with the fastboot bootloader. We go to the task manager and find our tablet there under the name "Mipad". Right-click and select Update Driver. In my screenshot it is "Update Driver Software" since I have an English version of Windows.

Next, we do everything in the same way as we did above with installing the driver, only now you need to install the driver “Manufacturer - Google, Inc. Model - Android Bootloader Interface". In the pop-up window, select "Search for drivers on this computer" and in the next menu "Select a driver from the list of already installed drivers." Then select "Show all", then click "I have a disk" and select the folder that you downloaded. Specify the required driver.

If something is not clear, see the first paragraph of the plan. There, all the actions are similar, only the device and the driver itself are different.
Now let's go to the open terminal. If you closed it, go back to the folder with fastboot, adb, TWRP And userdata.img and pinch Shift on the keyboard and press the right mouse button and select "Open Command Window Here".
Writing a team fastboot oem unlock.

The following will appear on the tablet screen.

Use the volume rockers to move the selection slider to Yes and press the power button. The following will be output to the console.
If you have the same, then everything is done correctly.
Firmware image userdata.img, firmware custom recovery TWRP and boot into it
Let's flash the userdata.img image. This is necessary in order to avoid error 963 in Google Play. Writing a team fastboot flash data userdata.img to flash the userdata.img image. The following message will be displayed in the console.

In the next step, we need to download the firmware for Xiaomi MiPad 2. Therefore, we write the command fastboot reboot. A scary message will appear on the tablet screen stating that the bootloader is unlocked. To download to android, press the volume up key (Volume UP).

Now download the firmware that you like. Please note that the firmware must be in the form of an archive for TWRP. I chose the firmware from miui.su. You can download it here on this page. After the download is complete, just drop the firmware into the tablet's memory. For convenience, I created a ROMs folder and put the firmware there.

Again we go into the terminal (I hope you didn’t close it), if you closed it, find above how to open it. Writing a team adb reboot bootloader to boot into the bootloader again.
Now we write the command fastboot flash recovery twrp.img for firmware TWRP. There will be a similar message in the console.

Now to boot into TWRP write a command and fastboot oem reboot recovery waiting for download. A message will appear on the screen again that the bootloader is unlocked. Press the Volume Up key. After a while, TWRP will boot.

Installing custom firmware on Xiaomi MiPad 2
In the previous paragraph, we booted into TWRP, and we are required to swipe the slider to allow data modification. After the swipe, you get into the TWRP menu. Next, select "Wipe" and do another swipe.


Now click back 2 times to get to the main menu, and from there go to Install. Go to the folder where you dropped the firmware for Xiaomi MiPad 2 and select it.

After selecting, swipe to install the firmware.

We are waiting for the installation to complete. It took me about 1 minute. So wait for the process to complete. When finished, press "Wipe cache / dalvik" first, and swipe in the next menu to confirm. And after the operation is completed, click "Reboot System".
Hooray! The firmware is installed!
If you have comments, suggestions, or questions - write about it in the comments.