Subscribe:

A monopod (selfie stick) is a newfangled device, technically quite simple. It is a long telescopic pole on one side of which a smartphone is fixed. When choosing the best position from the point of view of the photographer, he presses the release button of the monopod, a signal is transmitted to the device and a photo is taken.
But it is not uncommon for a monopod to fail. How to fix the problem, read today's article.
Why not work the selfie stick
There are quite a few manufacturers of monopods, and often these are devices designed to work under the iPhone. However, all of them are guaranteed to be able to work with Android. Almost any case when a monopod does not work with Android can be eliminated quite simply, but first you need to understand exactly how a particular "selfie stick" is connected to a smartphone.
Varieties of monopods
There are two main types of connection - via Bluetooth, and via a 3.5 mm audio jack for headphones.
If a device of the first type is used, then it must be charged before use - this is easily verified by the indication. After that, you need to turn on the bluetooth on the phone, synchronize the devices, and only then the control will be available in the "Camera" application. With the second type, there are no such nuances.
If the connection is configured, but the monopod does not work, then the most effective solution is to remap the buttons, which is available in all versions of Android. Moreover, some manufacturers, for example, HTC, include the capabilities of the "selfie stick" initially. They are available through the volume key settings menu.
If reassigning the buttons did not help, you should use the following method.
Using other apps
Another easy way is to use other than the standard built-in Camera application.
For example, Camera FV-5 has very high functionality. SelfiShop Camera has a very simple and accessible user interface. Whistle Camera generally allows you to take a photo by whistle - through a microphone, or by another loud and distinguishable sound.
In 90% of cases, the assignment of buttons and the use of third-party software allow you to configure and fix the problem due to which the monopod does not take pictures.
When I connect a selfie stick with a wire to the phone, nothing happens
Sometimes, when connecting a monopod to the audio output of a smartphone, a message appears “this type of accessory is not supported” or there is simply no reaction.
Such problems are inherent in smartphones from Sony, Alcatel, etc.
It turns out that the whole problem lies in the smartphone's audio output jack. The socket is made specially for a headset - microphone + headphones. For smooth and correct operation, you need not three (like ordinary headphones), but four contacts in the plug. In inexpensive and low-quality monopods, cheap (3-pin) plugs are used and the bulk of gadgets are simply not compatible with them.
Therefore, for correct operation, you only need to buy an adapter from 3 to 4 pin, as shown in the picture below:

For Sony phones, this is much more complicated. To buy only the headsets of their production, the developers changed two wires in the socket of their devices. The required adapter is the same, but the order of contacts is completely different.
If the selfie stick is equipped with a 4-pin plug, then most likely it's a matter of contact and their order. In this case, connect the monopod to phones of other brands and if no problems have been identified, then you just need to buy a MiniJack 4x4 pin adapter with a different order of contacts.
By the way! If for some reason all of the above methods did not solve the problem, for example, the release button of the monopod is out of order, then this will not prevent you from getting good selfies. You just need to implement shooting in a different way, not through the release of the shutter by the operator himself. The standard Android Camera application already has everything you need to do this - the ability to take pictures on a timer or burst shooting. Any of these options is not at all as bad as it seems, it will just take a little longer to pose.
Comments
Selfie sticks allow you to capture yourself and your friends in a photo without the help of strangers. This accessory has long come into common use and does not surprise passers-by. By connection method.
note
Wired cables are preferable because it eliminates dependence on battery power and problems with data transmission over the air.
In the current article, we will consider how to connect a selfie stick with a wire to Android, and also provide options for solutions to problems that arise during operation.
How to connect a monopod to Android?
To start using a wired selfie stick, you need to follow this algorithm:
Selfie stick apps for Android
Exists . Let's dwell on a few of the most popular ones.
This The software has many settings that allow you to get the most out of your lens. To set up work with a selfie stick, you need to repeat the same steps as with the standard application: open the settings and reassign the volume keys.


note
The free version has limited functionality. The biggest inconvenience is the limitation on the maximum photo resolution.
A simple app that lets you customize your selfie stick with ease. It is a fully functional camera with key remapping. The connection process should be performed as follows:

Camera360
A program for a selfie stick on Android, which can fully replace the standard software. One of the main advantages is the ability to use all the functionality at no additional cost. The application also has an image enhancement function, changing the aspect ratio for Instagram, various filters, imitation of painting with paints and much more.
You can reassign the buttons in the settings.
It's important to know
Unfortunately, some selfie stick models may not work with this software.
Connection problems and solutions
Even knowing perfectly well how to use a selfie stick with a button on Android, the user is not immune from various kinds of problems that prevent the creation of a photo. There are the following reasons and methods for solving problems with a monopod:
- Inconsistency in the number of required pins on the monopod plug. For the accessory to function properly, its plug must include 4 pins, but many inexpensive products use only 3. In most cases, this does not cause problems, but some smartphones may display the message “accessory does not support”. The problem is especially common with Sony devices. The issue is being solved by purchasing an adapter - from 3 pin to 4 pin.
- Contact has departed. The plug may not have been firmly inserted into the connector or pulled out during use. The symptom will be the complete lack of response of the phone to button presses. Reconnect the cord and try again. If the trouble persists, it is likely that the wiring is damaged at the bend points.
- Android OS version. If the selfie stick is used for Android version 4.2, then in this case there is a software incompatibility. Only updating the operating system to version 4.4 and higher will help.
- Physical breakage of the button on the monopod. The failure of the button itself is not excluded, as a result - the phone does not receive a signal and does not respond to pressing. If the warranty is valid, you can contact the service center or send the accessory for repair to a specialist.
Among the possible reasons for the inoperability of a selfie stick on a specific mobile device, there may be a banal incompatibility of models. To find out this information, you must use one of the presented methods.
The fashion for selfies has introduced completely new devices into our lives that simplify the whole process of photographing, and that is why many are wondering how to connect a selfie stick to an Android phone. The selfie stick can connect to the phone in two ways: with via bluetooth or wire, which is usually connected to the headphone jack.
Mechanism types. Tripod
Read on as we help straighten things out and get you back to extended coverage. As manufacturers big and small are wriggling suicide in record numbers to keep up with the surge in popularity, it's no surprise that the documentation that comes with them is missing or absent; don't be surprised if you buy it and it doesn't contain any instructions at all.
Your self-taught pen isn't broken, and your cell phone isn't misbehaving. Both are essentially doing exactly what they are supposed to do. Let's break down what's going on and how you can fix it, so both your phone and your wife can live in the harmony of suicide.
But what if you can't connect a monopod? Or is it just not working? Do not panic in advance, because the solution may be extremely simple!
How to connect a selfie stick via Bluetooth
Remote shutter Is a special remote that can communicate with your phone using Bluetooth. It is also suitable for ordinary Bluetooth monopod... It helps to control the device at a certain distance. Then you can take great pictures with just one button press. If you don't connect this little accessory, then the monopod won't work at all.
How to link yourself to your phone
First, there are two varieties of suicide sticks. The button on the stick sends a wireless signal to the device and captures the image. Another way to interface is the headphone jack you have. Why does the headphone jack control the camera?
When you hold the phone horizontally, the volume button ends at the top right corner of the device, and that's a pretty close approximation of the camera button on a thin point and taking a camera shot. So it was only natural that suicide owners could use all this volume-boosting mechanic to make a simple, reliable, and low-powered trigger for their self-driving sticks, simply by running the headphone cable through the stick so that each button presses the handle's handle. volume signal through the wire to the telephone.
In fact, there cannot be any other problems with the Bluetooth monopod. The main thing is to charge the stick and the remote control, and then connect them to each other, and then everything will work out. Typically, you do not need to configure this connection. Dealing with the remote is very simple, just select the button that you need for your device. There are usually two of them, one for Android and the other for IOS.
So where does it all fall apart? If you're stuck in a situation where a spare camera isn't actually stocking up, how do you fix it? Before you start downloading a new app, take a moment to review your device settings first and double check that you need a new app. Perhaps you just need to switch to the setting and you'll be ready to use your suicide pen.
Metal sticks are usually expandable, with one grip on one end and an adjustable clip on the other end to hold the phone in place. With the advent of smartphones, these objects have changed. They support different sizes of smartphones, telescopic, which are easier to carry, and they help you better manage yourself. Basically, you have a long arm.
Video instruction - Connect a selfie monopod via Bluetooth
How to connect a monopod to Android via a wire
In this case, we will talk about a selfie with a wire that connects to the headphone jack. To work with such a selfie stick no need Remote Shutter, but all because the device is configured manually. But it is precisely for this reason that the bulk of the problems arise. There are some specific devices that do not recognize the monopod, and the camera simply does not see it.
Type of devices that can be used with self-guided sticks
These self-driving sticks have a different camera app. These guns, where the camera can be attached, have a screw. You can remove the holder from the gun and then attach the camera to it. If you are unable to remove the phone holder from the gun, chances are that your self-taught grip is not camera compatible. When attaching the camera to the camera mount, make sure it fits properly, otherwise you may damage the camera.
How to connect a selfie stick via Bluetooth
Note. If your selfie grip is not made for cameras, you can still put the camera in the phone holder, it might work if your camera is thin and small. But we do not recommend this because it could damage your camera. You can try this at your own risk.
For starters, after you have connected the stick to your smartphone, but he was not recognized by him, it is recommended to try to check the tightness of the wire connection in the connector.

Suggestion: If you are using a camera instead of a mobile phone to pull yourself together. Please check your information before buying. Make sure it is compatible with cameras as well as smartphones. If you buy from amazon or any other online site, you can contact the seller or ask a question on the product page to make sure it works with the cameras.
Self defense sticks, which are only made for mobile phones, are mounted at the end of the stick. This holder or phone holder can be pulled out to accommodate your smartphone. You can extend the phone holder to fit into it. There are two types of self-driving sticks with different types of phone holders.
Also, the buttons on the camera of your smartphone may not be prepared for working with a selfie stick, and this can also become cause inoperability of the device. If the reason is in them, then a little work needs to be done to help set them up.
- First, go to camera mode, after which you will need to click on three dots located in the corner of the screen.
- Then go to the settings, which are usually indicated by a gear. There, you need to select the section with general settings.
- Then you need to change the parameters of the volume keys, after which, after saving the result, you need to return to the camera in order to make sure that the setting was successful.
- If after the work done, you still can't connect it, try again, and be sure to be sure to save your result.
- If nothing has changed again, then see the recommendations below (pay attention to the video instruction).
How to set up a monopod Selfie stick Android - Video instruction
Make sure your phone is properly seated in the mount. Then pull the phone holder vertically until your phone slides into it. These suicides were popular a while ago, but have been diminished in popularity thanks to a new development in the design of self-guided sticks that are comfortable and easy to use, and also safe for phones. We no longer recommend using these types of self-driving rods because for the same price you can get the newest designer suicide pen which is more compact in size, has a much better look and is safe for phones.
There are smartphones that lack this function.which would help remap the buttons. Then the best solution for you is to download the camera app. There are hundreds of such varieties today, it remains only to find the right one. In general, such applications do not need to be configured, it starts functioning correctly by itself. But, in rare cases, you still have to dig into the application settings, but everything is much simpler there. Play Market ( Google play) Is the main store where you can find the apps you want.
New Design Self-Guiding Sticks: With these guns, you just have to pull the phone holder vertically so that it fits between the top and bottom of the phone holder. After placing the smartphone between the phone holder, gently release it, the spring will pull on both parts to fit securely into your mobile phone.
For both types of self-steering rods, you must tighten the screw in the base of the phone holder to fix the phone holder at a specific angle. Note: If you are using a large size phone, you may need to remove the phone cover before placing your phone on your phone if your phone is not properly seated in the phone holder.
Well, if this option does not suit you, then the reason is hidden in the smartphone's firmware. The thing is that in the most rare cases, on a smartphone can't install the app... Then you will need to reflash the device. But be careful, if the device is under warranty, flashing it will void it.
Also, many may ask a screaming question: "The selfie stick does not work on android, what should I do?" it may not work even if your device has an outdated version. This is one of the more common cases.
Then connect the device using the following steps. Then turn both devices back on, you can pair them. If you still cannot do this, it means that both devices are not compatible. Before using this wired self-driving thing, you need to take care that you have to change the setting of the volume button in the camera settings of the camera in order to take pictures. Best suicide camera app: 360 camera is one of the best camera apps for selfies.
Third: the 360 \u200b\u200bcamera has various functions such as photo editing to enhance your self-service experience. Connect your phone or camera to the self-driving handle. Adjust the angle of the device you are using, and then tighten the screw. Extend the stick to the desired length.
Monopod apps for Android
Below you can find a small list of the most functional and simple programs (applications) for your phone. We will not describe a lot of information about each application, and we will only say that they are all really cool and very easy to use! And of course, the apps for selfie sticks presented below can be downloaded for free from Google Play!
Set a timer. Smile and get ready for yourself. Common problems faced by suicides and how to solve them. The sticks are bent. The camera pans down. This issue occurs when using low-level self-driving sticks. Now, good quality self-adhesive sticks have a grooved design to prevent the stick from twisting so that it stays in the correct position when stretched.
Failure of the button for photographing the monopod
Remember to take your power bank with you during your holidays and you should be fine. Failed to connect devices. This is not a 100% guarantee method, but definitely worth a try. Where can you buy good quality sticks. You should do some research before purchasing suicide sticks as per your requirements.
- SelfiShop Camera
- Camera FV-5
- The cellfie
- Retrica

Also, when choosing a selfie stick, look in advance of its functional specifications, it may simply not be designed for Android devices. There are universal options, there are those that are designed only for Android, but there are those specially created for IOS.
Helps you to take perfect selfies and videos without any worries. This new self-defense pocket tip protects expensive phones from fall damage - protects any phone with a built-in scratch-resistant silicone mount.
Pocket size, light weight, compact and perfect for any occasion and we offer the best quality. Never miss an opportunity to attract people and videos. Ideal for independent parties, vacations and visiting friends and family. Folded to a small size, can be put in a pocket or bag to take with you wherever you go.
Now you know how to connect a selfie stick to your Android phone quickly and without unnecessary movements. And now we can come to the final conclusion that there may be several reasons for the improper operation of a selfie device, but each has its own solution. It is important to know that Remote Shutter is not always available in the kit. If it was still not included in your package, no need to panic... It is sold separately, which means there is a solution!
Why isn't the selfie stick taking pictures?
Lifetime warranty. We give a lifetime warranty because we are confident that you will fall in love with this Rage. Rest assured to buy the best quality. The Secret to Making People Like Your Photos - The 270-degree adjustable head lets you shoot photos and videos from any angle.
Built-in anti-scratch stand keeps your phone safe and secure, preventing falls and saving repair costs that come with poor quality. A new design feature makes this self-assured wand a terrific "Best Hand Wand". Grooved design helps prevent overconfident arms from twisting when self-steering vertically.
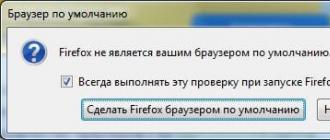
How to connect a monopod selfie stick to Android If you have a phone based on the Android system: Samsung, LG, HTC, Sony, then most likely it works on the Android platform. You bought a monopod, but during the initial check on your phone, smartphone in the standard "Camera" application, the bluetooth button does not work. Why? Because the bluetooth button does not always work in the standard "camera" application on Android platform. But do not rush to return the monopod to the seller and give up the pleasure of taking photos with a selfie stick. Why doesn't the button respond to the tripod?
Our company is committed to 100% customer satisfaction. All products are checked one by one before packing, thus reducing the chance of product defect. Strong construction helps you to take stunning photos with our pen to make your friends fall in love with your photos. Have fun with your family and friends when traveling or vacationing.
Thousands of satisfied customers all over the country. Our customers are really happy and satisfied with this product. The best self defense you'll ever see. It took me 30 seconds after taking it out of the box to figure out how to use this product. The product seemed pretty straightforward. Plug the headphone jack into your phone, dock your phone, turn on the camera app and press the button. The gold base gives it an elegant look.
The fact is that the bluetooth button in this case does not work at the software level. Those. it works, but the Camera program does not understand it. She just doesn’t know that when you press the bluetooth remote button you need to take a picture ... Why don’t the bluetooth buttons of the monopod work on Android?
In Android 4.4, and many versions of Samsung smartphones, the bluetooth button can work with the standard "Camera" application. It is also possible to support the buttons "Plus" and "Minus" as an increase and decrease. To do this, in the additional settings, you must select "Volume buttons - as increase or ZOOM". How to install and configure a monopod on an android We make the bluetooth buttons of a monopod work For our clients, a special free application has been developed Selfishop Camera. This is the first and only free application in the world, which was specially developed for pairing a monopod and a smartphone (phone) on the Android platform. It is used by people all over the world and appreciated the excellent quality of this application and the user-friendly interface.
Using other apps
The authenticity card inside the package is a nice thing that I really liked. It is lightweight and easily expands and collapses. But this does not prevent me from reconsidering this. Take care that the "staples" do not press on your volume buttons. Besides, this is suicide. The telescopic bar and clip are strong enough to hold my phone worry-free and your phone is pretty secure. If you take on self-defense and post them online is your thing, you really can't resist this self-taught magician.
How to set up to connect a monopod to an Android phone... If you are looking for an answer to the question of how to set up a monopod on Android, then you are on the right track. Just a few correct steps and your monopod will obediently shoot at the push of a button.
Step 1. Download and install the program selfishop camera to your phone smartphone. Launch the "monopod connection assistant" from the program settings or by long pressing the icon with the logo.
Not all online video stores are working on a stick
So, if you're ready to buy this, please just don't hesitate. I liked the handling of the phone with this wand. Other services require even higher data rates. Games can be downloaded as apps, often even for free. In addition to games, apps for streaming music, news and sports information are also available. For example, movies and photos can be viewed on a TV stored on a mobile phone or tablet.
Easier to operate with the remote control
In general, the number of available apps is limited. The stick starts automatically. From a control point of view, the user can choose whether to use the supplied remote control or an app on a smartphone or tablet. The app also allows you to enter voice commands using your mobile phone or tablet - for example, to search for movie titles. In the test, the remote control turned out to be more convenient. Smartphone and tablet apps take a lot of practice as they are sometimes too sensitive to touch.
Step one - plug in the monopod.

Step two - find and scan selfie buttons

Step three - setting up actions on the selfie button.

Step four - saving the results.
Step 2.1. Connect the wired monopod (which connects to the phone to the smartphone using a cable) to the headphone / headset jack (3.5 mm) using the plug. Step 2.2. Selfie stick monopod connection via bluetooth wireless channel.- 1) Turn on the power on the monopod (if the bluetooth button is built into the grip of the selfie stick). We are looking for and connect a device with the name of a monopod.
- 2) When the indicator light on the bluetooth monopod / remote button starts flashing, turn on bluetooth on the phone (smartphone).
- 3) Find the paired device in the bluetooth list of the smartphone / phone. For Selfie King: “Winnersun”. For Selfie Pro: “Yunteng”. For Selfie Hit: “Selftimer03” or “icanany selfie stick”. Selfie Star: “kjstar”. For Selfie Mix: “EDUP-3515”, “ABShutter” or “Aple_Mler”.
- 4) Click on the name corresponding to your monopod. Wait for the pairing of the monopod (remote-button bluetooth) with your phone (smartphones). When the light indicator on the monopod (bluetooth remote button) goes out and the message "Connected" appears on the phone (smartphone) screen - pairing was successful!
Monopod has become a popular tool for all mobile device lovers. It greatly simplifies the process of joint photos or videos without involving strangers. The only question that may arise is how to set up a monopod on Android for your device. Much depends on the phone model and the type of selfie stick.
How the selfie stick works
To understand how to use a selfie stick, you need to understand how it works. All monopods have the same design - smartphone holder, telescopic handle. The models differ in the way of activating the "take pictures" button on your phone. There are three main options:
- Sticks without controls. In this case, after installing the phone, the user must turn on the timer on it for the required time and wait for the picture to be triggered. The main advantage of such monopods is that they will be inexpensive.
- Wired monopod. The most popular type of selfie sticks because they have a low price, easy connection and setup. They are equally often used for both Android devices and iPhones. The connection is made using a regular 3.5 mm plug to the headphone jack. No charging required for monopod, additional setup.
- Bluetooth monopods. This is a version of the device with wireless control. The device is synchronized with a smartphone using bluetooth communication. The price of such monopods is usually higher than the rest, and truly reliable models will cost a decent price. Most users have problems with this type of connection.
Selfie stick app for Android
In some cases, to control the monopod, the user will need to download additional programs. This is due to the problem of assigning keys for shooting. For example, Samsung phones have preset settings by default, the owner simply connects a monopod and can use it right away. In some models, this option is not provided and applications help to perform the necessary actions for a comfortable selfie. In addition, the programs will help you immediately perform the initial processing of photos for uploading to the Internet.
Selfie stick program for Android
You can take selfies without special applications, but using them can greatly simplify the process and open up additional opportunities. Here are some examples that are popular with users:
- B612 - a utility designed specifically for taking selfies. Directly while shooting a video, photos can be applied with additional effects. The application has a built-in self-timer, a large set of filters, the function of creating collages and the ability to post the result to any popular social network.
- SelfieShop Camera - will help you connect correctly both wireless bluetooth monopods and wired models. Suitable for most popular selfie sticks, seamlessly pairing them with a smartphone. You need to download the utility in the Play Store for free, but there will be ads in the application. You can remove it by paying 99 rubles.
- Retrica is another selfie app option that is especially popular with owners of devices with a front camera. The utility offers a choice of more than 100 filters, which are applied even before taking a picture. Directly in the program, you can perform the primary processing of the photo.
How to connect a monopod with a wire to Android
In most cases, users do not have problems with how to connect a monopod to Android. The easiest way to set up is with models that use a wire, for example:
- Attach your smartphone to the holder on a stick.
- Insert the plug into the headphone jack.
- Launch the standard photo and video capture application.
- Extend as many monopod sections as needed to get the desired shot.
- Press the button on the handle of the device.

In some cases, an algorithm such as connecting a selfie stick to Android does not work. There may be several reasons for this, so you should carry out the initial "diagnosis" yourself:
- Check if the plug is firmly seated in the connector.
- Volume buttons may not be prepared for monopod operation. To assign, go to the camera settings, change the parameters of the keys, save the changes. Try to see if the settings have been saved and reconnect the monopod.
- Some phones do not support key remapping. In these cases, you should use the applications that were described above. Downloading them will not be a problem in the official Google store on Android.
- As a last resort, the phone is flashed, but it is not recommended to do it if the phone is still under warranty.
- The lack of communication between devices may be due to an old version of the operating system.
How to set up a selfie stick on Android via Bluetooth
The options for a device with a Bluetooth connection will cost a little more, but eliminate the need to use wires. The main problem with bluetooth is pairing devices. This often leads users to search for an answer on how to install a selfie stick over a wireless connection. The connection algorithm is as follows:
- Make sure the monopod is charged or fresh batteries are inserted. If they have been used for a long time or you are not sure of them, then take spare ones with you or replace them immediately.
- Enable Bluetooth connectivity on your smartphone.
- Turn on the selfie stick to connect to Android.
- Go to the phone menu where found devices are displayed.
- Find the name of your selfie stick (it can be named as the manufacturer or the monopod model), establish the connection. After a few seconds, device pairing will appear.
- Go to your photo maker app and take pictures with the push of a button on the handle.
- If the pairing has occurred, and the picture is not taken when you press the key, try using the third-party Android application described above.

Prices for selfie sticks for Android
How much a selfie stick for Android will cost will depend on the connection method (wired or bluetooth), the materials from which the device is made and the fame of the manufacturer's company. The most favorable price will be if you buy a monopod in an online store and order delivery. You can find many options in the catalog, below are the most popular models:
The main advantages of this monopod for Android are ease of use, unlimited autonomy, reliability. The devices are connected via a cord that is inserted through the headphone jack. The holder is universal, capable of holding most modern phone models. If necessary, a video camera can also be attached to the screw. The length of the selfie stick when folded is 20 cm, when unfolded it is more than 90. The design is able to withstand a weight of no more than 178 grams. The price of KjStar Z07-5S is 600 rubles.
Kjstar Z07-5 (V2)
This is an improved model of the above-described selfie stick for Android. Pairing takes place via a wireless network. The maximum weight of a smartphone has been increased to 600 g, and the monopod itself weighs 165 g. Charging a 45mAh battery takes 1 hour. The holder is designed for phones of different sizes, for small models there is a silicone cover. The length of the unfolded selfie stick is 100.5 cm. The price is 1500 rubles.
An interesting feature of this stick is that the shutter button is integrated into the handle, but it can be detached if necessary. She is able not only to release the camera shutter, but also to zoom the image (zoom in / out). Pairing with a phone is via Bluetooth. The tube has 4 sections, the design is very strong, the maximum length is 125 cm. The selfie stick can withstand 2.5 kg of weight. Price - 2100 r.
As a rule, the materials from which it is made affect how much a selfie stick will cost. This variant contains a very high quality package, including a monopod case. Outwardly, it looks stylish, presentable, has 4 sliding sections, which give a total length of 90 cm. The stick is compatible with both Android and iOS. If desired, you can connect a camera to it. Price - 1790 r.
How to choose a monopod for Android
A good selfie stick for Android will serve you for more than one year, but for this you should take a responsible approach to choosing a device. When buying, it is necessary to take into account some features of the connection, design, characteristics of the monopod:
- Height. If you plan on photographing landscapes, then you need a telescopic handle over 1 meter, but note that it will cost more. If you just want to have joint pictures with friends, then this height is not necessary for you.
- Weight. Keep in mind that the structures are designed for different weights of phones. The severity of the selfie stick itself depends on this.
- Strength. Make sure the monopod is sturdy and does not flex when unfolded.
- Connection type. If you do not want to mess with batteries, you should choose the option of connecting via a cord. Such models show great reliability of device pairing.
Video: how to connect a selfie stick to Android
- Insert the wire from the monopod (3.5 jack) into the headphone jack on your smartphone. Place your phone in the smart clip. On most models, this mount is a sliding clip with springs inside. You just need to pull back the top of the clip to make room for the phone. After you have secured your smartphone to the smart clip, make sure it is firmly fixed.
- Then we turn on the camera on the smartphone and go to its settings. Change the volume keys to the camera key. The monopod is ready to use! This setting is suitable for smartphones with Android mobile operating system.
For Apple iPhone smartphones on the iOS system, the connection to the selfie stick occurs without settings. By the way, if you use a monopod with a wire, then it does not need to be charged.
If your monopod with a Bluetooth button
The Bluetooth button can be either built into the handle of the monopod or used separately. In some models, the button is immediately included in the kit, and in some it must be purchased separately. Battery powered Bluetooth button (usually CR2032) are sold separately and come in various designs.
If the bluetooth button is built into the monopod, then at the bottom of the handle you will find a connector for the charging cable. Depending on the battery capacity of your selfie stick, the charging time will range from 40 minutes to 2 hours. Most monopod models with built-in rechargeable batteries are designed for 500 recharge cycles.
How to connect Bluetooth monopod to Apple iPhone?
- Fully charge your monopod. By the way, one hour of charging is enough for 100 hours of standby time. If the button is separate, then check that it has a good, new battery. Now press / move the monopod power button (from the bottom of the handle or on the button itself).
- We go into the iPhone in "Settings", then in the "Bluetooth" tab. Turn on Bluetooth. The name of your monopod or bluetooth button should also appear here. Click on the name of the new bluetooth device to establish a connection with it and your iPhone will remember it. Subsequently, you will already select it from the list of "My devices". As soon as the smartphone establishes a connection with the bluetooth button, the message "Connected" will appear opposite the name of the new device.
Your monopod is now ready to go. All that remains is to insert the smartphone into the smart clip. Do not forget to charge it in time or change the battery in the button.
From experience: I noticed that sometimes the remote control (bluetooth button) turns off periodically and I have to reconnect it. Then the connection is restored quickly and without problems. I think this is done to save energy.
If the button on the monopod doesn't work or doesn't work correctly?
If your smartphone shows the volume up slider and Zoom when you press the monopod button, this means that the button is working correctly, now you just need to adjust the camera settings. We talked about them at the very beginning of the publication. If this does not help, then just download a special application for connecting a monopod, for example MoMax Cam. You can also take photos using the Delayed Start function.