On any home computer there is a “C” drive, and sometimes also a “D” and “E” and several more. Why do we need so many? Let’s take and format one, for example, “C”. Just for the sake of experience, to see what happens. Let's begin by praying... But first we need to know what formatting is. Still, it’s stupid to do something you don’t know.
A computer hard drive is simply a magnetic storage device. In order for a computer to accurately find old files and write new ones, the disk must have some structure. Formatting creates exactly this - the entire disk is divided into certain areas - sectors and clusters, of a strictly defined size, into which all information is recorded. In addition, service information is created and also written to disk. This also includes a table of files. Simply put, it stores information about which file is in which sector - by reading this table, the computer quickly finds the necessary files. Formatting just creates a new partition on the disk. The so-called “quick format” only clears the table, but the files are still lost, since their addresses are erased. Although it is possible to restore them using some programs.
So, right-click on the “C” drive shortcut and select “format”. Here we are waiting for a somewhat unexpected reaction from the computer if we have the operating system Windows XP, Vista or Windows 7 installed. Usually they are located just on the “C” drive, and the system is not a kamikaze to destroy itself, even with our divine permission. That's why we won't succeed, we will only receive a warning window, which says that by formatting we will damage service files.
However, we are more cunning, so we take out some kind of disk from which we can boot bypassing Windows. We insert it into the drive, select boot from it in the BIOS, and wait. On the disk we will certainly find many programs to satisfy our destructive needs. The most common program that is now on almost any boot disk is Acronis Disk Director. It is quite suitable for us, especially since everything is clear and in Russian. Let’s select the unfortunate “C” drive and try to format it. Surprisingly, this time everything will go smoothly, without any warnings. If we wish, we can even completely delete the entire “C” drive, but this is completely perverted... We have achieved our goal, we remove the drive and restart the computer...
Yeah, all the LEDs blinked, as during a normal boot, the monitor turned on and behold... We are sitting in front of a black screen, looking at him blankly. Why did we expect him to dance, or what? Here we are sitting in front of a pristine computer that no longer has an operating system, and without it it is just a pile of hardware. She now grazes on the heavenly hard drives, taking with her “My Documents”, viruses and antiviruses, the desktop and much more... Now the operating system needs to be installed again, so take the installation disk and go! Or we call someone who knows how to do it...
However, if our system was not on the “C” drive, but, say, on the “D” drive, nothing bad will happen. We will simply lose all the files in “C”, but this is safe for the system - it was in a different place at that moment...
It is worth noting that in general the operating system is installed on the “C” drive, and not just because it is first on the list. It’s just that usually all disks are not separate hard drives, but one, but of large capacity. It’s just divided into several so-called “logical” disks. The computer perceives them as different, but there are differences. In this case, disk “C” is not just the first in the list, but also the first from the axis of the real magnetic disk - they say that it is “at the beginning of the disk.” This means that it is easier for the hard drive’s reading head to search for information in this place; it has to move less due to the smaller radius of this area. Fewer unnecessary movements – higher speed of reading/writing files. And the overall speed of the system depends on this, which is why the operating system is placed on the “C” drive. Although it is possible for any other, of course, but this is no longer professional. Usually, not very understanding “home hackers” can find the system folder in the most unexpected places.
But we already understand everything, so we will install our system on the “C” drive, and we will format it only before installing it, and even then we will first copy all the necessary files from it to other drives. And such experiments... Well, keep them away, it won’t take long to lose a six-month job. It’s a pity for the daytime...
Question from a user
Hello.
I want to completely delete all content on the disk, and then reinstall the system. I have two drives ("C:" and "D:") - I was able to format one, but there is a problem with the "C:" drive. Can you tell me how I can format the system hard drive (on which Windows 8 is installed)?
Good day to all!
In general, on today’s modern system, formatting a disk is not a difficult operation, I would even say simple (not like it was 20 years ago). Perhaps, questions arise only in cases where Windows does not see the disk, errors appear during formatting, or when trying to format the system disk (as in your case).
In the article below I will discuss several formatting methods - depending on your tasks and the specific problem, choose the one you need. So...
Important: After formatting the drive, all information on it will be deleted! Make a copy of the necessary files from the disk to third-party media in advance.
From under Windows
Via My Computer
Probably the classic and easiest way to format a disk is to go to “My Computer” (or “This Computer”, depending on the version of your OS), and find the desired disk partition in it. Then select this section, right-click on it - and select the required one in the context menu (ie formatting, see screenshot below).
Note: if the "My Computer" icon is not on the desktop, and you do not know how to open it, press the button combination WIN+E- Explorer will open: in the menu on the left, select the link to “My Computer/This Computer”.

Format disk // This PC // Windows 10
- file system: FAT 32, NTFS, exFAT, etc. In most cases, the best option for a hard drive is to use NTFS;
- allocation unit size: 4096 bytes (optimal);
- volume label: disk name, you can enter any (I recommend using the Latin alphabet, as some programs do not read Russian font correctly).

In general, the default settings will usually suit most users - you can immediately click the "Start" button. In a few minutes you will receive a “clean” disk...
Via Disk Management
In cases where you go to “My Computer” - and it simply does not show your connected disk (this often happens with new disks that have not been formatted) - then you need to use either special utilities or use the “disk management” tool , built into Windows.
To open Disk Management you need to:
- press a combination of buttons WIN+R to open the Run window;
- enter the command diskmgmt.msc and press Enter. The Disk Management application should open.
Next, you will see not only all connected disks, flash drives, memory cards, etc., but also what partitions were created on them - i.e. the entire structure. Select the desired section and right-click on it - in the context menu, click on the item "Format..." (see red arrows in the screenshot below).


Via command line
In cases where Explorer freezes (for example), also in the event of various types of errors, you can try formatting the disk through the command line.
First you need to open it as an administrator. For this:

format G: /FS:NTFS /q
G: - letter of the drive to be formatted (specify carefully!);
/FS:NTFS - select a file system;
/q - quick formatting.
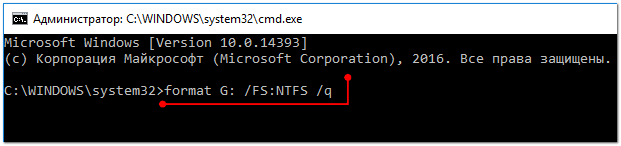
Basically, the disk must be formatted.
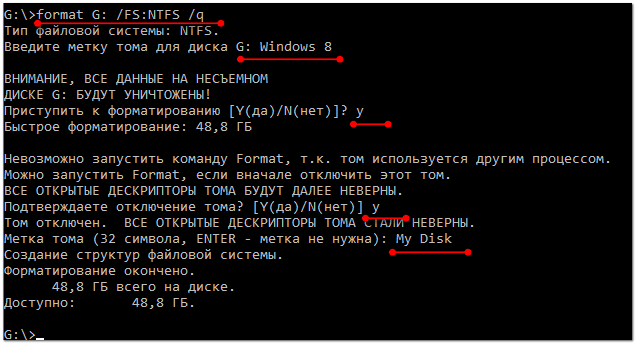
In Windows 10, by the way, a small “error” may appear - the system will ask you to specify the volume label for the disk, and then write that “The specified disk label is invalid” (although you seem to have specified everything correctly, example below).

In this case, do the following...
First, open the drive you want to format in a command prompt, for example, drive G: (see screenshot below).

Team VOL- look at the volume label
Next, enter the formatting command again, and in the disk label field - the label that we found out in the previous step (in my case - Windows 8). Next, you will be warned that all data will be destroyed during formatting (you agree by entering y and pressing Enter ).
In the next step you will be prompted to enter a volume label - now you can enter any name (32 characters). You can simply leave the field empty by pressing Enter. Actually, that’s it - the disk will be formatted (screenshot below).
With the help of special utilities
The best programs and utilities for working with a hard drive:
There are now hundreds of different programs and utilities for working with hard drives. Operations such as formatting, partitioning, defragmentation, etc. can be done in more convenient programs than those built into Windows. The link to the article with the best of them is given above.
In my opinion, one of those that deserves attention is AOMEI Partition Assistant.
AOMEI Partition Assistant
It allows you to quickly, safely, and easily carry out the most necessary operations with disk drives:
- change their partition size (including without formatting);
- move partitions;
- merge sections;
- format drives;
- change labels and much more!
What’s also captivating is that the program has many different step-by-step wizards - they will help solve the problem even for those users who have only recently become acquainted with a PC. Well, for example, you can convert the FAT 32 file system to NTFS without losing data, transfer Windows from a hard drive to a newfangled SSD, etc.
Via BIOS
(for formatting system partitions, for example, on which Windows is installed)
If you want to format a partition on which Windows is installed, you won’t be able to do it just like that. The bottom line is that you need to boot from another medium - for example, from another hard drive (on which Windows is installed) or from a bootable USB flash drive, and then format your disk.
Naturally, you need to prepare such media in advance (for example, an installation flash drive with Windows) - since after formatting the system partition of the drive, Windows will no longer boot from it (don’t install it again yet. I explained it chaotically, but in general terms, I think it’s clear ☻).
Using a Windows installation flash drive
The easiest way to format the system partition of a disk is to use a Windows installation flash drive. You can learn how to create and prepare it (if you don’t have one) from my previous articles (links are provided below).
Utilities for creating bootable USB flash drives with Windows -
Creating a bootable Windows 10 USB flash drive -
Creating a bootable USB flash drive for installing Windows XP, 7, 8, 10 (UEFI and Legacy) -
The easiest way to boot from a flash drive is to use a special boot menu - BOOT MENU, which can be called up immediately after turning on the computer/laptop (or by changing the boot priority in the BIOS). In order not to repeat myself here, I will provide a couple of links to detailed articles about this.
Hotkeys to enter the BIOS menu, Boot Menu, restore from a hidden partition -
How to configure the BIOS to boot from a flash drive or disk (CD/DVD/USB) -
Next, after booting from the installation flash drive, you need to go to selecting a partition for installing Windows. In this step, you can format the entire disk (delete all partitions and create them again), as well as its individual partitions.

If you have difficulties and you don’t know how to get to this step when installing Windows, I recommend reading this article:
With the help of special programs
Take the same AOMEI Partition Assistant that I recommended using when working under Windows, just above in the article. She has an excellent tool in her arsenal for creating a special emergency flash drive from which you can boot when your system crashes (or it is not installed on the disk at all).
I have an article on programs for working with hard drives on my blog:(including information about AOMEI Partition Assistant).
To create such a flash drive, you need to run the program on your working PC "Master/Make Bootable CD Master".


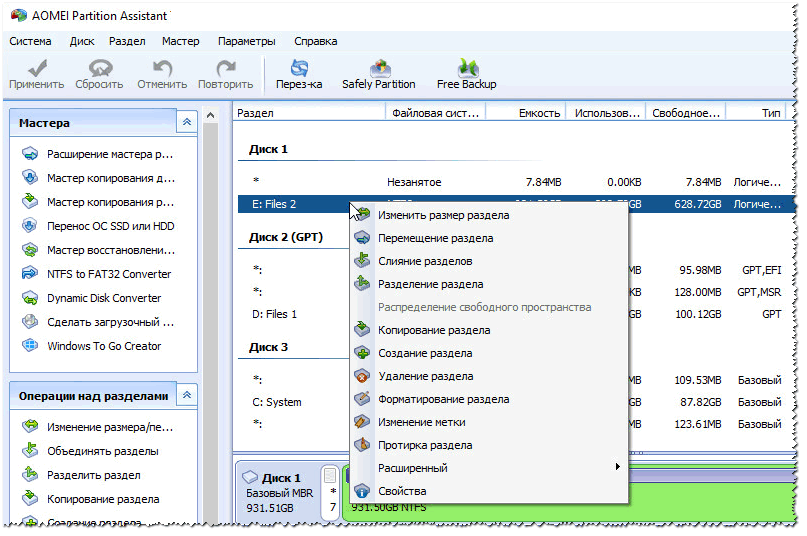
To boot from such a flash drive, use also Boot Menu, links to instructions were given above in the article, in the previous step. When you boot from the emergency flash drive, the menu and operation of the program will be similar to that running under Windows. Also click on the desired disk and perform the necessary operation (screenshot below).

AOMEI Partition Assistant - formatting a partition
That's all, a separate merci for additions.
 Formatting a hard drive is the process of creating a file system on its partition, accompanied by deleting data and creating a new file system structure. Functionality for formatting hard drives and solid-state drives is contained in almost all modern operating systems, but the standard mechanism is not always optimal and applicable. This material will tell you in more detail how to format a hard drive in several ways.
It is very easy to format a HDD using standard tools. To do this, you need to select the desired partition in Explorer, right-click and select “Format” from the pop-up menu.
 In the menu that opens, select formatting options. It is recommended to use NTFS as the file system, and leave the cluster size as standard. Checking the box next to “Quick formatting” significantly speeds up the process, but only the FS table is created anew. The data itself physically remains on the disk, although it becomes inaccessible. If you do not check the box, all data will be physically erased (filling each memory cell with zeros), but the process will take a long time. A hard drive with a capacity of several terabytes will take hours to format. But such formatting allows you to permanently destroy data, for example, when transferring the drive to a new owner.

An alternative way to format the HDD using standard means is through the “Control Panel”. To do this, you need to find the “Administration” menu, select “Computer Management” in it and find “Disk Management” in the left column. The menu that opens will display all drives in the form of a structure. The advantage of this method is that this way you can format disks that do not have a partition and therefore are not displayed in Explorer.

How to format a hard drive via the command line
To format a disk via the command line, there is a utility command called format. To use it, you need to run the command line as an administrator and enter the format command. It should look like this:
format [drive letter]:- formatting will take place without any questions, into the same FS that is on the disk, in a slow way (with complete erasing).

format [drive letter]: /q — the “/q” flag triggers a quick format, without physically clearing the contents of its memory. The flag can be placed in combination with any other keys.
format [drive letter]: fs:[file system]— formatting the selected partition into one of the supported file systems: NTFS, FAT, FAT32.
format [drive letter]: fs:[file system] /q- the same thing, but with quick formatting.
How to format your hard drive before installing Windows
To format your hard drive before installing Windows, you need to select a full installation, wait until the partition selection menu for installation appears, click on the desired drive and press the “Format” button at the bottom. The system will independently determine the optimal formatting method, file system type and cluster size. The whole process takes less than a minute.
Before you format your hard drive, installing Windows may require creating additional system partitions to load the OS. The screenshot below shows that such a partition takes up 100 MB. It stores part of the system bootloader.

The disadvantage of formatting this way is that you can't manually manipulate the parameters. Ordinary users do not need this, but sometimes they need FAT32 instead of the standard NTFS system. For example, such a need arises on tablets with Intel processors and two installed operating systems (Windows + Android), like the ten-inch Chuwi Hi10. In order for the Windows partition to be visible from Android, it must be formatted in a compatible file system. The “green robot” cannot work with NTFS without special plugins and third-party programs.
The correct answer to this question is “not at all.” The computer's BIOS is intended for slightly different purposes and does not have functionality for working with the HDD. Usually, “formatting from Bios” is popularly known as formatting via the command line in a text-based operating system (for example, MS-DOS). The advantage of this solution is that you can even work with a system partition that is not in use.
To format a hard drive using a boot disk with DOS, you need to create an image of such an OS, write it to a flash drive and copy the formatting utility there. Instead of DOS, you can also use a special program for working with HDDs, for example, GParted. This option is preferable as it is more functional.
To format a HDD from BIOS using a bootable USB flash drive, you need to download. This is an automatic installer that will download and write the latest version of Gparted to a flash drive.

After creating the flash drive, you need to restart the PC, go to Bios (usually by pressing DEl or F2) and find the Boot menu. In it you should select the item containing the words “Boot device priority” or something similar in meaning. Among them, you should put your flash drive first. Then you need to press F10, agree to save the settings and wait for loading from the flash drive.

In the loaded menu of the GParted program, you need to select the language, select the disk and find the item responsible for formatting. You can select the file system, cluster size, format type, and other options.
The easiest way to clean a hard drive is to reset it through "My computer". This is a software process where a storage area is laid out and a new file system is created. You need to select the desired one from the list of disks and right-click on “Format”. Of course, this action requires confirmation from the user. What if you clicked on this item by mistake?

It's better to uncheck “Quick (clear table of contents)” to make this process more thorough. Default file system – NTFS, since it is more modern and technologically advanced. It has no restrictions on disk partition size.
The same can be done using the built-in tool “Disk Management”.

Here you can change the drive letter or delete the volume. Then you should create the volume again and format it.
If you need to reinstall Windows, you are initially asked to select an installation location. First you need to create a partition, and then format it in NTFS. This is done using a boot disk.
Hard disk formatting and partitioning program
Imagine having a 3, 5, or 8 TB drive. The question arises about the correct placement of information on it. One approach is to partition the disk. One of them, for example, will contain multimedia files, the other – working documents.
One of the popular programs of this type is Paragon Hard Disk Manager. It guarantees safe and complete erasure of all files using ten algorithms. You can also permanently erase SSD drives from most manufacturers.
The interface is in Russian and very informative.
The main window looks like this:

Presented here “Disk Map”- graphical representation of all drives in the system. Physical disks resemble elongated rectangles, while logical disks resemble small ones. The shaded area shows the volume occupied by the disk.
On the list “Disks and partitions” You can select the function you are interested in using the context menu.

IN “Property panels” you can find information about an object if you select it on “Disk map”.

The drive letter, file system name, serial number, volume size, and free space are displayed.
The program allows you to create a new partition in an unallocated area. At the creation stage, you can see the final state of the disk after all manipulations.

It is necessary to select a specific information keeper, and then a place for the future volume: preferably at the end. The partition can be of any size and is limited only by free space.

We also determine what the partition will be - primary or logical. Next, you can set various parameters for it: partition type (usually file system NTFS), volume label (used for identification) and the corresponding letter.
For more detailed settings there is a button "Extra options" at the bottom of the window.
The wizard has the ability to delete partitions.
There is a function to combine several adjacent sections into one. To do this, click on the left section of the pair of sections that you want to merge. During the operation, the entire contents of the right volume will be moved to a separate folder on the resulting shared partition.
Formatting large hard drives
Relatively recently, it became possible to connect large storage devices to a computer. There may be some problems with this. The system sees only part of the total free volume. In this case, the BIOS displays the entire size. The problem should be solved by adjusting the system settings.
Let's assume that a person has just purchased a 3 TB hard drive. If he has not yet taken any action with the disk, to initialize it in Windows, you need to find the corresponding parameter in the section “Disk Management”. Then we mark the table with a GUID. Problem solved. Now you can use the entire volume.

If the drive is already partitioned, we will use a third-party application, for example, Acronis Disk Director- this is powerful software for managing hard disk partitions, recovering partitions and disks, and managing multiple operating systems on one computer. In this utility, select an unpartitioned MBR partition, and then - “Convert to GPT”. Let's confirm this procedure and then reboot Windows. This way the current hard drive is visible in the system.


This program can be called a universal solution for configuring and changing the properties of both internal and external drives. Using it, the user can control disk space.

It clearly shows all the disks and what they consist of, which partition is intended for booting the system, and which acts as a logical drive. The size can be changed very simply by moving the slider or entering an exact number.

There is a function for merging volumes. To do this, you need to select them, and then specify the main volume to which all the others are attached.
Here, too, all operations are not applied immediately, but after verification and confirmation by the user. Still, these are procedures that require careful analysis.

This utility will come to the rescue if you need to format a disk at a low level, for example, using a flash drive at the boot stage. There are no built-in methods in the BIOS. We use Acronis Disk Director tools: in “Means” open “Acronis Bootable Media Builder”, select the media type Windows PE.
Going into the BIOS settings, select an external USB drive as the initial startup device. When loading we will see such a splash screen.

As a result, the same functions will be available as under Windows.
You should not additionally look for a program to format an external hard drive - they are similar to those mentioned above.
Wiping all available information on a storage device will require you to have some knowledge in this area. After all, sometimes it cannot be returned. If the goal is to completely protect yourself from the dissemination of personal data, you should use special utilities, for example, Paragon Hard Disk Manager. Usually such programs are paid. Not the most reliable way is the built-in Windows tools.