In general, the buyer of any Android device gets out of the box a device designed for the "average user". Manufacturers understand that it will not work to satisfy the needs of absolutely everyone. Of course, not every consumer is ready to put up with this state of affairs. This reality has led to the emergence of modified, custom firmware and just various advanced system components. To install such firmware and add-ons, as well as manipulate them, a special Android recovery environment is required - a modified recovery. One of the first solutions of this kind, which became available to a wide range of users, is ClockworkMod Recovery (CWM).
CWM Recovery is a third-party modified Android recovery environment designed to perform many non-standard operations from the point of view of device manufacturers. The ClockworkMod team is developing CWM recovery, but their brainchild is a fairly adaptable solution, so many users bring their own changes and, in turn, adjust the recovery to their devices and their own tasks.
CWM Recovery interface and management
The CWM interface is nothing special - these are ordinary menu items, the name of each of which corresponds to the title of the command list. It is very similar to the standard factory recovery of most Android devices, only there are more items and the drop-down lists of applicable commands are wider.

Control is carried out using the physical buttons of the device - " Volume +», « Volume-», « Food". Depending on the device model, there may be variations, in particular, the physical button “ Nome»Or touch buttons under the screen. In general, the volume keys are used to move through the items. Pressing " Volume +"Moves one point up," Volume-", Respectively, one point down. Confirmation of entering the menu or executing a command is pressing the " Food"Or the physical button" Home"On the device.

Installing * .zip
The main, and therefore the most frequently used function in CWM Recovery, is the installation of firmware and various system patches. Most of these files are distributed in the format * .zip, therefore, the corresponding CWM recovery item for installation is called quite logically - " install zip". When you select this item, a list of possible file locations opens. * .zip... Installation of files from an SD card in various variations is available (1), as well as firmware download using adb sideload (2).

An important positive point, which allows you to avoid writing incorrect files to the device, is the ability to check the firmware signature before starting the file transfer procedure - item “ toogle signature verification».

Cleaning partitions
To eliminate errors when installing firmware, many Romodels recommend cleaning partitions Data and Cache before the procedure. In addition, such an operation is often simply necessary - without it, stable operation of the device is impossible in most cases when switching from one firmware to a solution of another type. In the main menu of CWM Recovery, the cleaning procedure has two items - " wipe data / factory reset"And" wipe cache partition". In the drop-down list, after selecting one or the second section, there are only two items: “ No."- to cancel, or" Yes, wipe ...»To start the procedure.

Creating a backup
In order to save user data in case of problems during the firmware process, or to play it safe in case of an unsuccessful procedure, you need to create a backup copy of the system. The developers of CWM Recovery have provided this possibility in their recovery environment. The function in question is called when the item " backup and storage". This is not to say that the possibilities are diverse, but they are quite sufficient for most users. Copying of information from sections of the device to a memory card is available - " backup to storage / sdcard0". Moreover, the procedure begins immediately after selecting this item, no additional settings are provided. But you can determine the file format of the future backup in advance by selecting the item " сhoose default backup format". The rest of the menu items " backup and storage"Are intended for restore operations from a backup.

Mounting and formatting partitions
The developers of CWM Recovery have combined the operations of mounting and formatting various partitions into one menu, called “ mount and storage". The list of the expanded capabilities is minimal enough for basic procedures with device memory partitions. All functions are performed in accordance with the names of the list items calling them.

Additional features
The last item of the main menu of CWM Recovery is “ advanced". This, according to the developer, is access to features for advanced users. It is not clear what the "advanced" functions of the functions available in the menu are, but nevertheless they are present in the recovery and may be needed in many situations. Through the menu " advanced"The recovery itself is rebooted, rebooted into bootloader mode, and the" Dalvik Cache», Viewing the log file and turning off the device at the end of all manipulations in the recovery.

Advantages
- A small number of menu items that provide access to basic operations when working with sections of the device's memory;
- There is a function for verifying the signature of firmware;
- For many outdated device models, this is the only way to easily make a backup and restore the device from a backup.
disadvantages
- Lack of Russian interface language;
- Some non-obviousness of the actions offered in the menu;
- Lack of control over the procedures;
- Lack of additional settings;
- Wrong actions by the user in recovery can damage the device.
Despite the fact that ClockworkMod recovery is one of the first solutions to ensure widespread adoption of Android customization, today its relevance is gradually decreasing, especially on new devices. This is due to the emergence of more advanced tools with more functionality. At the same time, you should not completely write off CWM Recovery as an environment that provides firmware, creating a backup and restoring Android devices should not be. For owners of somewhat outdated, but fully functional devices, CWM Recovery is sometimes the only way to keep a smartphone or tablet in line with modern trends in the Android world.
Since the topic of firmware Android devices is very relevant, I decided to write about installing CWM Recovery on an Android smartphone or tablet. There are several ways to do this at once: for some, all actions are performed on the device itself, but this requires root rights, while for others, when installing custom recovery, a computer is used. Use whatever you find easier or more convenient.
via ROM ManagerThe first way to flash Recovery is to use the ROM Manager program. This application has a separate item that allows you to install ClockWorkMod Recovery in a couple of minutes.
I want to note right away that the ROM Manager requires root rights. You can read how to get them.
After that, go to the official page https://clockworkmod.com and see if your device is on the list of supported ones.
1. Now open ROM Manager and select the first item " Recovery Setup».

2. In the next window in the section " Install or update Recovery»Select« ClockworkMod Recovery».


4. At the bottom, click on " Install ClockworkMod».

5. The download process will begin. With a good internet connection, it takes a couple of seconds.

6. At the end of the download, you will be asked to grant root access to the application. Select " Provide».

7. That's it! You will see a notification “ Successfully flashed ClockworkMod recovery!". Just click " OK».

This is how easy it is to flash the CWM Recovery through the ROM Manager. Now you can open it and find new items in it that were not in the standard one.
Method 2. Install custom Recovery on Android using the FastBoot utility
All steps described below are the same as installing TWRP Recovery:.

Unzip the folder to disk “ C:"- inside will be" tools", And in it the file" android". Start it up.

Select " Android SDK Platform-tools" and press " Install package».

Check the box " Accept License"And then click" Install».

When the installation is complete, in the folder " tools_version-windows"Appears" platform-tools", But it contains" fastboot"And" adb". They will be useful to us further.

UPD: The "platform-tools" folder on my computer is located in a different directory than yours. The fact is that this article was written even when the installer existed for the Android SDK. Starting with the 25th version, the installation is carried out only from the ZIP archive: because of this, part of the instructions had to be edited. Therefore, the path to ADB and Fastboot is different from mine, everything else remains unchanged.
If you have a Sony, HTC, Nexus, Huawei or LG device (some models), then Bootloader is blocked. How to unblock it is described on our website:
- Unlocking Bootloader on HTC
- For Nexus: instruction
- For Sony: instruction
- Unlocking
- Unlock Huawei bootloader
- Unlock LG bootloader
Let's start the Recovery firmware:
1. First of all, go to this page and download the version of the file " recovery-clockwork.img»For your device. Note that there are both touch and classic versions for most devices. Download the one you like best.
2. Now place the file with CWM recovery in the folder " platform-tools". I also renamed it to " recovery.img"(Then you will understand why). I recommend that you do the same.

3. Connect your tablet or smartphone to your computer using USB.
In this case, the device must be booted into fastboot mode. Usually, to do this, on the turned off device, you need to hold down the keyboard shortcut: Inclusion + Volume down... But this combination may differ depending on the device manufacturer.

UPD: it's much easier to switch to fastboot mode as follows: enable USB debugging on the device, go to command line (in point 4 just below it is described how to get into it) and enter the commands sequentially, while after each press " Enter».
cd / cd path to "platform-tools" adb reboot bootloaderI got it like this:
Your path will look different. If you followed exactly the instructions, it will exit (in any case, see the path in the appropriate line of the Explorer):
cd \\ tools_r25.2.3-windows \\ platform-toolsIn the screenshot you can see how I entered the same commands. As a result, the device will boot into fastboot mode.

4. Now open the command line (or skip this item and continue working with it, if you just transferred Android to fastboot mode through it). The easiest way to get there: press the key combination " Win» + « R"And enter:
cmdThen click " OK».

5. You will be taken to the command line.

6. Now you need to specify the path to the folder with the firmware. Enter the following command to navigate back to the folder.
cd /Click " Enter».

7. My path to the folder from the recovery is as follows: " C: \\ Program Files (x86) \\ Android \\ android-sdk \\ platform-tools". So I enter (you write yours):
cd Program Files (x86) \\ Android \\ android-sdk \\ platform-toolsAnd again we press " Enter».

8. It remains to enter:
fastboot flash recovery recovery.img« recovery.img"Is the name of the file to be flashed. Remember I advised you to rename the file from recovery? We did it for convenience, so as not to enter something like “ recovery-clockwork-6.0.4.7-flo.img».
After entering this command, press again " Enter».
9. As a result, we get the following message.

Congratulations! You have successfully installed custom recovery (CWM) with Fastboot utility!
Method 3. Flash Recovery through the Rashr application
This method is also incredibly simple and convenient, but requires root rights. Their receipt is written at the beginning of the article in “ Method 1».
1. Install the Rashr - Flash Tool application, open it and grant Root rights.

2. In the list of options, select " CWM Recovery».

3. Then the program will display a list of available Recovery for your device. In my case, Rashr showed 2 options: ClockworkMod with support for screen taps and the classic version (controlled by the volume and power buttons).

4. When you see a download prompt, click " Yes».

5. Then the download of CWM Recovery for your Android smartphone or tablet will start.

6. At the end, a notification will appear that the firmware was successful and now you have a modified recovery installed. You can reboot into it and try it out. To do this, click " Yes».

Perhaps this installation method can be called the simplest. The only thing that is needed for him is the presence of root rights.
Method 4. Installing Recovery on Samsung in Odin
If you have a Samsung device, you can install ClockWorkMod Recovery on Android using the proprietary Odin utility. Here I will briefly tell you what to do.
- 1. Find and download recovery for your Samsung phone or tablet.
- 2. Connect the device to a PC via USB and put it in the boot solution. How to do this is written in the full article at the link above.
- 3. Open Odin and click on " AP"(Some versions of Odin call this field" PDA»).

- 4. Click the " Start"And wait for the firmware to complete.
That's all! Hope you found this article helpful!
Hello gentlemen. Most people do not know their new devices well, they ask “How to get ROOT?”, “How to change OS” and so on. And so that there are no such frequent questions, I will tell you about different secrets about this popular mobile operating system - Android.
This time we will start with the most important thing - ClockWork MOD Recovery. Why is he, and what is he hiding? We will learn about this further ...
In general, CWM is a kind of BIOS (more understandable for PC users) that helps us fine-tune an Android device. Thanks to him, we can install different patches, firmware and mods. The CWM itself is located in the system memory of the smartphone, but first it must be installed. You can find details about installation for your device on this site, or download Rom Manager from Google Play (Requires Root) Basically, each device has a native Recovery. They are of different types - 1e, 2e, 3e. These native Recovery are limited in many more functions than CWM.
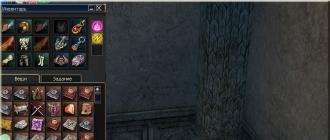
Now let's move on to the CWM itself. It comes in different versions for each device. For example, I now have version 6 of CWM. For some menus may differ, but in general the same.
In the photo, we see several points:
- Reboot system now - Immediate system reboot
- Install zip from sdcard - Install .zip from sd card
- Install zip from sideload - Install .zip using ADB
- Wipe data / Factory reset - Wipe data / factory reset
- Wipe cache partilion - Clears the cache partition
- Backup and restore - Backups and restores
- Mounts and storage - Mounts and Storage
- Advanced - Advanced settings
1. Reboot system now - just reboots the device
2. Install zip from sdcard has several sub-items:

- Choose zip from sdcard - choose zip from sd card
- Apply /sdcard/update.zip - apply automatically /sdcard/update.zip
- Toggle signature verification - Toggle signature verification

Apply /sdcard/update.zip - installs a special update from the root of the memory card only if it has the name update.zip
Toggle signature verification - enables / disables verification of signatures in .zip in order to install only factory .zip
3. Install zip from sideload is a special function that installs .zip from computer via USB cable. To do this, you need ADB drivers and a special program that manages all this. The program has detailed help on what and how to do.
4. Wipe data / Factory reset - allows us to return the device to its original state and deletes all data on the phone, but the memory card will not be touched
5. Wipe cache partilion - clears application caches. Needs only when flashing or when the device often "freezes"
6. Backup and restore - the savior of your Android device. This section helps to make backup copies of the software, and restore software from the "backup" if it is "okayed / gone into the bootlap". Let's take a closer look at this section:

Backup- makes a backup copy of the software to save applications, application data and all the firmware itself. You just need to click on the section and the "backup" will be created (The speed of creation depends on the class and cache of the memory card)
Restore - restores software thanks to "backup". When we click on the section, we will see a folder with some numbers. This is the year.month.day.the time for creating a "backup". Select the desired folder and the software will be restored.
Delete- deletes the backup copy if it is no longer needed. He chooses what he needs and the "backup" will be scrapped.
Advanced restore - restores from the backup only what is needed from the firmware. For example, user data or the system.
Free unused backup data - freeing memory in "backup"
Choose deafult backup format - choice of backup format .tar or .dub
7. Mounts and Storage -mounting and storage. I see no reason to describe.

- Unmount / cache - unmounting the cache directory
- Mount / data - mount the data directory
- Mount / system - mount the system directory
- Unmount sdcard - unmount an external sd card
- Mount / sd-ext - mount the sd-ext directory
- Format / cache - formatting the cache directory
- Format / data - formatting the data directory
- Format / system - formatting the system directory
- Format / sdcard - formatting an external sd card
- Foamat / sd-ext - formatting the sd-ext directory
- Mount USB Storage - mount an external USB

Report error - saves all errors in a special file error.log
Key test - hard key test. When you press a key, its code is displayed on the screen
Show log - saves all your actions in a special file recovery.log
Fix permission - fixes all permissions in rw-r-r in / system directory
Partition sdcard - mounts partitions such as ext3, ext4 and creates a swap file
How to get into Recovery? Each model has different methods, but I will tell you one universal one. When you turn on the device and see the manufacturer's logo - quickly press the "Volume -"
Be careful when playing with CWM, and make backups in every possible way. Good luck with your adventures!
Good day, everyone, today we will talk about an alternative recovery for your android device. Everyone knows that each smartphone has its own recovery, but it is very limited in functionality (installing updates and resetting settings). And then we will analyze ClockworkMod Recovery (alternative recovery), we will start strict why this is necessary and finish with instructions for flashing the smartphone.
Alternative recovery ClockworkMod
ClockworkMod Recovery - this is a much more powerful, compared to the factory, system recovery utility (menu), which allows you to make full backups of the entire device system, install software, firmware, kernels and much more on it, which usually does not allow factory recovery. ClockworkMod is installed in a special system partition of the internal memory of a tablet or phone, in place of the factory recovery menu. Closest competitor ClockworkMod Recoveryis anTWRP Recovery.
ClockworkMod Recovery can help you out in some seemingly hopeless situations. Even if your tablet or phone cannot boot, in many cases, using CWM, you can restore the system with all its settings and applications. Download ClockworkMod Recovery can be found on the w3bsit3-dns.com website for your specific phone model.
Here is a rough list of what you can do with ClockworkMod Recovery:
- Install custom firmware and unofficial kernels
- Install factory system updates, add-ons and fixes
- Connect to a computer via USB in removable storage mode
- Connect to a computer via USB to work with the ADB program
- Create a full backup of the current firmware and its individual parts (system, settings, applications)
- Recover a device from a previously created backup
- Reset to factory settings (Wipe - data / factory reset), clear cache (wipe cache), clear dalvik-cache (wipe Dalvik-cache), clear battery statistics (wipe battery stats)
- Create partitions on the memory card and format themClockworkMod Recovery was created by developer Koushik Dutta (also known as Koush) and there are versions of CWM for most Android phones and tablets.
Installing ClockworkMod Recovery
For many smartphones and some tablets, installing ClockworkMod Recovery is a very simple procedure, you just need to install the ROM Manager program from the Market and the first item in its menu will be the ClockworkMod installation item. For other devices, there may be separate utilities similar to the application Acer Recovery Installerfor Acer Iconia Tab tablet, or ClockworkMod Recovery is installed on them using the adb program.
Launching ClockworkMod Recovery
There are several ways to load your tablet or phone into ClockworkMod Recovery.
1. Using the ROM Manager program, selecting the item "Load Recovery Mode" in its menu.
2. By pressing a certain key combination when turning on the device. This combination depends on the device model. On many devices, you can get into recovery by pressing the volume down and power on buttons at the same time when they are turned on.
3. Using the ADB program. If you configured a connection to a computer using the ADB program, you can load your tablet into recovery using the command:adb reboot recovery
Purpose of ClockworkMod Recovery menu items
After loading your tablet into ClockworkMod Recovery, you will first of all see its main menu:On most devices, you can usually navigate through the menu items using the volume buttons. The power button selects the desired menu item. Some devices may use other buttons, for example, to return to the previous menu.In all submenus, you can return to the previous menu by selecting +++++ Go Back +++++
The purpose of the main menu items:
2 . apply update.zip from sdcard - this is one of the most used items of ClockworkMod Recovery.
With it, you can install both official and unofficial (custom) firmware, install kernels, themes and other software, which should be in the update.zip file, which you must place in the root of the memory card (in the file manager of the Android device, this folder / sdcard).
After selecting this item, you will be taken to the next menu, where you must confirm your choice by going to Yes - Install /sdcard/update.zip
3. wipe data / factory reset - full reset of settings, data and cache. After that, your phone or tablet will return to the state in which it was sold in the store. ClockworkMod will clear the / data and / cache partitions in the device's internal memory. Also everything from the system folder ".android_secure" on the memory card and the sd-ext partition will be deleted.
4.
wipe cache partition -
clearing the / cache partition in internal memory. All temporary data accumulated by the system and programs will be cleared. This item is usually used before installing a new firmware or kernel.
5. install zip from sdcard - installing a zip file from a memory card. After selecting this item, you will be taken to the following submenu:
- apply /sdcard/update.zip - this item is completely similar to item 2 of the main menu "apply update.zip from sdcard"
- chooze zip from sdcard - select the .zip file on the memory card for installation.
This item is also similar to item 2 and is also used to install firmware, kernels and other mods. Its only difference is that the installation can be done from any zip file with any name, located anywhere on the memory card. After you select this item, a list of files and folders on your memory card will open, from which you need to select a .zip file to install.
- toggle signature veritification - on / off file signature verification.
If you enable Signature check: Enabled, you will not be able to install alternative firmware that has not been signed by the developer. Most of the custom firmwares are not signed by developers.
- toggle script assert - on / off script approval.
This item is intended for internal use in CWM, and you will never need it, so it's best not to touch it.
- +++++ Go Back +++++ - this item, as already mentioned, is used to return to the previous ClockworkMod menu
6.backup and restore - creation and restoration of backups. Another of the most important points of ClockworkMod. With it, you can make a complete copy of the entire tablet system, along with the data and applications available in its internal memory - the so-called Nandroid backup, or a snapshot of the system, and then, if necessary, return the tablet to this state. This menu looks like this:
Its points mean the following:
- Backup - creating a backup copy of all partitions in the internal memory of the device.
The backup will be saved on the memory card. By default, the name of the backup contains the time and date of its creation. You can rename the backup. The name must consist of Latin letters and numbers and not contain spaces
- Restore - restoring all partitions from the selected backup.
By selecting this item, you will see a list of the backups available on the memory card and you can select the copy you need to restore from it.
- Advanced restore - restoring a specific partition from a selected backup.
You can select the individual partition that you want to restore from the backup - boot, system, data, cache, or sd-ext partition as shown in the screenshot:
7. mounts and storage - mounting individual partitions, formatting them and mounting the device as a USB drive when connected to a computer (mounting makes partitions or folders available for use).
Items in this menu mean the following:
- mount / system- mounting the system partition
- unmount / data - unmounting the data partition
- unmount / cache - unmounting the cache partition
- mount / sdcard - mounting a memory card
- mount / sd-ext - mounting a Linux ext partition on a memory card (if any)
- format boot, format system, format data, format cache - formatting the relevant sections.
Attention! Be careful with these menu items. For example, formatting the system partition will destroy your operating system (current firmware). After formatting the boot partition, you will not be able to boot your device and it will turn into a brick.
- format sdcard- formatting the memory card
- format sd-ext - formatting a Linux partition on a memory card
- mount USB storage - connecting a tablet or phone to a computer in removable storage mode
8.advanced - additional functions of ClockworkMod.
This menu consists of the following items:
- Wipe Dalvik Cache - clearing the cache of the Dalvik virtual Java machine, which is used to run applications. This menu item is usually used before installing new firmware, especially unofficial one.
- Wipe Battery Stat - reset battery statistics. It is considered that this item should be used in the event that the system battery level indicator shows incorrect values. However, Google, the developer of the Android system, claims that this should not affect the correctness of the indicator readings.
- Report Error- report a bug. You can report a ClockworkMod recovery bug to its developer. The error log will be written to the memory card, and you can send it to the developer using the ROM Manager program.
- Key Test - checking the functionality of the device buttons, when you press the button, it gives out its code
- Restart adb - reboot ADB server. This item helps when the device stops responding to commands from the ADB program when it is connected via a USB cable
- Partition SD Card - creating partitions on the memory card. This item is used to create / sd-ext and / swap partitions on the memory card. The / sd-ext partition can be used by some firmware when there is not enough internal memory of the device, for example, to expand the / data partition. The / swap section is usually used to speed up the Android device.
- Fix Permissions - Fix file and section permissions. This item is used in order to return to the factory state the permissions to system files and folders, which can be changed by the incorrect operation of some root applications, which can lead to freezes and malfunctions of the tablet or phone.
Backing up and restoring your device with ClockworkMod
As you already know, with ClockworkMod you can create a complete backup of the firmware of your tablet or phone (Nandroid). CWM takes snapshots of all partitions in the internal memory of the device and the ".androidsecure" folder located on the device's memory card. A snapshot is taken not only of the operating system, with all its settings, but also of the installed applications.
Making a backup (Nandroid Backup):
- Open the item "backup & restore"
- Choose "backup"
- We confirm the choice by going to the item "Yes"
A file with a full backup will appear on your memory card, located in the clockworkmod / backup folder. The file name consists of the date and time the copy was made, but you can rename it. Do not use Russian characters and spaces in the file name.
Restoring a device from a backup using ClockworkMod:
- Reboot the device to CWM recovery
- Open the item "Backup & restore"
- Choose "restore"
- Select the required backup from the list.
Note: Individual applications from the ClockworkMod Recovery backup, SMS and WiFi settings, without touching the current firmware, can be restored using the application AppExtractor. The program can also extract applications from a backup copy Titanium Backup.
Installing firmware, updates, kernels and more on an Android device using ClockworkMod
- All alternative firmware, custom kernels, crackers, add-ons, decorations, application packages that can be installed on a tablet or phone using ClockWorkMod recovery are packed as a zip file.
- Before installing anything on your device, do not forget to make a full backup of the current firmware, so that later you can painlessly return your tablet or phone to its original state.
- Make sure your device's battery is fully charged and disconnect it from your computer and charger.
- Copy the file that you want to flash to the memory card, preferably to its root, WITHOUT UNPACKING IT. Make sure that the file name consists only of Latin letters and numbers and does not contain spaces or special characters.
- If you are installing a new firmware, be sure to do a full wipe using the "wipe data / factory reset"
Let's get started with the firmware:
- Insert the memory card into the device
- Reboot the device to ClockWorkMod recovery
- Select the "install zip from sdcard" item.
- Open the "choose zip from sdcard" item.
- In the window that opens, we find our file, it will be at the bottom, after the list of folders (if they are on the memory card)
- We confirm the choice by going to the "Yes" item.
- After the end of the firmware, we return to the previous menu using the item "+++++ Go Back +++++"
- After flashing any zip files, it is highly recommended to clear the cache and dalvik cache.
How do I install TWRP Recovery? - this question is asked by every Android user who dares to install an unofficial firmware. On some devices, you cannot do without it even when you receive root rights. Also, TWRP Recovery or CWM Recovery will allow you to make a high-quality backup of the system, which will save absolutely all application data.
TWRP Recovery differs from CWM Recovery primarily by touch control, but there are also many invisible differences, some firmware cannot be installed due to incorrect recovery. So, first of all, find out what kind of recovery you need.
You can download a suitable recovery simply by writing in the comments “I want to download TWRP Recovery for Samsung Galaxy S7”, or “Where can I download CWM Recovery on Xiaomi Redmi 3S?”.
How to install TWRP Recovery via TWRP Manager
First, get and download TWRP Manager from Google Play. Open the application and grant superuser rights, the menu is very simple, so the chances of an error during installation are minimal.
- Specify your device in the "Device Name" line and click "Recovery Version To Install"
- In the window that opens, there will be a list from which you can download TWRP Recovery, select the latest available version of TWRP Recovery
- Click “Install Recovery”.
How to download CWM Recovery and install it using ROM Manager
- Install the app from Google Play and provide.
- Open the app and click Recovery Setup.
- In the window that opens, click "ClockworkMod Recovery" and confirm the model of your device. At this step, you can click on the three dots in the upper right corner and open the advanced mode, this will allow you to download CWM Recovery of the exact version you need.
- In the last window click “Install ClockworkMod” and the program will start downloading and installing.
- After installation, boot into CWM Recovery to check the installation result.

Installing custom recovery via Flashify
Installation via Flashify doesn't take long. Install Flashify, allow to use and click Recovery Image. Click download or select an already downloaded file on the flash drive, for example, Recovery.img, and click "YUP!" Done, the recovery is installed.

Easy installation of CWM Recovery or TWRP Recovery via Rashr
In Rashr, everything is extremely simple, in the application we select either one of the versions of recovery or recovery from memory, click on the one of interest and it is installed, it couldn't be easier. Route is required.

How to install TWRP Recovery on Samsung? Odin!
Everything is roughly the same as in the smartphone's firmware. The main thing here does not need root rights!
- Download Odin and the drivers for your device, as well as an archive from the recovery, for example TWRP Recovery, install and run Odin all this business.
- Uncheck "Auto Reboot" and click "AP", select the downloaded archive from TWRP Recovery and press start.
- Put your phone into firmware mode, usually volume down, home and power button, and connect it to your computer. Odin will pick up the phone and flash custom recovery.
- At the end, you need to immediately boot into CWM or TWRP Recovery, otherwise the system will restore its native one. You can find out the combination for entering TWRP Recovery in the comments by writing the model of your device.

SP Flash Tool as a recovery installer
If you know how to flash a phone using the SP Flash Tool, then there won't be much new information for you. Download and install SP Flash Tool and drivers for your phone. Now you need to download TWRP Recovery, or CWM Recovery for your device, after downloading, save your new recovery in a convenient place.
- Launch the Flash Tool and immediately in the settings check the box "DA DL ALL With Check Sum"
- Then click on "Scatter Loading" and select the Scatter file from the archive with the downloaded recovery, or take the Scatter from the official firmware.
- After that, you can press start and connect the phone in firmware mode.
- Done.

MobileUncle Tools and recovery
There are just a few steps to install CWM Recovery using MobileUncle Tools:
- Download TWRP Recovery or CWM Recovery for your device
- Download MobileUncle Tools, aka ToolHero.
- Run the application and click "Recovery Update"
- Select the downloaded file and click okay.
- Done, recovery is installed, enjoy full functionality.