Restore points allow you to restore operating system settings and previous versions of files in the event of a software failure. In this article, we will talk about how to create a restore point in Windows 7 and then how to use this point to restore the system.
In order to create a restore point in Windows 7, you must first open the system properties window. This can be done in several ways. For example, if you have a “Computer” icon on your desktop, then you can simply right-click on it and select the “Properties” menu item.
You can also open system properties through the Control Panel. To do this, you need to follow the path "Start - Control Panel - System and Security - System".

Well, or you can use the simplest way, namely, press the key combination Windows + Pause / Break.

After you have opened the system properties window, you need to go to the "System Protection" section. To do this, click on the corresponding link on the left side of the window.

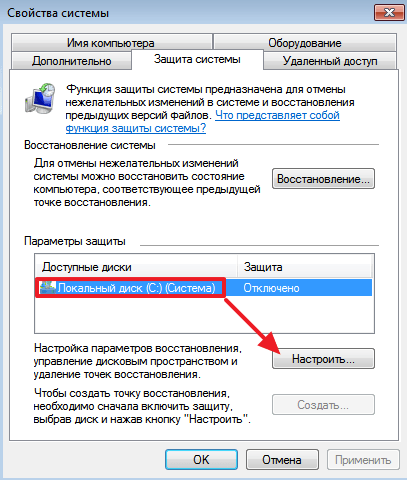
As a result, you will see a small window with system protection settings. There will be a list of disks, opposite which it will be indicated which disks are protected and which are not. If protection is enabled for your system disk (usually drive C :), then you need to select it and click on the "Create" button

After that, you just need to enter a name for the created restore point and click on the "Create" button again. After that, the Windows 7 operating system will begin the process of creating a restore point.

If the system disk protection is disabled, then you must first enable it. To do this, select the disk and click on the "Configure" button.
After that, activate the function "Restore system settings and previous versions of files" and specify what percentage of the disk you want to allocate for creating restore points for Windows 7. After making these settings, close the window by clicking the "Ok" button and you can start creating a restore point.

Please note that you can delete previously created restore points in the same window. There is a separate "Delete" button for this.

Restoring Windows 7 system from a previously created point
In order to restore the Windows 7 system using a previously created restore point, you need to open the Control Panel and use the search to find the "Recovery" section.

In the "Recovery" section, click on the "Start System Restore" button.


If Windows 7 does not boot, then you can run the recovery using the installation disc. To do this, boot from the Windows 7 installation disc, select a language and go to System Restore.

After that, select the operating system Windows 7 and click on the "Next" button.


And follow the instructions that appear on the screen.

This way, you can restore Windows 7 from a previously created restore point even if Windows 7 refuses to start.
To help protect against problems caused by installing software or hardware that can make your system unstable, Windows 7 offers System Restore. The task of this program looks quite simple, but it is also very logical, and it consists in periodically creating Windows 7 restore points, each of which includes the files of all currently installed programs, the current system registry settings and other important system data.
Thanks to this, in case of problems due to the installation of any program or hardware, System Restore makes it easy to return the system to the state in which it was before the installation. System Restore automatically creates restore points under the following conditions.
- Every 24 hours... This point is called a system checkpoint and is set once a day if the computer is operational. If the computer is not working, a system checkpoint is created the next time the computer is turned on (provided that at least 24 hours have passed since the previous checkpoint).
- Before installing certain applications... Some newer applications (especially those that ship in Office 2000 and later) already know that System Restore exists and will therefore offer to create a restore point before installation.
- Before installing the patch from the Windows Update site. System Restore always creates a restore point before installing a patch, either manually through the Windows Update site or automatically through the Automatic Updates option.
- Before installing an unsigned device driver... When installing unsigned drivers, Windows 7 displays a dialog box with an appropriate warning message. If the user still decides to move on, a restore point must be created before installing the driver.
- Before restoring files from backups... If you use the Windows 7 backup software to restore one or more files from backups, System Restore also creates a restore point in case this procedure causes damage to any system files.
- Before reverting to a previous system configuration using System Restore... Sometimes restoring a configuration to a previous state does not fix the current problem or even leads to a number of other problems. Therefore, System Restore creates a checkpoint just before starting the restore process so that if something goes wrong, the restore operation can be canceled.
Creating a restore point manually
Also, the System Restore utility allows you to create restore points manually. The steps required for this are as follows.
- Click on the button Start, type restore point in the search box, and then select an option from the list of search results. Will appear in a dialog box System properties, which will open the tab System protection.
- By default, restore points are automatically created in Windows 7 only for the system drive. If there are other disks in the system and you want to automatically create restore points for them, select the disk of interest in the Protection settings list, click the Configure button, activate the Restore system settings and previous versions of files switch and click OK.
- Click on the button Create ato display the dialog Create a restore point.
- Enter a description for the new restore point and click the button Create a... System Restore will create a new restore point and display a dialog box informing you about it.
- Click the Close button to return to the System Properties dialog box.
- Click on the button OK.


If you need to create restore points quite often, it is tedious to follow all these steps every time. Under these circumstances, it is much better to use a custom script to create a restore point instantly.
Script to instantly create a new restore point
If WScript.Arguments.Count \u003d 0 Then
Set objShell \u003d CreateObject ("Shell.Application)
objShell.ShellExecute "wscript.exe", Chr (34) & WScript.ScriptFullName & Chr (34) & "Run", "RunAs", 1
more
GetObject ("winmgmts: \\ \\ \\ Root \\ default: SystemRestore"). CreateRestorePoint InputBox ("Enter a description for restore point:", "Create restore point - Quick Tutoriel.com"), 0, 100
MsgBox ("restore point created!")
End If
It is important to note that this script must be run as an administrator account. In this scenario, the SystemRestore class is first returned using WMI (Windows Management Instrumentation), then a dialog box is displayed prompting you to enter a description for the new restore point, which is then used to execute the CreateRestorePoint method, after which the results are checked and a dialog box with information is displayed. whether to create a restore point.
Not every computer user knows what a Windows 7 restore point is, therefore, when faced with a problem with a system malfunction, he does not understand what to do and how to fix the situation.
A restore point is a system-generated snapshot that reflects the most important files affecting your computer. For example, it could be a registry. Often, when working on a computer, any program makes erroneous actions, sometimes they turn out to be fatal for the system, so it starts to work badly, sometimes it does not want to load at all as expected.
This may be due to:
It is not necessary to immediately go to the wizard or reinstall Windows yourself, you just need to find the necessary restore point and fix the breakdown, returning the computer to its previous state. A restore point can and even must be created on your computer. It is enough to do this on a monthly basis, for those who regularly use a PC once a week. In addition, points are created by Windows 7 automatically if you roll back the system, when installing drivers, applications, and when updating Windows.
Despite the fact that the process of creating such a point is very simple, not every user uses the opportunity, and this allows, without resorting to outside help, to return the system to work.
It should be said that during the creation of a restore point, there are some nuances that you must be aware of.
First step
It should be remembered that the restore mark retains the main system components and settings, therefore the multimedia will not be saved. Pictures, photos, music and everything else that the computer does not consider essential for its work, even if it is a program, it will try to remove it. It will be impossible to restore Windows after returning to the mark, for this you will need to select a function called "Previous versions".
In simple terms, the dot cannot replace the full return of windows, but it is a good option that saves time and money.
For the recovery system to work on a PC, the System Protection function must be enabled. Not everyone has such a program activated, to check this, you need to right-click on "my computer" or use the windows + Pause hotkeys. In the window that opens, select "Properties".
In the tab, you will need to select "System protection", it is here that the periods of further return are created. We open the window and see the current state on disk C. Here we are interested in the question, do we have a protection program installed, if not, put a tick.

You can replay the settings manually, for this you need to select in the "Configure" section and change the available parameters for the specified disk.
What's available in the settings tab?
Once on the windows tab, we can change the following parameters:
- Old versions of existing files;
- Enable or disable the windows protection system;
- Leave only the previous file versions.

If you do not have the necessary knowledge, then it is better not to change anything here. The settings were set by professionals, so they are by default, turning off means a lot to change. If you remove protection, then the "Previous versions" function for the disk in question is also deactivated.
While in the same window, you can create a limit on the amount of disk space that is used for recovery. It is set as a percentage, so you can set the value that you like.
As a rule, the standard size is 15%, if you exceed the value, then the period limit will be created at the expense of others previously made.
You can completely clear the disk from previously created marks, for this there is a button "Delete". You can use an alternative function and delete the special folder. If the limit is increased, earlier versions of files will also disappear.
Process of creation
If you need to manually download or install a new driver on your PC, you can delete, change or disable the settings, but for this it is better to create a recovery period first. If something goes wrong, you can get your system back at any time.


To do this, without leaving the previous tab, click on the "Create" button, after which a wizard opens to our review. Here we find the button with the same name and click on it. We wait a bit, and our goal has been achieved, now we can return the PC to its previous form at any time after this moment.
If points disappear?
Indeed, it happens that after the process of creating the marks disappear, and this happens for many reasons:
- The created samples can be deleted by a special program during cleaning the PC or when optimizing its operation. That is why during their installation it is better to make manual settings and add the folder with periods to the list of exclusions.
- If you are using a laptop on battery power, you will not be able to create a return mark, it will block it in order to save energy, so as not to turn off the screen.
- FAT or FAT32 file systems do not support this function, because it does not provide for shadow copying of information.
Today we will consider a burning topic - why the computer slows down and how to get rid of this problem as soon as possible. We all know that viruses, improperly installed or removed programs, modifications to registry branches and replacement of system files bring special harm. Every user is faced with this - all thanks to the peculiarities of Windows.
In order to save time, the creators of "windows" provided users with a system restore using a special backup of the main system parameters. That is, if at the moment the computer is working normally and there are absolutely no problems, it makes sense to protect yourself in the future and create a Windows 7 restore point.
Preparation
It is also important to remember that any changes made after the restore point creation process will be lost if you return to it. In this case, the uploaded music, films and other content will be in place, but the program settings or new installations will be canceled. So if in the future you decide to roll back the system, then you need to save them in advance.
System Restore is a special module that is present in all Windows starting from XP. It is specifically designed to be able to roll the system back to a certain point. That is, it is a kind of time machine, which, however, only works in the opposite direction.
Restoring functionality using standard Windows tools
1. Right-click on "My Computer", then in the window that appears on the left, click "Advanced system settings" - "System protection".


2. Press "Settings" and moving the slider to the right, as shown in the figures above, select the amount of space on your hard disk that you do not mind spending on a backup point. I have 6 gigabytes.
3. Now repeat step 1 again and press "Create" - enter the date or name of the point - "Ok". After 10-15 minutes, a notification window will pop up about the successful completion of the process. Click "Close". This will create a Windows 7 system restore point.
Now, when the computer does not work well, and the usual cleaning of the registry and removal of garbage cannot cope with the task, do the following:
- close all programs and save the required changes,
- in the start menu at the bottom there is a search box where you need to enter the word "Recovery",
- in a second from the top in the results, click "System Restore".


If there are several recovery checkpoints, select the appropriate one. Click next and agree to the reboot process after the end of the process:


Recovery using the MultiBoot utility
Especially for those who cannot work with standard tools, I suggest using the free MultiBoot program as an alternative.
To do this, just download the archive with the program and run the executable file MultiBoot.exe with the right button and click "Run as administrator".
Our attention will open a window for managing the program.

Check the boxes in the same way as shown in the picture.
If the "Restore Windows Vista / 7 bootloader" item is active, the command to restore the MBR will be available on all disks.
If you have Windows XP in parallel as a second operating system, check the box next to the item "Add entry for Windows XP to the boot menu". Thus, this version of Windows will be taken into account.
The last option allows you to configure the delay time before starting the dedicated system in seconds. Choose at your discretion. After configuring the program, click "Run".
The "Additional" tab allows you to load backup points saved to a file with the "bcd" extension. Before using this program, we strongly recommend that you read the instructions.
Many users of computers based on the Windows operating system know that this operating system allows you to create restore points. They allow you to restore the full operation of the system in cases where it is infected with a virus, does not start or the OS is malfunctioning... To help PC users who are not familiar with this procedure, we have prepared a material where we will describe this process in detail for Windows 7.
The principle of the recovery procedure in the seven
The basic principle of the procedure for creating a restore point is automatic saving of system settings when it is changed... For example, in order for a Windows 7 restore point to start automatically creating in the OS, changes must occur in the registry. That is, when installing any driver or software, the OS fixes this and creates a restore point. Based on the above, it becomes clear how many restore points Windows 7 can save on the hard drive. Therefore, in order for the PC user to return the computer to its previous state, it is enough just to use one of them and start the procedure itself.
How to restore a computer at seven
In this section, we will describe the OS recovery procedure faulty PK using one of the points. For example, we will take a faulty PC with an operating system Windows 7 Ultimate... It is still possible to boot the OS in this computer, but it is unstable, giving out "screens of death", freezes and many other system errors. Most likely, this behavior of the OS is caused by a virus or the absence of some system files.
Now let's try to select a restore point on this PC when it was still functioning stably. To do this, go to the system properties and open the "" tab. Now press the button Recovery ....
After clicking, a wizard window should appear. In the wizard window, you can see that we can start fixing the OS using the recommended point, as well as by selecting the points created earlier.

In our case, we will choose the last point when it worked stably and is recommended.

After selecting it, the wizard will ask you to confirm the recovery procedure using it.

Once you confirm, the wizard will immediately start rolling back to the previous OS state.

It can take five minutes or much longer to roll back to previous settings. The rollback time depends not only on the amount of returned data that is stored on the PC, but also on the computing power of the computer itself. After a successful rollback, you will see this message.

Manual Windows restore point
In addition to automatically creating checkpoints, the user has the opportunity to make them himself. For example, before installing a beta version of software that does not yet support the OS, you can create it manually.
To create a point manually, we will go to the system properties on the same "" tab. On this tab, we'll select the bottom-most button named New…. After this action, a window will appear in which you need to specify a name. It is best to create a name associated with specific changes in the 7. For example, if you installed a driver package, the restore point might be named “ Installing drivers from 10.06.2016».

After specifying the name, click the Create button. After successful creation, you will see this message.

You can find the newly created checkpoint in the wizard that we looked at earlier.

In the wizard window, you can only select and view the properties of the point to roll back to the previous state of the system, but you cannot delete it using this wizard.
Removing checkpoints can free up space on your hard drive, but you should also bear in mind that they are removed permanently.
A free utility will help us to remove a specific checkpoint CCleaner... You can download the CCleaner utility from its official website. To use the uninstallation options, you need to start the program and go to the tabs " Service / System Restore».

In the CCleaner utility window, you can view and delete all previously created restore points, except for the last one. This is done on purpose so that the user can use the last point in the OS in case of its crash.
Reviving an OS that has stopped loading
Consider an example of OS recovery when it completely stopped loading... In this case, the culprit, as in the example above, could be malware, unlicensed softwareand remote files operating system.
For this example, we need a Windows 7 license disk. To get the OS back into operation, we will boot from this disk when the computer starts. In the second window of the bootloader there is a link "". To start rolling back to the previous state, we need to click on it.

After this action, the bootloader will scan the hard drive for previous operating systems and allow you to select one of them for rollback. In our case, this is the only operating system Windows 7.

Having chosen the necessary operating system, let's move on to the next window.


In the second window of the wizard, a list of all checkpoints will open, with which you can roll back to the previous state.

Further actions are identical with the first example, so there is no point in describing them. The example described above is used by thousands of users, as it allows you to return the OS to normal.
Summing up
After reading this material, any PC user who was unfamiliar with checkpoints can restore the system to a working state. In addition, I would like to give our readers some advice.
For your OS to function properly, use good antivirus software and do not install pirated software.
For example, if you maintain the system in a normal state, then the creation of checkpoints can be completely disabled. Many experienced PC users do this because it can slightly improve computer performance. However, if the computer resources allow, then the described technology will greatly simplify your life if something goes wrong with your OS. Therefore, the choice is yours.
Related Videos